- Записки IT специалиста
- Как узнать оставшийся ресурс SSD в Linux
- How to Test SSD/HDD Health in Linux
- Test SSD Health using Smartctl
- Test health of SSD/HDD
- Test SSD/HDD Health using Gnome Disks
- Install Gnome Disks
- Monitoring and Testing the Health of SSD in Linux
- What is S.M.A.R.T.?
- What isn’t S.M.A.R.T.?
- Using smartctl to Monitor Status of your SSD in Linux
- Understanding the output of smartctl command
- Test your SSD in Linux with smartctl
- Conclusion
Записки IT специалиста
Технический блог специалистов ООО»Интерфейс»
- Главная
- Как узнать оставшийся ресурс SSD в Linux
Как узнать оставшийся ресурс SSD в Linux
 В одной из наших прошлых статей мы поднимали вопрос надежности SSD, где делали упор на такие параметры, как гарантированный объем записи — TBW и допустимое количество перезаписей в день — DWPD. Для оценки оставшегося ресурса вашего накопителя нужно знать несколько параметров: суммарный записанный объем данных и суммарное время работы, что позволит вычислить необходимые показатели и оценить режим работы диска. В Windows это сделать достаточно просто — к вашим услугам масса утилит любой сложности, но что делать пользователям Linux? Сегодня мы расскажем об этом.
Следует понимать, что любая утилита, даже от производителя диска, не обладает никакими «тайными знаниями» и всего лишь выводит в удобочитаемой форме некоторые из параметров S.M.A.R.T. накопителя. Но не все так просто, в отличие от набора атрибутов S.M.A.R.T. для жестких дисков, твердотельные накопители не имеют единого стандарта и многое зависит от конкретного производителя. Однако, кроме самых запущенных случаев с китайскими полуподвальными «производителями», вся нужная информация так или иначе в S.M.A.R.T. содержится, поэтому будем учиться ее получать.
Прежде всего следует установить утилиту для работы с атрибутами S.M.A.R.T., если вы, конечно, не сделали этого раньше:
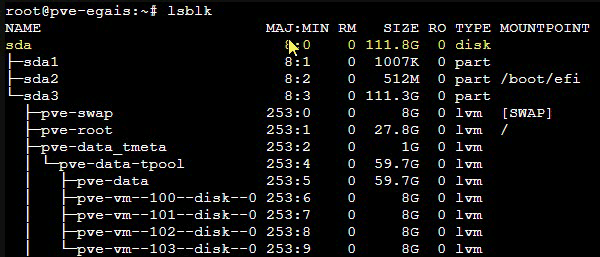
Теперь выясним какие дисковые устройства установлены в вашей системе, для этого выполните:
В выводе нас интересуют только устройства с типом disk, в нашем случае это sda:
 Чтобы получить информацию из S.M.A.R.T. диска воспользуемся командой:
где /dev/sda — имя нашего диска, которое мы выяснили на предыдущем шаге.
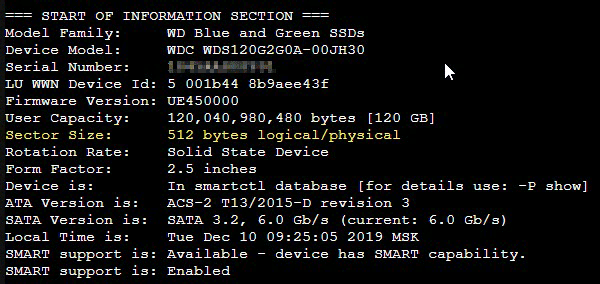
В полученном выводе прежде всего изучим общие данные о диске, в частности обратим внимание на размер логического сектора:
 Потом спустимся немного вниз и изучим таблицу S.M.A.R.T.-атрибутов:
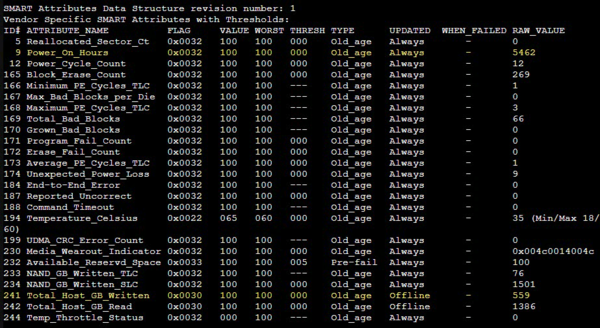 Колонки Value, Worst и Threshold содержат значения каждого из показателей в «попугаях»: Value — текущее значение, Worst — наихудшее за все время. RAW_value — колонка с абсолютными значениями показателя. Атрибуты могут быть двух типов: Old_age — это параметры, которые просто растут (изменяются) со временем, критический порог отсутствует, например, это время работы диска в часах; Pre-fail — это параметры имеющие критическое значение, которое указано в колонке Threshold и приближение к ним указывает на предаварийное состояние диска. На скриншоте выше к таким параметрам относится Available_Reservd_Space — доступная резервная область, снижение значения которой указывает на износ диска.
Но вернемся к показателям ресурса. Western Digital заботится о своих пользователях и выводит подробную информацию, в частности атрибут 241 Total_Host_GB_Written содержит количество записанной на диск информации в гигабайтах, а атрибут 9 Power_On_Hours хранит количество отработанных часов.
Также интересно изучить показатели 233 NAND_GB_Written_TLC и 234 NAND_GB_Written_SLC, где показано количество записи в TLC и SLC ячейки соответственно. Как видим, работа SLC-кеша у современных дисков построена эффективно, количество данных, записанных непосредственно в TLC крайне мало. Второй момент — это мультипликация записи, как мы уже знаем, нельзя просто так записать данные в занятую ячейку, ее предварительно нужно очистить, но очистить отдельную ячейку также невозможно, это можно сделать только для блока, поэтому на одну операцию записи внутри SSD может потребоваться несколько, что мы и видим в данном случае.
Но для оценки износа мы всегда должны принимать объем данных, записанный хостом (241 Total_Host_GB_Written), так как именно на это значение ориентируется производитель, указывая TBW, внутренние параметры представляют в основном академический интерес.
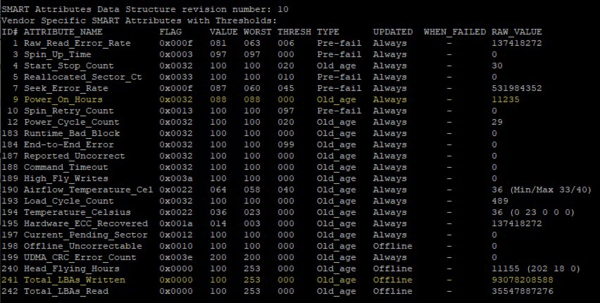
К сожалению, не все производители включают в S.M.A.R.T. подробные и удобочитаемые данные, во многих случаях вы найдете тот же самый атрибут, но несколько в ином виде 241 Total_LBAs_Written. Это наследство жестких дисков, RAW-значение этого атрибута показывает количество записанных LBA-секторов (ниже показан S.M.A.R.T. от HDD):
 Но даже этой информации может не быть, к примеру Toshiba A100 отличается предельной лаконичностью, сообщить еще что-либо кроме времени работы, количества включений и температуры посчитали излишним:
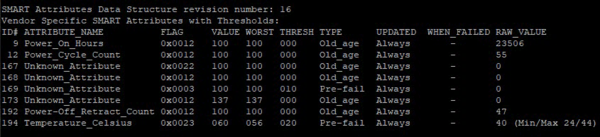 Но не будем впадать в уныние, получим расширенный набор информации из S.M.A.R.T.:
В этот раз информации будет гораздо больше, в ней необходимо найти раздел Device Statistics в котором содержится искомый параметр Logical Sector Written, значение которого аналогично 241 Total_LBAs_Written и показывает количество записанных LBA-секторов:
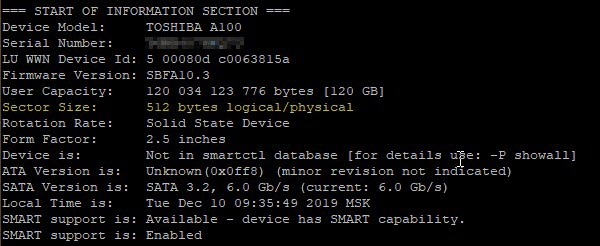
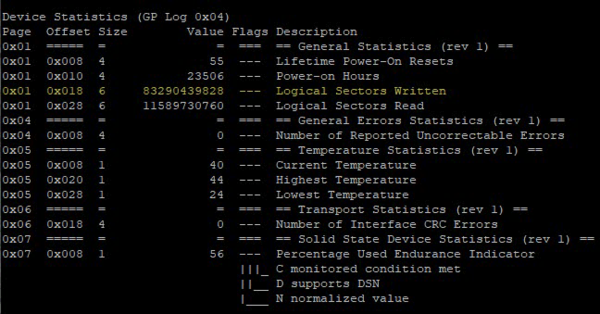 Для дальнейших расчетов нам нужно знать размер логического сектора, его можно получить из общей информации о диске в самом начале вывода:
 А дальше нам поможет несложная математика уровня «дружим с калькулятором», для получения суммарного объема записанных данных умножим количество секторов на размер сектора:
Для размера сектора в 512 байт, как в нашем случае, результат также будет в байтах, для размера сектора в 4 КБ — в килобайтах. Для перевода в единицы более высокого порядка результат нужное количество раз нужно разделить на 1024:
Для показанного выше диска путем таких несложных вычислений мы получим значение:
Теперь можно оценить ресурс и условия эксплуатации диска, для данной модели TBW = 30 TB, а DWPD = 0.23. Как видим, гарантированный ресурс записи диск выработал, общее время работы составило 979 дней или 2,68 года, т.е. немного менее гарантийного срока. Ежедневный объем записи на диск составил 34,5 ГБ, а реальный DWPD равен 0,29. В целом условия эксплуатации диска можно назвать удовлетворительными, но на замену рекомендуется выбрать модель с более высоким TBW.
Как видим, ничего сложного в получении информации об оставшемся ресурсе SSD в Linux нет, даже в тех случаях, когда такую информацию производитель явно в S.M.A.R.T. не выводит, максимум что вам понадобится — это калькулятор.
Помогла статья? Поддержи автора и новые статьи будут выходить чаще:

Или подпишись на наш Телеграм-канал: 
Источник
How to Test SSD/HDD Health in Linux

SMART (Self-Monitoring, Analysis, and Reporting Technology) is a feature enabled in all modern hard disk drives and SSDs to monitor/test reliability. It checks different drive attributes to detect the possibility of drive failure. There are different tools available in Linux and Windows to perform the SMART tests.
In this tutorial, we will learn how to test SSD/HDD health in Linux from CLI and GUI
Two methods explained here are:
- Using Smartctl
- Using Gnome Disks
Test SSD Health using Smartctl
Smartctl is a command-line utility tool that can be used to check S.M.A.R.T-enabled HDD or SSD status in the Linux system.
Smartctl utility tool comes with the package smartmontools.Smartmontools is available by default in all Linux distributions including Ubuntu, RHEL and Centos and Fedora.
To install smartmontools in Linux:
Ubuntu
Start the service using the following command.
RHEL and CentOS
Fedora
Smartd service will start automatically after the successful installation.
If not started, start smartd service:
Test health of SSD/HDD
To test overall-health of the drive, type:
d — Specifies the type of device.
ata — the device type is ATA, use scsi for SCSI device type.
H — Check the device to report its SMART health status.
The result PASSED indicates that the disk drive is good. If the device reports failing health status, this means either that the device has already failed or could fail very soon.
If it indicates failing use -a option to get more information.
 Smartctl command — SMART attributes
You can monitor the following attributes:
[ID 5] Reallocated Sectors Count — Numbers of sectors reallocated due to read errors.
[ID 187] Reported Uncorrect — Number of uncorrectable errors while accessing read/write to sector.
[ID 230] Media Wearout Indicator — Current state of drive operation based upon the Life Curve.
100 is the BEST value and 0 is the WORST.
Check SMART Attribute Details for more information.
To initiate the extended test (long) using the following command:
To perform a self test, run:
To find drive’s self test result, use the following command.
To evaluate estimate time to perform test, run the following command.
 Calculating estimated time to perform test
You can print error logs of the disk by using the command:
Test SSD/HDD Health using Gnome Disks
With GNOME disks utility you can get a quick review of your SSD drives, format your drives, create a disk image, run standard tests against SSD drives, and restore a disk image.
Install Gnome Disks
In Ubuntu 20.04, the GNOME Disks application comes with the GNOME disk tool installed. If you are unable to find the tool, use the following command to install it.
GNOME Disk is now installed, now you can go to your desktop menu navigate to the application, and launch. From the application, you can overview all your attached drives. You can also use the following command to launch the GNOME Disk application.
 GNOME Disks GUI
Now the test can be performed on the drives. To do so, launch the GNOME disks and select the disk which you want to test. You can find the quick assessment of the drives such as size, partitioning, Serial number, temp, and health. Click on the gear icon and select SMART Data & Self-tests.
 GNOME Disks SMART Data and self tests
In the new window you can find the results of the last test. In the top right of the window, you can find that the SMART option is enabled. If SMART is disabled, it can be enabled by clicking on the slider. To start the new test click on the Start Self-test button.
 GNOME Disks running Self-test
Once the Start Self-test button is clicked, a drop down menu will be appeared to select the type of the tests which are Short, Extended and Conveyance. Select the test type and provide your sudo password to continue the test. From the progress meter, percentage of the test complete can be seen.
 GNOME Disks self test result
Источник
Monitoring and Testing the Health of SSD in Linux
What is S.M.A.R.T.?
S.M.A.R.T. –for Self-Monitoring, Analysis, and Reporting Technology— is a technology embedded in storage devices like hard disk drives or SSDs and whose goal is to monitor their health status.
In practice, S.M.A.R.T. will monitor several disk parameters during normal drive operations, like the number of reading errors, the drive startup times or even the environmental condition. Moreover, S.M.A.R.T. and can also perform on-demand tests on the drive.
Ideally, S.M.A.R.T. would allow anticipating predictable failures such as those caused by mechanical wearing or degradation of the disk surface, as well as unpredictable failures caused by an unexpected defect. Since drives usually don’t fail abruptly, S.M.A.R.T. gives an option for the operating system or the system administrator to identify soon-to-fail drives so they can be replaced before any data loss occurs.

What isn’t S.M.A.R.T.?
All that seems wonderful. However, S.M.A.R.T. is not a crystal ball. It cannot predict with 100% accuracy a failure nor, on the other hand, guarantee a drive will not fail without any early warning. At best, S.M.A.R.T. should be used to estimate the likeliness of a failure.
Given the statistical nature of failure prediction, the S.M.A.R.T. technology particularly interests company using a large number of storage units, and field studies have been conducted to estimate the accuracy of S.M.A.R.T. reported issues to anticipate disk replacement needs in data centers or server farms.
According to that study, it appears some S.M.A.R.T. attributes are good indicators of imminent failure. The paper specifically mentions:
Reallocated (Realloc) Sector Count:
While the underlying technology is radically different, that indicator seems as significant in the SSD world than it was in the hard drive world. Worth mentioning because of wear-leveling algorithms used in SSDs, when several blocks start failing, chances are many more will fail soon.Program/Erase (P/E) fail count:
This is a symptom of a problem with the underlying flash hardware where the drive was unable to clear or store data in a block. Because of imperfections in the manufacturing process, few such errors can be anticipated. However, flash memories have a limited number of clear/write cycles. So, once again, a sudden increase in the number of events might indicate the drive has reached its end of life limit, and we can anticipate many more memory cells to fail soon.CRC and Uncorrectable errors (“Data Error”):
These events can be caused either by storage error or issues with the drive’s internal communication link. This indicator takes into account both corrected errors (thus without any issue reported to the host system) as well as uncorrected errors (thus blocks the drive has reported being unable to read to the host system). In other words, correctable errors are invisible to the host operating system, but they nevertheless impact the drive performances since data has to be corrected by the drive firmware, and a possible sector relocation might occur.SATA downshift count:
Because of temporary disturbances, issues with the communication link between the drive and the host, or because of internal drive issues, the SATA interface can switch to a lower signaling rate. Downgrading the link below the nominal link rate has the obvious impact on the observed drive performances. Selecting a lower signaling rate is not uncommon, especially on older drives. So this indicator is most significant when correlated with the presence of one or several of the preceding ones.
According to the study, 62% of the failed SSD showed at least one of the above symptoms. However, if you reverse that statement, that also means 38% of the studied SSDs failed without showing any of the above symptoms. The study did not mention though if the failed drives have exhibited any other S.M.A.R.T. reported failure or not. So this cannot be directly compared to the 36% failure-without-prior-notice mentioned for hard drives in the Google paper.
The Microsoft/Pennsylvania State University paper does not disclose the exact drive models studied, but according to the authors, most of the drives are coming from the same vendor spanning several generations.
The study noticed significant differences in reliability between the different models. For example, the “worst” model studied exhibits a 20% failure rate nine months after the first relocation error and up to 36% failure rate nine months after the first occurrence of data errors. The “worst” model also happens to be the older drive generation studied in the paper.
On the other hand, for the same symptoms, the drives belonging to the youngest generation of devices shows only 3% and 20% respectively failure rate for the same errors. It is hard to tell if those figures can be explained by improvements in the drive design and manufacturing process, or if this is simply an effect of drive aging.
Most interestingly, and I gave some possible reasons earlier, the paper mentions that, rather than the raw value, this is a sudden increase in the number of reported errors that should be considered as an alarming indicator:
“”” There is a higher likelihood of the symptoms preceding SSD failures, with an intense manifestation and rapid progression preventing their survivability beyond a few months “””
In other words, one occasional S.M.A.R.T. reported error is probably not to be considered as a signal of imminent failure. However, when a healthy SSD starts reporting more and more errors, a short- to mid-term failure has to be anticipated.
But how to know if your hard drive or SSD is healthy? Either to satisfy your curiosity or because you want to start monitoring your drives closely, it is time now to introduce the smartctl monitoring tool:
Using smartctl to Monitor Status of your SSD in Linux
There are ways to list disks in Linux but to monitor the S.M.A.R.T. status of your disk, I suggest the smartctl tool, part of the smartmontool package (at least on Debian/Ubuntu).
smartctl is a command line tool, but this is perfect, especially if you want to automate data collection, on your servers especially.
The first step when using smartctl is to check if your disk has S.M.A.R.T. enabled and is supported by the tool:
As you can see, my laptop internal hard drive indeed has S.M.A.R.T. capabilities, and S.M.A.R.T. support is enabled. So, what now about the S.MA.R.T. status? Are there some errors recorded?
Reporting “all SMART information about the disk” is the job of the -a option:
Understanding the output of smartctl command
That is a lot of information and it is not always easy to interpret those data. The most interesting part is probably the one labeled as “Vendor Specific SMART Attributes with Thresholds”. It reports various statistics gathered by the S.M.A.R.T. device and let you compare those value (current or all-time worst) with some vendor-defined threshold.
For example, here is how my disk reports relocated sectors:
You can see this a “pre-fail” attribute. That just means that attribute is corresponding to anomalies. So, if that attribute exceeds the threshold, that could be an indicator of imminent failure. The other category is “Old_age” for attributes corresponding to “normal wearing” attributes.
The last field (here “3”) is corresponding the raw value for that attribute as reported by the drive. Usually, this number has a physical significance. Here, this is the actual number of relocated sectors. However, for other attributes, it could be a temperature in degrees Celcius, a time in hours or minutes, or the number of times the drive has encountered a specific condition.
In addition to the raw value, a S.M.A.R.T. enabled drive must report “normalized” values (fields value, worst and threshold). These values are normalized in the range 1-254 (0-255 for the threshold). The disk firmware performs that normalization using some internal algorithm. Moreover, different manufacturers may normalize the same attribute differently. Most values are reported as a percentage, the higher being the best, but this is not mandatory. When a parameter is lower or equal to the manufacturer supplied threshold, the disk is said to have failed for that attribute. With all the reserves mentioned in the first part of that article, when a “pre-fail” attribute has failed, presumably a disk failure is imminent.
As a second example, let’s examine the “seek error rate”:
Actually, and this is a problem with S.M.A.R.T. reporting, the exact meaning of each value is vendor-specific. In my case, Seagate is using a logarithmic scale to normalize the value. So “71” means roughly one error for 10 million seeks (10 to the 7.1st power). Amusingly enough, the all-time worst was one error for 1 million seeks (10 to the 6.0th power). If I interpret that correctly, that means my disk heads are more accurately positioned now than they were in the past. I did not follow that disk closely, so this analysis is subject to caution. Maybe the drive just needed some running-in period when it was initially commissioned? Unless this is a consequence of mechanical parts wearing, and thus opposing less friction today? In any case, and whatever the reason is, this value is more a performance indicator than a failure early warning. So that does not bother me a lot.
Besides that, and three suspects errors recorded about six months ago, that drive appears in surprisingly good conditions (according to S.M.A.R.T.) for a stock laptop drive that was powered on for more than 1100 days (26423 hours):
Out of curiosity, I ran the same test on a much more recent laptop equipped with an SSD:
The first thing to notice, even if that device is S.M.AR.T. enabled, it is not in the smartctl database. That won’t prevent the tool to gather data from the SSD, but it will not be able to report the exact meaning of the different vendor-specific attributes:
This is typically the output you can expect for a brand new SSD. Even if, because of the lack of normalization or metainformation for vendor-specific data, many attributes are reported as “Unknown_SSD_Attribute.” I may only hope future versions of smartctl will incorporate data relative to that particular drive model in the tool database, so I could more accurately identify possible issues.
Test your SSD in Linux with smartctl
Until now we have examined the data collected by the drive during its normal operations. However, the S.M.A.R.T. protocol also supports several “self-tests” commands to launch diagnosis on demand.
Unless explicitly requested, the self-tests can run during normal disk operations. Since both the test and the host I/O requests will compete for the drive, the disk performances will degrade during the test. The S.M.A.R.T. specification specifies several kinds of self-test. The most important are:
Short self-test ( -t short )
This test will check for the electrical and mechanical performances as well as the read performances of the drive. The short self-test typically only requires few minutes to complete (2 to 10 usually).Extended self-test ( -t long )
This test takes one or two orders of magnitude longer to complete. Usually, this is a more in-depth version of the short self-test. In addition, that test will scan the entire disk surface for data errors with no time limit. The test duration will be proportional to the disk size.Conveyance self-test ( -t conveyance )
this test suite is designed as a relatively quick way to check for possible damage incurred during transporting of the device.
Here are examples taken from the same disks as above. I let you guess which is which:
The test has now being stated. Let’s wait until completion to show the outcome:
Let’s do now the same test on my other disk:
Once again, sleep for two minutes and display the test outcome:
Interestingly, in that case, it appears both the drive and the computer manufacturers seems to have performed some quick tests on the disk (at lifetime 0h and 12h). I was definitely much less concerned with monitoring the drive health myself. So, since I am running some self-tests for that article, let’s start an extended test to so how it goes:
Apparently, this time we will have to wait much longer than for the short test. So let’s do it:
In that latter case, pay special attention to the different outcomes obtained with the short and extended tests, even if they were performed one right after the other. Well, maybe that disk is not that healthy after all! An important thing to notice is the test will stop after the first read error. So if you want an exhaustive diagnosis of all read errors, you will have to continue the test after each error. I encourage you to take a look at the very well written smartctl(8) manual page for the more information about the options -t select,N-max and -t select,cont for that:
Conclusion
Definitely, S.M.A.R.T. reporting is a technology you can add to your tool chest to monitor your servers disk health. In that case, you should also take a look at the S.M.A.R.T. Disk Monitoring Daemon smartd(8) that could help you automate monitoring through syslog reporting.
Given the statistical nature of failure prediction, I am a little bit less convinced however than aggressive S.M.A.R.T. monitoring is of great benefit on a personal computer. Finally, don’t forget whatever is its technology, a drive will fail— and we have seen earlier, in one-third of the case, it will fail without prior notices. So nothing will replace RAIDand offline backups to ensure your data integrity!
This article was written by Sylvain Leroux
Источник


