- Подключение наушников AirPods к компьютеру на Windows 10
- Подключаем AirPods в Windows 10
- Использование системных параметров
- Проверка версии Bluetooth
- How to Pair and Connect AirPods to a Windows 10 PC
- Use Bluetooth to pair Apple’s wireless headphones
- What to Know
- How to Pair Your AirPods to Windows 10 Computers
- How Can AirPods Connect to a Windows PC?
- How to Fix Windows 10 Apple AirPod Sync Problems
- How to connect AirPods to Windows 10 PC
- Pair AirPods to Windows 10
- 1] Pairing the AirPods for the first time
- 2] Reconnecting the AirPods again
Подключение наушников AirPods к компьютеру на Windows 10

AirPods – беспроводная гарнитура, которая изначально «заточена» под устройства компании Apple. Тем не менее, использовать ее можно и со сторонними операционными системами. Из данной статьи вы узнаете о том, как корректно подключить AirPods к устройствам на базе ОС Windows 10.
Подключаем AirPods в Windows 10
Сразу обратим внимание на тот факт, что при подключении к Виндовс 10 у упомянутых наушников будут доступны не все имеющиеся функции. К примеру, не будет работать сенсорное нажатие на устройство для управления мультимедийным воспроизведением. Напомним, что AirPods, как и любая другая беспроводная гарнитура, подключаются посредством Bluetooth-соединения. Поэтому наличие соответствующего адаптера обязательно. Если такового не имеется, его придется приобрести и установить самостоятельно.
Кроме того, для наиболее корректной работы гарнитуры желательно иметь в компьютере или ноутбуке Bluetooth версии 4.0 или выше. О том, как узнать эту информацию, мы расскажем дальше.
Использование системных параметров
Прежде чем приступить к подключению наушников, мы настоятельно рекомендуем зарядить их. Это поможет избежать возможных проблем с поиском и сопряжением гарнитуры с системой. Сам процесс подключения будет выглядеть на практике следующим образом:
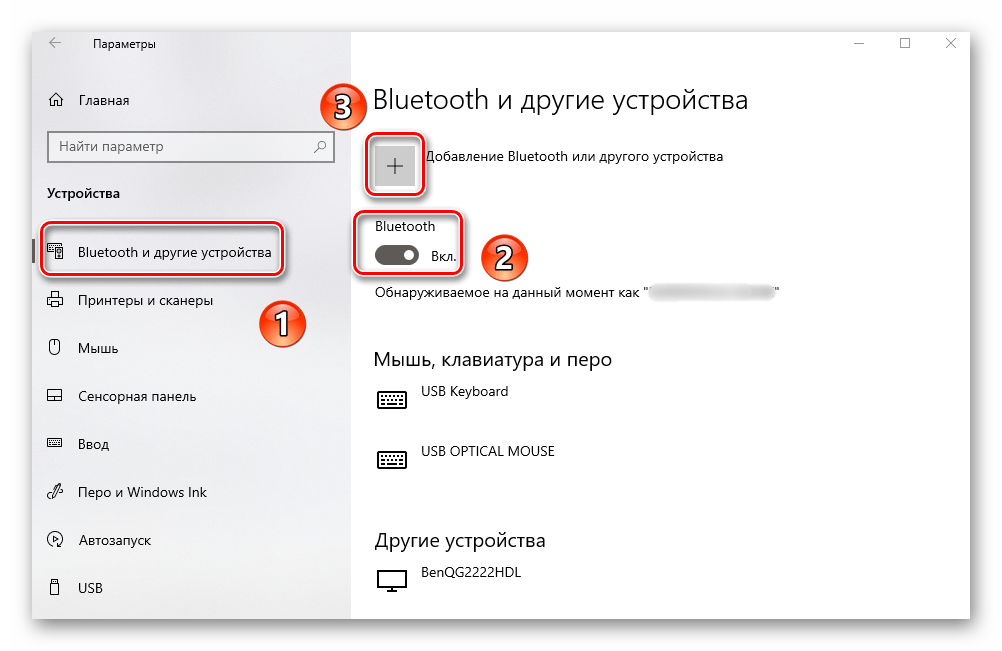
- Нажмите на клавиатуре одновременно «Windows» и «I». Таким образом вы откроете стандартное окно «Параметры». В нем кликните по разделу «Устройства».

Читайте также: Что делать, если не открываются «Параметры» Windows 10
Автоматически откроется вкладка «Bluetooth и другие устройства». Именно она и нужна нам. В ней в первую очередь включите сам модуль, если он был деактивирован. Для этого передвиньте переключатель вправо. Затем нажмите кнопку с крестиком чуть выше для поиска и добавления нового устройства.
Читайте также: Включение функции Bluetooth на ОС Windows 10
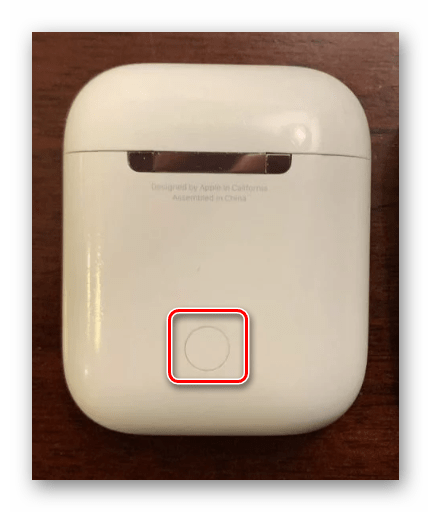
Далее возьмите в руки контейнер с наушниками. Откройте его крышку и зажмите на несколько секунд кнопку на корпусе. В итоге должен загореться соответствующий индикатор, который свидетельствует, что устройство готово для обнаружения и сопряжения.
Теперь вернитесь к открытому ранее окну на компьютере. В нем кликните по самой первой строке «Bluetooth» левой кнопкой мышки.
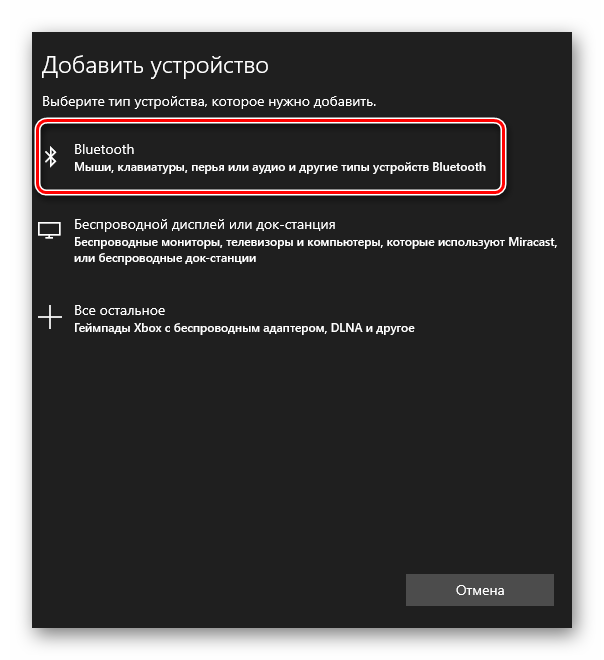
В следующем окне отобразятся все устройства, которые готовы к сопряжению с компьютером. Дождитесь, пока в списке появится строка «Наушники» — именно так по умолчанию определяются AirPods при поиске в Windows 10. Кликните по этому наименованию.


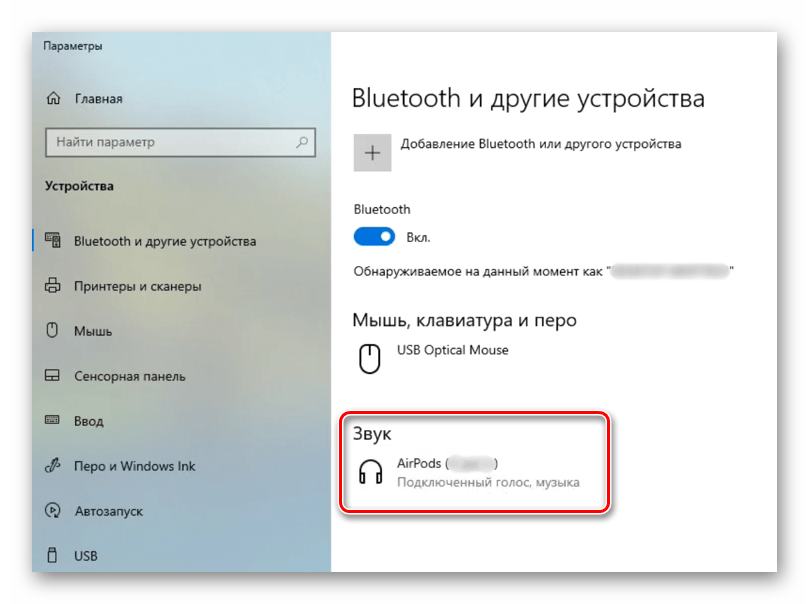
В результате в окне параметров, в блоке «Звук», должно появиться корректное название подключенных AirPods. После этого можете закрыть открытые ранее окна.
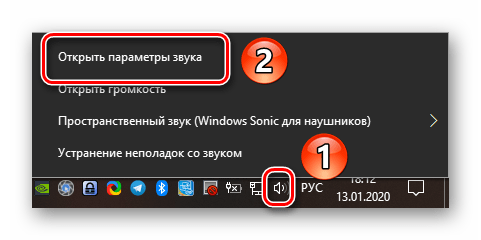
Теперь необходимо убедиться в том, что система правильно назначила устройство для ввода и вывода звука. Для этого кликните в трее по иконке с динамиком правой кнопкой мышки. Из контекстного меню выберите строку «Открыть параметры звука».
В открывшемся окне убедитесь в том, что в блоке «Вывод» и «Ввод» в соответствующих полях, отмеченных на скриншоте, выбрано нужное устройство. Если это не так, просто кликните по строке и из выпадающего меню выберите AirPods. Затем закройте окно.

Проверка версии Bluetooth
Как мы писали ранее, наиболее корректно гарнитура работает с адаптерами версии 4.0 и выше. На более ранних версиях проблемы с использованием могут возникать гораздо чаще. Особенно этот факт следует учитывать, если планируете покупать для стационарного компьютера внешний адаптер. Чтобы узнать версию уже подключенного устройства, выполните следующие действия:
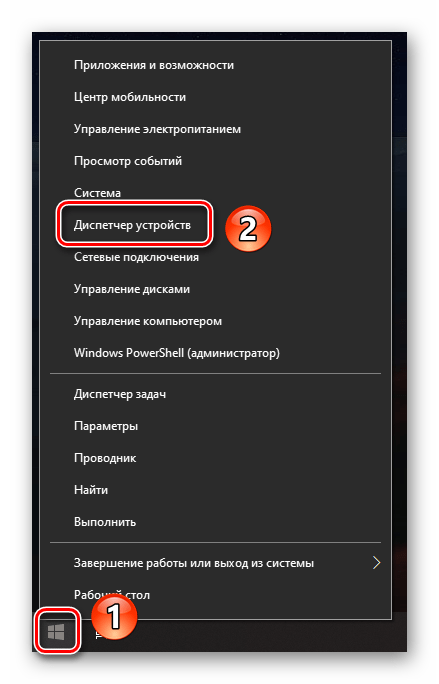
- Кликните по кнопке «Пуск» на «Панели задач» правой кнопкой мышки. Из открывшегося контекстного меню выберите пункт «Диспетчер устройств».
Читайте также: Открываем Диспетчер устройств в Windows 10
В открывшемся окне откройте ветку «Bluetooth». В результате появится перечень устройств. Кликните правой кнопкой мышки на оборудовании «Media Bluetooth Adaptor». Из контекстного меню выберите пункт «Свойства».

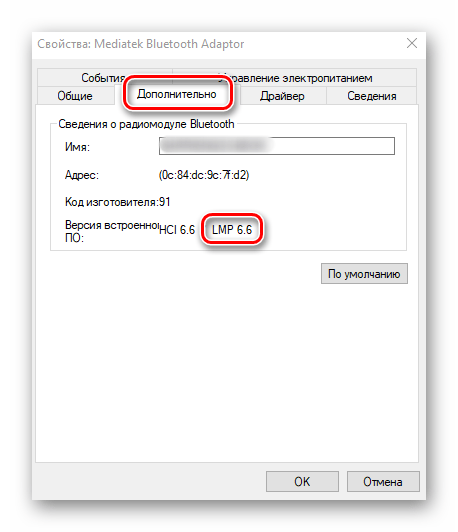
В следующем окне перейдите во вкладку «Дополнительно», просто кликнув ЛКМ по ее названию. В ней обратите внимание на строку «Версия встроенного ПО». Напротив нее будут стоять значения. Нас интересуют те из них, которые находятся рядом с аббревиатурой LMP. Учтите, что это не является версией Блютуза.
- LMP 0.x — Bluetooth 1.0b
- LMP 1.x — Bluetooth 1.1
- LMP 2.x — Bluetooth 1.2
- LMP 3.x — Bluetooth 2.0
- LMP 4.x — Bluetooth 2.1
- LMP 5.x — Bluetooth 3.0
- LMP 6.x — Bluetooth 4.0
- LMP 7.x — Bluetooth 4.1
- LMP 8.x — Bluetooth 4.2
- LMP 9.x — Bluetooth 5.0
Как видите, в нашем случае используется модуль Bluetooth версии 4.0, так как значение LMP – 6.6.
Таким образом, вы узнали о том, как правильно подключить гарнитуру AirPods к любому устройству под управлением Windows 10. Напомним, что помимо этого их также можно с легкостью подключить практически к любому смартфону на Android. Этому вопросу мы посвятили отдельное руководство.
How to Pair and Connect AirPods to a Windows 10 PC
Use Bluetooth to pair Apple’s wireless headphones
:max_bytes(150000):strip_icc()/BradStephenson-a18540497ccd4321b78479c77490faa4.jpg)
:max_bytes(150000):strip_icc()/WorkBadgePhoto-61c0b98ef5a74e4a85851a8f706dbd65.jpg)
What to Know
- In the Action Center, select All settings > Devices > Bluetooth & other devices and follow instructions to add your Airpods.
- Once the pairing process begins, press the circle button on the charging case until the process completes.
This article explains how to use Bluetooth to connect AirPods to a non-Apple computer plus explains what to do if syncing isn’t working.
How to Pair Your AirPods to Windows 10 Computers
Instructions in this article apply to all Apple AirPods and Windows PCs with wireless capabilities. The method for connecting Apple AirPods is exactly the same process as adding any other Bluetooth speaker or headphones to a Windows computer:
Select the Action Center icon in the bottom-right corner of the Windows taskbar to open Windows Action Center.
Select All settings in the Windows Action Center.
While you have the Action Center open, check to make sure Bluetooth is enabled. The Bluetooth tile should be highlighted; if it’s not, select the tile to turn it on.
:max_bytes(150000):strip_icc()/allsettingsinwindows-54914a87736d4fcd9bbbe67be0e7bb8c.jpg)
Select Devices in the Windows Settings.
Select the Bluetooth & other devices tab on the left side, then select Add Bluetooth or other devices.
:max_bytes(150000):strip_icc()/bluetoothandotherdeviceswindows-368de327f8094ae8bd70952356ccc71a.jpg)
Select Bluetooth in the Add a device window.
Your Apple AirPods should appear on the list as AirPods. Select AirPods to begin the pairing process.
If your AirPods aren’t showing up, open the lid of their charging case.
:max_bytes(150000):strip_icc()/addadeviceinwindows-dd53e410ae6143d9a68b1dda9813eccc.jpg)
Press the circle button on the rear of the Apple AirPod charging case while having the lid open. The charging case’s light should change from green to white.
Continue firmly pressing the sync button until the pairing is complete. If you encounter an error message, press the sync button on the charging case before you select the AirPods on the Bluetooth device list.
:max_bytes(150000):strip_icc()/003_how-to-connect-airpods-to-pc-windows-10-4692881-82a34e40a16b43e79e5d90a5a7a72403.jpg)
If paired correctly, you should see a «Your device is ready to go!» message. Select Done to close the message.
:max_bytes(150000):strip_icc()/devicereadytogo-fb6600e86bca499989a905a196609f27.jpg)
How Can AirPods Connect to a Windows PC?
Apple AirPods use Bluetooth to connect to any computer, from laptops and traditional desktop computers running modern Windows 10. Once connected, you can use AirPods to listen to audio, input audio via their built-in mic, and to control audio volume or pause sound via tap controls.
AirPods are actually compatible with most devices that support Bluetooth including Android tablets and smartphones.
How to Fix Windows 10 Apple AirPod Sync Problems
If your Apple AirPods stop working on your Windows PC, try these fixes:
- Disable Bluetooth on other devices. If you’ve paired your AirPods with your iPhone, it could interfere with the connection to your PC, so try temporarily turning off Bluetooth on other devices.
- Open the charging case lid. Apple AirPods connect to devices when the charging case’s lid is opened and its light turns green. Try opening the lid for a few seconds before removing the AirPods and putting them in your ears.
If you’re still having problems, follow these troubleshooting steps:
Open an app such as Spotify on your Windows 10 PC and begin playing some music.
:max_bytes(150000):strip_icc()/Capture-b1c5b36af9be4473a14eeec2f4c7e735.JPG)
Place your Apple AirPods back in their charging case and close the lid, then wait a few seconds.
:max_bytes(150000):strip_icc()/001_how-to-connect-airpods-to-pc-windows-10-4692881-85f2b1d2af5f4f3dbbe04a39c118a477.jpg)
Open the Action Center and select All settings.
Select Devices in the Windows Settings.
Make sure your AirPods are on the list of paired devices.
:max_bytes(150000):strip_icc()/airpodsinbluetoothlist-e94f23bd8cfb497cb4b39268614f9248.jpg)
Open the charging case’s lid, remove the AirPods, and place them in each ear.
:max_bytes(150000):strip_icc()/002_how-to-connect-airpods-to-pc-windows-10-4692881-9b3f409cd1a0454cbedf708cc2c2f40c.jpg)
Select AirPods in the device list, then select Connect. The AirPods should connect, and the audio should being playing through them.
If your Apple AirPods still won’t play sound, open All settings > Devices, then select Remove Device under AirPods and repeat the pairing process.
How to connect AirPods to Windows 10 PC
Apple introduced its new wireless earphones after dropping the headphone jack from their latest iPhones of that time. They named it AirPods. Not surprising, these new earphones work with the help of Bluetooth. Even though it is said that they will only work with Apple’s iPhones, there is a relatively simple way by which it can be paired up with a computer running Windows 10. However, it stands to be a little different than others and reconnecting is relatively different too. In this article, we will be finding out how to connect Apple AirPods to Windows 10.

Pair AirPods to Windows 10
We will be covering two scenarios for using Apple’s AirPods’ with a Windows 10 computer:
- Pairing the AirPods for the first time.
- Reconnecting the AirPods.
1] Pairing the AirPods for the first time
Before pairing, make sure that AirPods are at least 40% charged. If not, insert into the AirPod case, and charge it. Keep it inside for the pairing process.
- Open the cap of your AirPods’ case.
- Press and hold the circular button on the rear portion of the charging case for few seconds.
- Release the button when the light inside the case blinks in white colour.
- Open Windows Settings app. (WIN + I)
- Navigate to Devices > Bluetooth
- Select Add Bluetooth or other devices.
- In a mini window that pops up, select Bluetooth.
- A list of available Bluetooth devices will be populated.
- Select your AirPods from there.
- It will automatically pair and connect your AirPods, and they will be available for the first use.
2] Reconnecting the AirPods again
Technically, once paired, your AirPods should be able to auto connect to already paired devices. But the chances are that you have it connected to your phone or tablet. So if it doesn’t connect automatically, it is best to connect it manually.
- Open Settings and navigate to Devices > Bluetooth.
- Under the section of Audio, select the entry for your AirPods.
- Select the button that says Connect.
- Once it prompts you of the connection, you are good to go.
If it still keeps connecting an disconnecting, read our guide on how you can fix AirPods frequent disconnection.
The guide should help you connect AirPods to your Windows 10 computer.


