- How to use SSH keys with Windows on Azure
- Overview of SSH and keys
- Supported SSH key formats
- SSH clients
- Create an SSH key pair
- Create a VM using your key
- Connect to your VM
- Next steps
- How to login into Ubuntu using SSH from Windows 10/8/7?
- How do I SSH into Ubuntu from Windows?
- Step 1: OpenSSH-server on Ubuntu Linux machine
- Step 2: Enable the SSH server service
- Step 3: Check the SSH status
- Step 4: Download the Putty on Windows 10/9/7
- Step 5: Install Putty SSH client on Windows
- Step 6: Run and configure Putty
- Step 7: Login to Ubuntu server via Putty SSH client
- Configure SSH Server With Windows 10 Native Way
- Installing and configuring OpenSSH Server
- Apply asymmetric key authentication
- Using $HOME\.ssh\authorized_keys
- Using administrators_authorized_keys
- Setting File Permissions with Authentication Key Information
- Changing the SSH Default Shell
- Staring SSH Server
- How to Secure Remote Desktops
- Set your desired password
- Generate a new password every time
- Try logging in to Remote Desktop with Tunneling
- Using secure file sending and receiving
- Wrap-up
- Credits
How to use SSH keys with Windows on Azure
This article is for Windows users who want to create and use secure shell (SSH) keys to connect to Linux virtual machines (VMs) in Azure. You can also generate and store SSH keys in the Azure portal to use when creating VMs in the portal.
To use SSH keys from a Linux or macOS client, see the quick steps. For a more detailed overview of SSH, see Detailed steps: Create and manage SSH keys for authentication to a Linux VM in Azure.
Overview of SSH and keys
SSH is an encrypted connection protocol that allows secure sign-ins over unsecured connections. SSH is the default connection protocol for Linux VMs hosted in Azure. Although SSH itself provides an encrypted connection, using passwords with SSH still leaves the VM vulnerable to brute-force attacks. We recommend connecting to a VM over SSH using a public-private key pair, also known as SSH keys.
The public-private key pair is like the lock on your front door. The lock is exposed to the public, anyone with the right key can open the door. The key is private, and only given to people you trust because it can be used to unlock the door.
The public key is placed on your Linux VM when you create the VM.
The private key remains on your local system. Protect this private key. Do not share it.
When you connect to your Linux VM, the VM tests the SSH client to make sure it has the correct private key. If the client has the private key, it’s granted access to the VM.
Depending on your organization’s security policies, you can reuse a single key pair to access multiple Azure VMs and services. You do not need a separate pair of keys for each VM.
Your public key can be shared with anyone, but only you (or your local security infrastructure) should have access to your private key.
Supported SSH key formats
Azure currently supports SSH protocol 2 (SSH-2) RSA public-private key pairs with a minimum length of 2048 bits. Other key formats such as ED25519 and ECDSA are not supported.
SSH clients
Recent versions of Windows 10 include OpenSSH client commands to create and use SSH keys and make SSH connections from PowerShell or a command prompt. This is the easiest way to create an SSH connection to your Linux VM, from a Windows computer.
You can also use Bash in the Azure Cloud Shell to connect to your VM. You can use Cloud Shell in a web browser, from the Azure portal, or as a terminal in Visual Studio Code using the Azure Account extension.
You can also install the Windows Subsystem for Linux to connect to your VM over SSH and use other native Linux tools within a Bash shell.
Create an SSH key pair
Create an SSH key pair using the ssh-keygen command. Enter a filename, or use the default shown in parenthesis (for example C:\Users\username/.ssh/id_rsa ). Enter a passphrase for the file, or leave the passphrase blank if you do not want to use a passphrase.
Create a VM using your key
To create a Linux VM that uses SSH keys for authentication, provide your SSH public key when creating the VM.
Using the Azure CLI, you specify the path and filename for the public key using az vm create and the —ssh-key-value parameter.
With PowerShell, use New-AzVM and add the SSH key to the VM configuration using`. For an example, see Quickstart: Create a Linux virtual machine in Azure with PowerShell.
If you do a lot of deployments using the portal, you might want to upload your public key to Azure, where it can be easily selected when creating a VM from the portal. For more information, see Upload an SSH key.
Connect to your VM
With the public key deployed on your Azure VM, and the private key on your local system, SSH to your VM using the IP address or DNS name of your VM. Replace azureuser and 10.111.12.123 in the following command with the administrator user name, the IP address (or fully qualified domain name), and the path to your private key:
If you configured a passphrase when you created your key pair, enter the passphrase when prompted.
If the VM is using the just-in-time access policy, you need to request access before you can connect to the VM. For more information about the just-in-time policy, see Manage virtual machine access using the just in time policy.
Next steps
For information about SSH keys in the Azure portal, see Generate and store SSH keys in the Azure portal to use when creating VMs in the portal.
For detailed steps, options, and advanced examples of working with SSH keys, see Detailed steps to create SSH key pairs.
You can also use PowerShell in Azure Cloud Shell to generate SSH keys and make SSH connections to Linux VMs. See the PowerShell quickstart.
If you have difficulty using SSH to connect to your Linux VMs, see Troubleshoot SSH connections to an Azure Linux VM.
How to login into Ubuntu using SSH from Windows 10/8/7?
SSH which is a Secure shell protocol allows the users to connect the Unix and Linux based operating systems running on servers or desktops remotely. We can run all commands on remote servers like Ubuntu, Debian, Centos, RedHat etc. using the lightweight piece of SSH software. To know more about it see our article: What is SSH (Secure Shell)?
Well, running SSH on Linux using SSH server to connect and login some other Linux system is pretty easy but how to do it between Ubuntu (Linux) and Windows 10/8/7. In this article, we focus on this and let you know the simple way to SSH into Ubuntu from Windows 10.
Note: This method will be the same for Ubuntu 18.04,170.4, 16.04, 14,04… to log in using Windows 7, Windows 8 or Windows 10.
How do I SSH into Ubuntu from Windows?
Step 1: OpenSSH-server on Ubuntu Linux machine
To connect & login the Ubuntu using the SSH first of all we need to install the same on Ubuntu. For this purpose use the command:
Step 2: Enable the SSH server service
After installing the SSH server, enable it on Ubuntu by using the command:
Step 3: Check the SSH status
Once you enabled the SSH service, its time to check whether it is running in the background or not. Use this command:
If you output for above command is * sshd is running then everything is fine and move to the next step.
Step 4: Download the Putty on Windows 10/9/7
To connect or log in the Ubuntu via SSH, we need an SSH client for Windows. The Putty is a free and easy way to login Ubuntu and other Linux servers remotely from Windows using SSH. However, there are numbers of other free SSH clients available online those ones can be used too. Here is the Putty Download Link.
Step 5: Install Putty SSH client on Windows
We can install the Putty.exe downloaded file just like any other software with few clicks. There is no special configuration or setup. Double click on it and follow the guided steps.
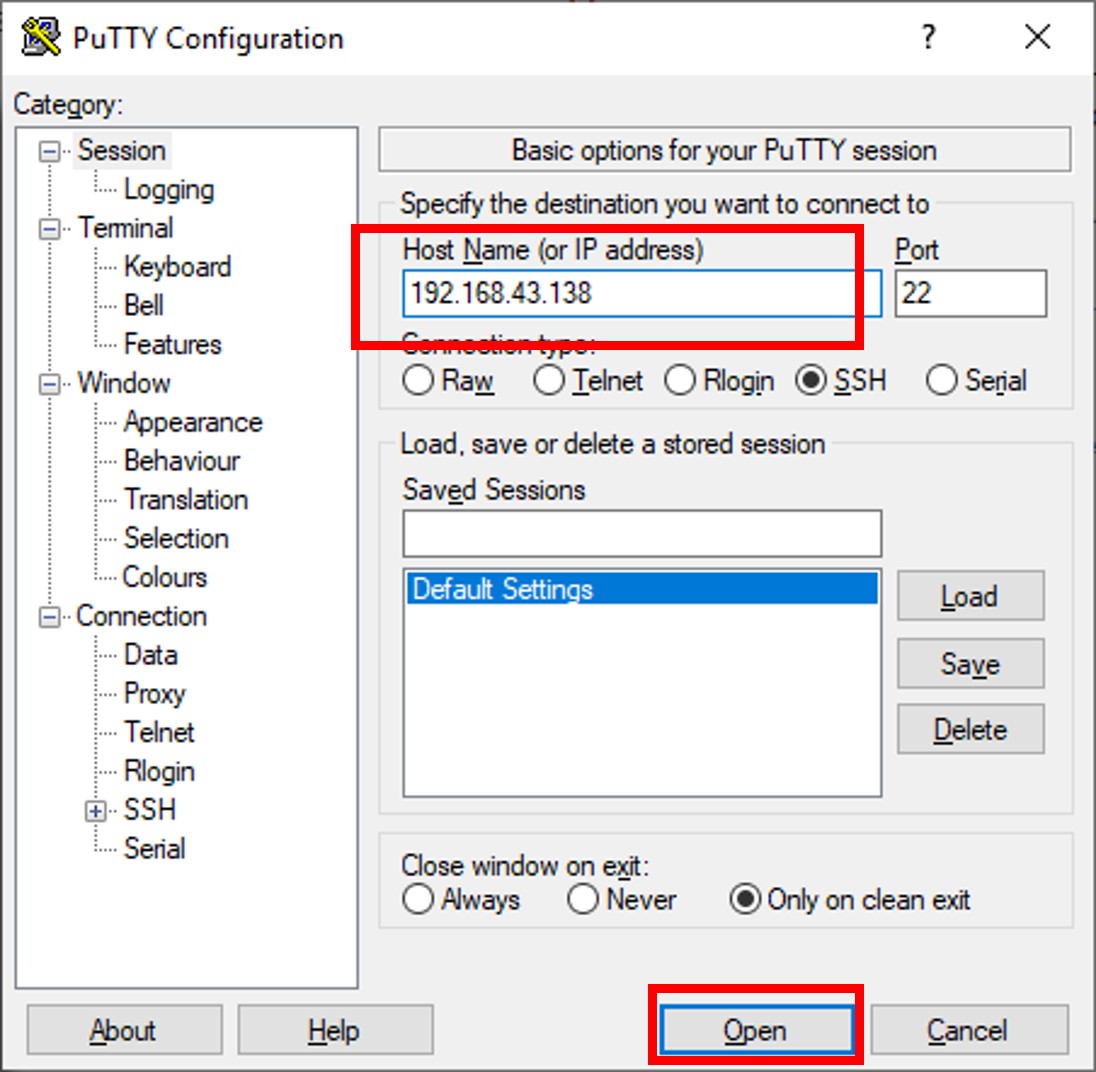
Step 6: Run and configure Putty
As we open the Putty, the first screen will be something like shown in the below screen. Now in the Host Name (or IP address) box type the Ip address of the remote Ubuntu server which you want to connect using the SSH protocol.
After adding the right IP address just click on the Open button.
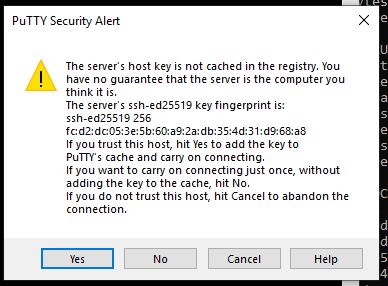
Step 7: Login to Ubuntu server via Putty SSH client
As we click on the Open button, the putty will ask whether you trust the server you about to connect or not, click on YES button.
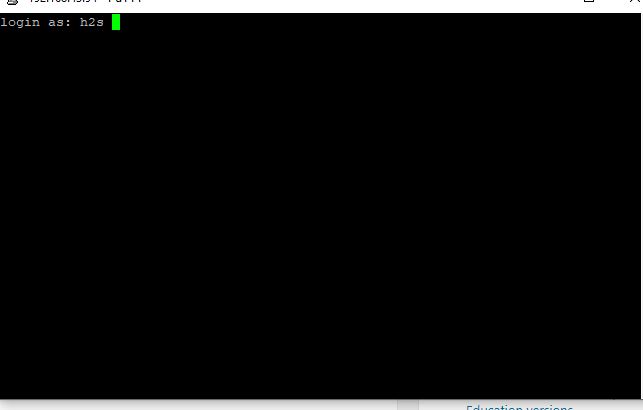
The black colour command terminal window of the Putty will appear along with login as: text. Enter the username and password of the remote server you want to login. That’s it.
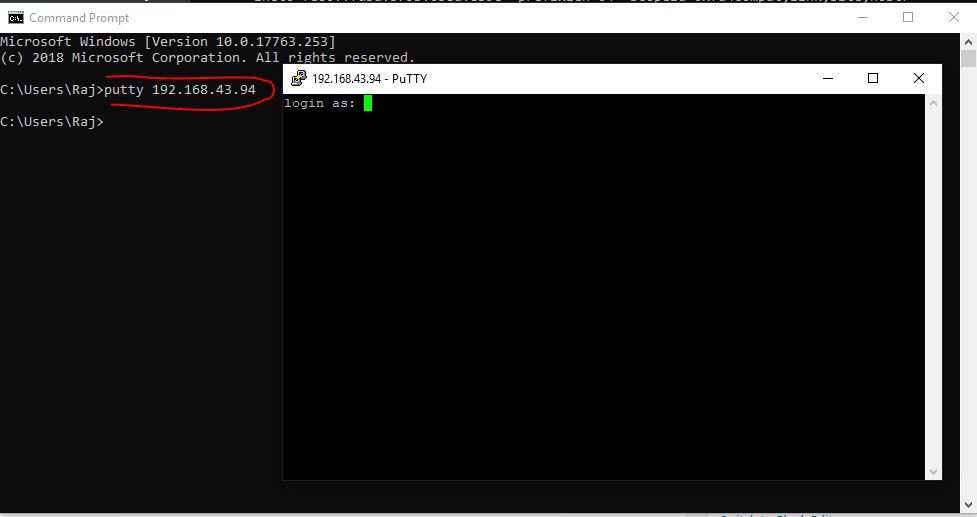
You can also use the command prompt to use the SSH after installing the Putty. Go to Command prompt or PowerShell on Windows 10 and type: putty [ipaddres] and hit the enter button.
For example– putty 192.168.43.94
In this way, we can connect and login remote Ubuntu server or any other Linux or Unix machine over SSH from Windows 10/8/7.
Other Resources to read:
Configure SSH Server With Windows 10 Native Way

C ontinuing from the last post, we’ll look at how to set up a built-in SSH server starting with Windows 10 and Windows Server 1709. This method allows Windows Server to connect remotely using SSH, just like a traditional Linux server. We will also look at how you can use Remote Desktop securely without modifying your firewall settings using SSH port tunneling.
Installing and configuring OpenSSH Server
You can install OpenSSH Server the same way you installed the SSH client in the previous article.
After installing the OpenSSH server program, start and stop the NT service once to create the necessary initial configuration files.
Apply asymmetric key authentication
Using public SSH Key authentication methods and disable the password authentication method highly recommended because it prevents attacks through password assignment. To enable this authentication feature, start PowerShell as an administrator and open the file in the path below with notepad. (Or you can use another text editor of your choice.)
For the following items, uncomment below lines and apply the value as follows:
- PubkeyAuthentication yes
- PasswordAuthentication no
- PermitEmptyPasswords no
Then choose your preferred method of managing SSH public keys. Starting with Windows Server 2019 (or 1809), there are two ways to describe SSH public keys. One of which is the traditional way of creating an authorized_keys file in the user’s home directory.
Using $HOME\.ssh\authorized_keys
To use this method, comment out the following block of code at the bottom of the configuration file:
Then go to the user home directory you want to log in to and create a .ssh directory.
Create an authorized_keys file (without the extension) inside the newly created directory and open it with your favorite text editor.
Add the public SSH key value you are using here.
When you save the file, you must change the file permission settings as described in the section Setting File Permissions with Authentication Key Information. If this setting is missing, the SSH connection will fail.
Using administrators_authorized_keys
This property is the default used by OpenSSH included in Windows Server 2019 (1809). Instead of registering a new SSH key for each user, you can manage your files in one place.
If you use this method, all public keys need to store in the $env: PROGRAMDATA\ssh\administrators_authorized_keys file, except for non-administrative users (that is, users who do not belong to the Administrators group). If you try, this setting will be used instead of your home directory, so if there is no key here, the connection will fail.
The administrators_authorized_keys file does not exist by default and created.
Warning: Run below commands carefully. If you change the other system file or configuration mistakenly, the system can break.
Add the public SSH Key you are using here.
When you save the file, you must change the file permission settings as described in the section Setting File Permissions with Authentication Key Information. If this setting is missing, the SSH connection will fail.
Setting File Permissions with Authentication Key Information
A common and very tough problem that you will face about using the OpenSSH server for Windows is this. SSH Key file permission should have correct and limited file permission. Windows version of SSH also follows this rule, but especially in Windows, configuring file permission can be unintuitive.
Depending on the method you chose in the previous step, you must verify the path of the authorized_keys file or administrators_authorized_keys file and change the permissions so that only the system account can access it using the icacls.exe utility and the Get-Acl and Set-Acl commands.
Warning: Run below commands carefully. If you change the system file’s ACL configuration mistakenly, the system can break.
Changing the SSH Default Shell
Basically, for compatibility reasons, the Windows operating system has provided a shell-based interpreter that recognizes DOS commands for a long time. But now, with more and more features than working with DOS commands, PowerShell is becoming a good alternative.
If necessary, you can specify that PowerShell as the default shell for SSH instead of the DOS interpreter. However, the settings here are specific to SSH sessions, not for the Remote Desktop or console session.
Warning: Run below commands carefully. If you change the registry configuration mistakenly, the system can break.
Staring SSH Server
You are now ready to start your SSH server. The SSH server is set to manual run by default so that you can change the startup mode to automatic. Then begins the service.

Congratulations! From now, you can connect to Windows with SSH-key authentication.
How to Secure Remote Desktops
Unlike Linux, Windows still runs much of the system on a graphical interface rather than on the command line. So if you try to do something with a terminal like this, you may not have much to do as you might expect.
Remote Desktop, however, is a well-known food for many hackers and script kiddies, as is well known. You may encounter the dilemma of choosing between convenience and security.
Fortunately, SSH provides the concept of tunneling, supporting the ability to relay other network connections securely. Remote desktop connections can also be protected in this way so that you can use them with confidence.
Start by blocking the TCP 3389 and UDP 3389 ports. You can do this because you will use Remote Desktop only with SSH tunneling.
Warning: Run below commands carefully. If you change the firewall configuration mistakenly, the system can become vulnerable.
Next, you must change the registry flag value so that the remote desktop server can accept the connection.
Warning: Run below commands carefully. If you change the registry configuration mistakenly, the system can break.
And the part that I’m going to explain right now is cool. As you saw earlier, you will not be asked for your password when you connect to OpenSSH, so you can set up a randomly generated strong password each time you use it. It is handy to have a simple script in the system directory that can do this.
Choose the type of script you want to create a file called ChangePassword.ps1 . We will keep this script in the system directory for your convenience.
Warning: Run below commands carefully. If you change the other system file or configuration mistakenly, the system can break.
Set your desired password
Create the contents of the ChangePassword.ps1 file as follows:
This script allows you to enter your password. However, unless you change the policy, you can only use passwords that pass the Windows Server enhanced default password rules. You must specify a password that must meet all of the following conditions.
- English capital letters (A through Z)
- Lowercase English letters (a through z)
- Arabic numerals (0 to 9)
- Special symbols (e.g. $, #,%)
Generate a new password every time
Create the contents of the ChangePassword.ps1 file as follows:
This way, you can set a strong password every time. If you forget your password, you can rest assured that you can still use public key authentication as a secondary means of authentication.
Try logging in to Remote Desktop with Tunneling
Now enter the following command to run the above script. After that, just set the password and verify that the remote desktop connection is working.
Warning: Run below commands carefully. If you lost the password you specified, you’d be lost access to your system.
To log in to the remote desktop, run SSH as follows:
The first 3389 is the port number on the server-side, and the second address is the port number you want to use locally. If you have changed the remote desktop’s port number from the registry to another port number on the server, you can enter the changed port number instead of 3389.

If you try to connect to a remote desktop using only the part as before, the firewall will block the connection as previously set up. So no one can access the remote desktop directly unless the user has registered a public key that matches the SSH secret key with that server.
Using secure file sending and receiving
Not surprisingly, it is possible to use SSH based SFTP. This feature designed to securely handle large file transfers in place of the remote desktop’s folder sharing feature.

Any client that supports the SFTP feature, such as FileZilla, is compatible and has a management advantage, as there is no need to apply complex firewall open policies like traditional FTP.
Wrap-up
This walkthrough let you through all the new SSH features that added since Windows 10 Version 1709. Both articles are available for Windows 10 and Windows Server 2019, so please take a moment to set them up for even more security.
Credits
The following articles helped me as I wrote this article.


