- 3 Methods to Create Bootable USB Windows 10 [Full Guide]
- Why create a bootable USB in Windows 10?
- 3 Methods to make a bootable USB drive for Window 10
- 1. Create bootable USB Windows 10 via CMD
- 2. Make bootable Win 10 USB via Windows USB/DVD Download Tool
- 3. Make bootable USB via MediaCreationTool
- Further study: create bootable USB to run Win 10 from flash drive
- Summary
- How do I create a bootable usb drive with an iso image of Windows 7?
- How to Create Bootable USB from ISO on Windows 10/8/7
- UUByte ISO Editor: Create Bootable USB from ISO on Windows 10/7/8
- Key Features of ISO Editor
- Step 1: Download and Installation UUByte ISO Editor on Windows PC
- Step 2: Import ISO File
- Step 3: Start Making Bootable USB Drive from Selected ISO Image
- XBOOT: Create Bootable USB from Windows 10/8/7 ISO
- Etcher: Make Bootable USB from ISO on Mac & Linux (Ubuntu)
- Conclusion:
3 Methods to Create Bootable USB Windows 10 [Full Guide]
Here, we collect three different methods to help you create bootable USB in Windows 10 easily and effectively.

By Emily  / Last Updated June 10, 2020
Why create a bootable USB in Windows 10?
In most cases, when the Windows 10 operating system goes wrong and the PC starts to run slowly or even stop working properly, your first move will be searching online for a solution. If lucky, you can get an effective solution to fix this issue. If not, the last resort should be reinstalling the operating system from the DVD or CD. What if your PC does not have an optical drive, or the original installation DVD is not available any longer?
In this situation, a bootable USB installer is a great alternative, which allows you to reinstall Windows 10 from a USB drive. Briefly, the USB stick is portable and compatible with nearly all desktops or laptops. After all, a USB port can be found on every PC. Besides, installing OS from USB drive is also quicker than from DVD or CD. Therefore, more and more users like to make a bootable USB installer to keep handy.
3 Methods to make a bootable USB drive for Window 10
In this part, we would like to share 3 different methods with you to make a bootable USB flash drive so that you can install OS more flexibly. Without any further ado, let’s get started.
Note: no matter which method you will choose finally, please ensure you have a copy of the required files stored in USB stick because it will be erased in the process. Free AOMEI Backupper is recommended for this backup task.
1. Create bootable USB Windows 10 via CMD
First of all, we will demonstrate how to make a bootable USB using Command Prompt. Download the Windows 10 ISO files from the official site and make sure the USB flash drive has at least 5GB free space.
Step 1. Press “Win+R” at the same time to open “Run” dialogue. Input “cmd” and hit on “Enter” key.
Step 2. When the Command Prompt window opens, type “diskpart” and press “Enter” to launch DiskPart.exe tool. Then execute the following command in sequence.
в–ёlist disk
в–ёselect disk #
в–ёclean
в–ёcreate partition primary
в–ёselect partition 1
▸format fs=ntfs quick (To create UEFI bootable USB, format it as FAT32 with command “format fs=fat32 quick” instead)
в–ёactive
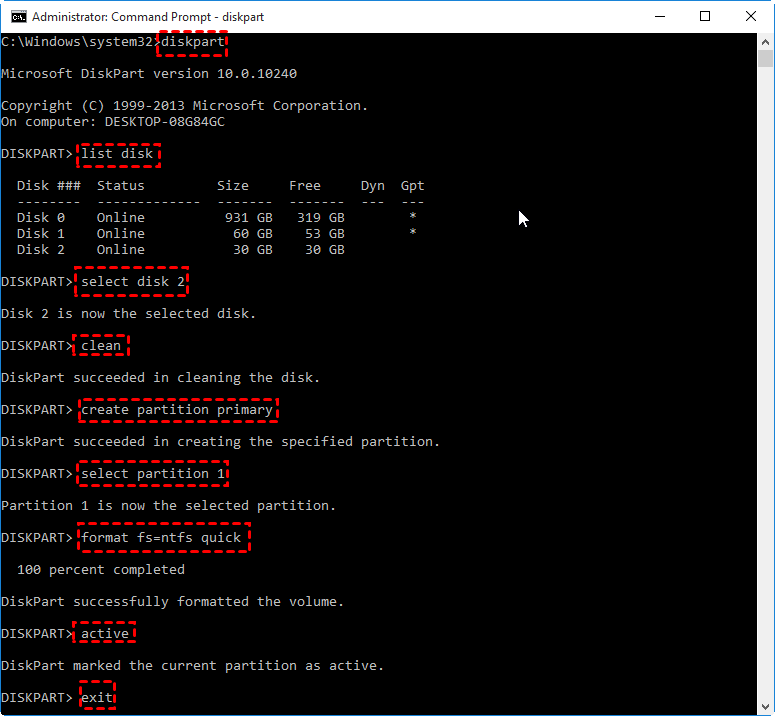
After you format the USB flash drive and set the primary partition as active, type “Exit” to close the diskpart.exe. Then use File Explorer to copy and paste the entire contents of the Windows ISO to the USB flash drive.
What if file copy fails?
If the Windows image file is over than 4GB, surpassing the file size limit of FAT32 file system, you will fail to copy files onto the USB flash drive. Once it happens, do as below:
1. Copy everything except the Windows image file (sources\install.wim) to the USB drive (either drag and drop, or use the following command, where D: is the mounted ISO and F: is the USB flash drive.)
robocopy D: F: /s /max:3800000000
2. Split the Windows image file into smaller files, and copy them onto the USB drive:
Dism /Split-Image /ImageFile:D:\sources\install.wim /SWMFile:F:\sources\install.swm /FileSize:3800
2. Make bootable Win 10 USB via Windows USB/DVD Download Tool
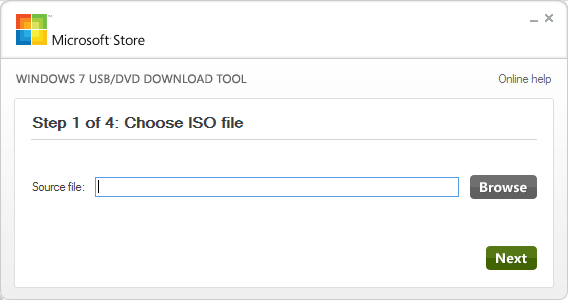
Secondly, you can make use of the Windows USB/DVD Download Tool. It can create a copy of ISO files onto USB flash drive as an installer.
Step 2. Run it. In the Source box, type the name and path of your Windows ISO file, or click BROWSE and select the file from the OPEN dialog box. Click “Next”.
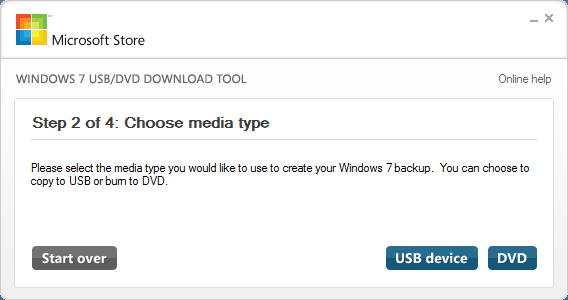
Step 3. Select USB DEVICE to create a copy on a USB flash drive.
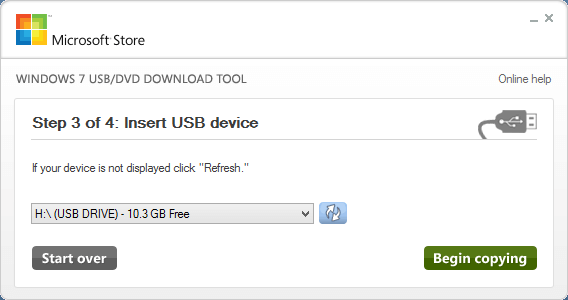
Step 4. Choose your USB drive and click “Begin copying”.
After it is finished, install Windows by moving to the root folder of your USB drive, and then double-click Setup.exe.
3. Make bootable USB via MediaCreationTool
Considering that most users tend to use MediaCreationTool, so here we also illustrate how to use this tool to create bootable USB in Windows 10.
Step 1. Download MediaCreationTool and run it as an administrator.
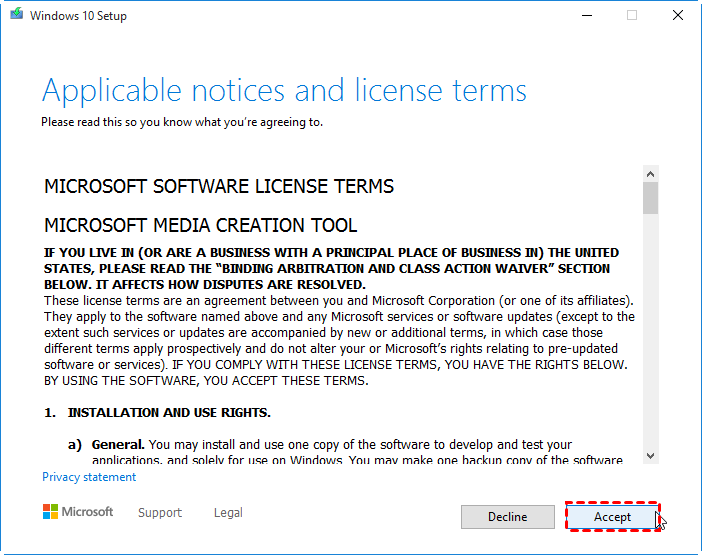
Step 2. Select ”Accept” in the license terms screen.
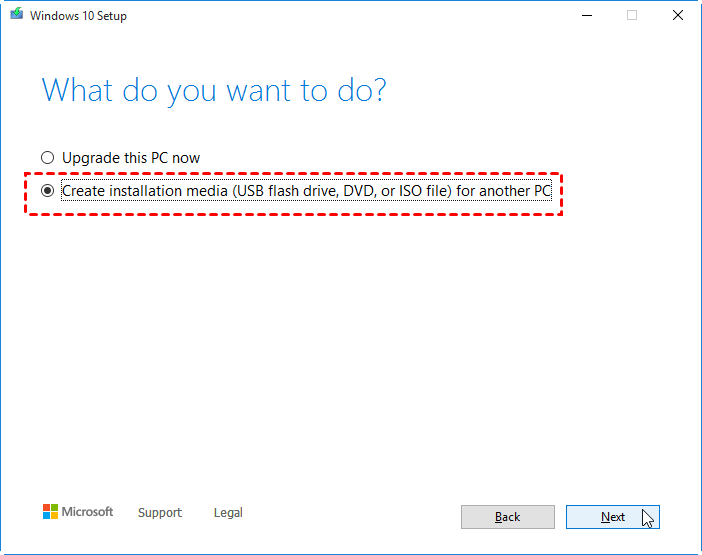
Step 3. Select “Create installation media for another PC”, and then select Next.
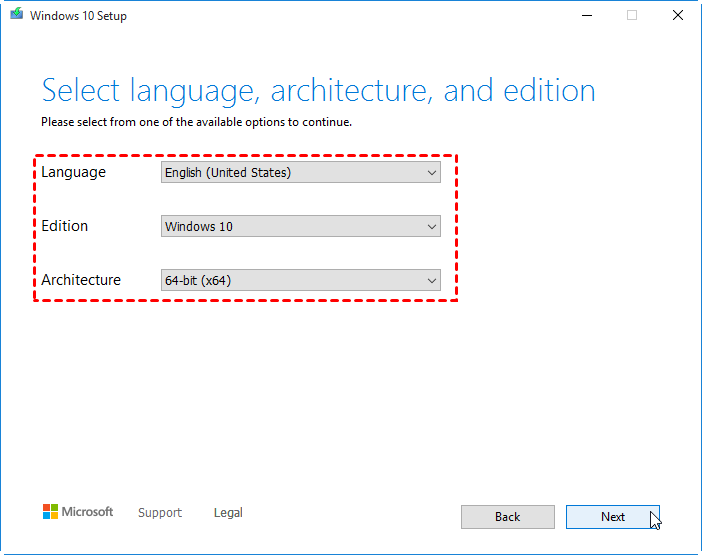
Step 4. Choose the language, edition, and architecture (64-bit or 32-bit) for Windows 10.
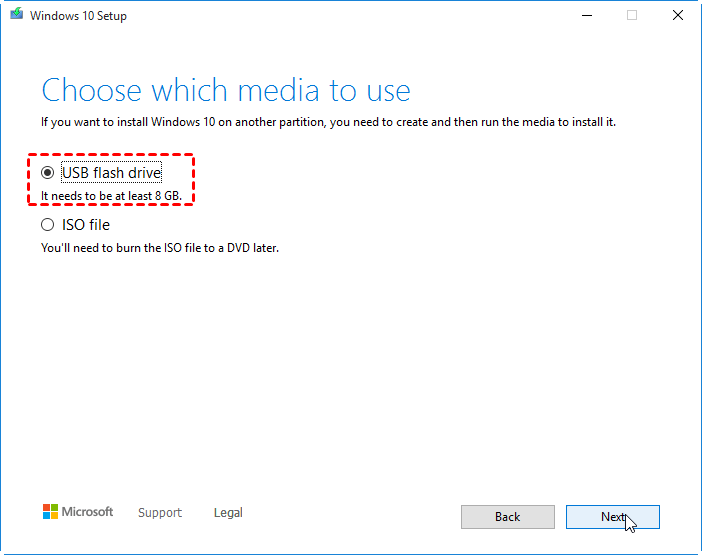
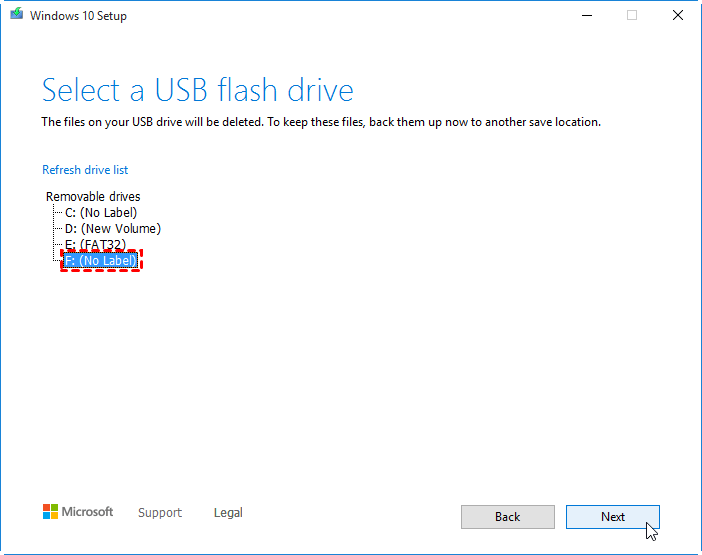
Step 5. Choose ”USB flash drive” and click “Next”.
Step 6. Choose your prepared USB drive from the list, then ”Next”.
Step 7. Once done, the tool will start to download the latest Windows 10 installation files to your device.
When it is over, this data is written to your flash drive and the USB is made bootable with the newest Windows 10 setup.
Further study: create bootable USB to run Win 10 from flash drive
Above content is all about how to make a bootable USB stick to install OS. If you do that for running Windows 10 operating system on another computer with an older operating system, you can run Windows 10 directly through a bootable USB drive. For this purpose, you can turn to the free partition manager: AOMEI Partition Assistant Standard. It is compatible with all editions of Windows 10/8/7 and Windows XP/Vista. With it, you can create Windows bootable USB drive with ISO files. Below is the detailed instruction:
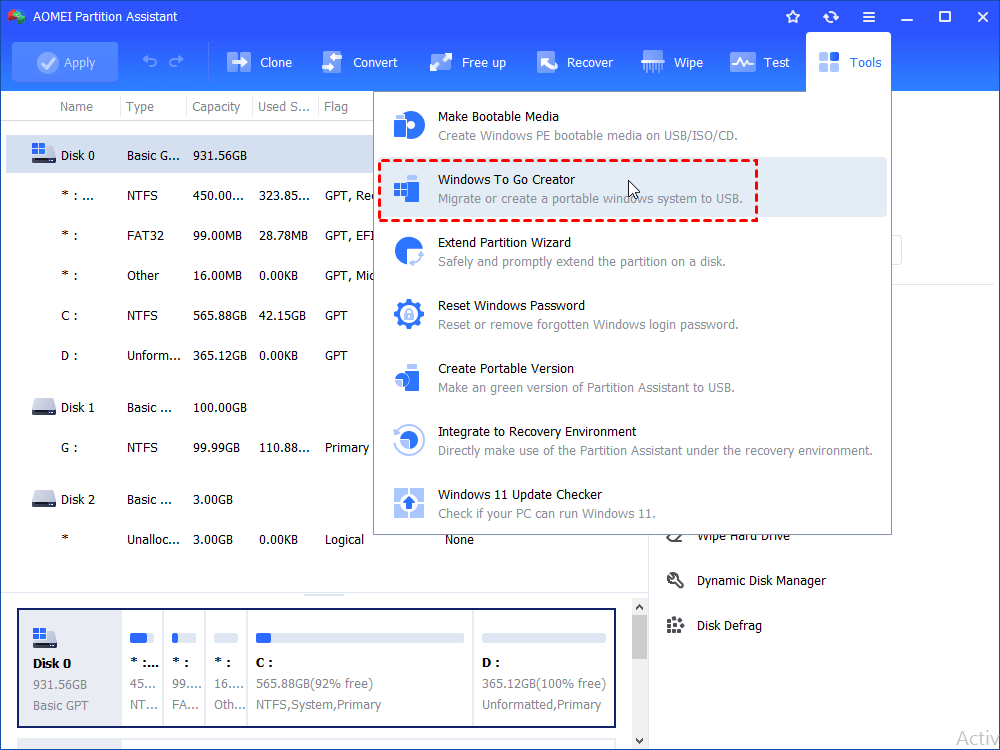
Step 1. Download the freeware, install and run AOMEI Partition Assistant Standard.
Step 2. Click “All Tools” > “Windows To Go Creator” on the left side.
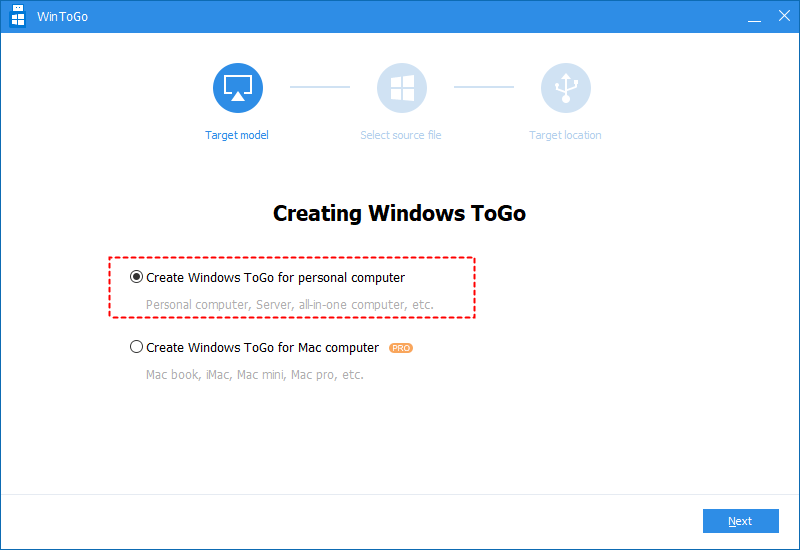
Step 3. Tick “Create Windows ToGo for personal computer”, and then click “Next”.
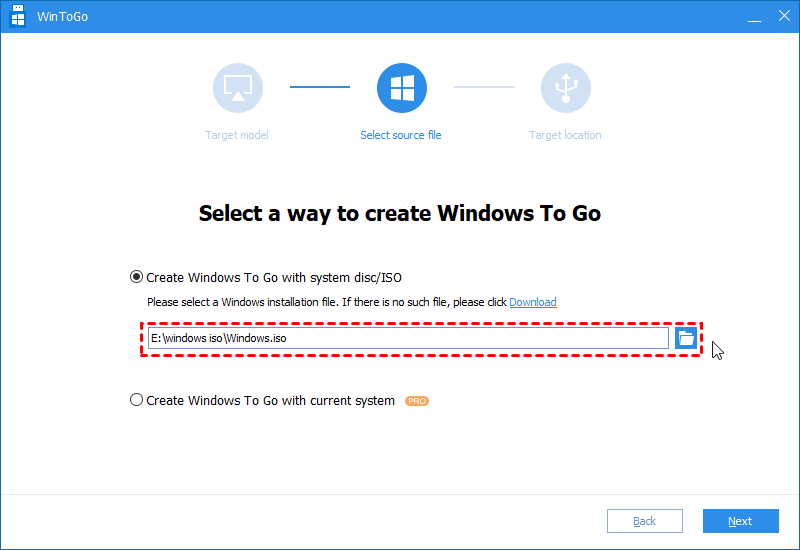
Step 4. Choose “Create Windows To Go with system disc/ISO” and select the prepared ISO file. Click “Next”.
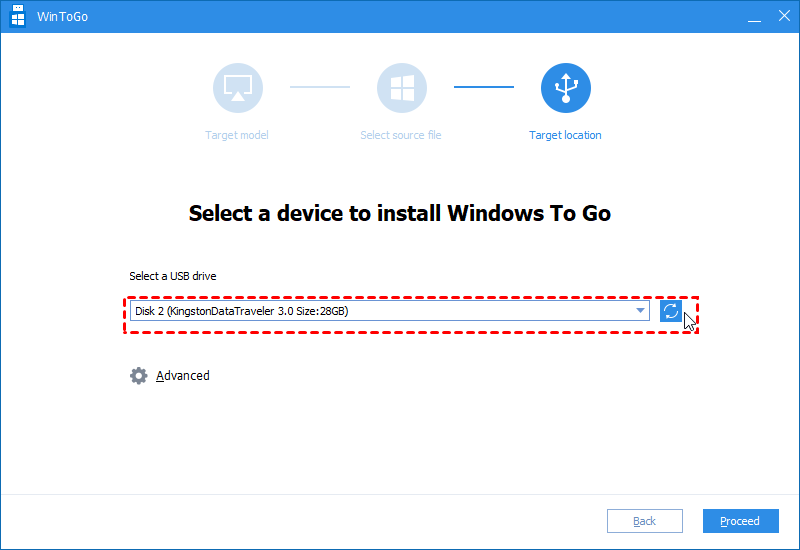
Step 5. Select the USB drive you have prepared and click “Proceed”.
After it is done, you can insert the bootable USB to the target computer, change boot order in BIOS and boot PC from it.
If you want to create bootable USB drive with current operating system installed on your computer, you can upgrade to Professional. That also enables you to run Windows from USB on Mac.
Summary
In this article, we shared 3 different ways to create bootable USB in Windows 10 as an installer, plus an additional way to make a portable boot USB to run OS on any other computers. Choose one according to your specific requirements. If you plan to create a bootable USB to repair boot issues caused by damaged MBR or disk errors, the AOMEI Partition Assistant Standard can also help you a lot.
How do I create a bootable usb drive with an iso image of Windows 7?
Which web site is this?
You need to convert those three files into a bootable .ISO file, the following article will show you how:
After you have converted it to a .ISO file, you need to burn it to a blank DVD disc as a disc image, then proceed to install:
ImgBurn — In addtion to supporting the creation of CD’s from .ISO files,
it supports a wide range of other image file formats, and it’s free.
(BIN, CUE, DI, DVD, GI, IMG, MDS, NRG, PDI and ISO)
Download and install Gear ISO burn (Free):
Note: Always use the slowest burn speed (4x or 2x) if offered a choice.
You should have the option to download the .ISO file from the Microsoft Store and simply burn it to a blank DVD as a disc image. Much easier to work with than the box files.
If you downloaded your copy of Windows 7 from the Microsoft Store, try redownloading it again:
1. Login to your Microsoft Store account ( http://store.microsoft.com ) to view your purchase history
2. Look for your Windows 7 purchase.
3. Next to Windows 7, there is an «Additional download options» drop-down menu.
4. In the drop-down menu, select «32 or 64-bit ISO.»
Download the ISO Image of Windows 7
Windows 7 Professional x64 (64-bit)
Windows 7 Professional x86 (32-bit)
Windows 7 Home Premium x64 (64-bit)
ImgBurn — In addtion to supporting the creation of CD’s from .ISO files,
it supports a wide range of other image file formats, and it’s free.
(BIN, CUE, DI, DVD, GI, IMG, MDS, NRG, PDI and ISO)
http://www.imgburn.com/
Note: Always use the slowest burn speed (4x or 2x) if offered a choice.
How to make a bootable USB thumb drive:
you will have to use a tool such as the Windows 7 USB/DVD Download Tool (http://store.microsoft.com/Help/ISO-Tool)
This simple tool will help you convert the same image file into to a USB thumb drive. For installation purposes, you should get a thumb drive that’s at least 4 GBs in size to store the installation files. Browse to where the Windows 7 Image is stored, open it.
Select the USB device where you want to have the backup stored to for installation.
Once the USB device has been identified, click the Begin copying button.
And that’s it, the next step now is to boot your computer, from the thumb drive, make sure the thumb drive you will be installing Windows 7 from is plugged into the USB port. This might vary by manufacturer, but the usual one to try is F12, start your computer and press F12 repeatedly until a screen is displayed giving you the option to boot from a USB Memory device, select that and press Enter on your keyboard.
How to Create Bootable USB from ISO on Windows 10/8/7
By Petty Madison | Last Updated: Apr. 13, 2019
ISO files, or image files can be extremely useful. They essentially contain a snapshot of all the required files and content for a particular OS, software, DVD or other media. It is important to know how to create bootable media from an ISO file because the process is not as simple as just copying the ISO file to another location. It requires a special utility for the purpose. In this article, we will showcase some of the best and most powerful tools to create a bootable USB drive from a source ISO file.
Please note that some of these methods require a significant knowledge of ISO files and how they are burned to create bootable media. If you are not very comfortable with the technical aspects of this process, then your choice will be narrowed down to a single option — the second one. Now, let’s go ahead and see what these tools are capable of.
UUByte ISO Editor: Create Bootable USB from ISO on Windows 10/7/8
One of the biggest challenges when creating bootable media is that ISO files tend to get corrupted unless you are using the correct software. Even when you use appropriate software for the purpose, it’s easy to end up redoing the burning process over and over again until you get it right. If you want to avoid all of that, then ISO Editor from UUByte should be your first choice.
This versatile application does not negatively impact your data in any way. It supports multiple file systems such as NTFS, FAT and FAT32. It also supports UEFI as well as legacy BIOS boots. In addition, the software offers full support across a wide range of Windows operating system ranging from Windows 10 all the way back to Vista and XP. Here is how you can easily use this reliable utility to create bootable USB drive from an ISO file that you have downloaded or extracted:
Key Features of ISO Editor
- One-click to create bootable USB or CD/DVD.
- Support 1500+ USB flash drives including the latest USB 3.0.
- Directly extract files from ISO Image.
- Copy entire ISO fime on DVD to local folder.
Step 1: Download and Installation UUByte ISO Editor on Windows PC
Download UUByte ISO Editor application from above location. Please note that this is a direct download link, which means the .exe file will be automatically downloaded when you click this link. Double-click the .exe file to install the software on your PC, and launch the application.
Step 2: Import ISO File
Click «Burn» button on the main interface to initial the setup process. All you need to do is follow the onscreen instructions. After this, you will be taken to a page where you can select the ISO file from which you will be creating the bootable USB drive. Select the file and then insert the USB drive before moving to the next step.
Step 3: Start Making Bootable USB Drive from Selected ISO Image
You can now select USB as the burn option, and click on the button that says ‘Burn’. In a few moments, your bootable USB drive will be ready and you can remove it and use it for your purpose.
As you can see, there are no complicated steps to follow and no additional software required to create bootable media. The application is completely error free, so you can confidently use even a DVD or CD to create the required bootable media from your ISO file.
XBOOT: Create Bootable USB from Windows 10/8/7 ISO
XBOOT is another very versatile utility, and it is designed to create multiboot USB drives. This simply means that you can have multiple ISO files on a single USB drive, and you can use these for various purposes as required.
One nice feature about this particular utility is that you will be notified in case a particular ISO file is not supported for burning as bootable media onto a USB drive. It’s convenient because it saves you time in case the ISO is not suitable for creating bootable media.
Step 1: First of all, download and extract the utility on your Windows PC. When you launch the application, you will see a window containing three tabs. The first step is where you will be adding your ISO file.
Step 2: You can simply drag and drop multiple ISO files into this particular window. As we already mentioned, any ISO file that is not supported will prompt a notification.
Step 3: Once you have done this, at the bottom of the window on the right hand side you will see an option to either create a DVD or USB. Click on the USB option.
Step 4 : Now select the appropriate USB in case you have more than one. You can leave the bootloader section on the default choice. Now click ‘Ok’ to make your bootable USB drive. At the end of the process, you will have your bootable USB drive with whatever ISO files you selected in Step 2.
Etcher: Make Bootable USB from ISO on Mac & Linux (Ubuntu)
This particular utility is available for multiple distributions including Windows, Mac OS X and Linux. Etcher is popular because of its smooth interface and ease of use. The simple three-step process does require some amount of preparation, however, since you will have to get the correct ISO image file to use the right bootable media.
It was originally created to help flash OS images to SD cards, but it is also very effective in flashing such images to USB drives, which is the focus of this article. Here is how Etcher works:
Step 1 : You can download the appropriate installer from the official Etcher website linked here. Go ahead and install the application and launch to program on your PC or Mac.
Step 2: On the software interface, the first option will be to select the source image, which is the ISO file from which you want to make the bootable USB drive. Choose the appropriate ISO file for this by clicking on ‘Select image’, and then browsing for and choosing the appropriate ISO file.
Step 3: The next step is to select your target drive. In this case, it will be the USB drive. Make sure you have inserted a USB drive prior to choosing the target location. Now choose USB as your ‘Target drive’.
Step 4: The final step is to click on the ‘Flash’ button, and in a few minutes your bootable USB drive will be ready for use.
In case you are not comfortable with choosing the different distributions for this particular installer, you can use another extremely popular application that will help you create a bootable USB drive from an ISO file even if you don’t have any technical expertise whatsoever.
Conclusion:
All of these utilities are extremely versatile, but at times you may face certain errors. For example, if your ISO file has not been extracted properly or is corrupted in anyway, no ISO utility will be able to create bootable media for you. As such, you will need to make sure that the ISO file is properly extracted or downloaded without errors. Once you have done that, you may use any of the above software applications to create your bootable media on USB.
Petty is editor in chief at UUByte and writes various topics about Windows and Mac to help people make the most of current technology.


