- Create a SQL Server Database programmatically by using ADO.NET and Visual C# .NET
- Summary
- Steps to create a SQL Server Database
- Quickstart: Create an Azure SQL Database single database
- Prerequisite
- Create a single database
- Launch Azure Cloud Shell
- Set parameter values
- Create a resource group
- Create a server
- Configure a firewall rule for the server
- Create a single database with Azure CLI
- Launch Azure Cloud Shell
- Set parameter values
- Create resource group
- Create a server
- Create a firewall rule
- Create a single database with PowerShell
- Query the database
- Clean up resources
- Next steps
- Create a database and add tables in Visual Studio
- Prerequisites
- Create a project and a local database file
- Add a data source
- View properties of the data connection
- Create tables and keys by using Table Designer
- Create the Customers table
- Create the Orders table
- Create a foreign key
- Populate the tables with data
Create a SQL Server Database programmatically by using ADO.NET and Visual C# .NET
This article describes how to create a SQL Server Database programmatically by using ADO.NET and Visual C# .NET.
Original product version: В Visual C#
Original KB number: В 307283
Summary
This step-by-step article shows you how to create a Microsoft SQL Server database by using ADO.NET and Visual C# .NET because programmers often need to create Databases programmatically.
This article refers to the following Microsoft .NET Framework Class Library namespace: System.Data.SqlClient .
Steps to create a SQL Server Database
To create the database, follow these steps:
Create a new Visual C# .NET Windows application.
Place a button on Form1. Change the button’s Name property to btnCreateDatabase, and then change the Text property to Create Database.
Use the using statement on the System and System.Data namespaces so that you do not have to qualify declarations in those namespaces later in your code. Add the following code to the General Declarations section of Form1:
Switch to Form view, and then double-click Create Database to add the click event handler. Add the following sample code to the handler:
Change the connection string to point to your computer running SQL Server, and then verify that the Database argument is set to Master or is blank.
Press F5 or CTRL+F5 to run the project, and then click Create Database.
Use the Server Explorer to verify that the database is created.
- This code creates a custom database with specific properties.
- The folder that is going to hold the created .mdf and .ldf files must already exist before you run the code or an exception will be generated.
- If you want to create a database that is similar to the SQL Server Model database, and you want the database in the default location, then change the str variable in the code, as in the following sample code: str = «CREATE DATABASE MyDatabase»
Quickstart: Create an Azure SQL Database single database
In this quickstart, you create a single database in Azure SQL Database using either the Azure portal, a PowerShell script, or an Azure CLI script. You then query the database using Query editor in the Azure portal.
Prerequisite
- An active Azure subscription. If you don’t have one, create a free account.
Create a single database
This quickstart creates a single database in the serverless compute tier.
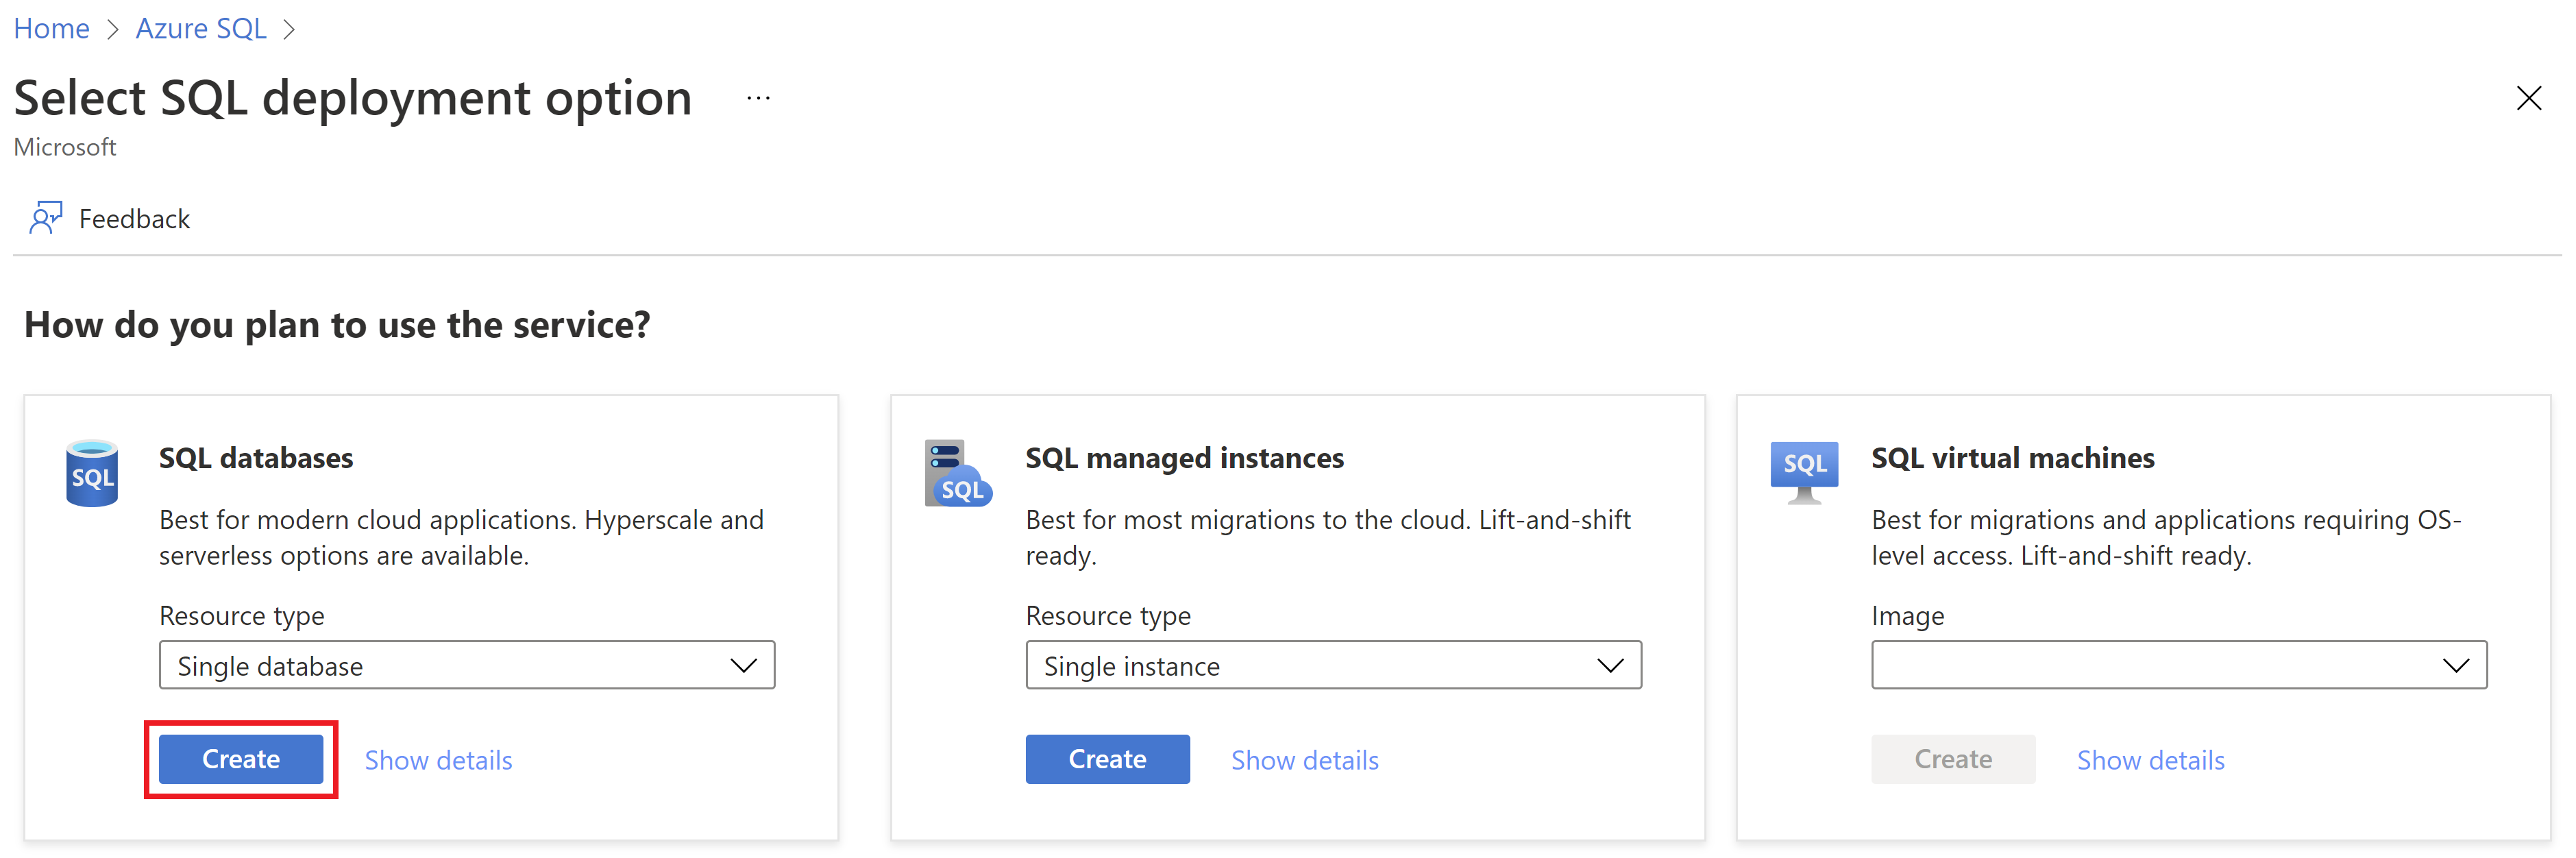
To create a single database in the Azure portal this quickstart starts at the Azure SQL page.
Under SQL databases, leave Resource type set to Single database, and select Create.
On the Basics tab of the Create SQL Database form, under Project details, select the desired Azure Subscription.
For Resource group, select Create new, enter myResourceGroup, and select OK.
For Database name enter mySampleDatabase.
For Server, select Create new, and fill out the New server form with the following values:
- Server name: Enter mysqlserver, and add some characters for uniqueness. We can’t provide an exact server name to use because server names must be globally unique for all servers in Azure, not just unique within a subscription. So enter something like mysqlserver12345, and the portal lets you know if it is available or not.
- Server admin login: Enter azureuser.
- Password: Enter a password that meets requirements, and enter it again in the Confirm password field.
- Location: Select a location from the dropdown list.
Select OK.
Leave Want to use SQL elastic pool set to No.
Under Compute + storage, select Configure database.
This quickstart uses a serverless database, so select Serverless, and then select Apply.

Select Next: Networking at the bottom of the page.

On the Networking tab, for Connectivity method, select Public endpoint.
For Firewall rules, set Add current client IP address to Yes. Leave Allow Azure services and resources to access this server set to No.
Select Next: Additional settings at the bottom of the page.

On the Additional settings tab, in the Data source section, for Use existing data, select Sample. This creates an AdventureWorksLT sample database so there’s some tables and data to query and experiment with, as opposed to an empty blank database.
Optionally, set the maintenance window so planned maintenance is performed at the best time for your database.
Select Review + create at the bottom of the page:

On the Review + create page, after reviewing, select Create.
Launch Azure Cloud Shell
The Azure Cloud Shell is a free interactive shell that you can use to run the steps in this article. It has common Azure tools preinstalled and configured to use with your account.
To open the Cloud Shell, just select Try it from the upper right corner of a code block. You can also launch Cloud Shell in a separate browser tab by going to https://shell.azure.com. Select Copy to copy the blocks of code, paste it into the Cloud Shell, and press Enter to run it.
Set parameter values
The following values are used in subsequent commands to create the database and required resources. Server names need to be globally unique across all of Azure so the $RANDOM function is used to create the server name. Replace the 0.0.0.0 values in the ip address range to match your specific environment.
Create a resource group
Create a resource group with the az group create command. An Azure resource group is a logical container into which Azure resources are deployed and managed. The following example creates a resource group named myResourceGroup in the eastus location:
Create a server
Create a server with the az sql server create command.
Configure a firewall rule for the server
Create a firewall rule with the az sql server firewall-rule create command.
Create a single database with Azure CLI
Create a database with the az sql db create command. The following code creates
You can create a resource group, server, and single database using Windows PowerShell.
Launch Azure Cloud Shell
The Azure Cloud Shell is a free interactive shell that you can use to run the steps in this article. It has common Azure tools preinstalled and configured to use with your account.
To open the Cloud Shell, just select Try it from the upper right corner of a code block. You can also launch Cloud Shell in a separate browser tab by going to https://shell.azure.com. Select Copy to copy the blocks of code, paste it into the Cloud Shell, and press Enter to run it.
Set parameter values
The following values are used in subsequent commands to create the database and required resources. Server names need to be globally unique across all of Azure so the Get-Random cmdlet is used to create the server name. Replace the 0.0.0.0 values in the ip address range to match your specific environment.
Create resource group
Create an Azure resource group with New-AzResourceGroup. A resource group is a logical container into which Azure resources are deployed and managed.
Create a server
Create a server with the New-AzSqlServer cmdlet.
Create a firewall rule
Create a server firewall rule with the New-AzSqlServerFirewallRule cmdlet.
Create a single database with PowerShell
Create a single database with the New-AzSqlDatabase cmdlet.
Query the database
Once your database is created, you can use the Query editor (preview) in the Azure portal to connect to the database and query data.
In the portal, search for and select SQL databases, and then select your database from the list.
On the page for your database, select Query editor (preview) in the left menu.
Enter your server admin login information, and select OK.

Enter the following query in the Query editor pane.
Select Run, and then review the query results in the Results pane.
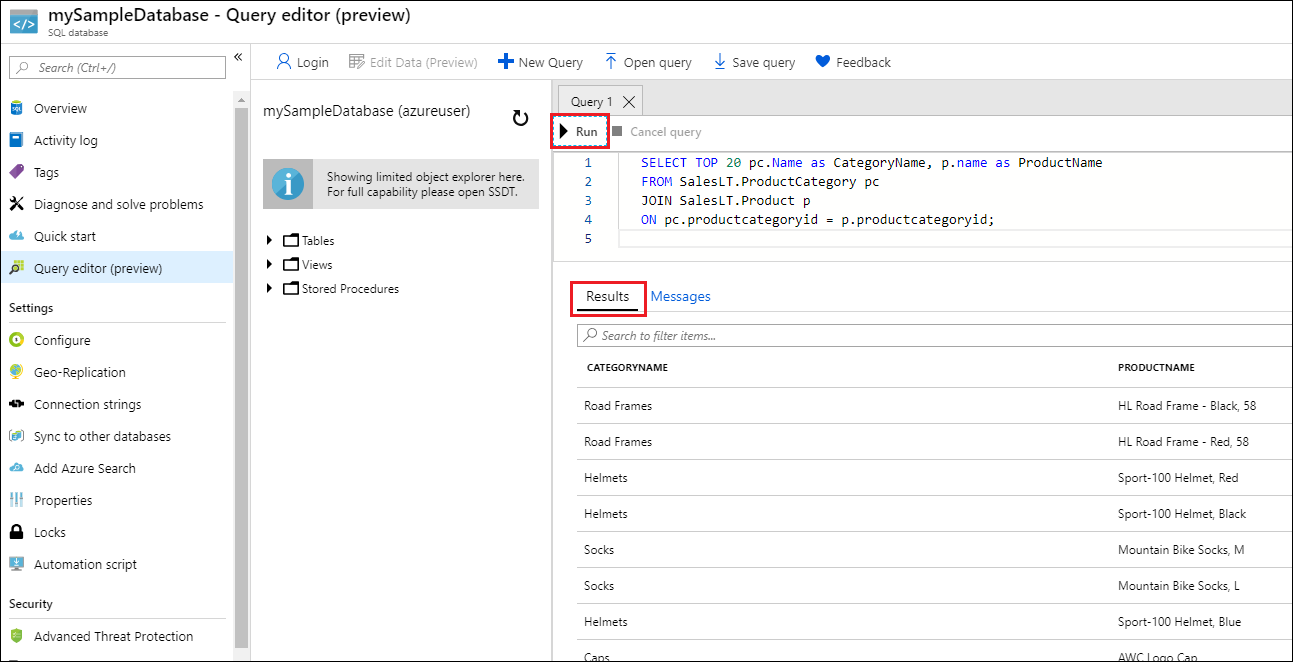
Close the Query editor page, and select OK when prompted to discard your unsaved edits.
Clean up resources
Keep the resource group, server, and single database to go on to the next steps, and learn how to connect and query your database with different methods.
When you’re finished using these resources, you can delete the resource group you created, which will also delete the server and single database within it.
To delete myResourceGroup and all its resources using the Azure portal:
- In the portal, search for and select Resource groups, and then select myResourceGroup from the list.
- On the resource group page, select Delete resource group.
- Under Type the resource group name, enter myResourceGroup, and then select Delete.
To delete the resource group and all its resources, run the following Azure CLI command, using the name of your resource group:
To delete the resource group and all its resources, run the following PowerShell cmdlet, using the name of your resource group:
Next steps
Connect and query your database using different tools and languages:
Want to optimize and save on your cloud spending?
Create a database and add tables in Visual Studio
You can use Visual Studio to create and update a local database file in SQL Server Express LocalDB. You can also create a database by executing Transact-SQL statements in the SQL Server Object Explorer tool window in Visual Studio. In this topic, we’ll create an .mdf file and add tables and keys by using the Table Designer.
Prerequisites
To complete this walkthrough, you’ll need the .NET desktop development and Data storage and processing workloads installed in Visual Studio. To install them, open Visual Studio Installer and choose Modify (or More > Modify) next to the version of Visual Studio you want to modify.
The procedures in this article apply only to .NET Framework Windows Forms projects, not to .NET Core Windows Forms projects.
Create a project and a local database file
Create a new Windows Forms App (.NET Framework) project and name it SampleDatabaseWalkthrough.
On the menu bar, select Project > Add New Item.
In the list of item templates, scroll down and select Service-based Database.

Name the database SampleDatabase, and then click Add.
Add a data source
If the Data Sources window isn’t open, open it by pressing Shift+Alt+D or selecting View > Other Windows > Data Sources on the menu bar.
In the Data Sources window, select Add New Data Source.

The Data Source Configuration Wizard opens.
On the Choose a Data Source Type page, choose Database and then choose Next.
On the Choose a Database Model page, choose Next to accept the default (Dataset).
On the Choose Your Data Connection page, select the SampleDatabase.mdf file in the drop-down list, and then choose Next.
On the Save the Connection String to the Application Configuration File page, choose Next.
On the Choose your Database Objects page, you’ll see a message that says the database doesn’t contain any objects. Choose Finish.
View properties of the data connection
You can view the connection string for the SampleDatabase.mdf file by opening the Properties window of the data connection:
Select View > SQL Server Object Explorer to open the SQL Server Object Explorer window. Expand (localdb)\MSSQLLocalDB > Databases, and then right-click on SampleDatabase.mdf and select Properties.
Alternatively, you can select View > Server Explorer, if that window isn’t already open. Open the Properties window by expanding the Data Connections node, right-clicking on SampleDatabase.mdf, and then selecting Properties.
If you can’t expand the Data Connections node, or the SampleDatabase.mdf connection is not listed, select the Connect to Database button in the Server Explorer toolbar. In the Add Connection dialog box, make sure that Microsoft SQL Server Database File is selected under Data source, and then browse to and select the SampleDatabase.mdf file. Finish adding the connection by selecting OK.
Create tables and keys by using Table Designer
In this section, you’ll create two tables, a primary key in each table, and a few rows of sample data. You’ll also create a foreign key to specify how records in one table correspond to records in the other table.
Create the Customers table
In Server Explorer, expand the Data Connections node, and then expand the SampleDatabase.mdf node.
If you can’t expand the Data Connections node, or the SampleDatabase.mdf connection is not listed, select the Connect to Database button in the Server Explorer toolbar. In the Add Connection dialog box, make sure that Microsoft SQL Server Database File is selected under Data source, and then browse to and select the SampleDatabase.mdf file. Finish adding the connection by selecting OK.
Right-click on Tables and select Add New Table.
The Table Designer opens and shows a grid with one default row, which represents a single column in the table that you’re creating. By adding rows to the grid, you’ll add columns in the table.
In the grid, add a row for each of the following entries:
| Column name | Data type | Allow nulls |
|---|---|---|
| CustomerID | nchar(5) | False (cleared) |
| CompanyName | nvarchar(50) | False (cleared) |
| ContactName | nvarchar (50) | True (selected) |
| Phone | nvarchar (24) | True (selected) |
Right-click on the CustomerID row, and then select Set Primary Key.
Right-click on the default row ( Id ), and then select Delete.
Name the Customers table by updating the first line in the script pane to match the following sample:
You should see something like this:

In the upper-left corner of Table Designer, select Update.
In the Preview Database Updates dialog box, select Update Database.
The Customers table is created in the local database file.
Create the Orders table
Add another table, and then add a row for each entry in the following table:
| Column name | Data type | Allow nulls |
|---|---|---|
| OrderID | int | False (cleared) |
| CustomerID | nchar(5) | False (cleared) |
| OrderDate | datetime | True (selected) |
| OrderQuantity | int | True (selected) |
Set OrderID as the primary key, and then delete the default row.
Name the Orders table by updating the first line in the script pane to match the following sample:
In the upper-left corner of the Table Designer, select Update.
In the Preview Database Updates dialog box, select Update Database.
The Orders table is created in the local database file. If you expand the Tables node in Server Explorer, you see the two tables:

Create a foreign key
In the context pane on the right side of the Table Designer grid for the Orders table, right-click on Foreign Keys and select Add New Foreign Key.

In the text box that appears, replace the text ToTable with Customers.
In the T-SQL pane, update the last line to match the following sample:
In the upper-left corner of the Table Designer, select Update.
In the Preview Database Updates dialog box, select Update Database.
The foreign key is created.
Populate the tables with data
In Server Explorer or SQL Server Object Explorer, expand the node for the sample database.
Open the shortcut menu for the Tables node, select Refresh, and then expand the Tables node.
Open the shortcut menu for the Customers table, and then select Show Table Data.
Add whatever data you want for some customers.
You can specify any five characters you want as the customer IDs, but choose at least one that you can remember for use later in this procedure.
Open the shortcut menu for the Orders table, and then select Show Table Data.
Add data for some orders.
Make sure that all order IDs and order quantities are integers and that each customer ID matches a value that you specified in the CustomerID column of the Customers table.
On the menu bar, select File > Save All.


