- How to create an ISO file out of any Windows 10 build
- How to create an ISO file of any Windows 10 build
- Создание образа диска в Windows 10
- Способ 1: UltraISO
- Способ 2: PowerISO
- Способ 3: CDBurnerXP
- Create an ISO File from a Folder in Windows
- Use AnyBurn To Create ISO From The Folders On Your PC
- Create An ISO In Windows 10 Using WinCDEmu
- Use ImgBurn To Create ISO Files From Folders On Windows
- Use a Portable Tool To Create An ISO From Folders
How to create an ISO file out of any Windows 10 build


- Download Restoro PC Repair Tool that comes with Patented Technologies (patent available here).
- Click Start Scan to find Windows issues that could be causing PC problems.
- Click Repair All to fix issues affecting your computer’s security and performance
- Restoro has been downloaded by 0 readers this month.
When Microsoft releases a new Windows 10 build to Insiders on the Fast ring, it is usually only available through Windows Update.
This means you can’t find an ISO file of that build, and install it manually while it’s still available on the Fast ring only.
Microsoft usually releases Windows 10 ISO files for commercial versions, or when a certain build enters the Slow ring.
You can download official ISO files for the Anniversary Updates, and for different Windows builds, but you can’t download an ISO file of the latest build released.
However, if you you can’t wait for Microsoft to officially release an ISO file, and have a good reason to download it, and create an installation media, it’s actually possible to do that.
There’s a way to create a ISO file of basically any Windows 10 Preview build you want, but it’s not an official way, approved by Microsoft. So, here’s what you need to do.
ISO files, also called ISO images, represent a single file of an entire DVD or CD. In other words, it is a virtual version of a disc.
This is why ISO files are very useful, eliminating the need to carry data on a piece of hardware. Also, for Windows 10 builds, the ISO format may play an important role.
It is easier for Microsoft to release ISO files for updates, but it happens that you can’t download the official ISO file of the latest build.
How to create an ISO file of any Windows 10 build
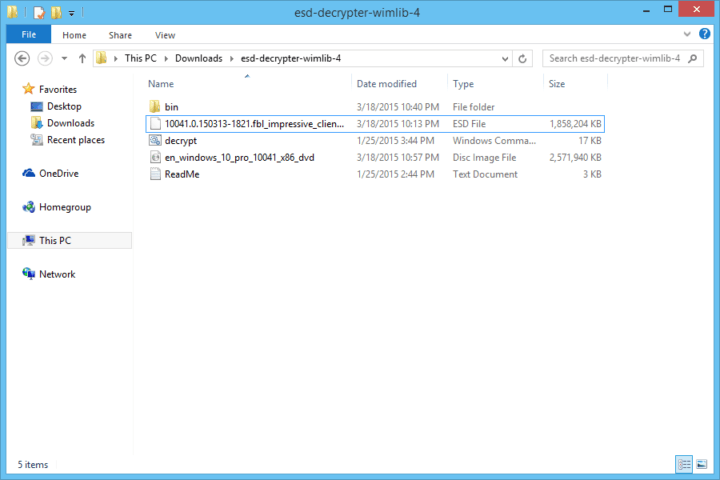
When you need to install a new version of Windows 10, or download a new build, Microsoft delivers it to you through a new ESD (Electronic Software Delivery) image format.
This image is known as install.ESD, and Windows 10 downloads it on your computer, every time you install a new Windows 10 release.
To create our custom ISO file, we’re going to take advantage of the install.ESD file. This file is usually stored the hidden $WINDOWS.
BT folder, there’s an easy way to find.
Once you’ve found the install.ESD file, you’re going to need a program called ESD Decrypter, to create your own ISO file.
But first, we have to mention that this utility is a third-party program, so you’ll be using it on your own risk.
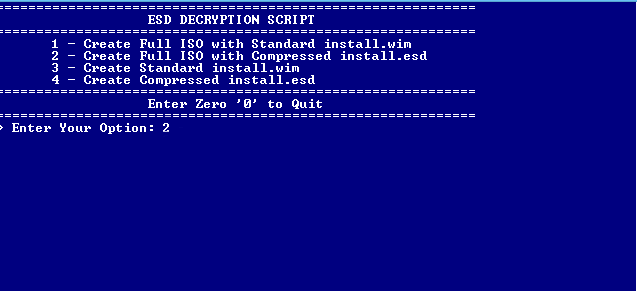
Now that we know what’s required, let’s create some ISO files:
- Download the ESD Decrypter (from the link above), and extract it anywhere on your computer
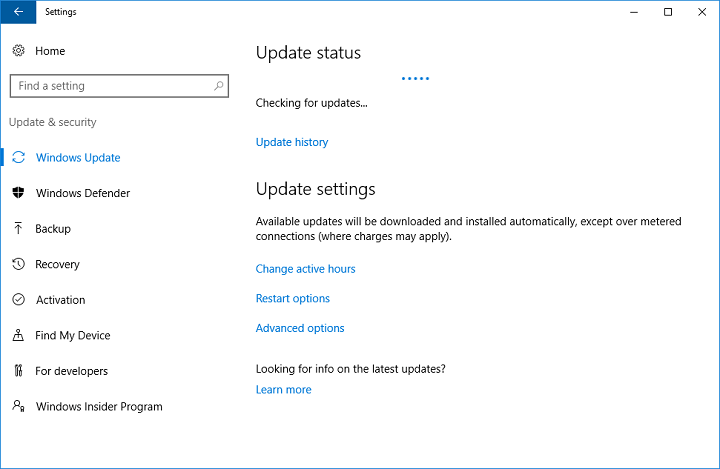
- Now, go to the Settings app >Updates & security >Check for updates
- Let Windows Update download and install the new build

- Once the build is installed, DON’T restart your computer to install it
- Go to File Explorer >This PC, and open a partition on which your system is installed (usually C:)
- Click the View tab on File Explorer, and check Hidden items option to see the $WINDOWS.
BT folder
Open the $WINDOWS.
BT, and find the Sources folder
That’s pretty much it, once you’ve created a ISO file using this method, you can mount it on a USB flash drive, using a tool like Rufus, and install it on your PC, or a virtual machine.
If you have any questions, and comments, please let us know in the comment section below.
RELATED STORIES YOU NEED TO CHECK OUT:
Создание образа диска в Windows 10

Способ 1: UltraISO
В качестве первого варианта рассмотрим бесплатную версию программы UltraISO, поскольку это решение является самым популярным среди остальных. За пример мы взяли формат ISO, ведь образы дисков чаще всего распространяются именно так. В Windows 10 взаимодействие с данным инструментом осуществляется следующим образом:
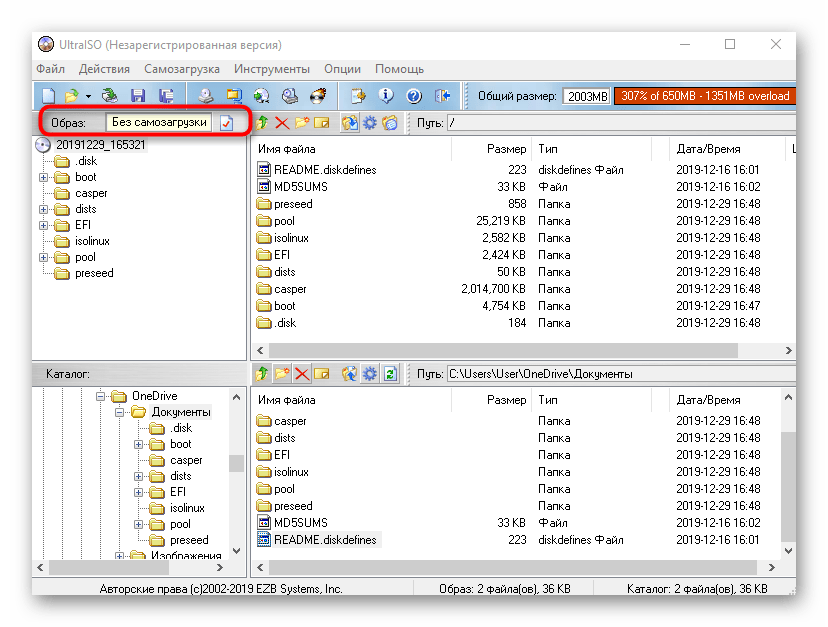
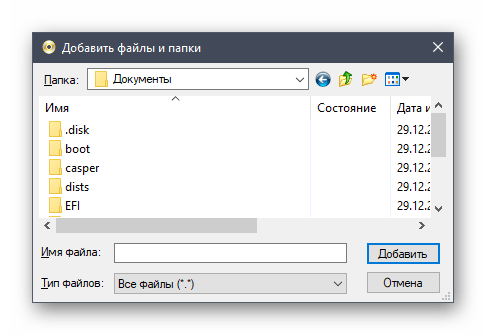
- Перейдите по указанной выше ссылке, чтобы загрузить и установить UltraISO. После запуска воспользуйтесь встроенным обозревателем для перемещения всех необходимых файлов в образ.

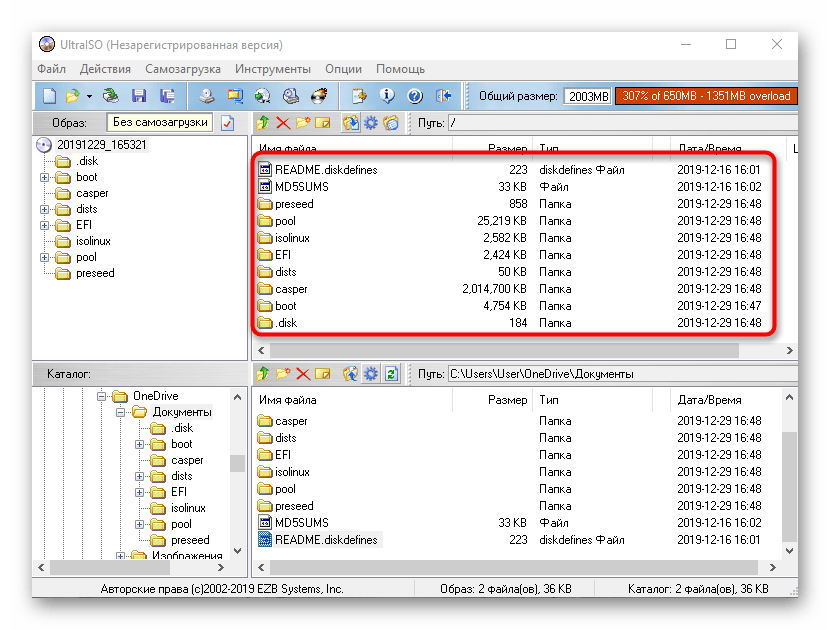
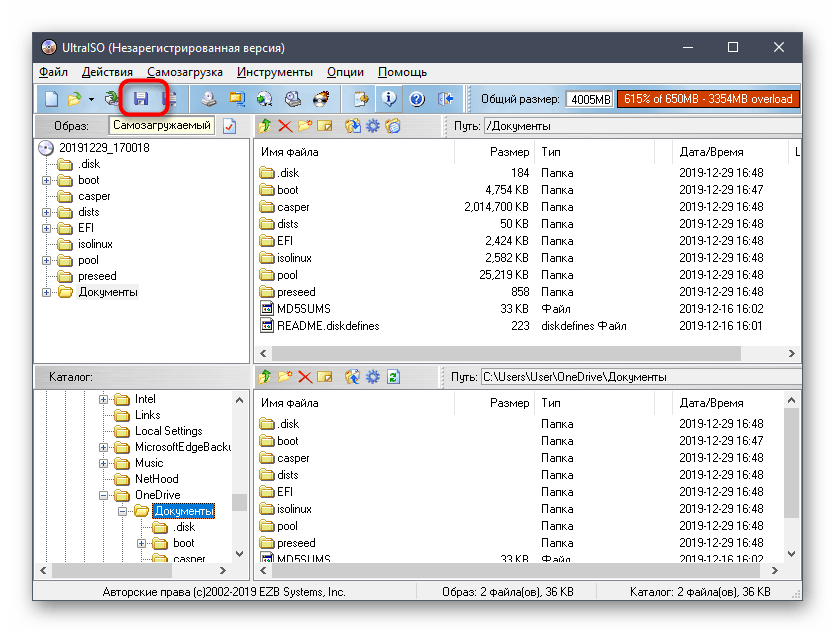
Нажмите на кнопку сохранения или надпись «Без самозагрузки», чтобы приступить к записи готового образа.
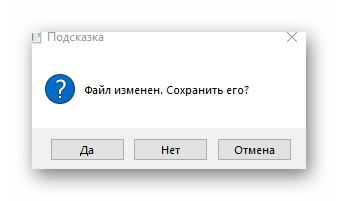
Подтвердите свои намерения сохранить внесенные изменения.

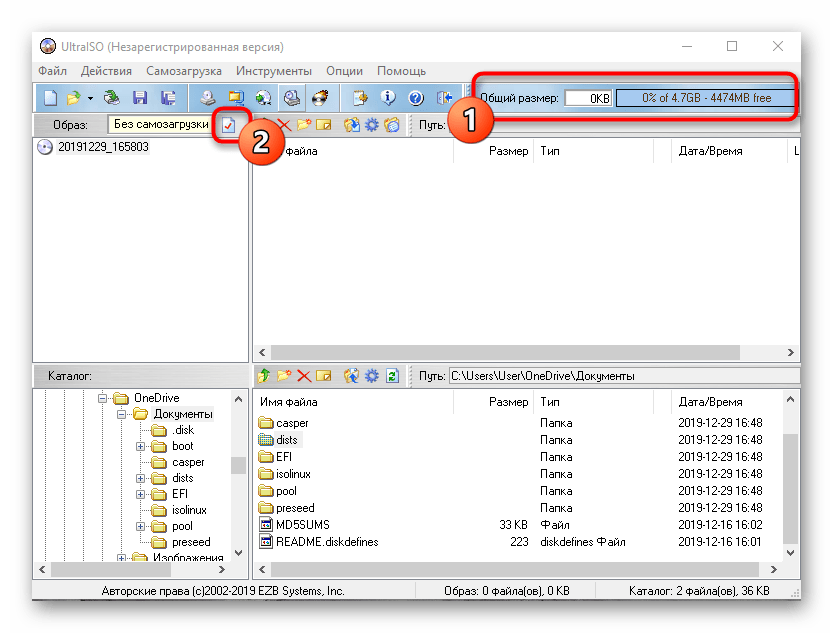
Если вы получили уведомление о том, что размер образа превышает допустимые границы, значит, в качестве виртуального диска выбрана модель с маленьким объемом пространства, что видно вверху возле надписи «Общий размер». Изменяется эта характеристика в свойствах диска.
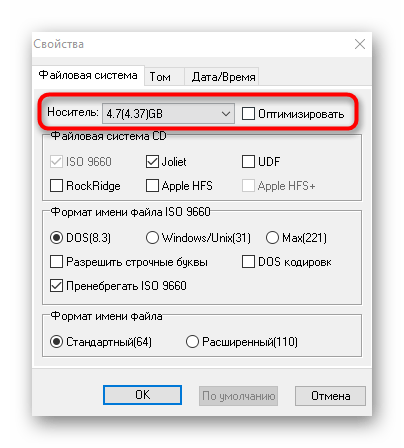
В открывшемся окне разверните список «Носитель» и выберите подходящий пункт.
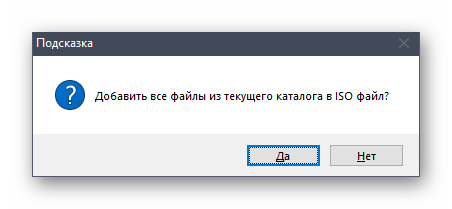
Дополнительно отметим, что вы можете добавлять сразу все файлы из каталога, нажав на кнопку «Извлечь».

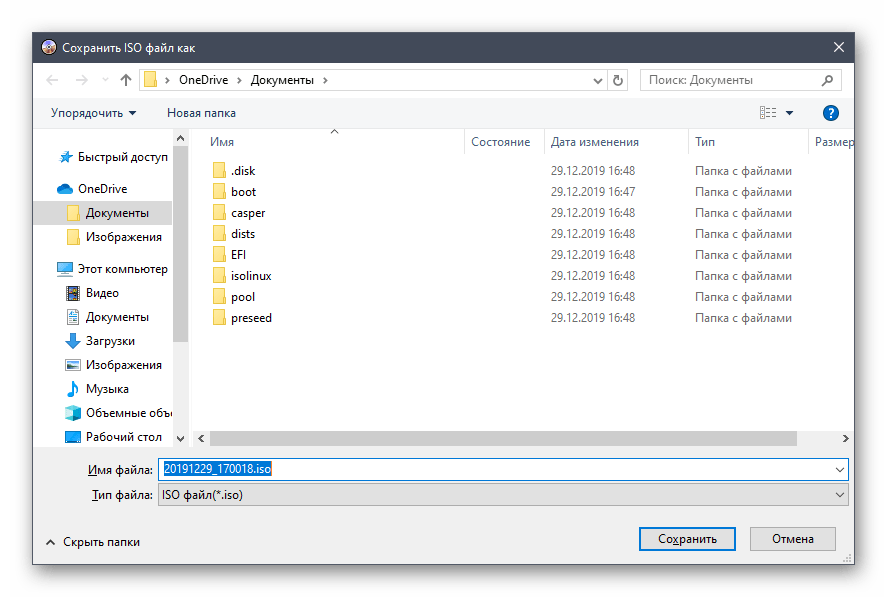
После этого можно щелкнуть на кнопку «Сохранить».
Повторно задайте расположение образа и его название, поскольку предыдущие настройки были сбиты, если сохранение произвести не удалось.
Как видим, в управлении UltraISO нет ничего сложного. Сразу же после сохранения перейдите в указанную папку, чтобы проверить образ диска, например, подключив его к виртуальному приводу через стандартное средство ОС или ту же используемую ранее программу.
Способ 2: PowerISO
PowerISO — еще одно популярное ПО, которое имеет пробную версию, позволяющую создавать образы дисков без каких-либо ограничений. Именно ей мы и предлагаем воспользоваться, если предыдущее решение вам по каким-либо причинам не подошло.
- После успешной инсталляции и запуска PowerISO в главном меню на верхней панели отыщите кнопку «Добавить».

Через нее открывается встроенный обозреватель. Отыщите там необходимые файлы и директории, выделите их, а затем кликните на «Добавить».
Изначально образ может хранить в себе только 700 МБ информации, поскольку выбран тип CD. Измените эту характеристику из всплывающего списка, который открывается нажатием по кнопке в правом нижнем углу программы.

После успешного добавления всех объектов в образ остается только сохранить его, щелкнув левой кнопкой мыши по соответствующей кнопке на верхней панели.

В появившемся окне выберите место расположения образа, его формат и название.
Дождитесь завершения операции. Она может занять определенное время, что зависит от размера итогового ISO.
В PowerISO присутствует русский язык интерфейса, а принцип управления будет максимально понятен даже начинающим пользователям, поэтому никаких трудностей с созданием образа здесь возникнуть не должно.
Способ 3: CDBurnerXP
CDBurnerXP — последний инструмент нашего сегодняшнего материала, распространяющийся бесплатно. Мы рекомендуем ознакомиться с ним тем юзерам, кто не желает загружать пробные версии перечисленных выше решений. Принцип создания образа в Windows 10 через CDBurnerXP выглядит так:
- В приветственном окне следует выбрать первый пункт «Диск с данными».

Затем используйте встроенный обозреватель, чтобы перетащить файлы в соответствующую область.
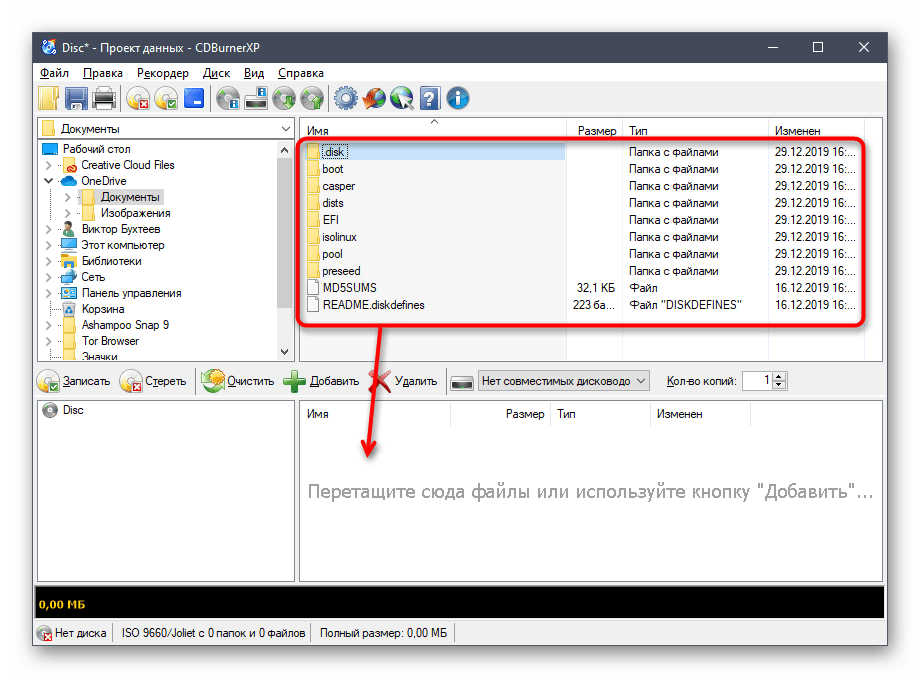
Это же можно сделать через стандартный «Проводник», кликнув на «Добавить».

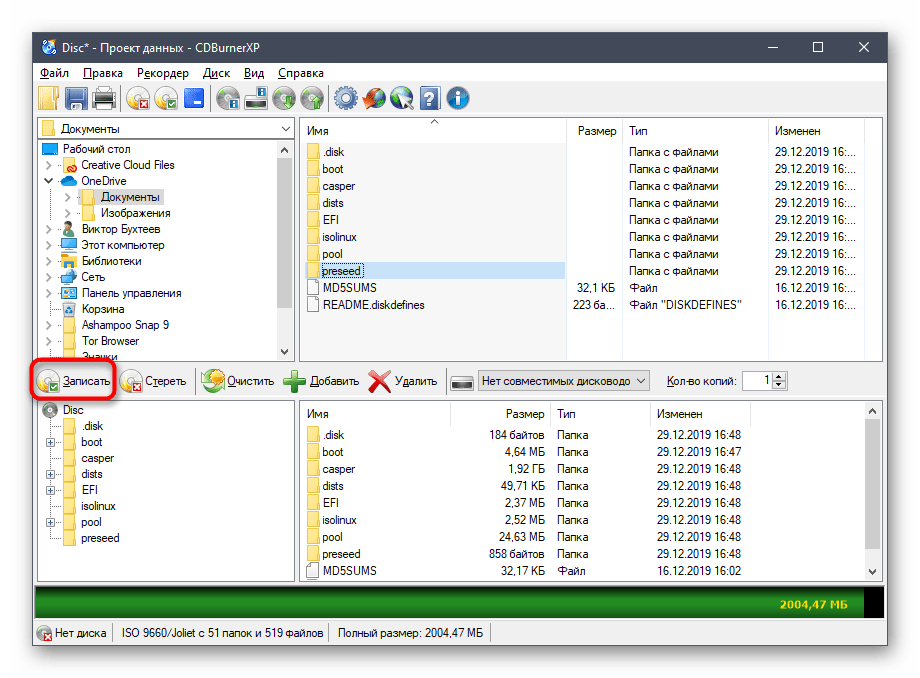
Если хотите сохранить образ сразу на подключенный диск, нажмите на «Записать» и дождитесь окончания процедуры.
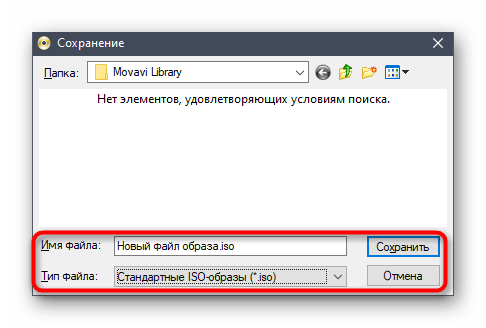
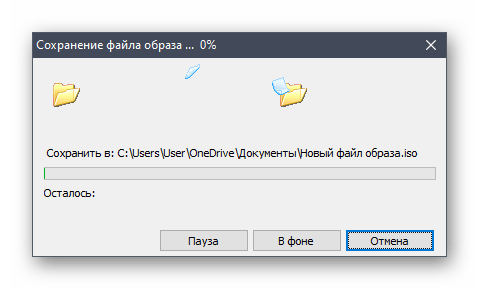
Для сохранения образа ISO в разделе «Файл» нажмите на «Сохранить проект как ISO-образ».
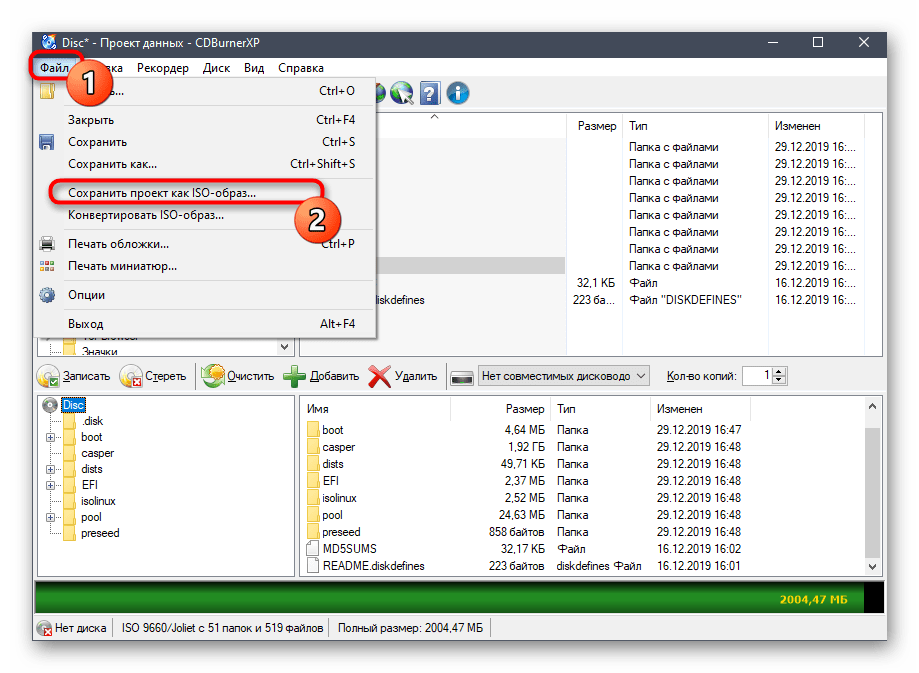
Через «Проводник» задайте название файлу и выберите место для его расположения.

В завершение сегодняшней статьи хотим отметить, что для Windows 10 существует еще множество программ, предназначенных для создания образов дисков из имеющихся файлов. Если ни один из приведенных выше вариантов вам не подошел, обратите внимание на статью по ссылке ниже. Там вы найдете детальные обзоры на всех популярных представителей подобного софта и точно подберете оптимальное для себя решение.
Create an ISO File from a Folder in Windows
A great tool for distribution or backups
If you don’t already know, an ISO file is a container that can hold a number of files in it. It’s usually used to create backups of your CD and DVD discs. However, you can create an ISO from the folders on your Windows PC as well. There are actually multiple apps that help you do it on your machine.
There are many reasons why you may want to create an ISO on your Windows 10 PC. Maybe you want to keep all of your folders in a single place. Or maybe you want to keep some of your folders handy ready to burn to your discs.
Regardless of the reasoning, it’s pretty easy to create an ISO from folders on a Windows computer. Also, check out the video from our sister site where we walk you through the steps in a short video.
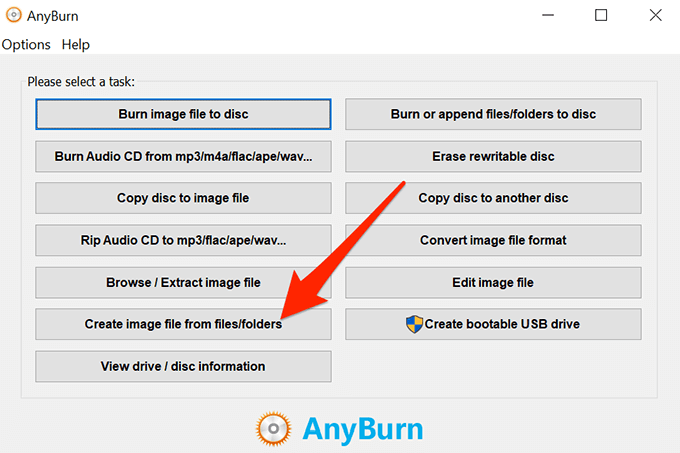
Use AnyBurn To Create ISO From The Folders On Your PC
One of the free apps you can use to create an ISO from your folders is AnyBurn. It’s actually an app that helps you burn your data to your discs but you can use it to create ISO files as well. It has an option on the main interface that helps add your chosen folders to an ISO which you can then save anywhere on your computer.
- Download, install, and launch AnyBurn on your computer.
- You’ll find several options regarding creating ISOs on the main interface. Find the one that says Create image file from files/folders and click on it.
- The following screen will let you choose the folders that you want to add to your ISO. Click on the Add button at the top to add your folders.

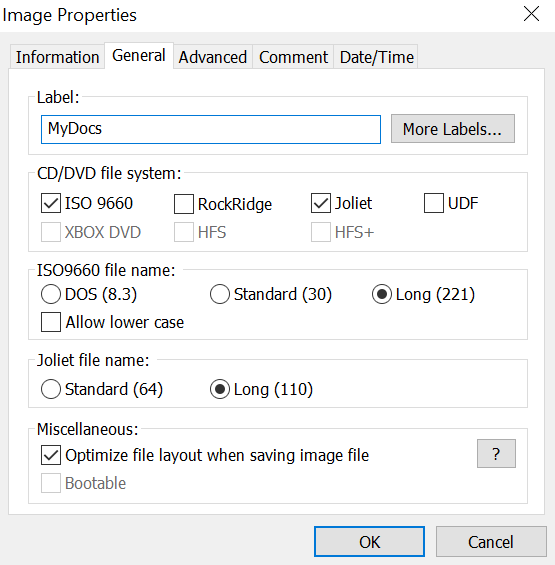
- If you want to specify any custom settings for your file, click on the Properties button at the top. It’ll then let you modify options like the file system for your ISO, file naming standard, compression level, and so on. Click on OK when you’ve configured them.
- Click on the Next button to go to the next screen of the ISO creation process.
- On the following screen, click on the folder icon to choose the folder where you want to save your ISO. You can also enter a name for your file on the same screen.
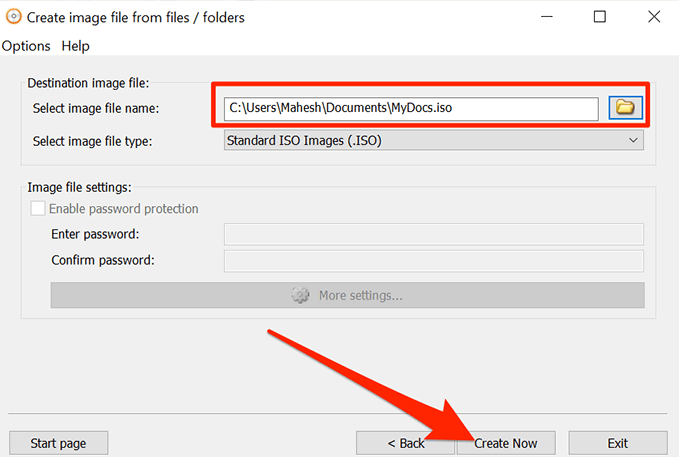
- Finally, click on Create Now to start creating an ISO out of your chosen folders.
Create An ISO In Windows 10 Using WinCDEmu
WinCDEmu is an open-source tool that lets you create virtual drives out of various image file formats on your computer. If you have downloaded an ISO file and you want to view its contents, this app can help you mount that as a drive on your machine.
You can use the app to create ISO files from folders in Windows as well, and it actually provides you with the easiest way to make an ISO from your folders. All you basically need to do is install the app and it’ll add an option to your context menu. You can then use that option to generate an ISO from your folders.
- Download and install the WinCDEmu app on your PC.
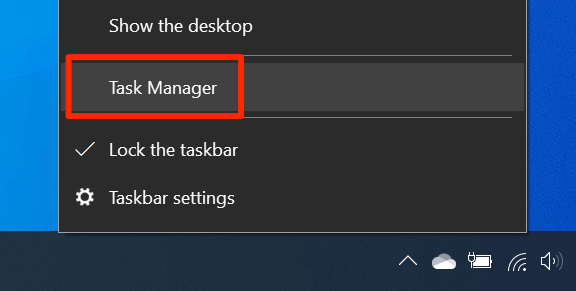
- Right-click on your taskbar and select Task Manager.
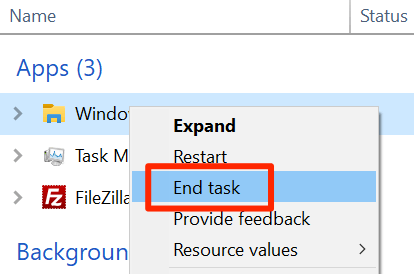
- Right-click on the process that says Windows Explorer and select End task. You need to close the Explorer before you can see the newly added item in the context menu.
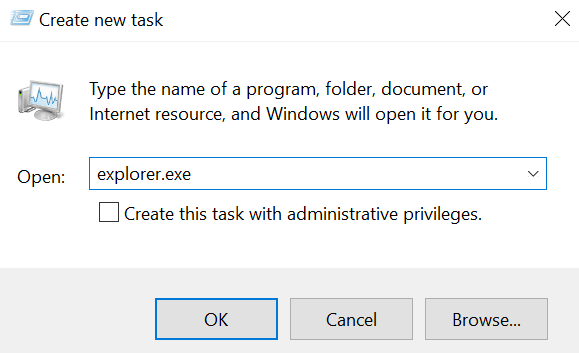
- Click on the File menu in Task Manager and select Run new task.
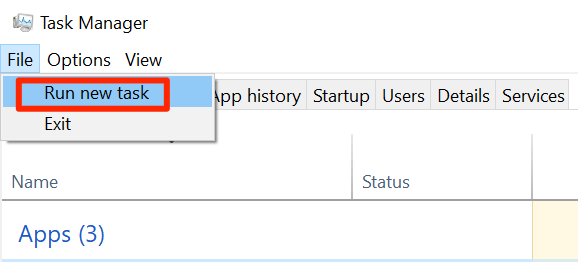
- Type in explorer.exe and hit Enter. It’ll relaunch the Windows File Explorer.
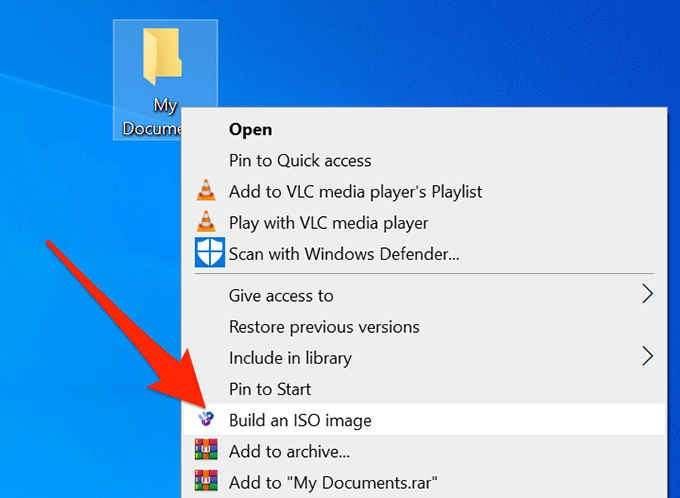
- Find the folder that you want to create an ISO for, right-click on it, and select Build an ISO image.
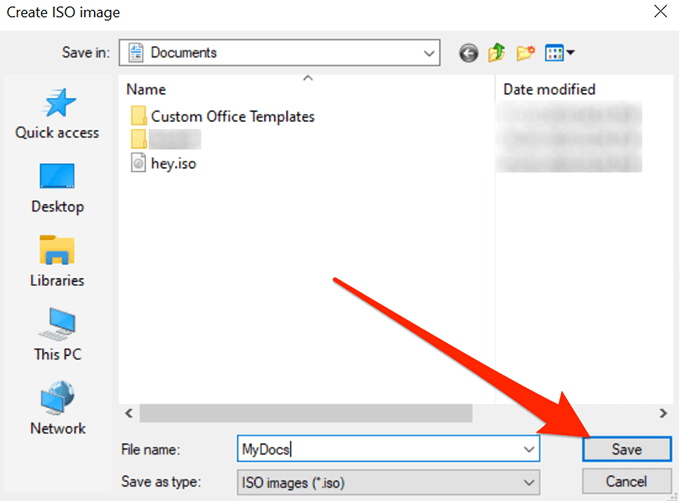
- It’ll ask you to enter a name for your ISO and the location where you want to save it. Enter these details and click on Save.
- It’ll quickly create the ISO for you and let you know when it’s fully built.
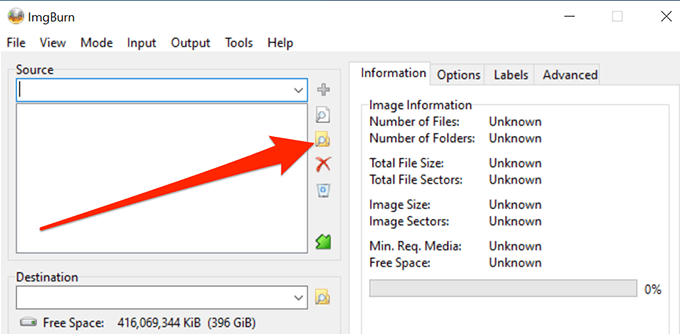
Use ImgBurn To Create ISO Files From Folders On Windows
ImgBurn has been a popular app to create and burn image files for a long time. If you’ve ever created a backup of your discs or you’ve burned a disc, you’ll likely recognize the app.
The app can be used to create ISO files from your folders as well.
- Download, install, and open the ImgBurn app on your computer.
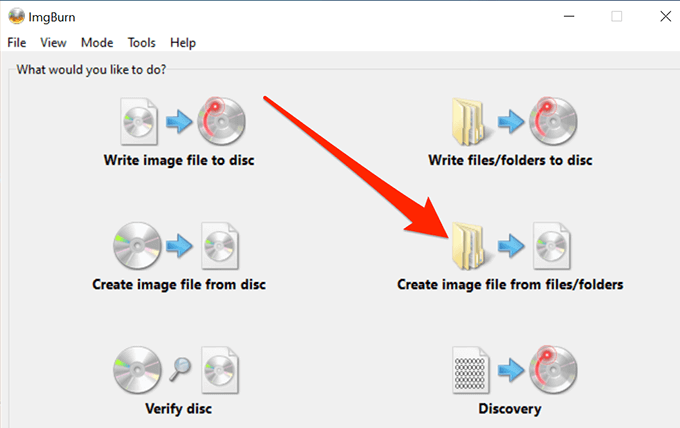
- On the main interface, find and click on the option that says Create image file from files/folders.
- You’ll see a screen that lets you add the folders you want to include in your ISO. Click on the little folder icon and add the folders for your ISO file.
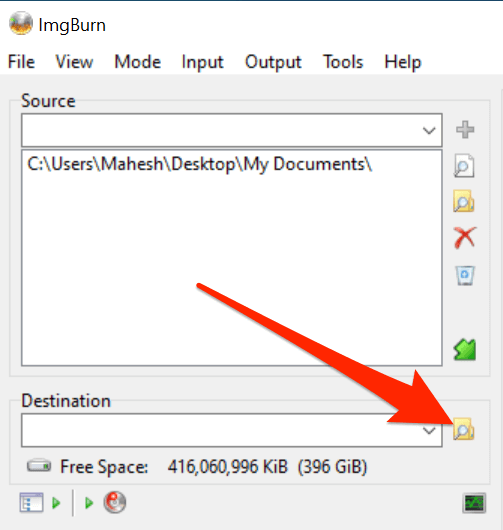
- Click on the tiny folder icon next to where it says Destination and select a name and target folder for your ISO file.
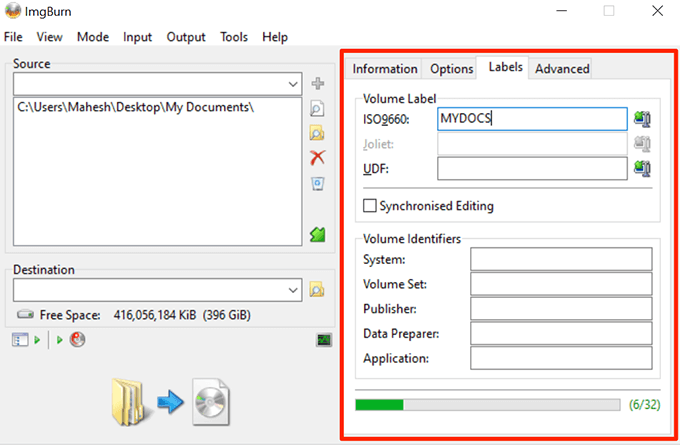
- On the right-hand side pane, you’ll find various options to configure for your ISO. With these options, you can change your image type, enter a label for your image, specify restrictions, and do a few other things.
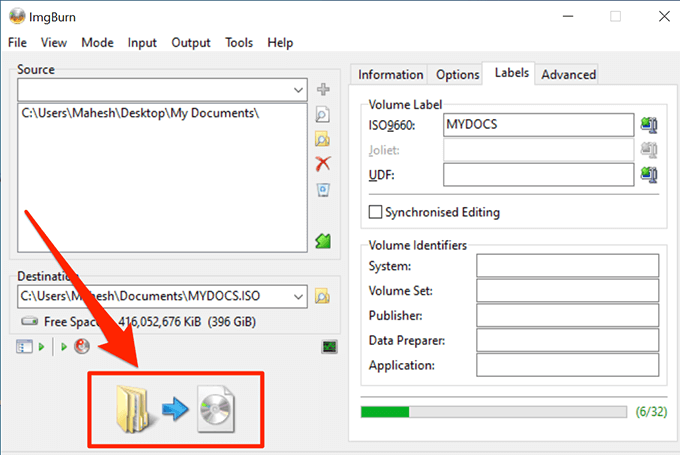
- Finally, click on the large Build button on your screen to start building an ISO file out of your selected folders.
Use a Portable Tool To Create An ISO From Folders
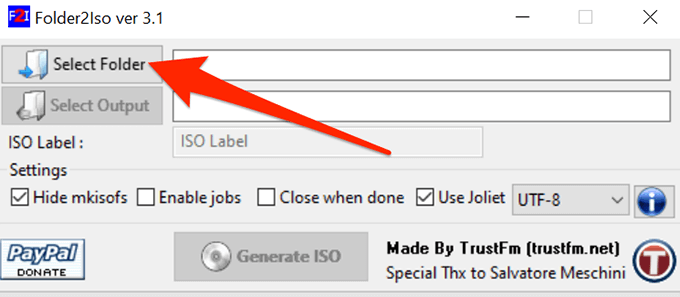
If it’s just a single ISO that you’ll be making and you don’t think you’ll be doing it again anytime soon, you might prefer something that doesn’t require an installation. Folder2Iso can actually help you out as it’s a free and portable tool that helps quickly create ISOs without any hassle.
It works on many versions of Windows including Windows 7, 8, 10, and Linux.
- Download the Folder2Iso app and double-click on it to extract the actual app contents.
- Run the executable file that you extracted from the archive.
- You’ll see a simple interface with only a few options on it. Click on the Select Folder option and select the folder you want to add to your ISO.
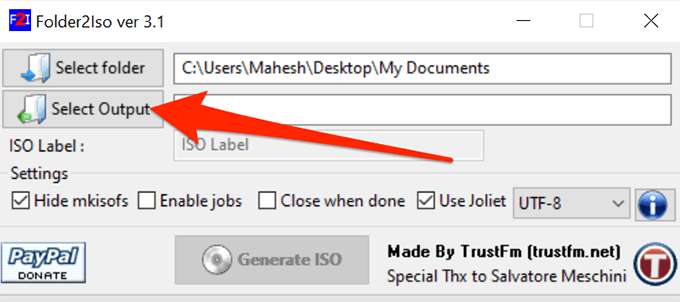
- Click on the Select Output button and choose the folder where you’d like to save your ISO file. Remember you can’t choose the folder that you’ve chosen to include in your ISO.
- You can then specify the extra options available on your screen, if you want.
- Click on the Generate ISO button to make an ISO out of your chosen folders.

- The progress bar will go all green when the ISO has been generated.
It’s a good idea to create an ISO from your folders in Windows so you can mount them all as a single drive on your PC. If you have done it on your computer already, let us know what app you chose to do it and why. We await your response in the comments below!
Mahesh has been obsessed with technology since he got his first gadget a decade or so ago. Over the last few years, he’s written a number of tech articles on various online publications including but not limited to MakeTechEasier and Android AppStorm. Read Mahesh’s Full Bio


