- How to create linux server
- SCP: Secret Laboratory
- How to Create a Linux VPS Server on ScalaHosting
- Run an Email Server on ScalaHosting VPS
- How To Create a Linux VPS Server on ScalaHosting
- SSH Port
- Creating a sudo User
- Debian/Ubuntu
- CentOS
- How to Set Up a Mail Server
- Tips for Staying Out of the Spam Folder
- Web-based VNC Console
- Wrapping Up
- Creating Your Own Webserver and Hosting A Website from Your Linux Box
- Requirements:
- Install WordPress on Linux
- Install Drupal on Linux
- Install Joomla on Linux
- Setting Up Own Webserver and Hosting A Website in Linux
- What is Apache?
- What is MySQL?
- What is PHP?
- What is Kompozer?
- What is IP?
- How to Setup Virtual Server
- If You Appreciate What We Do Here On TecMint, You Should Consider:
How to create linux server


SCP: Secret Laboratory


| 566 | уникальных посетителей |
| 5 | добавили в избранное |

Everyone knows that we don’t all use Windows, or own a dedicated Windows Server, but some or may be many of us have that one Linux server that we just have to host things on.
As of Jan 24, the developers of SCP: Secret Laboratory have given us the ability to run the game on Linux, also allowing for servers to be ran on it as well, and this is great news.
As of now this is still in beta, and there are still going to be problems that come with it. Maybe your server will crash, or it just doesn’t work right, but from my own experience it seems that it works great for running a server, if you are planing to run it without getting verified as it is very weird how all of this works.
So without further a do, lets get going on getting this up and running!
So now lets get started on actually getting places in life and install some important stuff
What we first need to do is go-to the Mono Project website [www.mono-project.com] and follow that guide there for the Linux distro that you are using.
Since I am using Ubuntu server on my own home server, I will be following the Ubuntu guide, but it is pretty much the same idea for Debian.
Now follow the first part of the guide of adding «the mono repository to your system», but after that we won’t be using sudo apt-get install mono-dlevel, but instead we are going to be installing a different type of mono package that contains all the things needed to allow the server to boot without any errors.
The command we should use is sudo apt-get install mono-complete
Follow everything through the install process and you will now have Mono installed!
SteamCMD is just steam but as a command-line, and very handy for creating servers for many games without the need of installing all of steam itself. We are doing this because of how you can choose where to install the server with ease and have no problems.
To install SteamCMD, just run the command sudo apt-get install steamcmd
This is a very basic process that only takes some commands to get everything ready and installed.
This part is simple, first we need to use the login command. This command works by just typing login and then your login username that you normally use for logging into steam itself.
We need to login to steam because it is required to have an account to download and install the game, for some reason.
Now lets set the install path. This should be simple by just creating a folder where you want to download the game to, and doing the force_install_dir command. Make sure that your path is exact, there is no shortcuts you are going to have to type it all out by hand, so make it easy on yourself.
Note: Make sure not to use spaces in the folder name or in the path at all, else you will need to surround the path you put in quotation marks.
This is basically one simple command that will download the game to the folder for you.
Here is the very basic command: app_update 700330 -beta Linux
after that it will download and once it completes just do quit
This is the part you all have been waiting for, the starting of your new Linux server. This part is important for also creating the config file for the server itself.
First, make sure you have a terminal open and cd into the folder you installed SCP:SL into. Next we need to run the command mono LocalAdmin.exe
If you would want to run the server 24/7 with even your terminal closed, you will just need to run the command screen mono LocalAdmin.exe and after that just close the terminal. If it asked you to install screen, do it.
The server will launch, and will output all its info, and some stuff mono outputs too. It will say steam is not detected, that is because we didn’t launch it from steam, so that won’t work. You will know the server is ready once it says «waiting for players».
Note: To close the server, just spam CTRL + C because it is weird how it needs to close. Also don’t mind the constant spam about audio, it is from mono so it means nothing unless it shows very important errors that may cause server crashes.
After you started the server and it managed to launch without any problems, all you really have to do now is go-to the path of /home/
There you will see one file and one folder. The folder is where bans are stored and the file is config.txt
If you want to change any server settings edit the config.txt to your hearts content
Anyway you are now finished! Congrats on getting a dedicated Linux server.
Источник
How to Create a Linux VPS Server on ScalaHosting
ScalaHosting is my recommended VPS (Virtual Private Server) provider for running email servers. This article is going to explain how to create a Linux VPS on ScalaHosting.
Run an Email Server on ScalaHosting VPS
There’re hosted email solutions like Google Workspace and Microsoft Exchange Online, but they become very expensive when you have many users. If you run a self-hosted email server on a VPS, you can add unlimited users, unlimited domains, and send unlimited email messages for a very low price ($20
It’s not an easy task to find a VPS provider suitable for email hosting. Many hosting companies like DigitalOcean blocks port 25. DigitalOcean would not unblock port 25, so you will need to set up SMTP relay to bypass blocking, which can cost you additional money. If you use Vultr VPS, then port 25 is blocked by default. They can unblock it if you open a support ticket, but they may block it again at any time if they decide your email sending activity is not allowed. Vultr actually may re-block it if you use their servers to send newsletters.
Another problem is that big well-known hosting providers like DigitalOcean or Vultr are abused by spammers. Often the server IP address is on several blacklists. Vultr has some entire IP ranges blacklisted.
ScalaHosting is a very good option to run a mail server because
- They don’t block port 25.
- The IP address isn’t on any email blacklist. (At least this is true in my case. I chose the Dallas data center.) You definitely don’t want to be listed on the dreaded Microsoft Outlook IP blacklist or the spamrats blacklist. Some blacklists block an entire IP range and you have no way to delist your IP address from this kind of blacklists.
- You can edit PTR record to improve email deliverability.
- They allow you to send newsletters to your email subscribers with no hourly limits or daily limit, whatsoever. Note that you are not allowed to send spam, also known as unsolicited bulk email. If the recipient doesn’t explicitly give you permission to send emails, and you send emails to them, that’s unsolicited email.
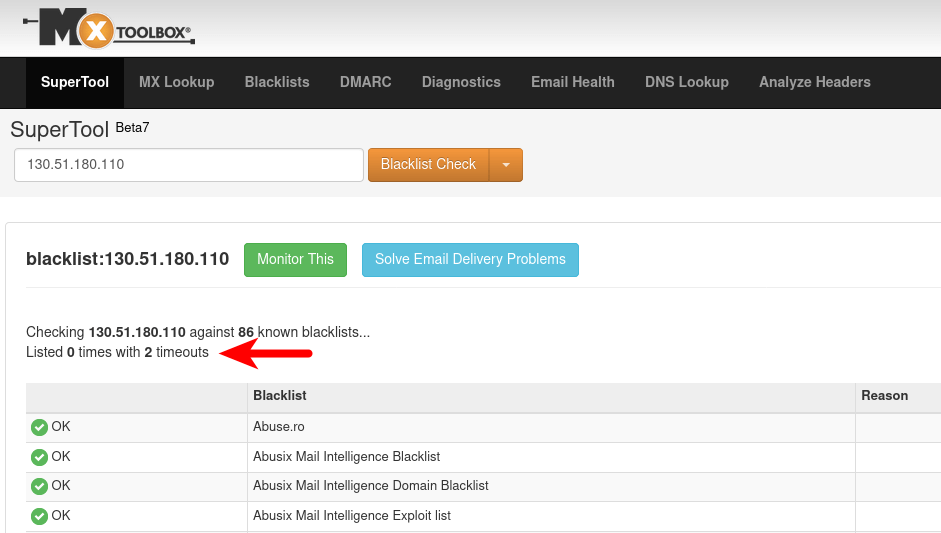
As you can see from the screenshot below, The IP address (130.51.180.110) of my mail server (mail.linuxbabe.com) isn’t on any blacklist.
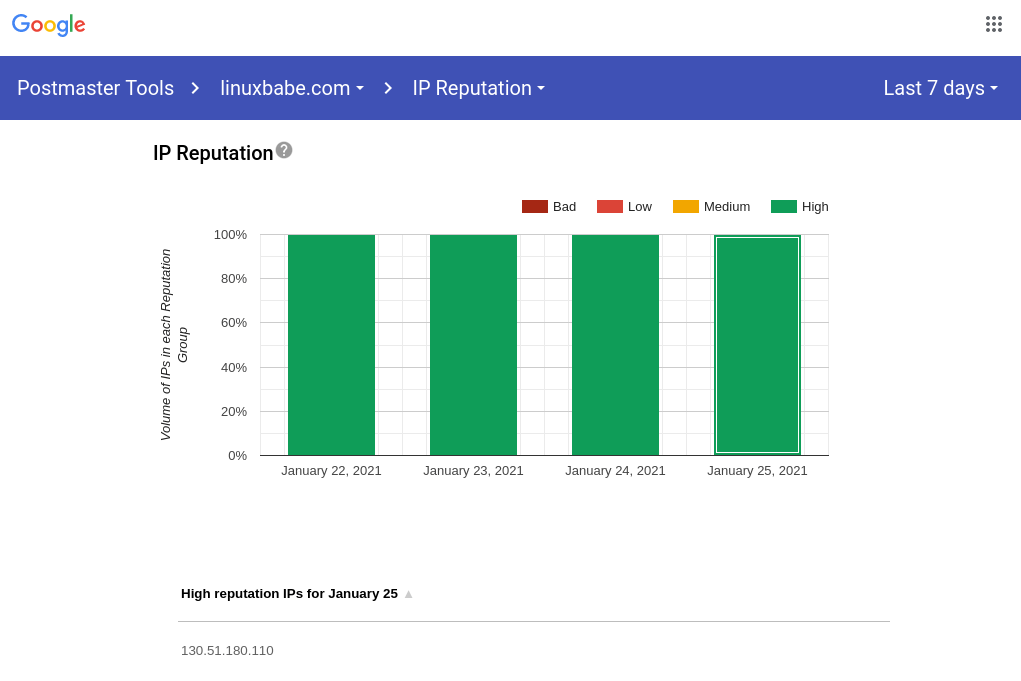
And Gmail thinks my IP reputation is high.
How To Create a Linux VPS Server on ScalaHosting
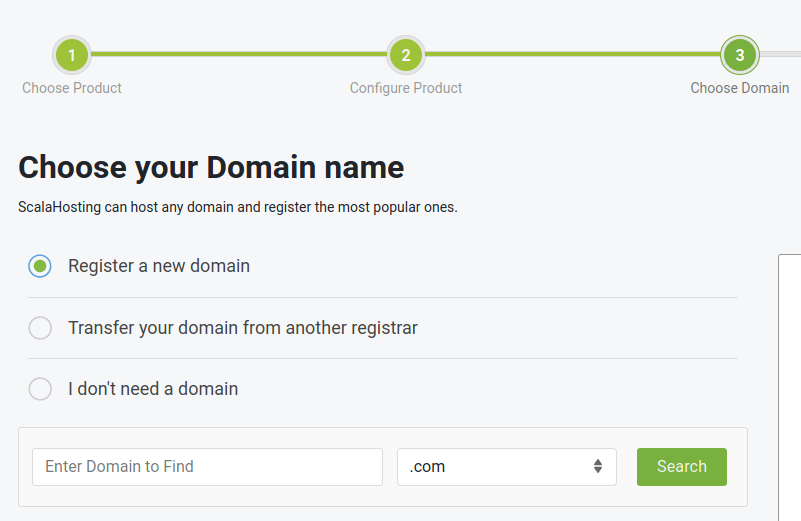
Go to ScalaHosting website and click the Get started button.
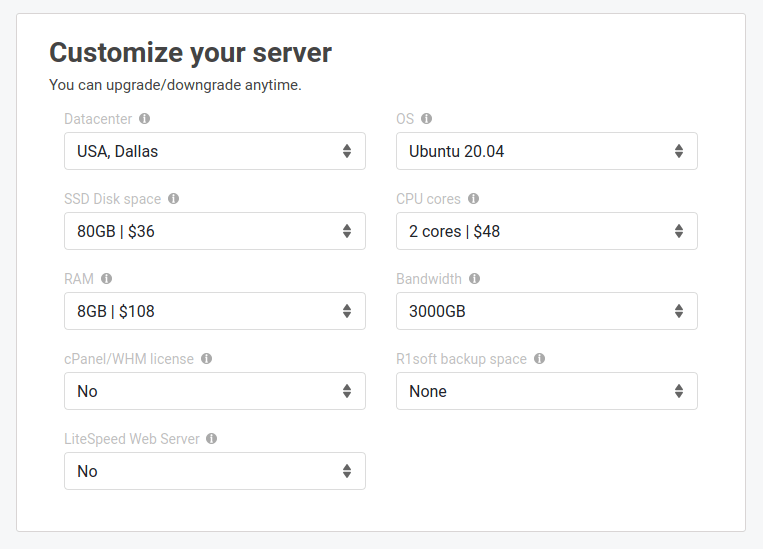
It will take you to the order page, where you can customize your server such as selecting the data center location, choosing an operating system (Debian, Ubuntu, CentOS, OpenSUSE), etc.
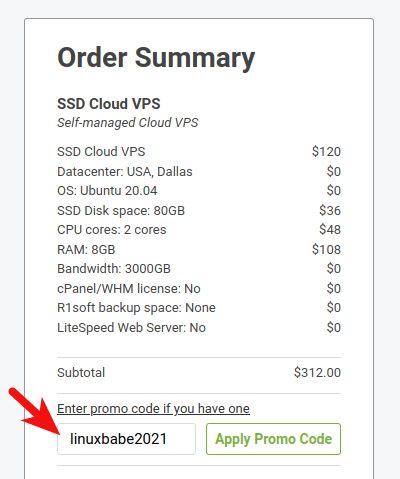
Hint: Use coupon code linuxbabe2021 on ScalaHosting payment page to save $100 if you choose to pay 12 months upfront.
8GB RAM gives you great performance because the mail services won’t be killed because of out-of-memory problem. I recommend choosing the Dallas data center.
Then click the continue button. In the next step, you can choose to register a domain name if you don’t have one. (Note: I highly recommend purchasing domain name from NameCheap, because their price is low and they offer whois privacy protection free for life. You can learn how to create DNS records at NameCheap. If you choose to buy domain name from NameCheap, then select I don’t need a domain in this step.).
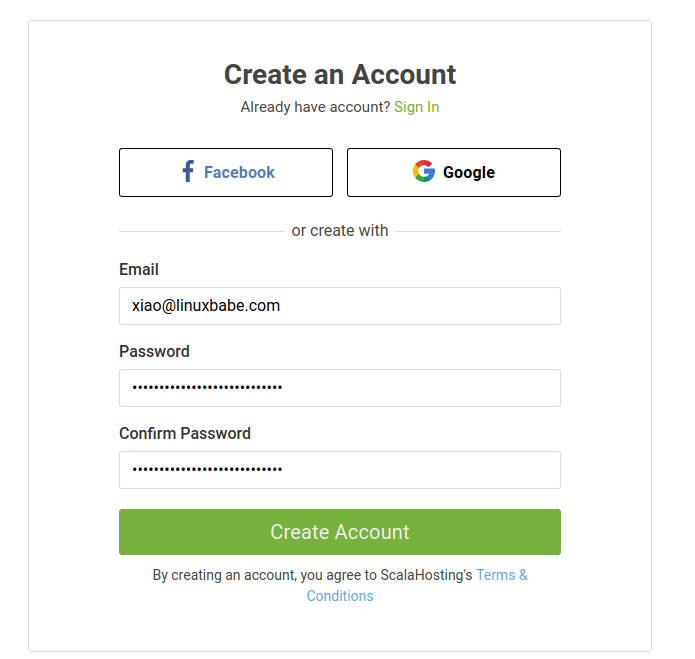
Next, enter your email address and a password to create an account at ScalaHosting.
After that, enter some additional information and choose your payment method. Then click the Proceed to payment button and complete the payment. Hint: Use coupon code linuxbabe2021 to save $100 if you choose to pay 12 months upfront.
Once that’s done, you will receive an email that contains the details of your VPS. Please keep this email, because if you ever need to reinstall the server OS, the root password will be the same.
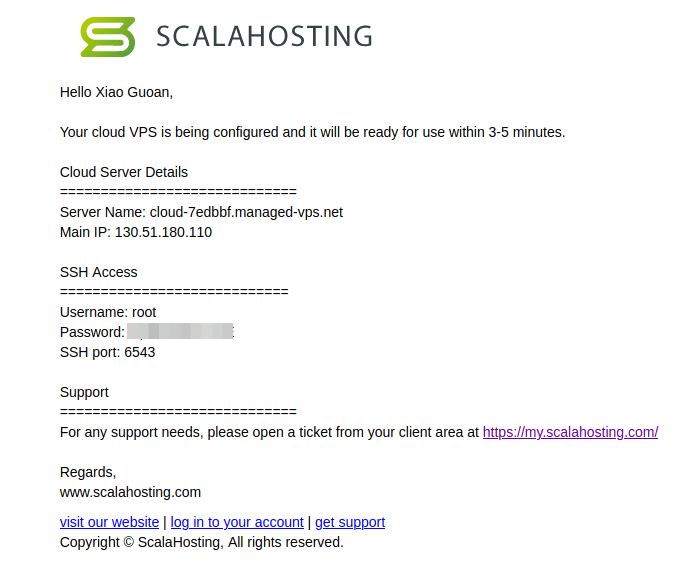
If you are using Linux on your desktop computer, you can open a terminal window and run the following command to log into your server. Replace 12.34.56.78 with your server’s IP address. You may also need to adjust the port number.
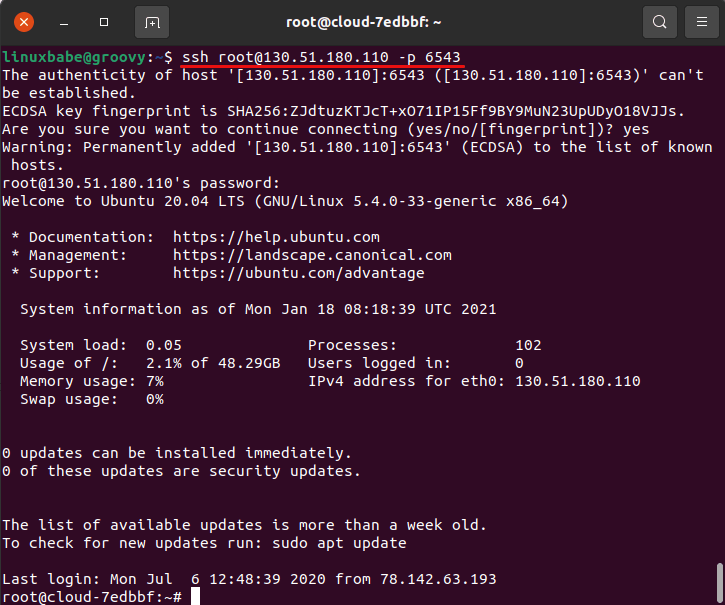
Congrats! Now you can start your Linux server project. If you are using Windows, please read the following article on how to use SSH client.
SSH Port
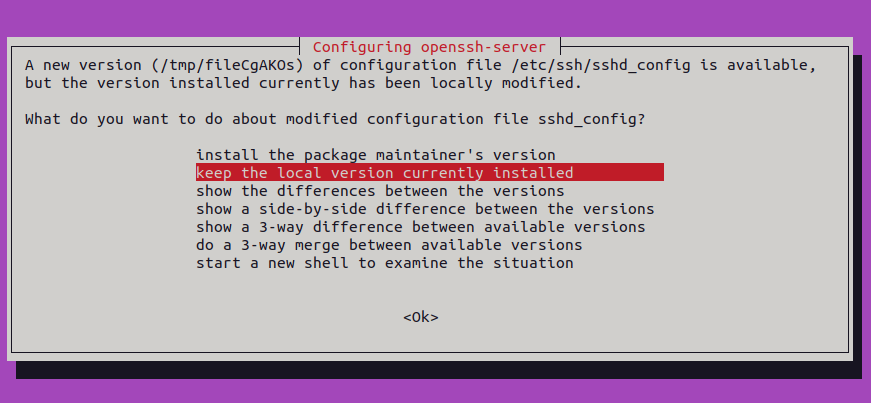
By default, the SSH service on ScalaHosting servers listens on port 6543. Now upgrade existing server software with the following command.
During the upgrade process, it may ask you the following question. If you want to keep using port 6543 for SSH, then select keep the local version currently installed . If you want to use port 22 for SSH, then select install the package maintainer’s version .
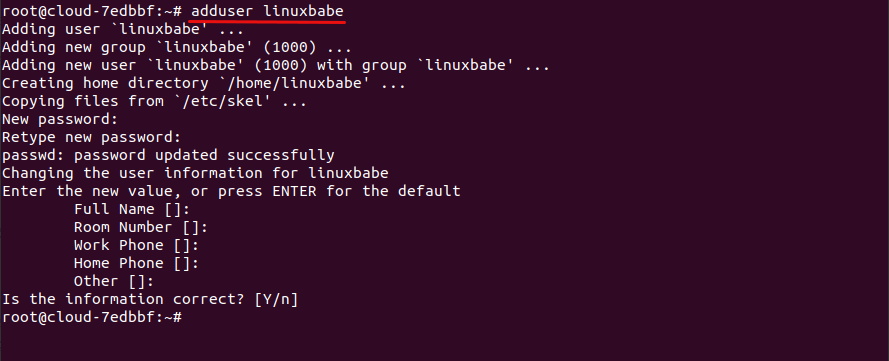
Creating a sudo User
After the upgrade is finished, I strongly recommend creating a sudo user for managing your server rather than using the default root user. Not only it increases your server’s security, but also allows you to log in as the new user if you can’t log in as the root user.
Debian/Ubuntu
If you installed Debian or Ubuntu on your server, run the following command to create a user.
Then add the user to the sudo group.
Now you can exit from the root user.
And login as the new user.
CentOS
If you installed CentOS on your server, run the following command to create a user. Replace username with your preferred username.
Set a password for this user.
Add this user to the wheel group in order to use sudo .
Make sure you have the sudo utility installed.
Now you can exit from the root user.
And login as the new user.
How to Set Up a Mail Server
You can easily set up a mail server with iRedMail.
Tips for Staying Out of the Spam Folder
I highly recommend following email sending best practices, so your emails can land into the inbox and stay out of the spam folder.
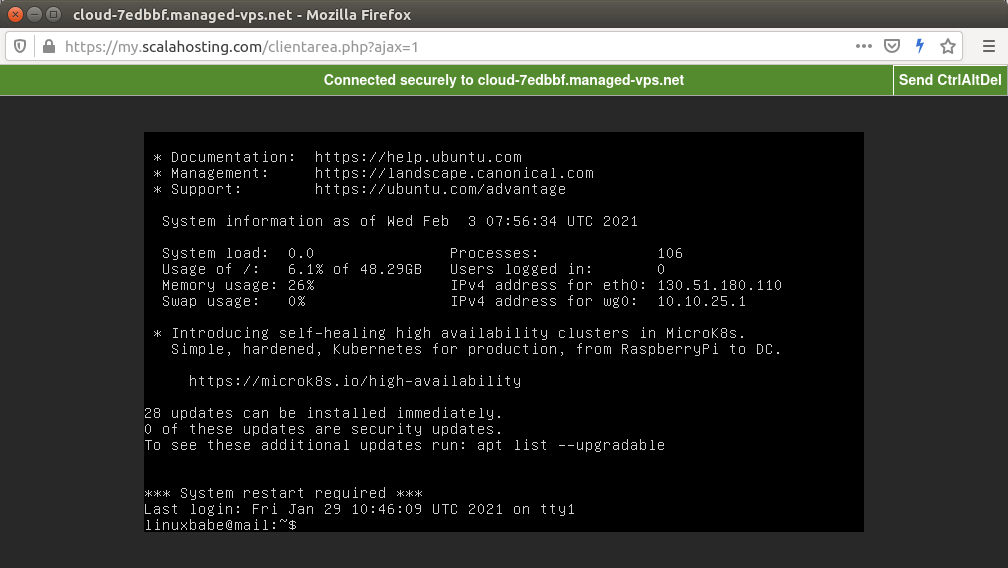
Web-based VNC Console
ScalaHosting provides a web-based VNC console in the account control panel. This VNC connection is not affected by SSH. If you accidentally lock yourself out of the SSH service, you can always use the VNC console to fix the errors in the SSH service. Note that after you create a fresh VPS on ScalaHosting, you may need to wait a few hours to use the VNC console.
Wrapping Up
I hope this article helped you create a Linux VPS on ScalaHosting. As always, if you found this post useful, then subscribe to our free newsletter to get more tips and tricks. Take care 🙂
Источник
Creating Your Own Webserver and Hosting A Website from Your Linux Box
Many of you would be a web programmer. Some of you might be owing to a website and would certainly be editing and updating it frequently. While a few having no adequate knowledge of web technologies would still be planning to have one.
Through this article, I will make know how you could develop a working website with very little knowledge and could even host it using your Linux box. Things could be as simple as that.
Requirements:
Linux Box (However, You can use Windows but things surely won’t be as much simple and perfect as it will be on Linux Machine, Debian has been used here for example citing). If you don’t have an operating system installed, or you don’t know how to install a Linux operating system, then here are few guides that show you how to install a Linux operating system.
Apache, PHP, and MySQL (having a prompt knowledge of any other SQL, you can use it but examples in the article will be using MySQL.
Content Management Framework – Drupal with KompoZer, or you can use WordPress or Joomla.(But here I used Drupal as my Content Management System (CMS)).
Install WordPress on Linux
Install Drupal on Linux
Install Joomla on Linux
Setting Up Own Webserver and Hosting A Website in Linux
An Internet Connection with Static IP (Preferred) connected through a modem having a virtual hosting facility (In Reality it is not as much complex as it sounds here).
What is Apache?
Apache is a web server program. It comes installed and configured on most of the Systems. Check if it is installed on your system or not.
Sample Output
Sample Output
From the above output, it is clear that Apache is installed on the box, if it is not in your case you can ‘apt‘ or ‘yum‘ the required package. Once the Apache is installed start it as.
Note: You might have to type ‘httpd‘ and not ‘apache‘ on some server Viz., RHEL. Once the ‘apache2‘ or ‘http‘ aka ‘httpd‘ server is started you could check it in your browser by going to any of the following links.
This link will open into a hosted page which means Apache has been successfully installed and started.
What is MySQL?
MySQL is a database server program. It comes packed with a number of distros. Check if it installed on your system or not and where it is installed.
Sample Output
From the above output, it is clear that MySQL is installed along with the location of binary files. If in case it’s not installed, do ‘apt‘ or ‘yum‘ to install it and start it.
Note: You might have to type “mysqld” in place of mysql, obviously without quotes, in some distro viz., RHEL. Check the status of MySQL, run.
Sample Output
The above output shows that MySQL is running for 11 min 58 sec.
What is PHP?
PHP is the server-side scripting language designed for web development and is commonly used as a general-purpose programming language. You have to just deploy the php script after installing php. As I said above use ‘apt‘ or ‘yum‘ to install the required package for your box.
If you successfully installed the php in your system, you could check if it is working correctly or not by creating a file “info.php” in your ‘/var/www/html‘ or ‘/var/www‘ directory (which is your Apache directory) with the content given below.
Now navigate to your browser and type any of the following link.
![]() Check PHP Info in Debian 10
Check PHP Info in Debian 10
Which means php is installed and working correctly. Now you can build your website in your Apache directory, however, it is not always a good idea to reinvent a wheel again and again.
For this, there exists the Content Management Framework (CMF), viz., Drupal, Joomla, WordPress. You could download the latest framework from the link provided below and can use any of these frameworks, however, we will be using Drupal in our examples.
Download Drupal from the above link which would be a tar archive. Move the tar archive to your Apache directory ‘/var/www/html‘ or ‘/var/www‘. Extract it to the root of the apache directory. Where ‘x.xx‘ would be version number.
If everything goes OK, again open your browser and navigate to the below links and you will be greeted with.
![]() Drupal Installation
Drupal Installation
Choose Your language settings.
![]() Language Selection
Language Selection
Checking for requirements and file permission. Provide proper permission to the required files and folders. You may need to create certain files manually, which is not a big deal.
![]() File Permission Checking
File Permission Checking
Setup Database, the backend process.
![]() Database Configuration
Database Configuration
If the Database setting goes perfect profiles are installed automatically.
![]() Database Installation
Database Installation ![]() Installing Drupal
Installing Drupal
Configuring means setting ‘Site Name‘, ‘Email‘, ‘User Name‘, ‘Password‘, ‘Time Zone‘, etc.
![]() Enter User Details
Enter User Details
And if everything goes smoothly, you will get a screen something like this.
![]() Installation Completed
Installation Completed
Open Your page by referring to the address http://127.0.0.1.
![]() Welcome to Drupal
Welcome to Drupal
What is Kompozer?
Kompozer is a tool that lets you work in GUI for designing a website in html and you can insert a php script anywhere you want. Kompozer made it too easy to create a web page.
well you don’t need to install it on most of the Linux system. Just download, extract, and run Kompozer.
![]() Kompozer
Kompozer
If are creative, kompozer is right there for you.
What is IP?
A Few Words about Internet Protocol (IP) Addresses.
It is generally called loopback IP address or localhost, and it always points to the machine on which it is browsed. All the machines on a network referring to the above address will loop back to its own machine.
Ipconfig/ifconfig: Run this in your terminal to know your machine local address.
Sample Output
Search for the inet addr:192.168.1.2 here 192.168.1.2 is my local IP. Any computer on your LAN including you could refer to your hosted web page using this address.
However a computer outside of your LAN won’t be able to access your web page using this IP address. You will have to ask your Internet service provider to provide you with a static IP (That doesn’t change with time). Once you got your static IP address, the easiest way to find your IP is to type “My IP is” at google and note-down the result.
You won’t be able to access this IP from your own machine nor any other machine on your LAN. However, you can use a proxy server (www.kproxy.com) to access your hosted page using your static IP. But before that, you need to set up a virtual server and your service provider will surely be helpful in this regard.
How to Setup Virtual Server
Hmmm! That’s not difficult at all. First, you need to know the port apache is using, which in most of the case is 80.
the output would be something like:
Now go to your router which generally is http://192.168.1.1 and the user name/password would be admin-admin, however, it could be different in your case based on service provider and area.
Next, go to the Virtual server tab. Fill the port number, service name, and local IP address, inform, and save. Ask for assistance from your ISP.
![]() Setup Virtual Server
Setup Virtual Server
Remember You will only be able to access this webserver from your machine, any other machine on your LAN, or a computer on the Internet when your machine is UP and running MySQL and Apache simultaneously.
With great power, comes a big responsibility. And now it’s your responsibility to safeguard your machine. Never give your IP address to any unknown person till you know your ways in and out.
We surely will try to cover the issues related to security and how to safeguard it. Feel free to give your valuable comments and share them with your friends. You know ‘Sharing is Caring‘. Your Positive comment encourages and motivates us.
If You Appreciate What We Do Here On TecMint, You Should Consider:
TecMint is the fastest growing and most trusted community site for any kind of Linux Articles, Guides and Books on the web. Millions of people visit TecMint! to search or browse the thousands of published articles available FREELY to all.
If you like what you are reading, please consider buying us a coffee ( or 2 ) as a token of appreciation.

We are thankful for your never ending support.
Источник


