- Генерация и использование SSL-сертификатов в Linux
- Как SSL-сертификат помогает защитить данные?
- Общий порядок создания SSL-сертификата, ключи и подпись
- Подписание SSL-сертификатов
- Использование SSL-сертификатов для домена
- Заключение
- How to Generate a Self-Signed SSL Certificate on Linux
- Step 1: Create an RSA Keypair
- Step 2: Extract the Private Key into the “httpd” Folder
- Step 3: Creating a “Certificate Signing Request” (CSR) File
- Step 4: Creating the Certificate “.crt” File
- Step 5: Configuring Apache to Use the Files
- How To Create a Self-Signed SSL Certificate for Apache in Ubuntu 16.04
- Introduction
- Prerequisites
- Step 1: Create the SSL Certificate
- Step 2: Configure Apache to Use SSL
- Create an Apache Configuration Snippet with Strong Encryption Settings
- Modify the Default Apache SSL Virtual Host File
- (Recommended) Modify the Unencrypted Virtual Host File to Redirect to HTTPS
- Step 3: Adjust the Firewall
- Step 4: Enable the Changes in Apache
- Step 5: Test Encryption
- Step 6: Change to a Permanent Redirect
- Conclusion
Генерация и использование SSL-сертификатов в Linux
В целях безопасности, в частности во избежание перехвата конфиденциальных, персональных или важных данных. Многие владельцы сайтов в сети защищают трафик с помощью SSL-сертификатов. Естественно, защите подлежит только тот трафик, который связан непосредственно с запросами и передачей данных с определённым адресом — адресом сайта. Системные администраторы, сотрудники техподдержки должны ориентироваться в вопросах, касающихся создания и внедрения SSL-сертификатов для хостов. Поскольку предоставляют соответствующие услуги. Для этих целей в системах Linux существует утилита openssl. Она является свободной реализацией методов защиты, протокола SSL, а также генерации сертификатов.
Как SSL-сертификат помогает защитить данные?
На самом деле схема защиты трафика основана на его шифровании открытым ключом и его расшифровке закрытым ключом. Понятие SSL-сертификата применимо в контексте подтверждения того факта, что открытый ключ действительно принадлежит именно тому домену, с которым происходит соединение. Таким образом, в данной схеме присутствуют две составляющие:
- Пара ключей (открытый и закрытый) — для шифрования/расшифровки трафика;
- Подпись открытого ключа. Гарантирующая, что он подлинный и обслуживает именно тот домен, для которого и был создан.
Обе эти составляющие и представляют собой то, что принято обозначать понятием SSL-сертификат. Подпись является гарантией, поскольку выдаётся авторитетным центрами сертификации. Это доступные всем онлайн-сервисы (достаточно воспользоваться любой поисковой системой), которым можно отправить свой ключ, заполнив соответствующую анкету. Далее сервис (центр сертификации) обрабатывает данные из анкеты и сам ключ и высылает уже подписанный ключ обратно его владельцу. Среди самых популярных на сегодняшний день центров сертификации являются такие как Comodo.
Важно заметить, что зашифрованный открытым ключом трафик возможно расшифровать только соответствующим ему закрытым ключом. В свою очередь подпись для открытого ключа от авторитетного цента говорит, что зашифрованный трафик пришёл от «своего» или подлинного узла и его можно принять в обработку, т. е. расшифровать закрытым ключом.
Общий порядок создания SSL-сертификата, ключи и подпись
Во время создания SSL-сертификата происходит последовательная обработка следующих видов ключей:
- *.key – это сами ключи шифрования, открытий и/или закрытый;
- *.csr – ключ, содержащий сформированный запрос для получения подписи сертификата от центра сертификации, а сам запрос — это открытый ключ и информация о домене и организации, связанной с ним;
- *.crt, *.cer, *.pem – это, собственно, сам сертификат, подписанный центром сертификации по запросу из файла *.csr.
Для начала нужно создать закрытый ключ:
Здесь команда genrsa генерирует RSA-ключ, опция -des3 указывает алгоритм шифрования ключа. А опция -out указывает, что ключ должен быть получен в виде файла server.key. Число 2048 — это сложность шифрования. При выполнении этой команды пользователю будет предложено ввести пароль для шифрования. Поскольку указан его алгоритм опцией -des3. Если это личный ключ и его планируется использовать на сервере, который можно настроить в собственных целях, то естественно шифрование обязательно. Однако, многие серверы требуют закрытые ключи без шифрования (например хостинг-площадки, поскольку предоставляют универсальную услугу по заказу SSL-сертификатов). Поэтому перед генерацией закрытого ключа нужно определиться, как он будет использоваться.
Теперь нужно создать запрос на подпись — CSR-файл, который будет включать только что сгенерированный ключ server.key:
При выполнении этой команды пользователю необходимо ввести информацию о домене и организации. Причём наименование домена следует вводить точно, например, если идентификатор URL сайта https://mycompany.com, то ввести нужно mycompany.com. Для URL-идентификатора www.mycompany.com уже необходим отдельный сертификат.
Теперь файл server.csr со сформированным запросом на подпись можно отправить в выбранный центр сертификации.
Подписание SSL-сертификатов
Получить подписанный сертификат, когда имеется закрытый ключ и запрос на подпись можно несколькими способами: воспользоваться услугой авторитетных центров сертификации, отправив им запрос (CSR-файл) и получив в ответ готовый сертификат *.crt. Либо можно сделать сертификат самоподписанным. Т. е. подписать его тем же ключом, который использовался при создании файла CSR. Для этого следует выполнить команду:
Здесь опция -days указывает количество дней, в течение которых выпускаемый сертификат server.crt будет действителен. В данном случае на протяжении одного года.
Также можно создать самоподписанный сертификат из имеющегося закрытого ключа без использования CSR-файла. Но в этом случае нужно вводить информацию CSR-запроса:
Параметр -x509 задаёт формат генерируемого сертификата. Он является самым распространённым и используется в большинстве случаев. Опция -new позволяет запрашивать информацию для запроса у пользователя.
Важно отметить, что сертификаты, подписанные авторитетными центрами сертификации известны веб-браузерам. Самоподписанные сертификаты необходимо импортировать в хранилище доверенных сертификатов веб-браузера вручную. Поскольку соединения с доменами, обслуживаемыми такими сертификатами по-умолчанию блокируются.
Использование SSL-сертификатов для домена
Для использования сертификата доменом, для которого он был создан, необходимо соответствующим образом настроить виртуальный хост этого домена. Для начала нужно сохранить файлы *.crt и *.key где-нибудь, где доступ к ним может получить только их владелец. Например в
/ssl/certs/ нужно поместить файл server.crt, в
/ssl/private/ — файл server.key. Далее, в конфигурационном файле виртуального хоста нужно определить следующие директивы:
Важно заметить, что для SSL-соединений домена должен быть отдельный конфигурационный файл (или просто отдельная конфигурация в одном файле) виртуального хоста для него. Это необходимо, поскольку обычные HTTP-соединения обрабатываются по порту 80, а HTTPS (SSL) — по 443. Это отдельные конфигурации одного виртуального хоста (хотя это не совсем верное определение). Также для Apache должен быть включен модуль SSL. Типичная конфигурация может выглядеть следующим образом:
Как подключить ssl сертификата в nginx читайте в этой статье.
Заключение
В заключение следует заметить, что генерация и подключение SSL-сертификатов к домену — далеко не самая сложная задача. Однако она требует очень внимательного выполнения отдельных её этапов, поскольку от ошибки зависит безопасность для домена.
Если вы нашли ошибку, пожалуйста, выделите фрагмент текста и нажмите Ctrl+Enter.
Источник
How to Generate a Self-Signed SSL Certificate on Linux
In today’s guide, we will discuss how to generate a self-signed SSL certificate on Linux as well as how to implement them in Apache. SSL is becoming more and more important as the internet becomes more popular. With free Let’s Encrypt certificates becoming a commodity that anyone can use, there’s no reason for anyone to not use SSL – not to mention the search ranking benefits, and the fact that browsers and search engines will trust your site.
However, you can also generate your own self-signed SSL certificate for private use on your server. One big reason to do this is encryption. While your personal certificate won’t mean anything to browsers, and visitors will still get a warning message if they visit your site directly, you can at least be sure that you’re protected against “man-in-the-middle” attacks. A self-signed certificate is a good first step when you’re just testing things out on your server, and perhaps don’t even have a domain name yet.
Let’s start with our step by step procedure on how to create a self-signed SSL certificate on Linux.
Table of Contents
Step 1: Create an RSA Keypair
The first step in generating your own self-signed SSL certificate is to use the “openssl” package on Linux/CentOS to create an RSA key pair. To do this, make sure that you have the package installed. If not, install it with this command:
Chances are that you already have it available on your system – it should now be installed regardless. Once the package is confirmed to be installed on your system, generate the keypair using the following command:
This command uses 2048 bit encryption and outputs a file called keypair.key , as shown here:
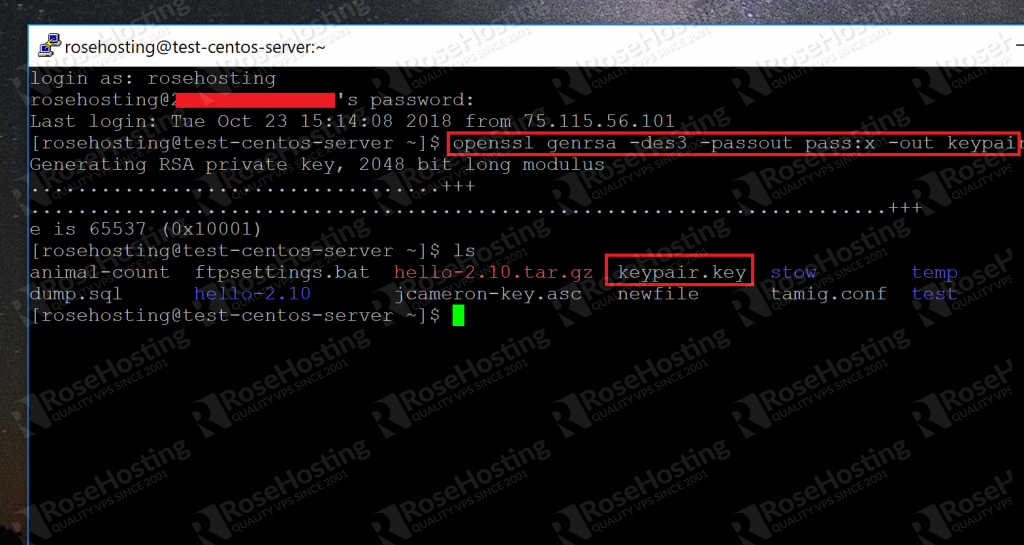
As you can see, the key has been generated and placed in the current directory.
Step 2: Extract the Private Key into the “httpd” Folder
The /etc/httpd folder is where the operating system keeps all important SSL related items. First, let’s create a new folder to hold all of our files related to our private key:
We called the folder httpscertificate and will refer to it by that name for all of the other command line examples. You can name the folder anything you want.
To extract the private key from the keypair file that we just created, type in the following:
Replace the section in bold with the IP address of your own server. Or if you’re able to access your site with a domain name, you can use that as well.
This will create a .key file in the folder that we just created. When this process is done, we can delete the original keypair file:
Step 3: Creating a “Certificate Signing Request” (CSR) File
With the key, we can create a special .csr file that we can either sign ourselves or submit to a “Certificate Authority”. It’s in a standardized format, and can be easily generated with our key from the previous step. To create it, type the following command:
Again, replace the items in bold with the IP address or domain name that you settled on in step 2. When you run this command, the tool will ask you for some of your personal information, such as your location and organization name:
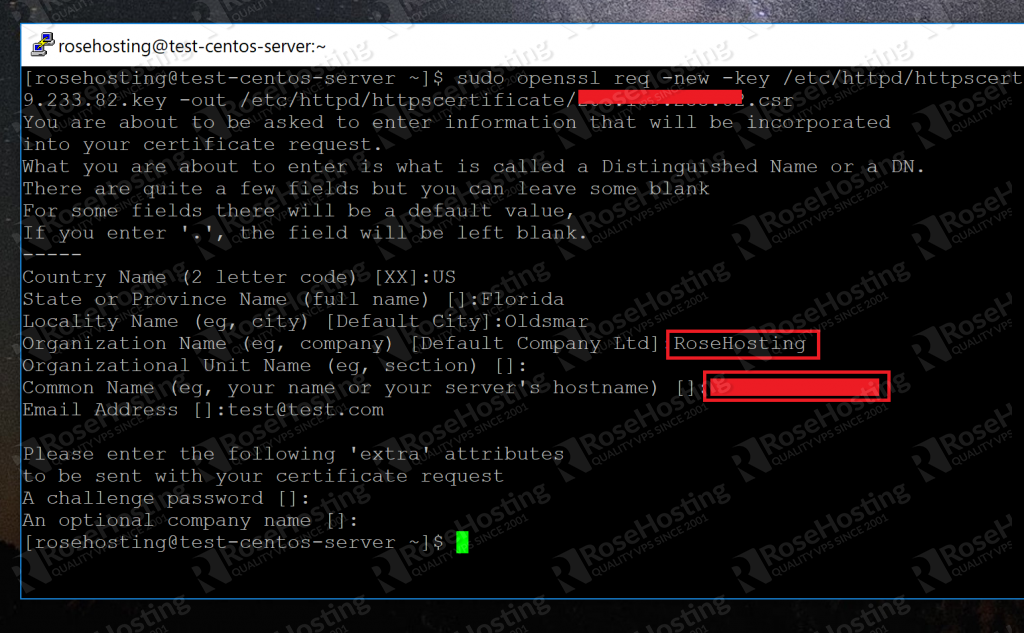
A CA (short for Certificate Authority) can use these details to verify that you are indeed who you say you are. Try to populate the fields with as much information as you can.
Once you’ve finished entering these details, the tool will finish with its work and place a .csr file in the directory that we created for just this purpose.
Step 4: Creating the Certificate “.crt” File
With the CSR, we can create the final certificate file as follows. We will now use our .csr and .key files to create our .crt file:
This creates a .crt file in the location with all of our other files. We now know how to generate our self-signed SSL certificate. Here’s a screenshot of the final files in our security folder:
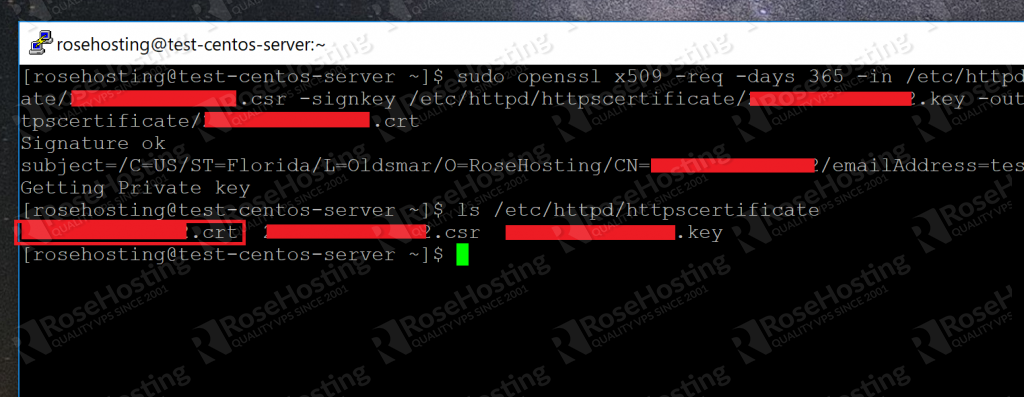
Now we need to tell Apache where these files are.
Step 5: Configuring Apache to Use the Files
All that we need to do now is show Apache where our generated self-signed certificates are. First, we need to install the mod_ssl package with the command:
Once done, this will place a ssl.conf file inside the /etc/httpd/conf.d/ folder. We need to modify this default file. Use your preferred text editor:
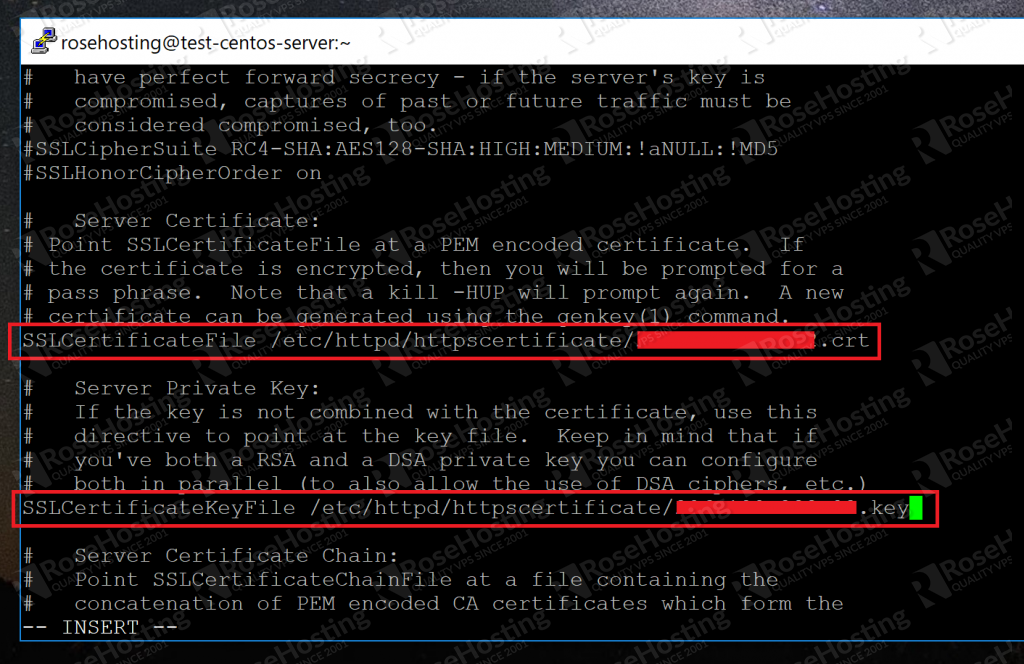
Now scroll down till you find the lines starting with:
Change the default paths with the paths to the certificate file and key file respectively, as shown here:
Save your changes. Now just restart Apache with:
And you’re done! When Apache restarts, it will be configured to allow SSL connections by using the generated self-signed SSL certificates.
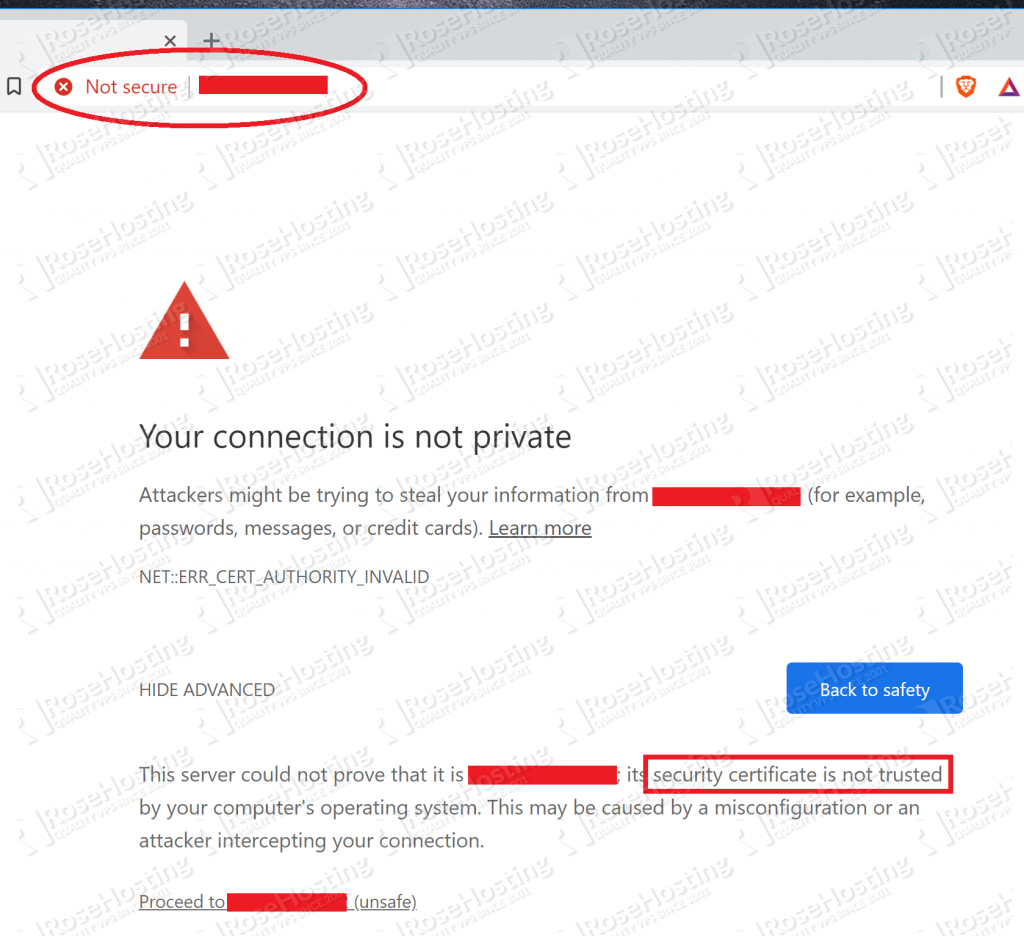
When you connect to your IP address via HTTPS the next time, you’ll be warned that it’s not a trusted certificate:
That’s ok. We know this since we signed it ourselves! Just proceed and it’ll take you to the actual website:
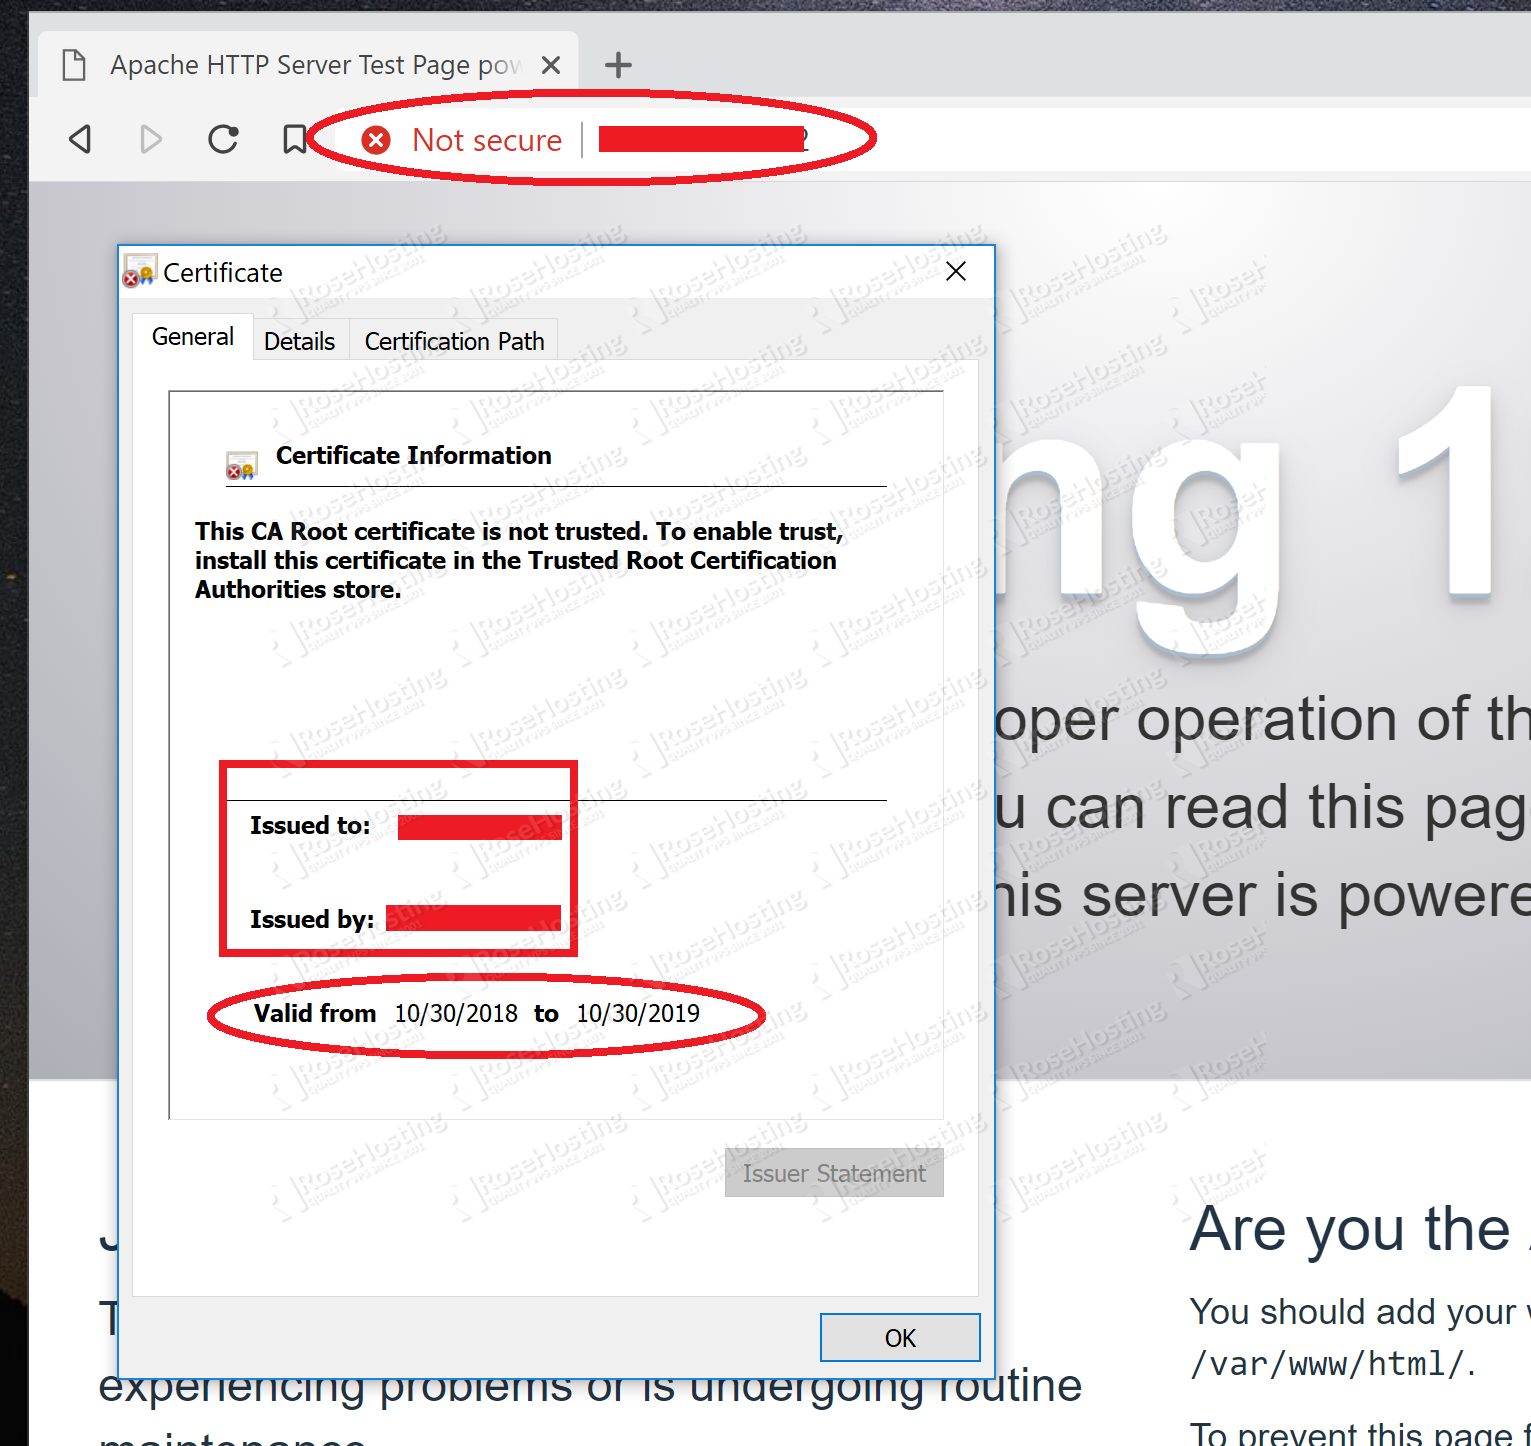
Here you can see that it’s using the certificate that we created. It’s not much use for anyone else visiting your site since they can’t verify your identity. But you know it’s safe, and moreover that it’s encrypted. No man in the middle attacks!
You now know how to generate your own self-signed SSL certificates and implement them on your Apache web server.
If you are one of our Managed VPS hosting clients, we can do all of this for you at no extra cost. Simply contact our system administrators and they will respond to your request as soon as possible.
If you liked this blog post on how to create a self-signed SSL certificate on Linux, please share it with your friends on social media networks, or if you have any question regarding this blog post, simply leave a comment below and we will answer it. Thanks!
Источник
How To Create a Self-Signed SSL Certificate for Apache in Ubuntu 16.04
Published on April 21, 2016
This article uses Ubuntu 16.04
This distro reached end of life (EOL) on Apr 2021.
We recommend upgrading to a more modern version. Read upgrade instructions.
Introduction
TLS, or transport layer security, and its predecessor SSL, which stands for secure sockets layer, are web protocols used to wrap normal traffic in a protected, encrypted wrapper.
Using this technology, servers can send traffic safely between the server and clients without the possibility of the messages being intercepted by outside parties. The certificate system also assists users in verifying the identity of the sites that they are connecting with.
In this guide, we will show you how to set up a self-signed SSL certificate for use with an Apache web server on an Ubuntu 16.04 server.
Note: A self-signed certificate will encrypt communication between your server and any clients. However, because it is not signed by any of the trusted certificate authorities included with web browsers, users cannot use the certificate to validate the identity of your server automatically.
A self-signed certificate may be appropriate if you do not have a domain name associated with your server and for instances where the encrypted web interface is not user-facing. If you do have a domain name, in many cases it is better to use a CA-signed certificate. You can find out how to set up a free trusted certificate with the Let’s Encrypt project here.
Prerequisites
Before you begin, you should have a non-root user configured with sudo privileges. You can learn how to set up such a user account by following our initial server setup for Ubuntu 16.04.
You will also need to have the Apache web server installed. If you would like to install an entire LAMP (Linux, Apache, MySQL, PHP) stack on your server, you can follow our guide on setting up LAMP on Ubuntu 16.04. If you just want the Apache web server, skip the steps pertaining to PHP and MySQL in the guide.
When you have completed the prerequisites, continue below.
Step 1: Create the SSL Certificate
TLS/SSL works by using a combination of a public certificate and a private key. The SSL key is kept secret on the server. It is used to encrypt content sent to clients. The SSL certificate is publicly shared with anyone requesting the content. It can be used to decrypt the content signed by the associated SSL key.
We can create a self-signed key and certificate pair with OpenSSL in a single command:
You will be asked a series of questions. Before we go over that, let’s take a look at what is happening in the command we are issuing:
- openssl: This is the basic command line tool for creating and managing OpenSSL certificates, keys, and other files.
- req: This subcommand specifies that we want to use X.509 certificate signing request (CSR) management. The “X.509” is a public key infrastructure standard that SSL and TLS adheres to for its key and certificate management. We want to create a new X.509 cert, so we are using this subcommand.
- -x509: This further modifies the previous subcommand by telling the utility that we want to make a self-signed certificate instead of generating a certificate signing request, as would normally happen.
- -nodes: This tells OpenSSL to skip the option to secure our certificate with a passphrase. We need Apache to be able to read the file, without user intervention, when the server starts up. A passphrase would prevent this from happening because we would have to enter it after every restart.
- -days 365: This option sets the length of time that the certificate will be considered valid. We set it for one year here.
- -newkey rsa:2048: This specifies that we want to generate a new certificate and a new key at the same time. We did not create the key that is required to sign the certificate in a previous step, so we need to create it along with the certificate. The rsa:2048 portion tells it to make an RSA key that is 2048 bits long.
- -keyout: This line tells OpenSSL where to place the generated private key file that we are creating.
- -out: This tells OpenSSL where to place the certificate that we are creating.
As we stated above, these options will create both a key file and a certificate. We will be asked a few questions about our server in order to embed the information correctly in the certificate.
Fill out the prompts appropriately. The most important line is the one that requests the Common Name (e.g. server FQDN or YOUR name) . You need to enter the domain name associated with your server or, more likely, your server’s public IP address.
The entirety of the prompts will look something like this:
Both of the files you created will be placed in the appropriate subdirectories of the /etc/ssl directory.
While we are using OpenSSL, we should also create a strong Diffie-Hellman group, which is used in negotiating Perfect Forward Secrecy with clients.
We can do this by typing:
This may take a few minutes, but when it’s done you will have a strong DH group at /etc/ssl/certs/dhparam.pem that we can use in our configuration.
Step 2: Configure Apache to Use SSL
We have created our key and certificate files under the /etc/ssl directory. Now we just need to modify our Apache configuration to take advantage of these.
We will make a few adjustments to our configuration:
- We will create a configuration snippet to specify strong default SSL settings.
- We will modify the included SSL Apache Virtual Host file to point to our generated SSL certificates.
- (Recommended) We will modify the unencrypted Virtual Host file to automatically redirect requests to the encrypted Virtual Host.
When we are finished, we should have a secure SSL configuration.
Create an Apache Configuration Snippet with Strong Encryption Settings
First, we will create an Apache configuration snippet to define some SSL settings. This will set Apache up with a strong SSL cipher suite and enable some advanced features that will help keep our server secure. The parameters we will set can be used by any Virtual Hosts enabling SSL.
Create a new snippet in the /etc/apache2/conf-available directory. We will name the file ssl-params.conf to make its purpose clear:
To set up Apache SSL securely, we will be using the recommendations by Remy van Elst on the Cipherli.st site. This site is designed to provide easy-to-consume encryption settings for popular software. You can read more about his decisions regarding the Apache choices here.
The suggested settings on the site linked to above offer strong security. Sometimes, this comes at the cost of greater client compatibility. If you need to support older clients, there is an alternative list that can be accessed by clicking the link on the page labelled “Yes, give me a ciphersuite that works with legacy / old software.” That list can be substituted for the items copied below.
The choice of which config you use will depend largely on what you need to support. They both will provide great security.
For our purposes, we can copy the provided settings in their entirety. We will just make two small changes.
Set the SSLOpenSSLConfCmd DHParameters directive to point to the Diffie-Hellman file we generated earlier. Also, take a moment to read up on HTTP Strict Transport Security, or HSTS, and specifically about the “preload” functionality. Preloading HSTS provides increased security, but can have far reaching consequences if accidentally enabled or enabled incorrectly. In this guide, we will not preload the settings, but you can modify that if you are sure you understand the implications:
Save and close the file when you are finished.
Modify the Default Apache SSL Virtual Host File
Next, let’s modify /etc/apache2/sites-available/default-ssl.conf , the default Apache SSL Virtual Host file. If you are using a different server block file, substitute it’s name in the commands below.
Before we go any further, let’s back up the original SSL Virtual Host file:
Now, open the SSL Virtual Host file to make adjustments:
Inside, with most of the comments removed, the Virtual Host file should look something like this by default:
We will be making some minor adjustments to the file. We will set the normal things we’d want to adjust in a Virtual Host file (ServerAdmin email address, ServerName, etc.), adjust the SSL directives to point to our certificate and key files, and uncomment one section that provides compatibility for older browsers.
After making these changes, your server block should look similar to this:
Save and close the file when you are finished.
(Recommended) Modify the Unencrypted Virtual Host File to Redirect to HTTPS
As it stands now, the server will provide both unencrypted HTTP and encrypted HTTPS traffic. For better security, it is recommended in most cases to redirect HTTP to HTTPS automatically. If you do not want or need this functionality, you can safely skip this section.
To adjust the unencrypted Virtual Host file to redirect all traffic to be SSL encrypted, we can open the /etc/apache2/sites-available/000-default.conf file:
Inside, within the VirtualHost configuration blocks, we just need to add a Redirect directive, pointing all traffic to the SSL version of the site:
Save and close the file when you are finished.
Step 3: Adjust the Firewall
If you have the ufw firewall enabled, as recommended by the prerequisite guides, might need to adjust the settings to allow for SSL traffic. Luckily, Apache registers a few profiles with ufw upon installation.
We can see the available profiles by typing:
You should see a list like this:
You can see the current setting by typing:
If you allowed only regular HTTP traffic earlier, your output might look like this:
To additionally let in HTTPS traffic, we can allow the “Apache Full” profile and then delete the redundant “Apache” profile allowance:
Your status should look like this now:
Step 4: Enable the Changes in Apache
Now that we’ve made our changes and adjusted our firewall, we can enable the SSL and headers modules in Apache, enable our SSL-ready Virtual Host, and restart Apache.
We can enable mod_ssl , the Apache SSL module, and mod_headers , needed by some of the settings in our SSL snippet, with the a2enmod command:
Next, we can enable our SSL Virtual Host with the a2ensite command:
We will also need to enable our ssl-params.conf file, to read in the values we set:
At this point, our site and the necessary modules are enabled. We should check to make sure that there are no syntax errors in our files. We can do this by typing:
If everything is successful, you will get a result that looks like this:
The first line is just a message telling you that the ServerName directive is not set globally. If you want to get rid of that message, you can set ServerName to your server’s domain name or IP address in /etc/apache2/apache2.conf . This is optional as the message will do no harm.
If your output has Syntax OK in it, your configuration file has no syntax errors. We can safely restart Apache to implement our changes:
Step 5: Test Encryption
Now, we’re ready to test our SSL server.
Open your web browser and type https:// followed by your server’s domain name or IP into the address bar:
Because the certificate we created isn’t signed by one of your browser’s trusted certificate authorities, you will likely see a scary looking warning like the one below:

This is expected and normal. We are only interested in the encryption aspect of our certificate, not the third party validation of our host’s authenticity. Click “ADVANCED” and then the link provided to proceed to your host anyways:

You should be taken to your site. If you look in the browser address bar, you will see a lock with an “x” over it. In this case, this just means that the certificate cannot be validated. It is still encrypting your connection.
If you configured Apache to redirect HTTP to HTTPS, you can also check whether the redirect functions correctly:
If this results in the same icon, this means that your redirect worked correctly.
Step 6: Change to a Permanent Redirect
If your redirect worked correctly and you are sure you want to allow only encrypted traffic, you should modify the unencrypted Apache Virtual Host again to make the redirect permanent.
Open your server block configuration file again:
Find the Redirect line we added earlier. Add permanent to that line, which changes the redirect from a 302 temporary redirect to a 301 permanent redirect:
Save and close the file.
Check your configuration for syntax errors:
When you’re ready, restart Apache to make the redirect permanent:
Conclusion
You have configured your Apache server to use strong encryption for client connections. This will allow you serve requests securely, and will prevent outside parties from reading your traffic.
Источник


