- How to make Windows 10 connect to VPN before login
- 5 Best VPNs we recommend
- How do I make Windows 10 connect to VPN before login?
- Add a VPN connection
- Create a BAT file
- Create and schedule a task
- How about connecting to a VPN client before logon?
- Why use Private Internet Access
- Private Internet Access
- How to make Windows 10 automatically connect to VPN
- 5 Best VPNs we recommend
- How do I make Windows 10 automatically connect to VPN?
- Create a VPN connection
- Create a BAT file
- Add the BAT file to Windows 10 autostart
- How do I make Windows 10 automatically connect to a VPN client?
- How do I stop my VPN from automatically connecting?
- Why use Private Internet Access
- Private Internet Access
How to make Windows 10 connect to VPN before login

- You can make Windows 10 connect to a VPN before logon to maximize your computer security and online privacy. It’s also a shortcut to connect to your office PC and access files through VPN.
- Unfortunately, Windows 10 doesn’t have an easy option to connect to a VPN before signing in. However, you can make some tweaks to your PC to make this happen, without any special skills.
- To find out the best features of Microsoft’s OS, check out our Windows 10 section .
- Join our VPN Troubleshooting Hub if you frequently have to fix VPN issues.
If you’re interested in protecting your online privacy and digital identity, you can make Windows 10 automatically connect to a VPN as soon as you turn on your computer. However, this happens only after you log in with your Windows account.
Connecting to a VPN as soon as the Internet connection is established is a much safer solution, especially if you typically use a public, unprotected Wi-Fi at work, at a restaurant, or while traveling.
In that case, it’s a better idea to make Windows 10 connect to the VPN before login since it provides a higher level of protection against hackers and other Internet dangers.
Check out our step-by-step instructions below to find out how to auto-connect to a VPN before signing into your Windows 10 PC. Although you can do this without having to install any additional software, we suggest getting a premium VPN subscription for better privacy and security.
5 Best VPNs we recommend
| 79% Off + 2 free Months |  Check offer! Check offer! | |
| 83% Off (2.25$/Month) + 3 free Months | Check offer! | |
| 68% Off + 1, 12 or 24 free Months (random prize) | Check offer! | |
| 83% Off (2.21$/Month) + 3 free Months | Check offer! | |
| 76% (2.83$) on 2 Years plan | Check offer! |
How do I make Windows 10 connect to VPN before login?
Add a VPN connection
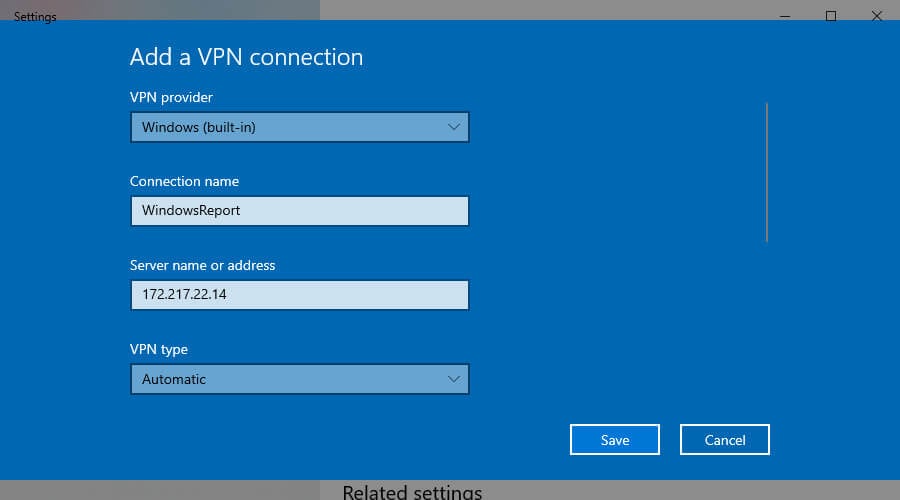
- Right-click Start and open Network Connections.
- Choose VPN and click Add a VPN connection.
- Specify the VPN connection details.
- Write down the Connection name, User name, and Password.
- Click Save.
Create a BAT file

- Launch the Notepad app in Windows 10 (press Ctrl + R, type notepad, press Enter).
- In the empty document, paste the following code: c:windowssystem32rasdial.exe YourConnectionName YourUsername YourPassword
- Replace the info above with the VPN details you wrote down.
- Save the Notepad document (press Ctrl + S) and exit.
- Rename the Notepad file to change the TXT format* to BAT.
- Store the document in a safe place.
*If the file formats are not displayed, you must show file extensions in Windows 10 to be able to change them.
Create and schedule a task
- Hit the Win key and type Task Scheduler*.
- Press Enter to launch this app.
- Go to the Actions panel on the right side.
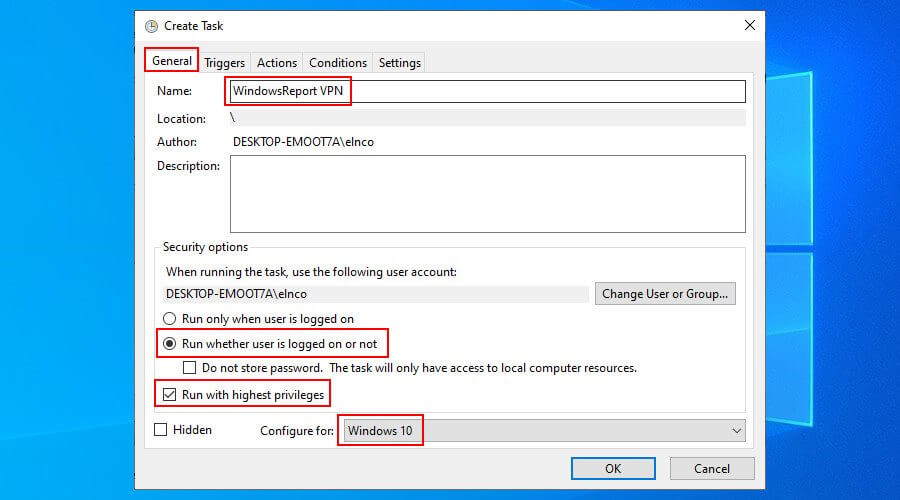
- Click Create Task (not Create Basic Task).
- General tab
- Write a task name, such as WindowsReport VPN.
- At Security options, select Run whether user is logged on or not.
- Enable Run with highest privileges.
- Set Configure for to Windows 10.

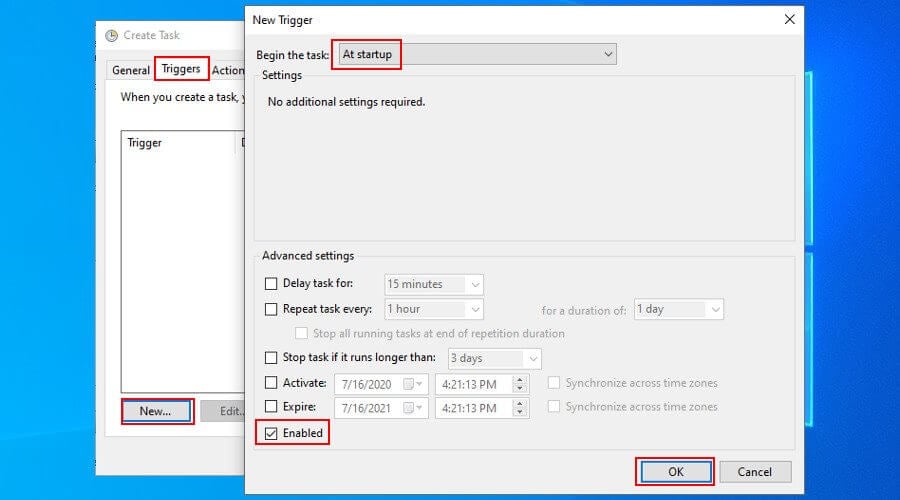
- Triggers tab
- Click New.
- Set Begin the task to At startup.
- Make sure the Enabled box is checked.
- Click OK.
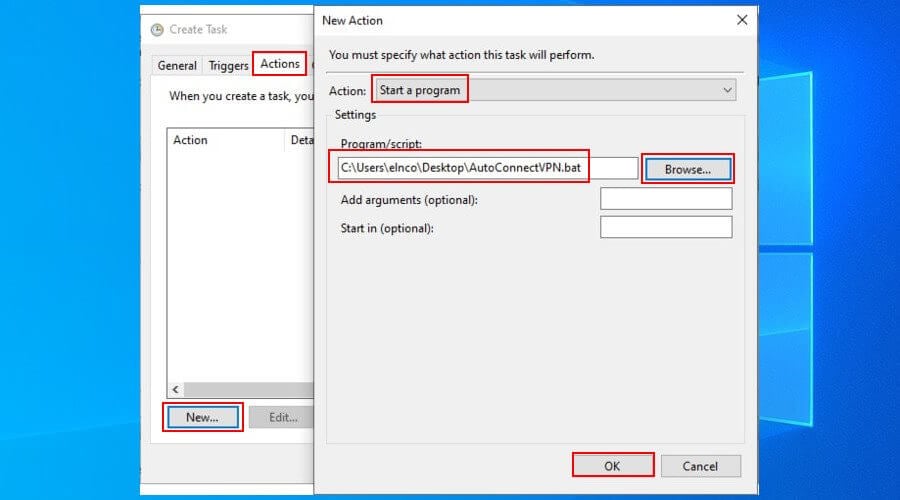
- Actions tab
- Click New.
- Set Action to Start a program.
- Click Browse and select the BAT file you created.
- Click Open and then OK.
- Conditions tab
- Deselect all options.
- Deselect all options.
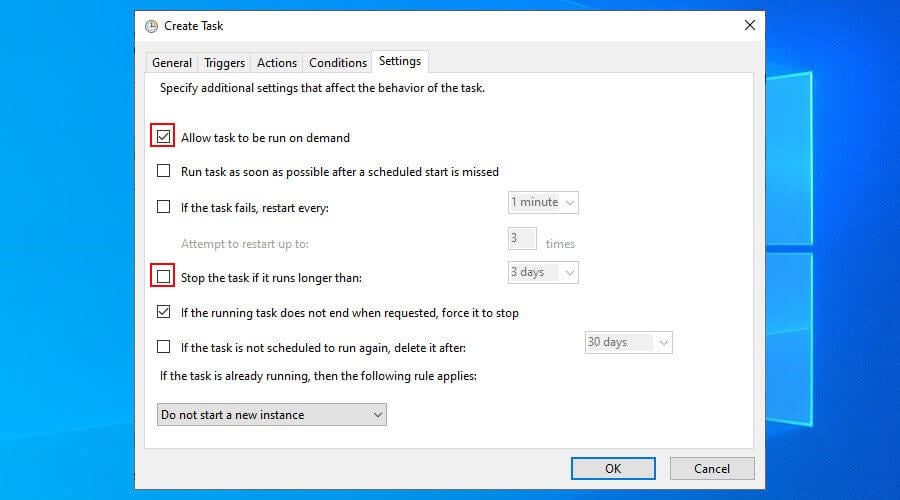
- Settings tab
- Enable Allow task to be run on demand.
- Disable Stop the task if it runs longer than.
- Click OK.
- Enter your user account information to confirm.

*You can find out everything about the Windows 10 Task Scheduler to master this application.
At every system startup, Windows 10 will connect to the VPN before logon. To disconnect, you just have to press the Network icon in the systray, select the VPN connection, and press Disconnect.
To temporarily disable the task, open the Task Scheduler app, select the task, right-click it, and press Disable. To permanently remove it, press Delete instead of Disable. You can also edit the task settings.
However, keep in mind that, if you wish to use a different VPN server, you must manually edit the VPN connection details in Windows 10 (at Step 1, where you added the VPN connection).
If you also change the VPN connection name, username or password, then you also have to update the BAT file you created (at Step 2 after updating the VPN profile in Windows 10).
How about connecting to a VPN client before logon?
Unfortunately, using Task Scheduler to schedule a VPN client to run before logon doesn’t work the same way as scheduling a manual VPN connection. Regardless of the settings configuration in Task Scheduler, a VPN client can’t run earlier than logon.
However, you can obtain the manual connection details of your VPN service to create a connection using the Windows 10 built-in VPN provider, such as Private Internet Access. Then, by following the instructions we provided above, you can make Windows 10 connect to the VPN before login.
Why use Private Internet Access

Private Internet Access (PIA) is a premium virtual private network solution and the best VPN for Windows 10. A product of Kape Technologies, PIA can hide your IP address, encrypt your entire network traffic, and keep you safe from hackers.
Furthermore, unlike Windows 10 that offers native support for few VPN protocols, PIA includes OpenVPN and WireGuard, which offer the best security features for your computer.
You also use native port forwarding without having to configure router settings, as well as set up an emergency kill switch to preserve your online anonymity.
Additionally, PIA supports exclusive DNS servers, up to 10 simultaneous device connections, split-tunneling mode, together with a malware and ad blocker.
It’s compatible with all major platforms, has a user-friendly interface, and provides manual configuration settings for OpenVPN, PPTP, L2TP, and SOCKS. Plus, PIA is the best VPN for Spotify.
More about PIA:
- +3,300 VPN servers in 48 countries
- A zero-logging policy
- No IP or DNS leaks
- 24/7 live chat support
- 30-days money-back guarantee (no free trial)

Private Internet Access
Use this fast VPN to secure your browsing sessions, access blocked websites, watch online streaming, and more.
To sum up, you can make Windows 10 connect to a VPN before login if you manually create a VPN connection and add its details to the Task Scheduler.
In older Windows versions, it was also possible to view the VPN connections on the logon screen and choose to connect or not (including Windows 8). But it doesn’t seem to work on Windows 10 anymore.
Nevertheless, by using the workaround we described above, you can instruct Windows 10 to automatically connect to a VPN before you get the chance to sign in with your user credentials.
To maximize security, though, we recommend signing up for a premium subscription service like PIA and obtaining the manual configuration settings for PPTP or L2TP. PIA’s VPN servers facilitate a higher level of security for your home PC.
How to make Windows 10 automatically connect to VPN
- If you’re a privacy-concerned user, you can make Windows 10 automatically connect to a VPN as soon as you turn on your PC. It’s also ideal for quickly connecting to your workplace through VPN.
- Although the Windows 10 built-in provider doesn’t have an option to auto-connect on system boot, you can make this happen by adding a BAT file to the Windows 10 startup folder. Find out how.
- Visit our Windows 10 area to learn how to fully take advantage of Microsoft’s operating system.
- If you’re having any VPN problems, bookmark our VPN Troubleshooting Hub .

If you’re wondering how to make Windows 10 automatically connect to VPN, we’ve got you covered. You just have to create a simple BAT file with your VPN connection details and add it to the Windows autostart sequence.
This way, the VPN connection you created using the Windows 10 built-in VPN provider will autostart every time you switch on your computer, just like Skype, Steam, or an antivirus.
However, if you have a VPN desktop client installed, things become significantly easier since you just have to find and activate the autostart and auto-connect options in the UI.
Follow our easy instructions below to find out how to make Windows 10 automatically connect to VPN using a manual VPN connection as well as a VPN desktop client.
We’re also showing you how to stop your VPN from auto-connecting if you need to turn off this feature temporarily or permanently.
5 Best VPNs we recommend
| 79% Off + 2 free Months | Check offer! | |
| 83% Off (2.25$/Month) + 3 free Months | Check offer! | |
| 68% Off + 1, 12 or 24 free Months (random prize) | Check offer! | |
| 83% Off (2.21$/Month) + 3 free Months | Check offer! | |
| 76% (2.83$) on 2 Years plan | Check offer! |
How do I make Windows 10 automatically connect to VPN?
Create a VPN connection
- Right-click the Start button and go to Network Connections.
- Select VPN and press Add a VPN connection.
- Add the required VPN connection details.
- Copy the Connection name, User name, and Password.
- Click Save.
Create a BAT file
- Open the Windows 10 Notepad (press Ctrl + R, type notepad, press Enter).
- Paste the following code: c:windowssystem32rasdial.exe YourConnectionName YourUsername YourPassword
- Replace the connection details with what you copied in the previous stage.
- Save the Notepad file and exit.
- Change the file extension of the Notepad file from TXT to BAT.
If you can’t see the format of your files, find out how to show file extensions in Windows 10.
Add the BAT file to Windows 10 autostart
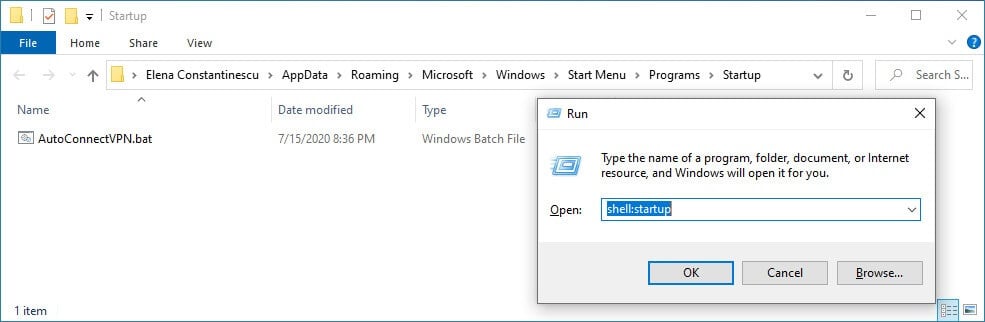
- Press Ctrl + R, type shell:startup, and press Enter.
- Copy the BAT file to this location.
- Restart your PC.
From this point on, Windows 10 will automatically connect to the VPN at every system startup. Command Prompt briefly opens a console window and shows how it verifies the username and password, registers your PC over the network, and connects to the VPN.
If you need to switch VPN servers, you only have to edit the VPN connection details in Windows 10. The changes will get automatically picked up by the BAT file.
However, if you also modify the VPN connection name, username, or password, then you will need to manually update the BAT file, too. Otherwise, Windows 10 won’t be able to automatically connect to the VPN.
How do I make Windows 10 automatically connect to a VPN client?

- Sign up for a Private Internet Access subscription.
- Download and install PIA on your PC.
- In the systray, click the PIA icon.
- Open Settings and go to the General tab.
- Enable Launch on System Startup and Connect on Launch.
- Restart your PC.
After making these changes, PIA will auto-launch every time you turn your PC and connect to the last used VPN server. As you can see, it’s a more convenient option than having to create a BAT file and add it to the Windows 10 startup.
Furthermore, it’s easier to change VPN servers in PIA in order for Windows 10 to automatically connect to the new VPN server, instead of editing the VPN connection info in the OS and manually updating the BAT file every time you do this.
How do I stop my VPN from automatically connecting?
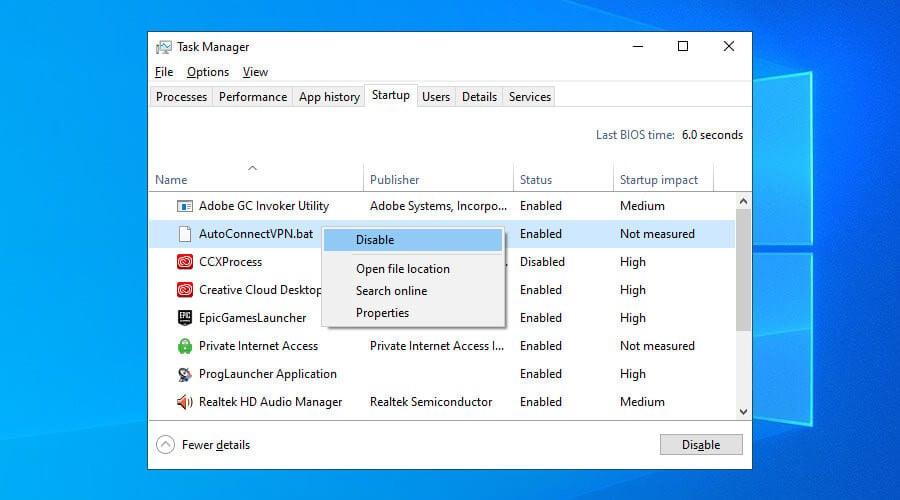
- Right-click the Windows taskbar and go to Task Manager.
- Go to the Startup tab.
- Right-click the VPN connection’s BAT file and click Disable.
If you change your mind and want to re-enable Windows 10 to automatically connect to the VPN, follow the same steps as above and click Enable on the disabled entry. To make a permanent change, head over to the startup folder using Ctrl+R and shell:startup to delete the BAT file.
If you used a VPN desktop client like PIA, simply find and disable the autostart and auto-connect options in the user interface. You can also use Task Manager to prevent PIA from autostarting at every Windows startup (same steps as disabling the BAT file).
Why use Private Internet Access
Developed by Kape Technologies, Private Internet Access (PIA) is the best VPN for Windows 10, thanks to high-speed VPN servers, military-grade encryption, and its user-friendly interface. It’s the reason why we used it in our example above.
Windows 10 has limited native support for VPN protocols, some of which are considered obsolete (PPTP, L2TP). On the other hand, PIA supports OpenVPN and WireGuard, which are safer and more versatile protocols.
Moreover, PIA comes with a bunch of security features that Windows 10 lacks, including a kill switch that cuts off Internet access in case the VPN connection drops, to protect you from IP leaks.
What else you should know about PIA:
- Quickly connect to more than 3,300 VPN servers in 48 countries
- Increase your security using private DNS
- Protects up to 10 devices at the same time
- No traffic logs, no IP or DNS leaks
- 24/7 live chat support
- 30-days money-back guarantee (no free trial)
Private Internet Access
Make Windows 10 automatically connect to PIA’s VPN servers fast and easy.
In conclusion, it’s a good idea to make Windows 10 automatically connect to a VPN as soon as you turn on your PC. This way, you can immediately connect to another computer over the Internet, like accessing your work PC from home.
However, using a premium VPN solution like PIA is significantly easier and unlocks more possibilities. For example, you can use PIA to access blocked websites, defeat government censorship, host game servers for you and your friends, and unlock Netflix catalogs.


