- (3 Free Methods) How to Remove or Delete Partition Windows 10
- Method 1. Remove Windows 10В Partition with Disk Management
- Method 2. Delete Partition Windows 10 in Diskpart
- Method 3. Delete Partition Windows 10 with Free Hard Drive Partitioning Software
- Bonus TipВ — Can’t Delete Partition During Windows 10 Installation
- How to delete the other Windows Operating System when I have two
- 1 Answer 1
- How to delete or uninstall Windows from your PC
- 1. How to delete Windows when it is the only operating system installed
- 2. How to delete one Windows when you have multiple Windows operating systems installed in a dual-boot or multi-boot configuration
- 3. How to delete Windows when you installed it alongside a Linux distribution such as Ubuntu, in a dual-boot or multi-boot configuration
- Why did you want to remove Windows?
(3 Free Methods) How to Remove or Delete Partition Windows 10
The Windows operating system allows users to manage partitions by themselves. Therefore, users can delete one partition and expand another partition. In this article, we’d like to introduce three free and easy methods to delete partitions on Windows 10.
The common demands for deleting a partition in Windows 10 are usually as follows:
- Delete a data storage partition that is unnecessary
- Delete a recovery partition on a computer or laptop
- Delete EFI system partition in Windows 10
- Delete a partition during Windows 10 installation
- Delete the unallocated partition in Windows 10/8/7
Whenever you need to remove a partitionВ in Windows 10, you can start with any one of the three ways within this page: [1] Windows Disk Management; [2] Diskpart command and [3] EaseUS hard drive partitioning software.
Note: All methods mentioned will erase the data stored in the partition. Back up your important data before proceeding. Then, follow the step-by-step guide to remove any unwanted partition and reallocate your Windows 10 disk space.
Method 1. Remove Windows 10В Partition with Disk Management
Applies to: remove data storage drive like D, E, F in a Windows 10 computer; delete one partition each time
To remove partitions in Windows 10 using Disk Management, follow the steps below:
Step 1: Search «Disk Management» at the Start Menu.
Step 2: Right-click the drive or partition by clicking «Delete Volume» in the Disk Management panel.
Step 3: Select «Yes» to continue the removal process. Then you’ve successfully deleted or removed your Windows 10 disk.

After doing so, the deleted partition becomes unallocated space. You can apply further operations to the unallocated space.
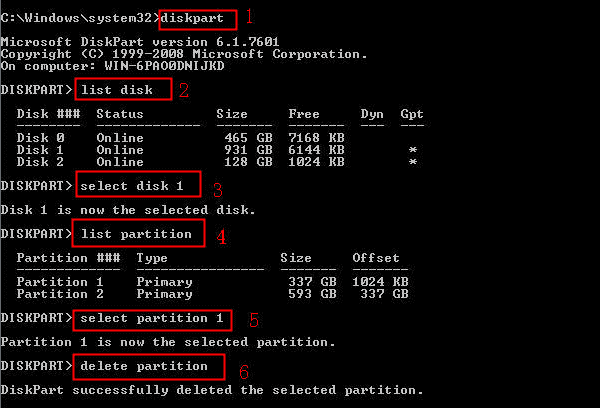
Method 2. Delete Partition Windows 10 in Diskpart
Applies to: delete data partition, recovery partition, or EFI partition in Windows 10 (require a recovery disk); delete all partitions one time
Here is the step-by-step guide for deleting partition in Diskpart:
Step 1: Press the «Windows» + «R» keyВ simultaneously to bring up the Run box. Type cmd and hit Enter.
Step 2: Type the following commands each after to delete a partition from your computer.
- diskpart
- list disk
- selected disk #
- list partition
- select partition #
- delete partition
Step 3: Type exit to close the Command Prompt window.
Method 3. Delete Partition Windows 10 with Free Hard Drive Partitioning Software
Applies to: delete data partition, recovery partition, or EFI partition in Windows 10; delete all partitions one time
If you delete the partition in order to expand other partitions. Then the free hard drive partitioning software — EaseUS Partition Master would be a better choice. It is an all-in-one partition management tool that supports users to delete and resize partitions with ease. Compared with the diskpart method, it’s able to delete one or more partitions at a time, yet is more user-friendly, without requiring a solid computer skill.
Now download EaseUS Partition Master and follow the detailed guide below.
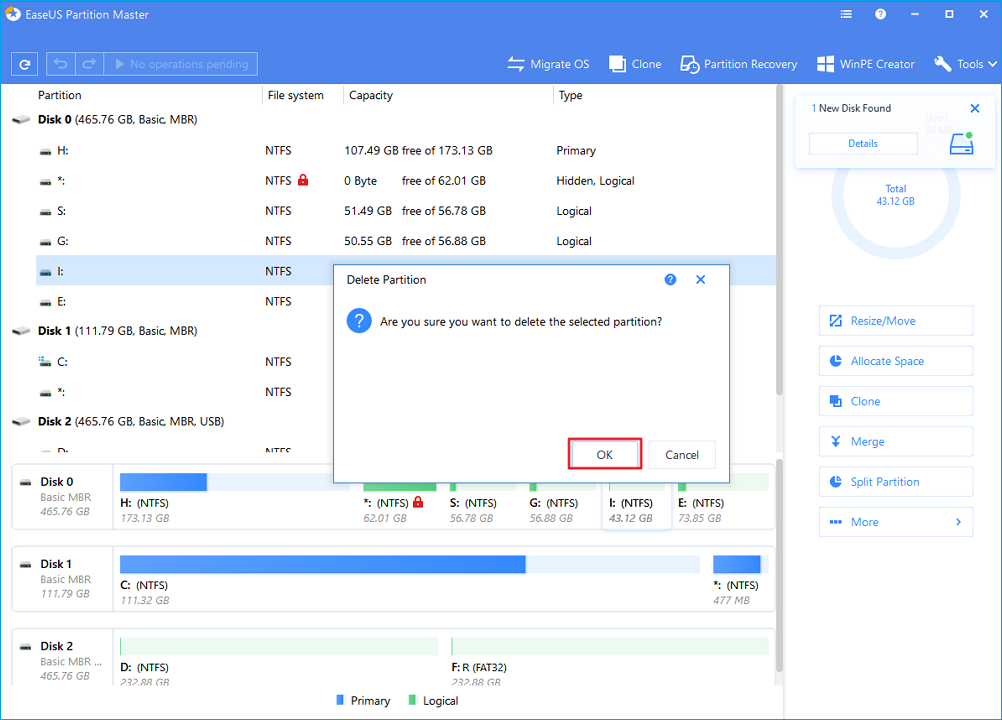
Guide: How to delete partition in Windows 10
Step 1.В Launch EaseUS Partition Master on your computer. Which partition do you want to delete? Right-click on it and choose «Delete. «.
Make sure that you’ve backed up the important data on the selected partition because this manner will compeletely erase data there.

Step 2. Click «OK» to confirm the deletion.
Step 3. Click «Execute xx Operation» on the top menu and then click «Apply» to save the change.
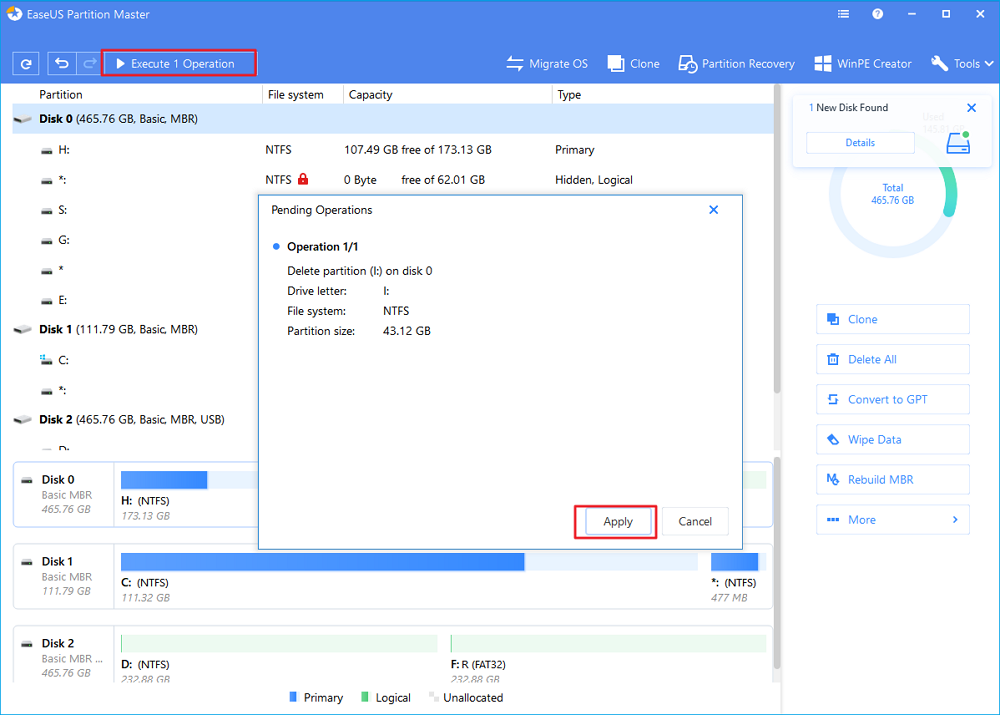
After doing so, you can enlarge other disks or do more operations using EaseUS Partition Master for free.
The following video tutorial shows how to partition a hard drive with EaseUS Partition Master, including how toВ resize, create, delete a partition and extend the C drive.В
Bonus TipВ — Can’t Delete Partition During Windows 10 Installation
Can’t delete a partition in Windows 10? It’s because you’re attempting to delete a protected partition using the default Disk Management, like a C drive, boot drive, recovery drive, or an OEM partition. When you can’t delete a partition Windows 10 install, you can try solutions as follows.
Step 1: Boot up with Windows installation media (USB/DVD).
Step 2: On the first screen. Press SHIFT + F10 and type the below commands:
Step 3: Continue with Installation, select custom, select the unallocated partition then click Next (Do not create partition/format. Let Windows create the needed partitions.
Step 4: When prompted for a product key. Click on «I don’t have the product key» or «Skip this step».
Was This Page Helpful?
Gemma is member of EaseUS team and has been committed to creating valuable content in fields about file recovery, partition management, and data backup etc for many years. She loves to help users solve various types of computer related issues.
Brithny is a technology enthusiast, aiming to make readers’ tech life easy and enjoyable. She loves exploring new technologies and writing technical how-to tips. On her spare time, she loves sharing things about her favorite singer — Taylor Swift on her Facebook or Twitter.
I love that the changes you make with EaseUS Partition Master Free aren’t immediately applied to the disks. It makes it way easier to play out what will happen after you’ve made all the changes. I also think the overall look and feel of EaseUS Partition Master Free makes whatever you’re doing with your computer’s partitions easy.
Partition Master Free can Resize, Move, Merge, Migrate, and Copy disks or partitions; convert to local, change label, defragment, check and explore partition; and much more. A premium upgrade adds free tech support and the ability to resize dynamic volumes.
It won’t hot image your drives or align them, but since it’s coupled with a partition manager, it allows you do perform many tasks at once, instead of just cloning drives. You can move partitions around, resize them, defragment, and more, along with the other tools you’d expect from a cloning tool.
Daisy/2021/04/16
Brithny/2021/04/16
Gemma/2021/04/16
Tracy King/2021/01/22
About EaseUS Partition Master
All-round disk & partition management software for personal and commercial use. Let it manage your storage drive: resize, format, delete, clone, convert, etc.
How to delete the other Windows Operating System when I have two
I have two Windows 7, one in drive C and other in drive D. I use the one in drive D. I want to remove the one present in drive C, to find more free disk space.
But I cannot delete the Windows folder present in drive C. It says you need permission something. Also when my computer starts it asks me which OS I want to use, the two OS names are the same «Windows 7». I chose the upper one, this is the one present in Drive D. However when I choose the other one that does not run, computer restarts after sometime before logging in. This is because I have deleted everything associated with the previous Windows, except the Windows folder. Because I can not delete it.
How can I delete this Windows folder present in drive C, which I cannot use ( and I don’t want to use). Please tell me the simple way, ASAP.

1 Answer 1
About dirty Windows folder:
a) Simplest way: Browse C:\Windows, hit the F3, search for everything. When searching complete, select all items and delete them, skip protected items. Then move C:\Windows under the carpet. Now you freed the space. If you really want to delete the remained files; take their ownership, then delete them again.
b) If you have Windows 7 Install disk, boot the PC from install DVD. Format the drive C:, go back and repair your Windows 7 -because probably it won’t boot. Or it will.
c) Boot form Windows 7 Install disk. Open a command prompt. Type del c:\windows /s or Format c:
P.S: If you don’t have the DVD, Win 7 has embedded recovery tools, just turn the power down, next boot, it will ask for recovery.
About boot menu:
Right click My Computer > choose Properties. At the left side click Advanced System Settings link. Select Advanced tab. There is a Startup & Recovery button. You can choose the default OS and menu duration. If you set 0 as duration, menu won’t appear next time. If you want to totally rip the older OS menu item, there are a few tools that modify startup menu.
How to delete or uninstall Windows from your PC
Some of our readers have asked us how they can remove Windows from their computers. Some of them want to remove Windows and empty their drives, some have dual-boot configurations and want to keep only one Windows version, and other have Windows and Linux running alongside, and prefer to get rid of Windows altogether. We wanted to help, so here are all the steps you need to take in these situations:
IMPORTANT: Make sure that you back up the data you have on the drive where Windows is installed. If you do not back it up while Windows is installed and works well, you risk losing your data if something goes wrong along the way.
1. How to delete Windows when it is the only operating system installed
If you installed just one Windows operating system, then the uninstallation is simple. Create a USB recovery drive or an installation CD/DVD or USB memory stick with the operating system that you want to use next, and boot from it.
Then, on the recovery screen or during the installation of the new operating system, select the existing Windows partition(s) and format or delete it (them).
Alternatively, you can boot from the recovery disk, load Command Prompt, and then use the diskpart and format commands to remove or format the Windows partition(s) you no longer need. If you need help with these commands or with opening Command Prompt from the recovery environment, you find instructions in these tutorials:
2. How to delete one Windows when you have multiple Windows operating systems installed in a dual-boot or multi-boot configuration
What if you have two or more Windows operating systems installed on the same computer, and you want to uninstall one of them? For example, let’s assume that you have installed Windows 10 to dual-boot alongside Windows 7. You may want to remove the older Windows 7 and use the space occupied by Windows 7 to create a new partition or to resize your existing Windows 10 partition. How do you do that?
First of all, remove the boot entry for the Windows version that you want to uninstall. In our example, that’s Windows 7. Perform this action from the version of Windows that you want to keep. In our case, that is Windows 10.
Start the Windows operating system that you want to keep and open the System Configuration tool. A quick way to launch it is to use the Run window. Simultaneously press the Windows + R keys on your keyboard and, in the Run window, enter type msconfig. Press Enter or click/tap OK, and the System Configuration tool opens.
We use the System Configuration tool because it is available in all Windows versions. If you prefer, you can also use other boot managers, but make sure that the one you choose is compatible with all the operating systems that you have installed.
In System Configuration, go to the Boot tab, and check whether the Windows that you want to keep is set as default. To do that, select it and then press “Set as default.”
Next, select the Windows that you want to uninstall, click Delete, and then Apply or OK.
To test if everything is OK with the Windows that you want to keep, restart your computer and see if you can boot without problems. You should be able to.
If something terribly wrong happens and you cannot boot correctly, you can repair the boot entries using the Windows installation media. Read Fix problems that keep Windows from loading, with Startup Repair and How to use the Command Prompt to fix issues with your PC’s boot records, for help.
Now that the boot entry is gone, it is time to erase or format the partition used by the Windows that you want removed. Format it if you plan to reuse that partition to install another operating system, or eliminate the entire volume if you would instead use that space to extend other partitions.
For both actions, you can use the Disk Management tool. Open it with a click/tap on its shortcut from the WinX menu (press Win + X on your keyboard), or use one of the methods we described here.
In the Disk Management window, right-click or tap and hold on the partition that you want to be removed (the one with the operating system that you uninstall), and select “Delete Volume” to erase it. Then, you can add the available space to other partitions.
If you want to reuse the same partition for another operating system, you should format the partition instead of deleting it. For example, if you want to remove Windows 7 so that you can install another operating system, select the partition, right-click or tap and hold on it, and then click/tap on Format in the contextual menu.
Windows warns you that you are about to erase all the data stored on that partition, and you might also get a warning that the selected partition is in use. To continue the formatting, press Yes. Once you do that, you can see that the Windows that you wanted to uninstall has been removed.
3. How to delete Windows when you installed it alongside a Linux distribution such as Ubuntu, in a dual-boot or multi-boot configuration
If you have a multi-boot setup that includes non-Microsoft operating systems, like Ubuntu Linux, the steps are similar to the ones in the previous section, but you have to perform them from Linux. Let’s assume that you have a dual-boot setup with Ubuntu and Windows 10 running alongside on the same computer. How do you get rid of Windows 10 and keep Ubuntu?
First of all, remove the Windows 10 system partition(s). To do so, you need an app that can manage drives and partitions. The one found by default in Ubuntu is called Disks. Start by opening the Applications menu with a click/tap on its button from the bottom-left corner of the screen.
On the Applications screen, type disks in the search field from the top. In the list of search results, click or tap Disks.
In the Disks app, select the Windows partition that you want to remove. It should be easy to spot because it’s usually formatted using NTFS. After you select it, click/tap the – (minus) button beneath the list of Volumes.
Ubuntu asks if you “are sure you want to delete the partition.” Click Delete.
Confirm the action by entering the administrator password, and then click/tap Authenticate.
Now, the Windows partition should be no more. However, there may be other Windows partitions found on your computer, such as System Reserved or Recovery partitions. If there are, you might want to delete those also, using the same procedure.
After you have deleted all the Windows partitions that you no longer need, reboot your computer.
When your computer starts, the GRUB loader should still show Windows 10 as an available operating system to boot from. However, it does not work, because you deleted its partition(s). To completely forget that a Windows operating system was ever found on your computer, you need to delete its entry from the GRUB boot menu. Fortunately, that’s easy: start Ubuntu again and login with your user account.
Open a Terminal window by simultaneously pressing the Ctrl + Alt + T keys on your keyboard. In the Terminal, type the command sudo update-grub and press Enter. Type the password of your administrator account and press Enter once more.
After a moment or two, Ubuntu updates the GRUB boot menu and removes the Windows 10 entry from it. From now on, you can enjoy a Windows-free Linux experience. 🙂
Why did you want to remove Windows?
As you have seen, uninstalling Windows is not as hard as it may seem. Anyone can do it with a bit of attention to the steps detailed above. If you are looking for guides on installing different versions of Windows, do not hesitate to read the recommendations below and, if you have something to add to our guide, write us a comment.


