- Disable Gatekeeper on macOS Big Sur (11.x)
- Usage
- Disabling Gatekeeper permanently
- Disabling Gatekeeper for one application only
- Using Finder
- Using Terminal
- Using curl or wget
- Frequently asked questions
- Isn’t it insecure to disable Gatekeeper?
- I still can’t run an application after disabling Gatekeeper.
- License
- How to disable gatekeeper mac os
- Как отключить проверку приложений в Mac OS
- How to Disable Gatekeeper from Command Line in Mac OS X
- Disable Gatekeeper from the Command Line in Mac OS
- How to Enable Gatekeeper from the Command Line of Mac OS X
- How to Prevent Gatekeeper Turning Back On Automatically in Mac OS X
- Disabling Gatekeeper Auto-Rearm Feature in Mac OS X
- Re-Enabling Gatekeeper AutoRearm with defaults in Mac OS X
- How to Disable Gatekeeper to Allow App Installation from Anywhere in macOS
- What is the Gatekeeper in Mac?
- When you attempt to download an application from the Internet, the Gatekeeper will behave in any one of the three ways in details:
- How can you install apps from other sources in MacOS?
- Option 1: Utilizing Terminal to disable Gatekeeper
- Option 2: Making use of the Applications Folder to open apps
- Option 3: Disable Gatekeeper security feature temporarily
- Disable Gatekeeper on iOS devices
- The Bottom Line
Disable Gatekeeper on macOS Big Sur (11.x)
Since macOS 10.8, Apple requires applications to be signed before they can be run. However, code signing is a paid process (costing a $99/year subscription, and more if you also want to publish to the Mac App Store).
Independent developers may not have the time or budget required to sign their applications or upload them to the Mac App Store. Due to this, many open source applications can’t be run out of the box on macOS.
Recent macOS versions have made it increasingly difficult to disable Gatekeeper. Thankfully, there are still several ways to disable or bypass it as of March 2021.
Usage
Disabling Gatekeeper permanently
- Open a terminal by pressing Cmd + Space , enter “Terminal” and open the application.
- Run the following command: sudo spctl —master-disable . Enter your administrator password when requested.
- Gatekeeper is now disabled permanently.
Disabling Gatekeeper for one application only
Using Finder
Note: This method may not work for all applications. If the application still doesn’t run after following the steps below, try following the steps described in Using Terminal instead.
- Open Finder and navigate to the application you just downloaded.
- Right-click the application and choose Open.
- Click Cancel in the confirmation dialog that appears. This is required since macOS Big Sur, as the dialog must now be opened twice for the Open button to appear. On macOS Catalina and older, you only have to open this dialog once.
- Right-click the application a second time and choose Open again.
- Click Open in the confirmation dialog that appears.
You only have to do this for the first application start. You can start the application as usual afterwards.
Using Terminal
- Open a terminal by pressing Cmd + Space , enter “Terminal” and open the application.
- Run the following command: xattr -dr com.apple.quarantine /path/to/Application.app . The path is case-sensitive and must point to the application bundle. (You can use Tab to complete file paths.)
You only have to do this before starting the application for the first time. You can start the application as usual afterwards.
Using curl or wget
You can also download the application using a tool that doesn’t set the quarantine attribute. curl or wget should work for this. Open a terminal then run:
This is how Steam and update frameworks like Sparkle are able to download and run applications without requiring them to be signed.
Frequently asked questions
Isn’t it insecure to disable Gatekeeper?
With today’s security threats, antivirus software is becoming less relevant over the years. Many antiviruses are now fooled by malware executables, and other forms of malware aren’t detected by most antiviruses. While perfect security doesn’t exist, it still is a good idea to avoid exposing yourself to modern threats such as ransomware.
To make your computing more secure, consider the following options:
- Block tracking and malware scripts using uBlock Origin. This will also make browsing faster and decrease network traffic.
- Block tracking and malware domains using Dan Pollock’s hosts file. This has the upside of working on all software on your computer, not just Web browsers.
I still can’t run an application after disabling Gatekeeper.
If the application was packaged in a ZIP archive, this could be due to the executable ( +x ) attribute being missing on the binary contained in the .app bundle. To solve this:
- Open a terminal by pressing Cmd + Space , enter “Terminal” and open the application.
- Run the following command: chmod +x /path/to/Application.app/Contents/MacOS/* . The path is case-sensitive and must point to the application bundle. (You can use Tab to complete file paths.)
You only have to do this before starting the application for the first time. You can start the application as usual afterwards.
License
Copyright © 2017-2021 Hugo Locurcio and contributors
Источник
How to disable gatekeeper mac os
All about macOS and iOS
Как отключить проверку приложений в Mac OS
В Mac OS существует специальный сервис Gatekeeper — в переводе на русский «хранитель ворот», созданный для проверки цифровой подписи приложений и при вероятных проблемах не дающий запускать их.
С одной стороны, вроде бы это полезный защитник — если вы волнуетесь за свою безопасность, то настройте ее на максимум и проблемы будут практически исключены. Однако чаще пользователей волнует, как отключить проверку приложений мак, как устанавливать программы на Mac OS Mojave от любого разработчика, потому что этот защитник докучает им своей назойливостью.
Ранее, до Mac OS Sierra, GateKeeper отключался проще, но и теперь программы можно запустить, а защитника — при необходимости отключить.
Если достаточно решить вопрос, как отключить проверку программ Mac, не разбираясь, как Gatekeeper Mac отключить целиком, то просто нажмите на ярлыке определенной программы с зажатым Ctrl и нажимайте на Открыть. Gatekeeper предупредит об опасности, но разрешит запуск.
Чтобы не мучиться каждый раз, что не запускаются программы Mac OS Sierra без подобных танцев с бубном, наберите в Терминале (нужен админский пароль) такую команду:
sudo spctl —master-disable
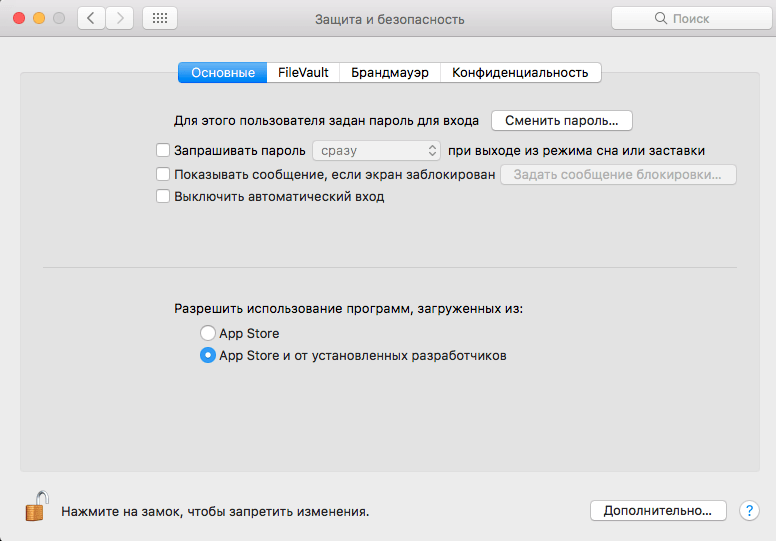
Далее откройте настройки системы, там «Безопасность и защита», вкладка Основные. Там должна будет появиться возможность разрешения запуска каких бы то ни было приложений, то есть вопрос, как отключить Gatekeeper Mojave, будет практически полностью решен.
Также существует скрипт от TNT Team, решающий проблемы с «хранителем ворот» на macOS Sierra, подробнее о котором узнать вы можете из этого тематического видео:
Источник
How to Disable Gatekeeper from Command Line in Mac OS X

Though most Mac users will want to keep Gatekeeper enabled for security purposes, some advanced users find that Gatekeeper is overly zealous in preventing third party apps from being used in macOS and Mac OS X.
While it’s easy to turn off Gatekeeper through the System Preferences on a Mac, another option is to disable Gatekeeper by using the command line in Mac OS. This can be helpful for scripting purposes, configuration, remote management, and just for those who prefer to use the Terminal.
Disable Gatekeeper from the Command Line in Mac OS
Launch Terminal if you haven’t done so yet (/Applications/Utilities/) and issue the following command to turn off Gatekeeper:
sudo spctl —master-disable
Hit return and enter the admin password as usually required by sudo, and Gatekeeper will instantly be disabled. If you feel like confirming this, you can do so with the –status flag and the same command, like so:
This will report back ‘assessments disabled’ to indicate that Gatekeeper has been turned off. You will also find that the Gatekeeper Security preference panel will be set to ‘Everywhere’.
How to Enable Gatekeeper from the Command Line of Mac OS X
Of course, you can also turn on Gatekeeper from the command line of macOS / Mac OS X too by using the following command string:
sudo spctl —master-enable
Hit return and you can confirm the status again with –status:
$ spctl —status
assessments enabled
Gatekeeper will be enabled again at it’s strictest setting. As disabling, the setting will carry through the GUI as well.
Again, most users should leave Gatekeeper turned on, and if need be, they can bypass it through the System Preference panel on a per-app basis, or by using the right-click “Open” trick.
The ability to disable Gatekeeper through Terminal has existed for quite a while now, and this tip applies to basically all modern Mac OS versions, including macOS Big Sur, Catalina, Mojave, High Sierra, and Sierra.
If you know of any other helpful tips or tricks associated with enabling and disabling Gatekeeper from the command line (or otherwise) do share them with us in the comments below.
Источник
How to Prevent Gatekeeper Turning Back On Automatically in Mac OS X
Gatekeeper is a security feature built into Mac OS X which helps to prevent unauthorized applications and code from executing on a Mac. Most users have encountered Gatekeeper before when they go to open an application downloaded from the internet, where you see an “App can’t be opened because it is from an unidentified developer” error message. Because Gatekeeper is a worthwhile security feature, almost all Mac users should leave it enabled, but some advanced OS X users, developers, and systems administrators may need to disable Gatekeeper. While you can do that, users will find that Gatekeeper re-enables itself after a 30 day period has lapsed, basically meaning that Gatekeeper will turn itself back on even if it has been turned off.
This is a security feature called ‘Auto Rearm’ and it’s a new addition to Gatekeeper in MacOS Sierra, OS X El Capitan and Yosemite, but with a little effort the auto-enable feature can be disabled too.
Disabling Gatekeeper Auto-Rearm Feature in Mac OS X
With a defaults command string you can prevent Gatekeeper from reactivating itself after it has been disabled for 30 days. This applies to modern versions of Mac OS X, but is really only relevant for advanced users.
Open the Terminal application (/Applications/Utilities) and enter the following defaults command string:
sudo defaults write /Library/Preferences/com.apple.security GKAutoRearm -bool NO
Hit return and enter the admin password as usual, this will prevent Gatekeeper from turning itself back on again after 30 days the next time you turn the feature off in the settings or from the command line.
Re-Enabling Gatekeeper AutoRearm with defaults in Mac OS X
To go back to the default setting and return Gatekeeper to it’s automatic reactivation abilities after 30 days, simply enter the following command string in the terminal:
sudo defaults write /Library/Preferences/com.apple.security GKAutoRearm -bool YES
Again hit return and enter an administrator password, Gatekeeper will turn itself back on again as intended.
Should the average user do this? No. Even for advanced users, this may be considered somewhat extreme, and perhaps a better approach may be to go about adding Gatekeeper exceptions manually for apps as needed, or just use the bypass method through System Preferences when an app is encountered by Gatekeeper.
Heads up to JonsView for discovering this defaults command.
Источник
How to Disable Gatekeeper to Allow App Installation from Anywhere in macOS

It is a known fact the Apple will only install apps that have been confirmed from the App Store. You will have a tough time downloading apps from other locations and will not install after downloading. This happens because the security feature of the operating system called Gatekeeper verifies the downloaded applications before allowing them to run. But the good news is that there are quite a few ways by which you can bypass and disable Gatekeeper and install all sorts of apps on your Mac.
PS: here, you will learn more about how to fix issues like Copy and paste not working on Mac, and Airpods not connecting to Mac, as well as Mac camera not working with ease.
What is the Gatekeeper in Mac?
As the name suggests, Gatekeeper is Apple’s security feature that keeps a check on the apps being installed on your Mac and keep the rest away. It was first introduced in the MacOS 10.7.3 (Lion) in the year 2011.
You will see that Apple reviews and offers only those apps that are safe and compatible to use. MacOS Gatekeeper verifies the application before allowing them to run; this implies that the apps that are not listed in the Apple Store cannot be installed into your Mac.
Gatekeeper security applies only to the apps downloaded from the Internet. Installation of applications from other sources like removable media or network drives is not checked by the security feature.
When you attempt to download an application from the Internet, the Gatekeeper will behave in any one of the three ways in details:
- If the App has been downloaded from the App Store, the Gatekeeper will, by default, allow it to be installed. All the software and apps listed under the App Store undergo the process of code review by the engineers of Apple and given a set of unique cryptographic digital signature that is then verified by Gatekeeper.
- If the App is not a native of the App Store, the Gatekeeper will look for a digital signature that identifies the developer. And if the signature is verified by the Gatekeeper, you can download and install the application if it is compatible with your system.
- If there is no digital signature, the operating system will warn you that the developer has not been identified and the App will not be installed.
MacOS Catalina’s Gatekeeper keeps these apps from being installed on your device for your own security. By default, the Gatekeeper will not allow you to install any app, even if you trust the app developer. The security feature is responsible for significantly reducing the chances of malware that can be unintentionally or accidentally installed on your Mac device. However, you have the option of changing the settings and disable Gatekeeper to perform the installation within a few minutes.
Additionally, you also have the option to install apps by ‘Identified Developers,’ apart from the ones that are already found in the App Store. Identified developers are developers whose apps cannot be found in the App Store, but has been tested and proven for security by Apple. To allow the installation of these apps, you can head over to the ‘System Preferences‘ and then the ‘Security and Privacy‘ option. Here, search and click on the General tab and choose the radio option ‘Allow buttons downloaded from App Store and identified developers.’
But what would you do if the App is neither found in the App Store or from an identified developer? Well, we can help you find your way around this peculiar issue.
Besides, let’s learn more about how to fix the MacBook Pro black screen and The recovery server could not be contacted issue with ease.
How can you install apps from other sources in MacOS?
Once you disable Gatekeeper, you will be able to install apps from anywhere without any problems. While removing the security feature entirely might not be possible, you can easily disable Gatekeeper security feature either temporarily or permanently. Here is how you can disable Gatekeeper:
Option 1: Utilizing Terminal to disable Gatekeeper
- 1. In your MacOS, open the Terminal; you can do this by heading towards the Applications folder and then the Utility folder.

- 2. Add in the key in the command ‘sudo spctl –master-disable‘ and press the enter button. Once done, you will be prompted to enter the admin password; click on Enter once you are done with the authentication.

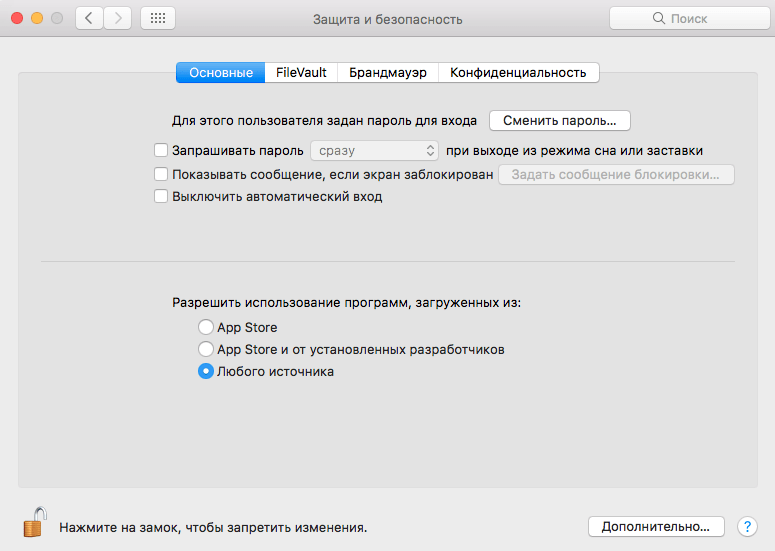
- 3. Next, you have to open the ‘System Preferences.’ Head over to the ‘Security and Privacy‘ and then to the General tab. Here, navigate to the section ‘Allow apps downloaded from‘; you will see the option labeled as ‘Anywhere.’ Select the option and save all the changes.
This change in command only adds a third option to the Gatekeeper. From this, we come to know that you have the option of installing apps from unknown third-party sources; it just has been hidden away very charily. You can easily find the option with a few steps and then download apps from unknown sources. You do not have to disable Gatekeeper security feature here exactly.
However, it is also important to mention that making use of this particular method will only risk the security of your Mac. As a precaution, you should always install apps that you can verify and trust completely. Additionally, you need to be sure to conceal the ‘Allow apps from anywhere‘ option if you are sharing your Mac with other people; you can do this by opening the Terminal and entering the code ‘sudo spctl –master-enable.’
Option 2: Making use of the Applications Folder to open apps
Here is how you can use the Applications Folder to open apps from unknown sources:
- 1. Pull the Downloaded App to the Applications Folder.
- 2. You can either press the control button on the keyboard and click on the App or simply right-click on the application itself.
- 3. Here, you will see the options. Drag the mouse pointer towards ‘Open‘ and click on it.

- 4. A warning pop-up box will be displayed and ask if you are sure that you want to go ahead of the task of opening the App. Click on the ‘Open‘ button to open the App.

Option 3: Disable Gatekeeper security feature temporarily
Here is a step-by-step guide on how to disable Gatekeeper temporarily:
- 1.Click on the App that you have downloaded from a third-party developer; you will not be able to open the application and will be blocked automatically.
- 2.Head over to the ‘System Preferences‘ and then to ‘Security and Privacy.’ Drag the mouse over the General tab; you will be able to see a message that reads something like ‘xyz was blocked from opening because it is not from an identified developer.’
- 3.Here, you will see the ‘Open Anyway‘ option; click on this option, and the App will open.

All three methods mentioned above will work on a single app. This means that you can also use any other application on your Mac as well as the application from the unknown developer. But, each time you want to open an unknown app, you will have to follow any one of these three methods to disable Gatekeeper security feature. It is not as simple as downloading the App from the third-party website and opening it.
If you are a person who loves to download apps from the Internet, it can be a very mind-numbing and dull process to right-click on each one of them and open the apps like any other application by Apple. Hence, you will need the help of some codes to the Terminal that will give you total control on whatever App that you install on your Mac device. This means that you no longer will have to rely on what applications Apple chooses for you!
Disable Gatekeeper on iOS devices
The iOS version of the Gatekeeper will only allow apps to be downloaded and installed from the App Store. The Gatekeeper settings here cannot be altered unless the iPad or iPhone has been jailbroken. But since Apple does not condone jailbreaking, you might violate your device’s warranty.
The Bottom Line
Making use of the Terminal is, by far, the best method to disable Gatekeeper security feature and install a third-party app on your Mac device without having to endure the tiring process of creating an exception for each one of them. With the help of this single method, you will be able to download, install, and use these apps as many times as you want with ease, no matter the source.
Ultimately, Apple installed this particular security feature for the security of its customers only. Hence, opening unknown apps is not exactly for everyone. You need to be certain that the apps you are downloading and installing is safe and secure and will not affect your device in a negative manner. Additionally, make sure that you have the latest antivirus program installed on your Mac to protect you from malware that can be mistaken as legitimate apps. Try to disable Gatekeeper as minimally as possible.
Источник


