- Отключение Internet Explorer в Windows
- Дополнительные сведения
- Метод 1. Использование панели управления (только клиентских систем)
- Метод 2. Использование DISM (клиентских и серверных систем)
- Disable Internet Explorer on Windows
- More information
- Method 1 — Use Control Panel (client systems only)
- Method 2 — Use DISM (client and server systems)
- How to disable Explorer’s automatic folder view switching on Windows 7?
- Replies (4)
- How to disable File Grouping in Explorer on Windows 10
- Disable File Grouping in Explorer
- Stop File Explorer sorting by week and month
- 1] Disable File grouping for only one folder
- 2] Disable File grouping for all the folders
- Related Posts
- How to show Details pane in File Explorer of Windows 10
- How to add Control Panel to File Explorer in Windows 10
- How to add User Profile folder to Navigation Pane of Windows 10 File Explorer
- [email protected]
- How to Disable Recent files in Windows 10 File Explorer
- How to Disable Recent files in Windows 10 Explorer
- 1. Manually Disable Recent Files
- 2. Disable using Local Settings
- 3. Via Group Policy Editor
Отключение Internet Explorer в Windows
В этой статье описывается, как отключить любую поддерживаемую версию Internet Explorer в Windows.
Применимо к: Windows
Исходный номер КБ: 4013567
Дополнительные сведения
Чтобы отключить Internet Explorer, используйте один из следующих методов.
Если вы хотите восстановить программу на том же компьютере, рекомендуется использовать тот же метод, который использовался в первый раз (панель управления или DISM). Так как Internet Explorer остается установленным на компьютере после его отключения, следует продолжить установку обновлений для системы безопасности, которые применяются к Internet Explorer.
Метод 1. Использование панели управления (только клиентских систем)
В клиентских системах для отключения Internet Explorer можно использовать элемент программы и компонентов на панели управления. Для этого выполните следующие действия:
- Нажмите клавиши с логотипом Windows+R, чтобы открыть окно «Выполнить».
- Введите appwiz.cpl и выберите «ОК».
- В элементе «Программы и функции» выберите «Включить или отключить функции окна».
- В диалоговом окне компонентов Windows найдите запись для установленной версии Internet Explorer. Например, найдите запись Internet Explorer 11. Затем сойми из этого окна.
- Выберите «ОК», чтобы зафиксировать изменение.
- Перезагрузите компьютер.
Метод 2. Использование DISM (клиентских и серверных систем)
В клиентских и серверных системах для отключения Internet Explorer можно использовать средство командной строки DISM. Например, чтобы отключить Internet Explorer 11, выполните следующие действия.
Чтобы отключить Internet Explorer 11, в командной области с повышенными уровнями запустите следующую dism /online /Disable-Feature /FeatureName:Internet-Explorer-Optional-amd64 команду:
Возвращается следующее сообщение:
Средство обслуживания образа развертывания и управления ими
Версия: 6.1.7600.16385
Версия изображения: 6.1.7600.16385
Отключение функций
[=======100.0%===
Операция успешно завершена.
Перезапустите Windows, чтобы завершить эту операцию.
Вы хотите перезагрузить компьютер сейчас (Y/N)?
Для реализации изменения необходимо перезагрузить компьютер.
Если вы хотите повторно включить Internet Explorer 11, в командной области с повышенными повышенными уровнями запустите следующую команду: dism /online /Enable-Feature /FeatureName:Internet-Explorer-Optional-amd64 .
Возвращается следующее сообщение:
Средство обслуживания образа развертывания и управления ими
Версия: 6.1.7600.16385
Версия изображения: 6.1.7600.16385
Включение функций
[=======100.0%===
Операция успешно завершена.
Перезапустите Windows, чтобы завершить эту операцию.
Вы хотите перезагрузить компьютер сейчас (Y/N)?
Для реализации изменения необходимо перезагрузить компьютер.
Disable Internet Explorer on Windows
This article describes how to disable any supported version of Internet Explorer on Windows.
Applies to: В Windows
Original KB number: В 4013567
More information
To disable Internet Explorer, use one of the following methods.
If you want to restore the program on the same computer, we recommend that you use the same method that you first used (Control Panel or DISM). Because Internet Explorer remains installed on the computer after you disable it, you should continue to install security updates that apply to Internet Explorer.
Method 1 — Use Control Panel (client systems only)
On client systems, you can use the Program and Features item in Control Panel to disable Internet Explorer. To do this, follow these steps:
- Press the Windows logo key+R to open the Run box.
- Type appwiz.cpl, and then select OK.
- In the Programs and Features item, select Turn Window features on or off.
- In the Windows Features dialog box, locate the entry for the installed version of Internet Explorer. For example, locate the Internet Explorer 11 entry. Then, clear the check box.
- Select OK to commit the change.
- Restart the computer.
Method 2 — Use DISM (client and server systems)
On client and server systems, you can use the Deployment Image Servicing and Management (DISM) command-line tool to disable Internet Explorer. For example, to disable Internet Explorer 11, follow these steps.
Disable the feature
To disable Internet Explorer 11, run the following command at an elevated command prompt: dism /online /Disable-Feature /FeatureName:Internet-Explorer-Optional-amd64 .
The following message is returned:
Deployment Image Servicing and Management tool
Version: 6.1.7600.16385
Image Version: 6.1.7600.16385
Disabling feature(s)
[===================100.0%===================]
The operation completed successfully.
Restart Windows to complete this operation.
Do you want to restart the computer now (Y/N)?
You must restart the computer to implement the change.
Enable the feature
If you want to re-enable Internet Explorer 11, run the following command at an elevated command prompt: dism /online /Enable-Feature /FeatureName:Internet-Explorer-Optional-amd64 .
The following message is returned:
Deployment Image Servicing and Management tool
Version: 6.1.7600.16385
Image Version: 6.1.7600.16385
Enabling feature(s)
[===================100.0%===================]
The operation completed successfully.
Restart Windows to complete this operation.
Do you want to restart the computer now (Y/N)?
You must restart the computer to implement the change.
How to disable Explorer’s automatic folder view switching on Windows 7?
I have customized Explorer to always show details view with customized columns and column display order. That works fine until I copy first picture file (jpg, gif, bmp etc.) into a folder. Now when I use Explorer to show content of that folder, folder view has automatically switched to «large icons». Why does that happen? How I can turn off that automatic switching?
I can switch folder view back to details view, but Windows won’t show those details it showed before I copied that picture file. I have to re-customize the folder view. Fortunately I have to do that only once, but it is still frustrating. I’m software delevoper and that unwanted feature messes up my c++ projects very often as I have to add picture files into my projects.
***Post moved by the moderator to the appropriate forum category.***
Replies (4)
You may have some success within the Folder Options of Explorer. Click Organize from the top left of an Explorer windows and select Folder and Search Options (noted in red rectangle below).

Figure 1.0 — Explorer’s Organize Menu
Within the Folder Options dialog’s View tab, you’ll find an option for Always view icons, never thumbnails.

Figure 1.1 — Explorer’s Folder Options
With that checked on, you shouldn’t have your folder’s views changing on-the-fly. After setting up a folder the way you wish it to be represented, the Apply to Folders button may make the changes more permanent.
- «Have you tried turning it off and then on again?» — Roy from ‘The IT Crowd’ (Emmy award-winning British comedy)
How to disable File Grouping in Explorer on Windows 10
The File Explorer is the ultimate tool for browsing files on storage on a Windows 10 computer. It provides a great sense of customization for both listing and performing operations on a file. A user can arrange the files and folders being browsed by their name, type, date, size, etc. Files sharing a common attribute can also be grouped using the grouping feature. But these feature does not always help users. That is why these features can be turned on or off. In this article, we will be checking out how to disable file grouping in File Explorer on Windows 10.
Disable File Grouping in Explorer
We will be taking a look at two things regarding disabling File grouping in File Explorer on Windows 10:
- Disable File grouping for only one folder.
- Disable File grouping for all the folders.
Stop File Explorer sorting by week and month
1] Disable File grouping for only one folder
It is a relatively simple and straightforward method that will work when you wish to Disable File grouping for one folder only.
- Open File Explorer and navigate to the folder where you wish to disable file grouping.
- Right-click anywhere in the folder.
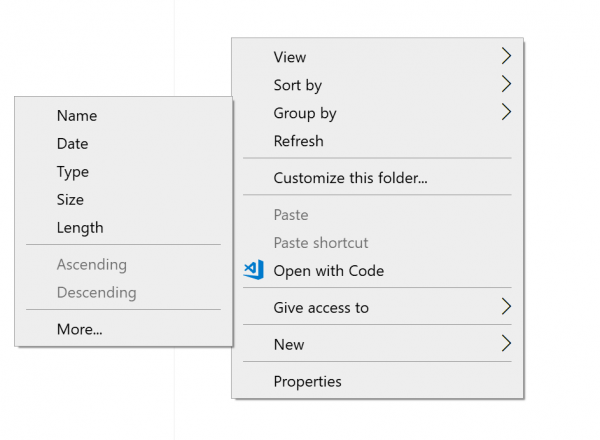
- Select Group by > None.
It will disable file grouping for that particular single folder only.
2] Disable File grouping for all the folders
This method is an extension of the first method. After following the steps in the first method, hit the following key combinations in the given order to open Folder Options:
- ALT + V
- Then, ALT + Y
- Lastly, ALT + O
Under the section of Folder views, select Apply to Folders.
Select Apply and then select OK.
It will disable file grouping on all folders on that computer listed in File Explorer.
I hope you found this guide useful.
Date: June 12, 2019 Tags: Explorer
Related Posts
How to show Details pane in File Explorer of Windows 10
How to add Control Panel to File Explorer in Windows 10
How to add User Profile folder to Navigation Pane of Windows 10 File Explorer
[email protected]
Ayush has been a Windows enthusiast since the day he got his first PC with Windows 98SE. He is an active Windows Insider since Day 1 and is now a Windows Insider MVP. He has been testing pre-release services on his Windows 10 PC, Lumia, and Android devices.
How to Disable Recent files in Windows 10 File Explorer
Today, we explore three different ways to disable Recent files in Windows 10 File Explorer. The company developed this folder so that users can access recent files or folders on their System easily. However, it may arise repercussions when there is more than one person who uses the same system. Hence if you don’t require any such folder so as to safeguard your privacy, you can permanently turn off this attribute on File Explorer.
Users can disable showing recent files on Windows 10 manually. You can also use either local Settings or Group Policy Editor to perform this task. All these workarounds are easy to set and enhance security features on your PC. Let’s discuss them in somewhat more detail-
How to Disable Recent files in Windows 10 Explorer
Below, we discourse 3 different methods to turn off disable recent files or folders on File Explorer-
1. Manually Disable Recent Files
This method is the easiest and quick process to clear recently opened files that are stored as cache on File Explorer. You need to delete these documents frequently using following steps-
Step-1: Right-click on Windows icon using the keyboard and select Run from Power menu.
Step-2: Once the Run dialog box pops up, copy/paste the following code then hit Enter to begin the task.

Step-3: When the list of files appears up, tap Ctrl & A hotkey to select all items.
Step-4: Now press Shift and Delete simultaneously to remove the files permanently.
Step-5: Henceforth, tap Yes on UAC prompt to authorize the changes.
At last open file Explorer and see whether all of the recent files are disappeared or not. If not, move to next solution.
2. Disable using Local Settings
Settings app provides a key feature to disable recent files on Windows Explorer. To avoid these documents from appearing, you should follow the below procedure-
- Press Win logo & I to cite Settings.
- On the next window, select the Personalization category followed by the Start section on the left column.
- Subsequently, move to the right pane and turn off the toggle switch Show recently opened items in Jump Lists on the Start or the Taskbar.

When the above task is over, Reboot your PC and check if all cache files stored in file Explorer vanish or not.
3. Via Group Policy Editor
If the above methods won’t work for whatsoever reasons, you can try Group Policy Editor. Using this tool, you can turn off all the services permanently that are running in the background on your system. In order to accomplish this, follow below processes-
- At first, Press Window & R hotkey to launch Run dialog.
- Type gpedit.msc in the void box then hit OK to initiate Group Policy Editor.
- Here, select the Computer configuration section on the left column followed by Administrator Templates.
- Succeeding after, choose the Start menu and Taskbar folder thereafter locate the following key on its corresponding right section.
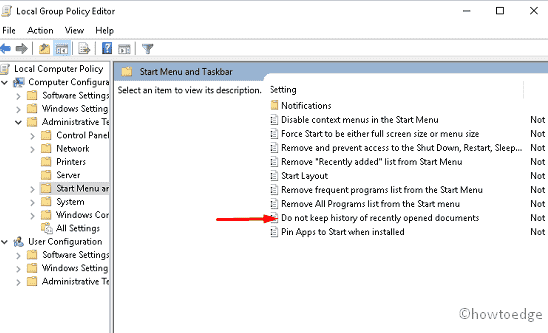
- Once found, Double click to start this then check to Enable radio button.
At last hit Apply and OK button to save the changes made so far.
Once you perform the above steps successfully, Restart your system. There must not lie any files or folders in the recent files section of Windows 10 Explorer.
Note: Disable recent files feature via group policy editor is applicable only for Windows 10 Pro and Enterprise users. This is because Group Policy Editor doesn’t exist on Windows 10 Home version.


