- ftp ftp
- Синтаксис Syntax
- Параметры Parameters
- Комментарии Remarks
- How to transfer files using FTP in Windows 10
- How do I transfer files using FTP?
- 1. Use a third-party product
- WinZip
- 2. Use Windows’ built-in FTP features
- Guide to Deploy FTP and Publish with VWD
- Deploying FTP
- Deployment Configuration
- Steps
- Create SSL Enabled Site
- Summary
- Configure User Isolation for All Directories
- Summary
- Configure the FTP Firewall Settings
- Configure the Passive Port Range for the FTP Service
- Summary
- FTP Server Names Examples
- Connect from Visual Web Developer
- Conclusion
ftp ftp
Область применения: Windows Server (половина ежегодного канала), Windows Server 2019, Windows Server 2016, Windows Server 2012 R2, Windows Server 2012 Applies to: Windows Server (Semi-Annual Channel), Windows Server 2019, Windows Server 2016, Windows Server 2012 R2, Windows Server 2012
Передает файлы на компьютер, на котором запущена служба протокол FTP (FTP), и с него. Transfers files to and from a computer running a File Transfer Protocol (ftp) server service. Эту команду можно использовать интерактивно или в пакетном режиме, обрабатывая текстовые файлы ASCII. This command can be used interactively or in batch mode by processing ASCII text files.
Синтаксис Syntax
Параметры Parameters
| Параметр Parameter | Описание Description |
|---|---|
| -v -v | Отключает отображение ответов на удаленные серверы. Suppresses display of remote server responses. |
| -d -d | Включает отладку, отображая все команды, передаваемые между FTP-клиентом и FTP-сервером. Enables debugging, displaying all commands passed between the FTP client and FTP server. |
| -i -i | Отключает Интерактивные запросы во время передачи нескольких файлов. Disables interactive prompting during multiple file transfers. |
| -n -n | Подавляет автоматическое имя входа при начальном подключении. Suppresses auto-login upon initial connection. |
| -g -g | Отключает имя файла глобализации. Disables file name globbing. Стандартная маска позволяет использовать звездочку (*) и вопросительный знак (?) в качестве подстановочных знаков в именах локальных файлов и путей. Glob permits the use of the asterisk (*) and question mark (?) as wildcard characters in local file and path names. |
| #d0 -s: | Указывает текстовый файл, содержащий команды FTP . Specifies a text file that contains ftp commands. Эти команды выполняются автоматически после запуска FTP . These commands run automatically after ftp starts. Этот параметр не допускает пробелов. This parameter allows no spaces. Используйте этот параметр вместо перенаправления ( ). Use this parameter instead of redirection ( ). Примечание. В операционных системах Windows 8 и Windows Server 2012 или более поздней версии текстовый файл должен быть написан в кодировке UTF-8. Note: In Windows 8 and Windows Server 2012 or later operating systems, the text file must be written in UTF-8. |
| -a -a | Указывает, что при привязке подключения к данным FTP можно использовать любой локальный интерфейс. Specifies that any local interface can be used when binding the ftp data connection. |
| -A -A | Выполняет вход на FTP-сервер как анонимный. Logs onto the ftp server as anonymous. |
| x -x: | Переопределяет размер SO_SNDBUF по умолчанию 8192. Overrides the default SO_SNDBUF size of 8192. |
| Cерверный -r: | Переопределяет размер SO_RCVBUF по умолчанию 8192. Overrides the default SO_RCVBUF size of 8192. |
| & -b: | Переопределяет число асинхронных буферов по умолчанию, равное 3. Overrides the default async buffer count of 3. |
| Белая -w: | Задает размер буфера перемещения. Specifies the size of the transfer buffer. Размер окна по умолчанию составляет 4096 байт. The default window size is 4096 bytes. |
| Указывает имя компьютера, IP-адрес или IPv6-адрес сервера FTP, к которому осуществляется подключение. Specifies the computer name, IP address, or IPv6 address of the ftp server to which to connect. Имя узла или адрес, если он указан, должен быть последним параметром в строке. The host name or address, if specified, must be the last parameter on the line. | |
| -? -? | Отображение справки в командной строке. Displays help at the command prompt. |
Комментарии Remarks
Параметры командной строки FTP чувствительны к регистру. The ftp command-line parameters are case-sensitive.
Эта команда доступна, только если протокол Internet Protocol (TCP/IP) установлен в качестве компонента в свойствах сетевого адаптера в окне Сетевые подключения. This command is available only if the Internet Protocol (TCP/IP) protocol is installed as a component in the properties of a network adapter in Network Connections.
Команду FTP можно использовать в интерактивном режиме. The ftp command can be used interactively. После запуска FTP создает подсреду, в которой можно использовать команды FTP . After it is started, ftp creates a sub-environment in which you can use ftp commands. Вы можете вернуться в командную строку, введя команду Quit . You can return to the command prompt by typing the quit command. При запуске вспомогательной среды FTP она указывается в ftp > командной строке. When the ftp sub-environment is running, it is indicated by the ftp > command prompt. Дополнительные сведения см. в разделе команды FTP . For more information, see the ftp commands.
При установке протокола IPv6 команда FTP поддерживает использование IPv6. The ftp command supports the use of IPv6 when the IPv6 protocol is installed.
How to transfer files using FTP in Windows 10

- FTPs are an excellent way of sending data efficiently between PCs.
- The guide below will showcase 2 methods on how to set up a FTP on Windows 10.
- If you want to learn more about this topic, head over to our dedicated File Sharing Hub.
- For more exciting and interesting tutorials, visit our website’s How-To page.

Many Windows 10 users want to create their own private cloud, upload files they can share and transfer files of any size (up to 1000GB), without restrictions.
The solution: building a FTP (File Transfer Protocol) server! It’s very easy to build one, and users will have full control of the server. They will even create multiple accounts so their friends and family will have access to those files.
Today, we’ll teach you how to install an FTP server on a Windows 10 PC.
How do I transfer files using FTP?
1. Use a third-party product
The easiest way to transfer files via FTP is to simply use a third-party tool that can do it for you in a simplified manner.
One software that comes to mind when it comes to file transfers should be WinZip. not only will it archive your files in a fast and efficient manner, but it can also secure it via encryption or password-protect it.
Once that is done, you can use WinZip to transfer your archives between different PCs, networks, or even clouds. As an added bonus, it also has integrations with many social media platforms, so sharing your archives has never been simpler.
WinZip
2. Use Windows’ built-in FTP features
These are the steps that you’ll need to follow to install an FTP server on your computer running on Windows 10:
Click and hold down the Windows key + X keyboard shortcut and when the Power User menu will appear, you will select Programs and Features. Now, you’ll click the Turn Windows features on/off link, then expand Internet Information Services.
You will check the FTP Server option and after expanding FTP Server, you will check the FTP Extensibility option. In continuation, you’ll check Web Management Tools and keep the default selections, then click OK to begin the installation and then on Close.
In order to create an FTP site on Windows 10, which will be used to send and receive files, follow these instructions:
- Again, open the Power User menu using the same method, and select Control Panel.
- Then, open Administrative Tools and double-click Internet Information Services (IIS) Manager.
- After expanding right-clicking Sites on the Connections pane, select Add FTP Site.
- Now, choose the name of the new FTP site, enter the path to the FTP folder that will be used to send and receive files, then click Next.
- When you see Binding and SSL Settings, choose only the SSL option to No SSL, then click Next.
- Check the Basic option on Authentication, and on Authorization, in the drop-down menu, select Specified users.
- Enter the email address of your Windows 10 account or local account name so that you will gain access to the FTP server.
- Finally, check Read and Write, then click Finish.
The above-mentioned steps can also prove helpful if you’re also interested in the following:
Set up FTP to transfer files – Both the software and the steps listed above will help you set up a FTP to transfer files anywhere.
Guide to Deploy FTP and Publish with VWD
The FTP service for IIS is a key component of the Windows Web Platform. It provides a robust, secure solution for FTP in a Windows environment. Shared hosting environment administrators can use FTP for IIS to enable their customers to upload and synchronize their content. The article What Is New for Microsoft and FTP? introduces the new FTP features. Here are the highlights:
Integration with IIS:
- New configuration store based on the .NET XML-based *.config format
- New administration tool
Security and support for new Internet standards:
- FTP over SSL
- Non-Windows accounts for authentication
- UTF8 and IPv6
Shared hosting improvements:
- Host FTP and Web content from the same site by adding an FTP binding to an existing Web site
- Virtual host name support, making it possible to host multiple FTP sites on the same IP address
- Improved user isolation, through per-user virtual directories
Improved logging and supportability features:
- Enhanced FTP logging includes all FTP-related traffic, unique tracking for FTP sessions, FTP sub-statuses, and additional detail fields in FTP logs
- Detailed error responses when logging on locally to an FTP server
- Detailed information when using Event Tracing for Windows (ETW), which provides additional information for troubleshooting
The following video provides an overview and demonstrations of several of the features in FTP 7.0.
Deploying FTP
FTP is one of the front-end servers in the shared hosting configuration.
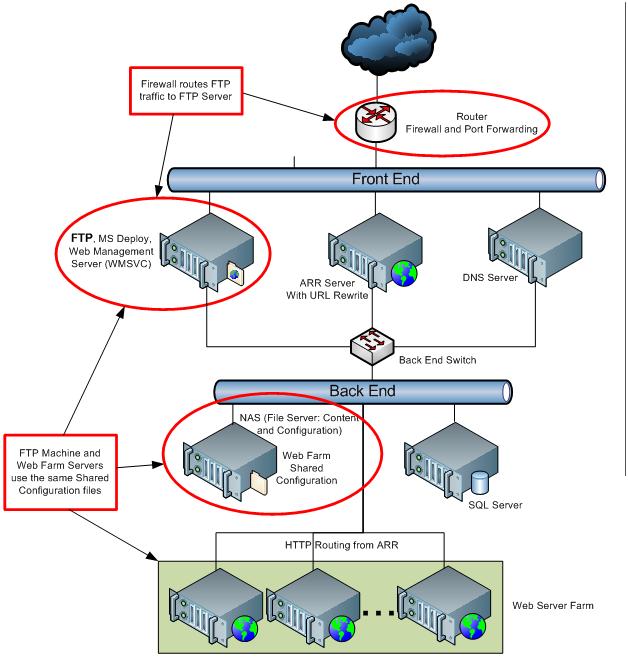
This image highlights several important characteristics of FTP deployment in the shared hosting environment:
- The FTP service can share the same computer that is used for the Remote Administration (Web Management — WMSVC) and MS Deploy services.
- The FTP computer is part of the shared configuration that is used by the Web farm servers, which means that the components installed on this computer should also be on the Web farm servers. However, since the Web farm will not be used to process FTP requests, the FTP, Web Management (WMSVC), and MS Deploy services can be stopped.
- The FTP computer is not intended to host Web applications.
- The Internet-facing firewall router performs the port forwarding of FTP traffic to the FTP server.
Deployment Configuration
The FTP for IIS server has several features that make it ideal for shared hosting scenarios. The guidelines below take advantage of the new FTP User Isolation feature. This feature allows:
- Administrators to limit user access to only the physical or virtual directory defined for the user. This means implementing a single FTP site; this site will contain a specific physical or virtual directory for each user name.
- Administrators to enable SSL and use a single certificate for all connections when explicitly required by users.
- Users to view the FTP site as if it were only theirs. When they log on to the FTP server, they will be restricted to their specific directory and will not be able to navigate up the directory tree.
Steps
Select the FTP computer and install the new FTP for IIS service. Follow the instructions found in Installing and Troubleshooting FTP.
Create a root folder to be used for your FTP site, for example: %*SystemDrive*%\inetpub\ftproot .
Optionally, if there are FTP high availability and/or load balancing requirements, Microsoft provides solutions such as Network Load Balance or Failover Clusters, DNS round-robin might be sufficient.
Create a site that allows SSL connections and Basic authentication. Follow the steps in the Create SSL Enabled Site section.
Enable the User Isolation feature. Follow the steps in the Configure User Isolation for All Directories section.
Configure the FTP firewall settings as described in the corresponding section below.
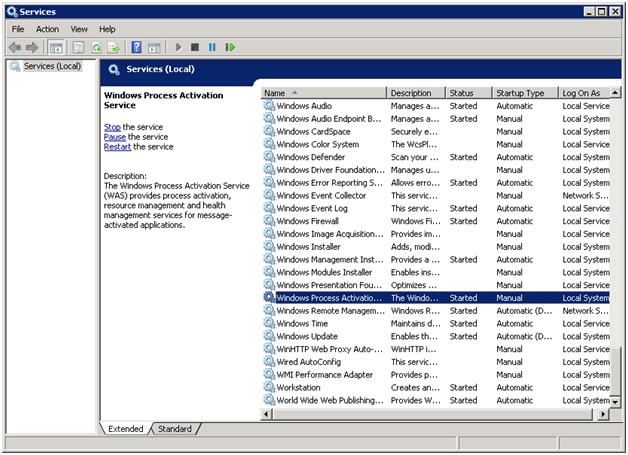
Stop the Windows Process Activation Service (WAS):
- At the command prompt, type services.msc This will display the Services console.

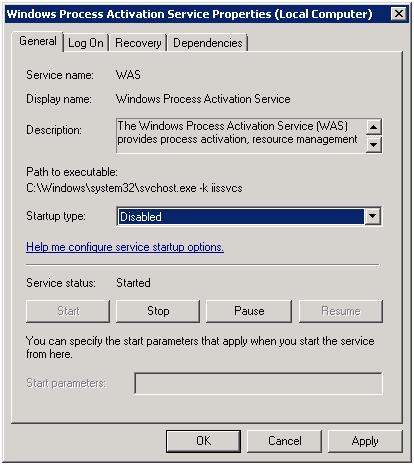
- Double-click Windows Process Activation Service.
- In the Windows Process Activation Service Properties dialog box, ensure that the Startup Type for this service is set to Disabled. Click Stop, and then click OK.
Create SSL Enabled Site
In this section, you will create a new FTP site that can be opened by using any of your user accounts.
Go to IIS Manager. In the Connections pane, click the Sites node in the tree.
Right-click the Sites node in the tree, and click Add FTP Site, or click Add FTP Site in the Actions pane. 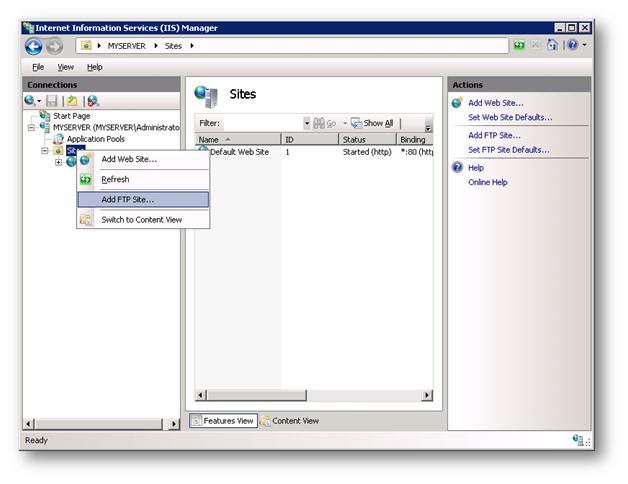
When the Add FTP Site Wizard appears:
Enter «My New FTP Site» in the FTP site name text box, and then navigate to the root folder that you created for your FTP site (example: %*SystemDrive*%\inetpub\ftproot ).
If you choose to type in the path to your content folder, you can use environment variables in your paths.
Click Next. 
On the next page of the wizard:
- Choose an IP address for your FTP site in the IP Address text box, or choose to accept the default selection of «All Unassigned.» This example uses the local loopback IP «127.0.0.1».
- Enter the TCP/IP port for the FTP site in the Port text box. This example uses the default port of «21».
- Ensure that the Virtual Host text box is blank. Do not use a host name.
- Make sure that the Certificates drop-down list is set to the appropriate certificate that you intend to use. This example uses a self-signed certificate called «My FTP Certificate.» For instructions, see Creating a Self-signed SSL Certificate.
- Ensure that the Allow SSL option is selected.
- Click Next.

On the next page of the wizard:
Select Basic for the Authentication settings.
For the Authorization settings:
- Choose «All users» from the Allow access to drop-down list.
- Select Read and Write for the Permissions option.
When you have completed these items, click Finish. 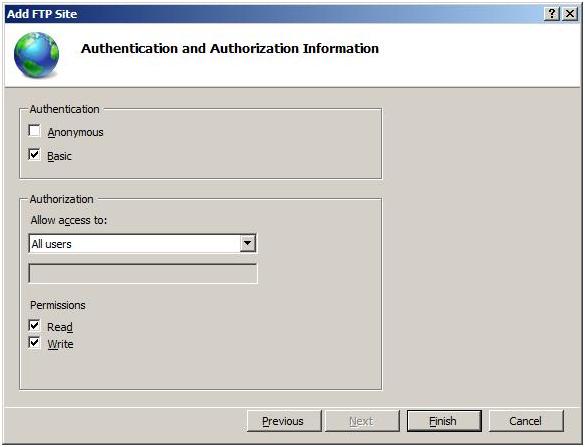
Summary
You have now created a new SSL-based FTP site using the new FTP service. Review the items that you completed in this procedure:
- You created a new FTP site named «My New FTP Site» that puts the site’s content root at %*SystemDrive*%\inetpub\ftproot .
- You bound the FTP site to the IP address for your computer on port 21.
- You chose to allow Secure Sockets Layer (SSL) for the FTP site, and selected your certificate.
- You enabled Basic authentication and created an authorization rule for all user accounts for Read and Write access.
Configure User Isolation for All Directories
When isolating users for all directories, all FTP user sessions are restricted to the physical or virtual directory that has the same name of the FTP user account. In addition, all global virtual directories that are created will be ignored. In this step you will configure user isolation for all directories.
- Create a folder at %*SystemDrive*%\inetpub\ftproot\LocalUser\ . This folder will contain all local user account directories. You may create this folder on your File Share server (NAS). When you provision user accounts, you must also assign read and write access to the users’ content folders.
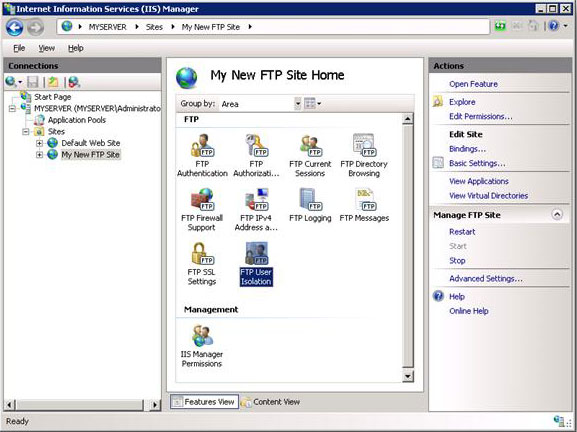
- In IIS Manager, click the node for the FTP site that you have just created. This will display the icons for all of the FTP features.
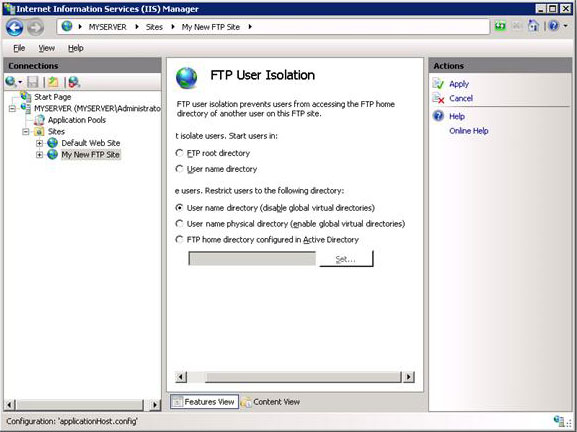
- Double-click the FTP User Isolation icon to open the FTP user isolation feature.
- When the FTP User Isolation feature page is displayed, select User name directory (disable global virtual directories), and then click Apply in the Actions pane.
Summary
Reviewing the items that you completed in this procedure: you configured FTP user isolation using the User name directory (disable global virtual directories) option. When using this mode of user isolation, all FTP user sessions are restricted to the virtual or physical directory with the same name of the FTP user account, and any global virtual directories that are created will be ignored.
To create home directories for each user, you first need to create a virtual or physical directory under your FTP server’s root folder that is named after your domain or named LocalUser for local user accounts. Next, you need to create a virtual or physical directory for each user account that will access your FTP site. The following table lists the home directory syntax for the authentication providers that ship with the FTP service:
| User Account Type | Physical Home Directory Syntax |
|---|---|
| Anonymous users | %FtpRoot%\LocalUser\Public |
| Local Windows user accounts (requires Basic authentication) | %FtpRoot%\LocalUser%UserName% |
| Windows domain accounts (requires Basic authentication) | %FtpRoot%%UserDomain%%UserName% |
| IIS Manager or ASP.NET custom authentication user accounts | %FtpRoot%\LocalUser%UserName% |
In the above table, %FtpRoot% is the root directory for your FTP site; for example, C:\Inetpub\Ftproot .
Global virtual directories are ignored; virtual directories that are configured at the root-level of your FTP site cannot be accessed by any FTP users. All virtual directories must be explicitly defined under a user’s physical or virtual home directory path.
Configure the FTP Firewall Settings
Configure the Passive Port Range for the FTP Service
In this section, you will configure the server-level port range for passive connections to the FTP service. Use the following steps:
Go to IIS Manager. In the Connections pane, click the server-level node in the tree. 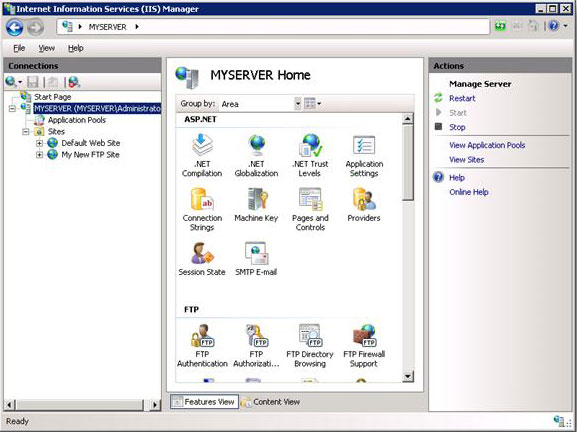
Double-click the FTP Firewall Support icon in the list of features. 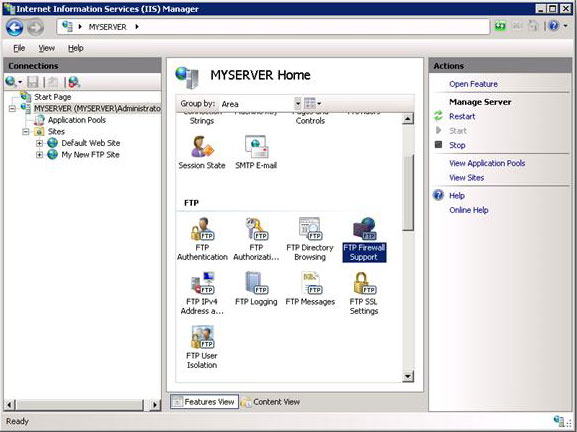
Enter a range of values for the Data Channel Port Range. 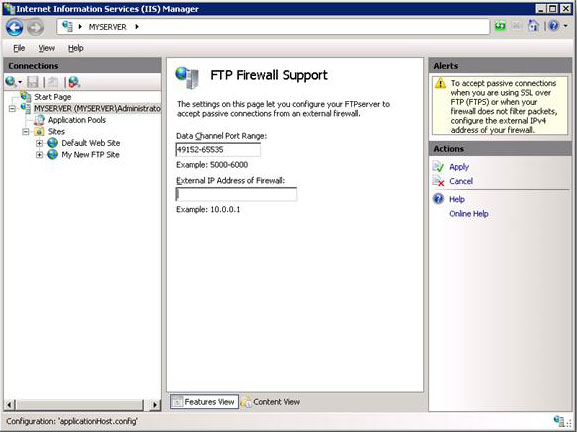
Once you have entered the port range for your FTP service, click Apply in the Actions pane to save your configuration settings.
The valid range for ports is 1025-65535. (Ports 1-1024 are reserved for use by system services.)
You can enter a special port range of «0-0» to configure the FTP server to use the Windows TCP/IP dynamic port range.
For additional information, see the following Microsoft Knowledge Base articles:
This port range will need to be added to the allowed settings for your firewall server.
Enter the IPv4 address of the external-facing address for your firewall server for the External IP Address of Firewall setting. 
Once you have entered the external IPv4 address for your firewall server, click Apply in the Actions pane to save your configuration settings.
Summary
Review the items that you completed in this procedure:
- You configured the passive port range for your FTP service.
- You configured the external IPv4 address for a specific FTP site.
For information about how to configure the Windows Server 2008 Firewall, see (Optional) Step 3: «Configure Windows Firewall Settings. Also see More Information about Working with Firewalls.
FTP Server Names Examples
FTP is a commonly included service when hosters provision accounts for their customers. The instructions provided above will enable the FTP for IIS service for customers, but the FTP server name, if based simply on the hosting company name, may look something like this:
ftp.hostingcompany.comSuch a name may be sufficiently clear for all users; when customers use it to connect to their FTP directory they will land in their directory and will be able to see only their folders. But the FTP server name may not be as appealing to customers as an FTP server name based on their reserved domain, such as:
If customers have their FTP server name associated with their reserved domain name, the FTP service experience will be more personalized and appealing. Functionally, it is the same as the previous example, but this option simplifies the domain naming for the customer. To set up a custom FTP server name for each customer, you will need to create appropriate DNS records for the customer domain. This will require additional provisioning steps.If you provide a custom FTP server name for each customer, you may also want to provide an alternative server name to prevent FTP service outage when domain names are being updated. An example of an alternative name to provide along with the custom name could look like:ftp.username.hostingcompany.comIn such a case, customers would receive two server names and would be able to connect to the same directory by using either name; for example:
- ftp.customerdomain.com (or customerdomain.com)
- ftp.username.hostingcompany.com
Connect from Visual Web Developer
This article has so far focused on how to deploy FTP in a shared hosting environment. This section describes how customers can take advantage of Visual Web Developer 2008 (VWD) to publish their Web applications by using the FTP service provided by the hoster. The following example assumes that:
- The hosting company has provisioned an account to a user named «ftpuser1».
- The hosting company has created the corresponding virtual folder «ftproot\LocalUser*ftpuser1*».
To publish Web application content with VWD, ftpuser1 performs the following steps:
Ftpuser1 opens the Web site called «WebSite1» in Visual Web Developer 2008 (VWD). 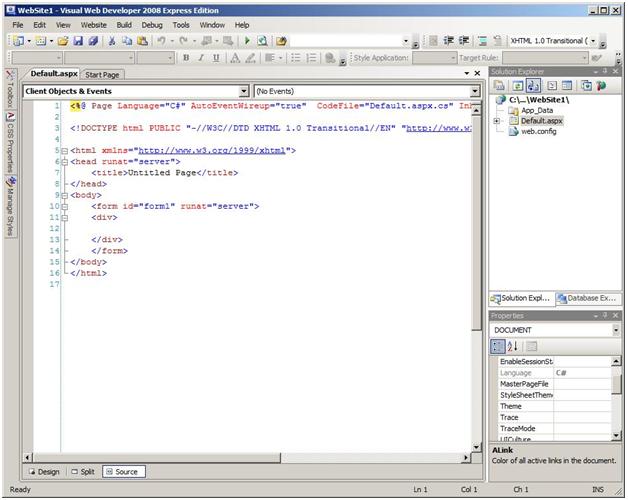
Ftpuser1 selects Copy Web Site from the Website menu. 
Ftpuser1 clicks Connect. 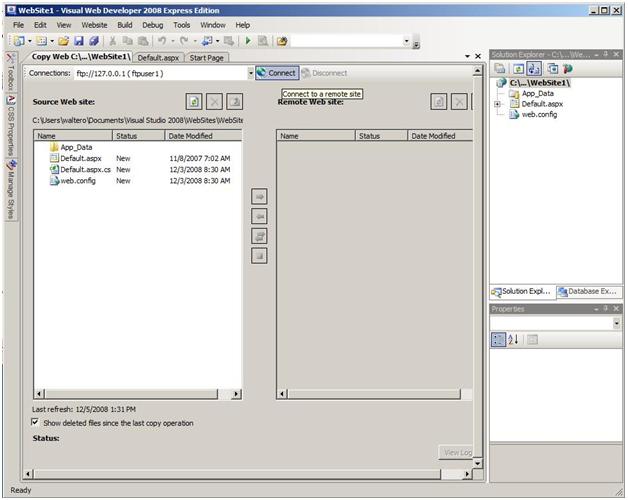
Ftpuser1 enters the following values:
- The FTP server name provided by the hosting company. In the example below, the loopback IP address is 127.0.0.1.
- Port. In the example below, the default value is port 21.
- Passive Mode option.
- Basic authentication option. Ftpuser1 deselects Anonymous Login.
- User name: ftpuser1.
- Password.
Ftpuser1 then clicks Open. 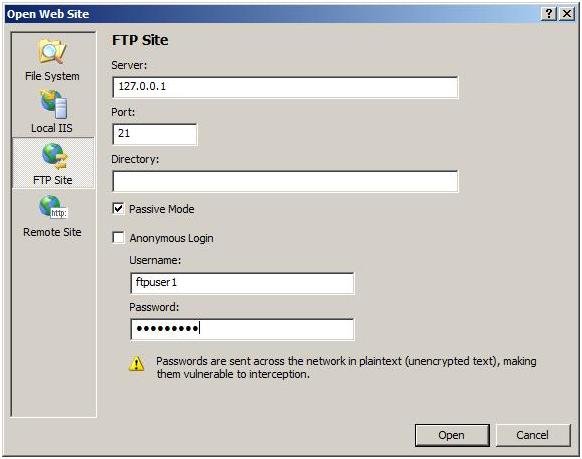
Ftpuser1’s folder appears in the Remote Web Site pane. In the following example, the pane is empty because ftpuser1 is publishing the Web site for the first time. 
Ftpuser1 publishes all content items in the Source Web Site pane by selecting all files and folders, and then clicking Synchronize:
- Ftpuser1 clicks the left pane.
- Ftpuser1 types Ctrl+A, to select all files.
- Ftpuser1 clicks Synchronize (located in between the two panes, third button from the top).

The files and folders are uploaded to the FTP server and stored in the user’s virtual directory: ftpuser1. (The user will be unaware of other users’ content on the same server because of the User Isolation restriction.) 
Conclusion
This guide provides the information needed to install and configure an FTP for IIS service in a shared hosting environment. It also shows how customers can take advantage of Visual Web Developer to publish their content to their FTP site directory.


