- How to Downgrade from Windows 10
- How to Downgrade from Windows 10: 5 Ways
- If you’re within 30 Days from the upgrade.
- 1. The Easy Recovery Method.
- 2. A Third-Party Backup.
- If you’re after 30 Days from the upgrade.
- 1. A Clean Install
- If your PC was not bought with Windows 10.
- If your PC was bought with Windows 10.
- 2. Downgrade by using previous backup.
- How to Downgrade Windows 10
- How to Downgrade from Windows 10 if You Upgraded from an Older Windows Version
- How to Downgrade from Windows 10 if the Rollback Period has Ended
How to Downgrade from Windows 10

There’s a lot of stuff about Windows 10 that’s not to like about.
From the forced updates (which you can’t turn off), peer-to-peer updates (which seems to use your own internet to distribute updates for strangers), and some are even getting the feeling that it is some form spyware.
You might also miss the simplicity that was on Windows 7 or Windows 8.1.
So whichever Windows version you are now deciding to downgrade from Windows 10, this guide is written to help you.
This guide will show you how you can downgrade from Windows 10 to Windows 7 or Windows 8.1 in just a few little steps that will not take longer than 10-20 minutes.
How to Downgrade from Windows 10: 5 Ways
One of the new things that did come with the Windows 10 was the option in the Settings app to easily go back to your previous version of Windows installed.
However, there’s only one rule about it: You only have a month (30 Days) from after you upgrade to your new Windows 10 to go back.
If you’re within 30 Days from the upgrade.
1. The Easy Recovery Method.
If you’re still within those 30 Days after you’ve upgraded to Windows 10, you can follow the steps below to downgrade from Windows 10.
Step 1: Go to the Settings app, or use this shortcut Windows + I
Step 2: Next, go to Update & Security
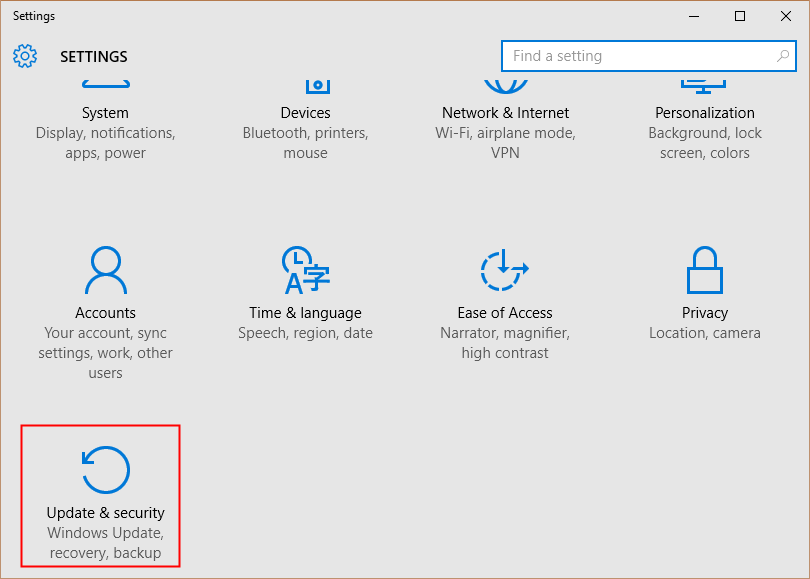
Step 3: Next, head over to Recovery.
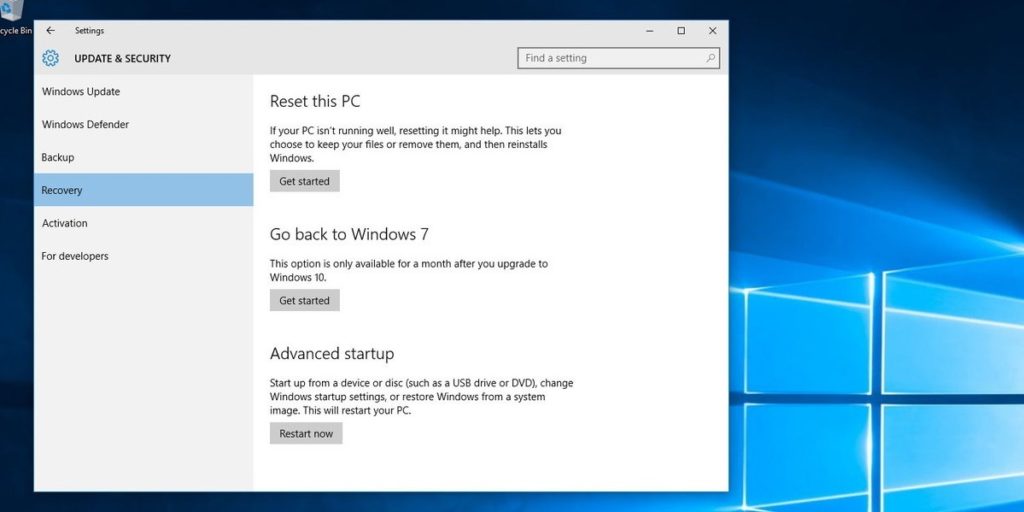
Now, if you’re within the 1 month (30 Days) from your upgrade to Windows 10, then you should be able to see the option Go back to Windows 7 or Go back to Windows 8.1 here.
Step 4: Click Get Started and this will get rid of your Windows 10 install and restore your previous install.
Step 5: Next select a reason why you’re downgrading to Windows 7 or Windows 8.1. After you have done that click Next.

Step 6: Now you will get a warning saying that you will need to reinstall some apps and programs and you’ll lose any changes made since making the upgrade to Windows 10.
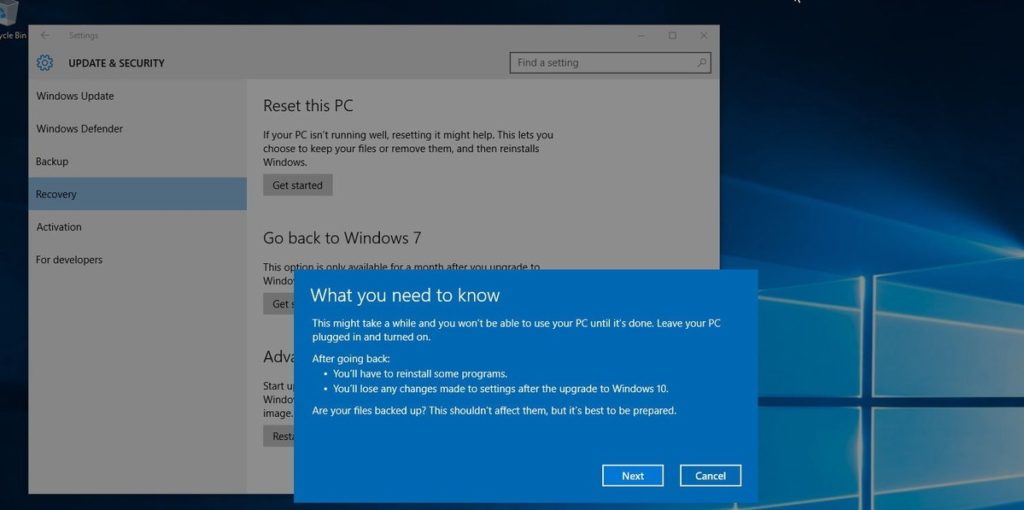
You don’t really have to backup all your files, but if you have important files that are too valuable for you to lose then it is recommended that you back up.
Step 7: Click Next
Step 8: Do make sure you know your password to Windows 7 or Windows 8.1. If you don’t, you are going to be locked out of your own system. Click Next

Step 9: Just one more step and you can then wave and kiss goodbye to your Windows 10. Finally, you need to click the Go back to Windows 7 or Go back to Windows 8.1 and to begin the downgrade process.
 Voila!
2. A Third-Party Backup.
Third-party backup is similar to the method of backing up by Downgrade by using previous backup (in the After 30 days section you can find below). However, for this case, you are going to be using other software.
These are some of the software that you can use
These tools allow you to make a complete copy of your hard drive.
This helps especially if something were to happen to your hard drive such as a hard drive failure. You can use this copy to get back to where you were.
Another software that you might like is EaseUs System GoBack which is specifically designed to let you get back to a previous version of Windows.
Again, you need to install this type of software and backup before you downgrade from Windows 10.
I will probably have tutorials written for these soon so that you can follow through step-by-step and downgrade from Windows 10 back to Windows 7 or 8.1 easily.
If you’re after 30 Days from the upgrade.
Here’s how you can downgrade from Windows 10 if you do not see the option to Go back to Windows 7 or Go back to Windows 8.1
I have included a number of methods here for you if you ever find that you prefer a certain method over the other, in order from easy to difficult.
1. A Clean Install
There are two ways you can go about this and it all depends on whether your computer was bought with Windows 10 in it or not since you’ll need the product key for the version of Windows7 or Windows 8.1 that you’ll be going back to for in order to use it.
Yeah, a clean installation is time-consuming but it is surely the most reliable and complete option you have if you’re out of the 30 day time period.
(So you can go to the appropriate subheading under this and go on from there)
If your PC was not bought with Windows 10.
If your PC was not bought with Windows 10 in it then you’ll have to find back the product key of your previous Windows 7 or Windows 8.1 version that you use to have.
To find that examine your PC for a “certificate of authenticity” sticker with a key on it. The sticker may be on the underside of your laptop, in the battery compartment under a removable battery, or even on a laptop’s power brick.
If you were on a Windows 8.1 PC, then you won’t need to search through your entire computer. The key may be embedded in your computer’s firmware and Windows 8.1 will automatically detect it and allow you to reinstall Windows 8.1 without even asking you to enter a key.
Did all of that? Alright, you can move on with the clean installation. Here’s how:
Step 1: Start off by heading over to Microsoft’s website and download either the Windows 7 or 8.1 ISO files.
Step 2: After you have done that, Download the Windows installation media and burn the ISO file to a disc or copy it to a USB drive using Microsoft’s Windows USB/DVD download tool.
Step 3: Reboot your computer with either the Windows 7 or Windows 8.1 installation files (make sure your PC is set to boot from the drive with installation files).
Step 4: You’re doing great! Just a little few steps and you’re done. During the Windows Setup, click Next, accept the licensing, and then click Next.
Step 5: Click the option Custom: Install Windows only (Advanced) option to do a clean installation.
Step 6: Here’s an important step. Now you have got to delete any partition created by your current installation of Windows. (Which would be your Windows 10)
Note: If you have a partition where you store files or a secondary hard drive, you don’t have to delete these partitions.
Step 7: Finally, Select the empty drive and click Next to start the installation process.
After you have followed those few little steps and once you’re done with the Windows Setup process, you will once again be back to your Windows 7 or Windows 8.1.
Do not panic if you find that all your files are empty, you do need to remember that you need to restore your files and reinstall and configure all the programs you have previously installed on your system. 🙂
If your PC was bought with Windows 10.
If your PC was bought with Window 10 in it and without any other Windows 7 or Windows 8.1 then it’ll be slightly tougher.
Why will it be tougher? Because you will need to get a brand new copy of either Windows 7/8.1 as you are going to need that product key in order for you to go back.
The steps are the same as how you normally install a brand new Windows version.
All you have got to do is install it from scratch and then follow up by entering the product key you purchased during the installation process.
2. Downgrade by using previous backup.
Keeping a backup of a computer before upgrading to a new operating system is recommended.
Not only keeps your data from being lost, but it’ll also help make things easier for you if you ever decide to downgrade from Windows 10 to any other operating systems in the future.
Now all you have got to do is now simply make a new backup of your new files since the last full backup or just make a copy of all your files to an external hard drive.
Also, take note of any new software installation since the last full backup, as you’ll need to reinstall them after you downgrade from Windows 10.
Here’s how you can do that:
Step 1: Go to Control Panel on your computer.
Step 2: Next, head over to Programs and Features
Step 3: Lastly, you can arrange the list of apps in your system by Installed On.
So once after you have the backup of your files and you know the apps you need to reinstall, reboot your computer using the “repair disc”, which you were prompted to create after creating the initial full backup.
Note: You don’t need to actually have a repair disk as you can also boot with the Windows 7 or Windows 8.1 installation media (check the A Clean Install section) to perform the recovery.
Now connect your external hard drive with the backup that you did and then reboot your PC.
Once you have done that, you can follow these steps:
Step 1: Firstly, While you’re in the Setup wizard, click Next, and then Repair your computer.
Step 2: Next, select Restore your computer using a system image that you create earlier, and then click Next.
Step 3: After you’ve done that, Select the backup to restore and then click Next.
Step 4: You’re almost there! Now select the image you want to use and again click Next.
Step 5: Click Next one more time and then Finish, to begin with the recovery process.
Annnd you’re done! Once you have finished these few little steps you’ll be brought back to your previous version of Windows 7 or Windows 8.1
How to Downgrade Windows 10
If you upgraded to Windows 10, but you don’t like it, don’t worry. You can always downgrade to a previous version of Windows.
There are several reasons why you would want to downgrade your Windows 10 laptop or PC to a previous version of Windows. Perhaps you are not able to run certain apps on Windows 10 or you simply liked Windows 8 or Windows 7 better. No matter what your reason for downgrading is, we are here to make the process of downgrading easy.
Note: Before you downgrade from Windows 10, make sure that you make a backup of your computer data. This includes programs, documents, photos, videos, music, and everything else. To be safe, we also recommend connecting your device to a power source while you are downgrading from Windows 10 to Windows 7 or 8.
How to Downgrade from Windows 10 if You Upgraded from an Older Windows Version
This method will only work if you upgraded to Windows 10 from an older version of Windows. You will not be able to downgrade your computer if it never had a previous version of Windows installed.
When you upgrade, Microsoft will give you 10 days to downgrade to your original version in most cases (some users may be able to downgrade within 30 days). Here are the steps to downgrade Windows 10 within the 30-day rollback period:
- Select the Start button and open Settings. You can find Settings under the Windows start menu, which is located on the bottom left-hand corner of your screen. Once you click it, you will see the Settings button (shaped like a gear icon) just above it.

- In Settings, select Update & Security.
- Select Recovery from the left side-bar.
- Then click “Get Started” under “Go back to Windows 7” (or Windows 8.1).
- Select a reason why you are downgrading. The next panel will show you several reasons for downgrading. Select the box that applies. You can also write your own reasons under the “tell us more” box.
- Pay attention to the reminders in the succeeding panels. Click Next after each panel to continue.
- Once the process is complete, your PC will restart several times. Don’t worry, this is normal.
- When the process is complete, you will be prompted to log in to your previous Windows account. Log in and reinstall your favorite apps, recover your files, and enjoy your downgraded Windows 10 laptop or PC.


How to Downgrade from Windows 10 if the Rollback Period has Ended
If you upgraded to Windows 10 more than 30 days ago, follow the steps below to downgrade to Windows 8:
Note: You will also need to have a licensed copy of the Windows OS version you want to downgrade to.
Warning: This process requires you to go into the BIOS settings of your computer. This can cause problems with your computer if you don’t know what you are doing. If you would like to have a professional take you through the steps, there are real people you can talk to at HelloTech.
- Insert the Windows 8 CD into your disk drive. If you are booting from an OS on a USB flash drive, make sure that it is fully plugged in when you restart.
- Click on Restart in the start menu while holding the Shift key. Click on the Windows logo on the bottom left-hand corner of your screen. This will bring up the Start Menu. Click the restart option while holding down the Shift key. This will restart your device in the Advanced Startup Menu.
- Click on Troubleshoot > Advanced Options > UEFI Firmware Settings, then select restart. This will restart your computer in BIOS Setup Utility.


There are several ways to access the BIOS Setup Utility, you can also press the BIOS key rapidly while the computer is restarting. The BIOS key is typically one the function keys (F1 or F2), the ESC key, or the DEL key.
If you are not certain what your BIOS key is, you can find it when you restart your computer regularly. As the computer is restarting, look for text that says something like “Press DEL to run Setup.” If your computer does not display this text, you can also find your BIOS key in the user’s manual.

Note: If you were not fast enough and the computer displays the startup screen, you will need to restart the device again.
In the BIOS Setup Utility, go to Boot and then move the CD-ROM Drive to the top of the list. You should see a list of instructions on the BIOS screen that will tell you how to navigate. When you get to the Boot tab, these instructions will tell you how to move an item up or down the list. By moving the CD-ROM drive to the top of the list, Windows will boot from your CD before it tries to boot from your hard drive. 
If you’re installing from a USB drive, select Removable Devices. Follow the instructions to begin your Windows 8 clean install. You will be prompted to select the time, language, and keyboard setting. Click Next after.

Warning: You can choose to delete the smaller partitions, but be warned that you might lose your data, or damage Windows.

This will begin your Windows 8 install process. Wait until the process is complete. Your computer will reboot several times.
Before you decide to downgrade from Windows 10, check out our article on Microsoft ending support for Windows 7.


