- How do I downgrade my Mac OS X operating system
- Безопасный downgrade macOS Big Sur (без 1008F)
- Подготовка учетной записи
- Подготовка USB — накопителя
- Создание установщика macOS Catalina
- Загрузка Mac для установки macOS Catalina
- Установка macOS Сatalina
- Заключение
- Downgrade macOS/Mac OS X without Losing Data 2021 (Big Sur/Catalina Applicable)
- Tip: Backup Mac data before downgrading macOS or Mac OS X
- Method 1. Downgrade macOS or Mac OS X with Time MachineВ
- Method 2. Create USB Boot Drive and Revert Back to Old macOS or Mac OS X
- Downgrade macOS (e.g: Downgrade macOS Mojave to High Sierra)
- Downgrade Mac OS X (e.g: Downgrade Mac OS X Yosemite to El Capitan)
- Bonus Tip: Restore Lost Data after Downgrading macOS/Mac OS X(without backups)
How do I downgrade my Mac OS X operating system
With 10.13’s release Apple introduced APFS, which is not readable by older operating systems. An extra step to make 10.13 or later readable from 10.12.6 or older systems would be to make sure the 10.12.6 or older system is to wipe and formatted HFS Extended Journaled before installing 10.12.6 or earlier. And an extra step to make 10.13 or later readable to the 10.12.6 booted system would be to clone backup the newer system, and wipe and reformat the newer system’s drive as HFS Extended Journaled. If you are just going to flip booting back and forth, only the first step is needed, as the Option key booting will choose the operating system that is loaded regardless of the drive formatting. When I say wipe, backup your data first. Also note, if you upgrade your libraries to a newer system, such as an Apple Photos library, only the raw photos will be readable by the older system, and not the libraries, tags, albums and favorites. It is better if you downgrade, to have a clone backup of the older system to fall back to, that way avoiding incompatibilities of newer libraries.
Starting with 10.7, on July 20, 2011 downgrading took an entirely new approach:
Apple introduced a restore install utility for Mac OS X 10.7 or later that boots with a command-R. Some macs older than 10.7’s releasecould get this utility through this firmware update. As indicated elsewhere on this forum, Macs that had a hardware refresh on or after July 20, 2011,can’t boot into 10.6.8 or earlier, though 10.6 server can be installed through virtualization. With each new retail release, the availability in the App Store may vary once you install an older retail online release. You may have to contact App Store billingto get an older online releaes available, or get a refund for an already previously purchased operating system that you go back to download.
Also, Apple has written these tips for those with Time Machine, wishing to restore an older versions of Mac OS X from Mavericks:
For a limited time 10.7 is available for purchase and download here:
Change the /us/ for your country’s 2 letter code when you go to http://store.apple.com/ to get the download link for your country.
Macs newer than March 29, 2010, but older than July 20, 2011 could not use a 10.6 installer CD, other than the prebundled CD with them. Call AppleCare if you need that disc:
A backup is still better than having no backups, as you avoid the pitfalls of older operating systems not being able to handle newer software, or newer software not being able to run on older operating systems. 10.7 was also available for a limited time on an Apple released USB flash drive. You could custom make a USB Flash drive with the installer if you didn’t install the operating system the moment the download was complete by copying it to your desktop, and then to the flash drive from the Applications folder. You could also just keep a copy of the installer outside the Applications folder and later clone backup your system to hold onto the installer. Either way the installer was tied to the AppleID that downloaded it and license limitations agreed upon there.10.8’s release on July 25, 2012, and 10.9’s release on October 22, 2013 likely limited the same hardware refreshes on or after to the same downgrading options. You may not be able to operate drivers or applications that weren’t downgraded and removed with the operating system, unless they were compatible with the older operating system. Check with various vendors if uncertain before attempting a downgrade.
You have one more option once backed up, before attempting a full downgrade. Just repartition your hard drive. This option is available in Mac OS X 10.6 and higher as long as your machine supports the older operating system. To repartition your hard drive, read this link
starting where it says:Create new partitions on a diskYou may be able to create new partitions on a disk without losing any of the files on the disk. Each partition works like a separate disk.Once you have a second partition that is large enough to install the older operating system, just install it there. Then you can use Apple menu -> System Preferences -> Startup Disk to change your active operating system. Keep in mind each partition can’t get over 85% full and that each partition needs to be backed up separately.
The rest of this tip addresses downgrading 10.6.8 and earlier systems:
Downgrading the operating system is not easy without a clone backup of the same system at an earlier stage already being present.
With 10.5.1 Intel or later (including 10.6 to 10.6.8) to 10.5:
1. Verify you made a Time Machine backup before you upgraded to 10.5.1 or later.
*2. Boot off the Leopard installer disk. Note for Macs newer than the October 26, 2007 release of 10.5, a later 10.5 installer disc may be needed:- 10.5.1 retail was released November 15, 2007- 10.5.4 retail was released June 30, 2008- 10.5.6 retail was released December 15, 2008Macs generally won’t boot an earlier retail version of Mac OS X than their release date, and they won’t boot a system specific (model labelled) or Upgrade or OEM disc unless designated for their model and vintage of that model.3. Select the installation language.
4. Go to the Utilities menu and use the Restore from Time Machine backup to restore to your Time Machine state before you installed 10.5.1.
This will only work, if you have no data to salvage from 10.5.1 or later.
* With Mac OS X 10.7 and 10.8 a Lion recovery assistant helps you with this function.Note, you can also when you buy 10.7 or 10.8, make a self extracted backup of the full installer on a Flash drive. Several places on the netoffer solutions for that to work on the details before you download from the Mac App Store. Apple also for a limited time sold a USB Flashdrive version of 10.7, that will work on pre-10.7 (July 20, 2011) machines that meet the qualifications on the user tip for 10.7 installation.
For those with machines released after 10.8 (July 25, 2012), only the recovery assistant, may work and it may not be possible to use another 10.8 installer used on a 10.7 machine and transfered to a Flash drive. Of course all this requires any such installer follow the license agreement of the said installer for the number of installations.
From (10.5 Intel through 10.5.8) to (10.4.4 through 10.4.11)
From (10.5 PowerPC through 10.5.8) to (10.0 through 10.4.11)
From (10.4 through 10.4.11) to 10.3
From (10.3 through 10.3.9) to 10.2
From (10.2 through 10.2.8) to 10.1
Either restore from your backup or:
1. Backup your existing data by cloning it to external hard drive(s) at least twice.
2. Write down registration codes for installing applications.
3. Erase and install the operating system with none of the backups connected to the machine during the erase and install process, and no peripherals other than display, keyboard and mouse attached.
4. Restore user documents that are capable of being downgraded.
Ask on Discussions if the applications you use can be downgraded before attempting this.
5. Install from the original installation disks which shipped with your machine (Mac OS X 10.7 Lion has a Recovery Assistant instead of discs, if your Mac shipped with Lion) additional applications which didn’t ship with the operating system:
6. Install from the third party CDs and downloads any other applications.
Finally, users downgrading from 10.3.x to another 10.3.x, and 10.2.x to another earlier 10.2.x can use archive and install:
1. Apple applications left behind from a newer installation may not work in an older installation on an archive and install.
2. Installation from restore disks are required if your Mac is
— — Intel and shipped with 10.4.4 through 10.4.11.
— — The install you are attempting is the minimum that Mac can run: http://support.apple.com/kb/HT2191
— — The retail installation available is older than the Mac itself.
Источник
Безопасный downgrade macOS Big Sur (без 1008F)
Недавно, я писал о том, как решить проблему с вечной ошибкой 1008F при попытке откатить macOS Big Sur до macOS Catalina через Internet Recovery. Как показал опрос, есть необходимость рассказать про способ отката macOS Big Sur без ошибки 1008F. Причин для отката может быть масса, и если вы обладатель одной из них, то этот пост для вас. Главное помнить о том, что описанный ниже метод приведет к полному стиранию данных с вашего компьютера Mac. Все далее описанное, происходило с MacBook pro 2019 с чипом безопасности T2 и HDD (256 GB) 2,5 в USB — кейсе.
Подготовка учетной записи
Первое что нам понадобится сделать — отключить функцию найти Mac и выйти из программы бета-тестирования:
Для отключения функции «Найти Mac», перейдите в «Системные настройки» -> Apple ID
2. «Найти Mac» -> Параметры
3. Нажмите кнопку «Выключить», после чего опция должна выглядеть так:
4. Для отключения программы бета-тестирования перейдите по ссылке
5. Войдите в свою учетную запись:
6. Покиньте программу:

После этих нехитрых манипуляций, можно приступать к созданию загрузочного диска.
Подготовка USB — накопителя
1. Подключите внешний USB — накопитель к вашему компьютеру Mac
2. Запустите дисковую утилиту
3. Выберите «Показать все устройства»
Выберите верхний уровень вашего устройства (в моем случае JMicron Tech Media (0 на рис.)) -> Стереть (1 на рис.), задайте требуемые параметры (2, 3, 4 на рис.) и нажмите кнопку «Стереть» (5 на рис.)
Теперь внешний USB — накопитель подготовлен, осталось записать на него установочный образ macOS Catalina.
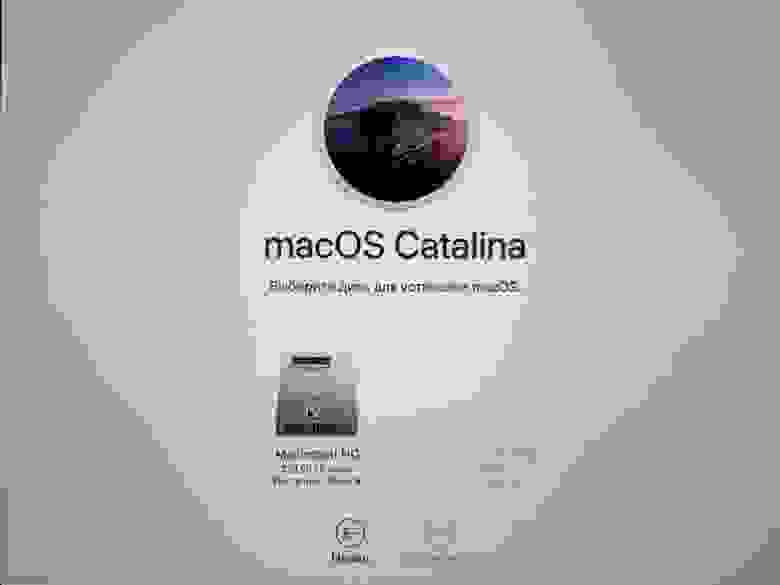
Создание установщика macOS Catalina
1. Перейдите по ссылке, после чего должен открыться AppStore
2. Нажмите кнопку загрузить, затем в диалоговом окне подтвердите загрузку
3. Дождитесь окончания загрузки
4. После завершения загрузки, появится сообщение об ошибке (это нормально)
5. Требуется закрыть ошибку и перейти в «Программы»
6. На «Установка macOS Catalina» нажмите правую кнопку мыши -> «Показать содержимое пакета» и перейдите в папку «Resources»
7. Откройте терминал и перетащите туда «createinstallmedia»
8. После чего допишите —volume
9. Левой кнопкой мыши, выберите любое пустое место на рабочем столе, нажмите Shift + Command + G и в появившемся окне введите /volumes -> «Перейти»
9. В открывшемся окне, вы должны увидеть устройство (том) bootable (если во время подготовки USB — накопителя вы называли его также как на рис.)
10. Перетащите bootable в терминал. На этом шаге у вас должна получиться следующая команда:
** для скорости, можно скопировать следующую строку: sudo /Applications/Install\ macOS\ Catalina.app/Contents/Resources/createinstallmedia —volume /Volumes/ (не забудьте добавить имя тома). Также вся информация есть в официальной документации.
11. Нажмите Enter -> y -> Enter
12. Дождитесь завершения операции
Поздравляю! Основная часть работы уже проделана. Осталось только загрузиться с подготовленного USB — накопителя.
Загрузка Mac для установки macOS Catalina
1. Выключите Mac, после чего включите его удерживая Command + R, до тех пор пока у вас не откроется экран с утилитой восстановления системы.
2. Перейдите в «Утилиты» -> «Утилита безопасной загрузки» . В моделях до 2018 года, нужно перейти к п.5
3. Введите пароль от macOS

4. Задайте конфигурацию как на рисунке

5. Перезагрузите Mac. Во время перезагрузки, удерживайте клавиши Alt (option)
6. Если вы все сделали верно, у вас должен появиться выбор загрузочного диска. Нужно выбрать «Install macOS Catalina»
Установка macOS Сatalina
Процесс установки macOS Catalina происходит в обычном режиме. Единственное что нужно сделать перед этим — отформатировать жесткий диск Mac. В macOS Big Sur появился дополнительный раздел Update, который в macOS Catalina не используется. Перед установкой в дисковой утилите требуется
1. Стереть текущий раздел с данными

2. Выбрать раздел «Update» -> Правая кнопка мыши -> Удалить том APFS
3. После чего можно начинать установку macOS Catalina в обычном режиме
Заключение
Надеюсь, этот пост поможет вам без проблем откатиться на macOS Catalina и избежать встречи с ошибкой 1008F. Процесс отката старался описать максимально детально и просто. Если у вас остались какие-либо вопросы, с радостью на них отвечу.
Желаю вам легких апдейтов, даунгрейдов и вообще поменьше багов и лагов.
Источник
Downgrade macOS/Mac OS X without Losing Data 2021 (Big Sur/Catalina Applicable)
If you don’t like your new macOS Catalina or current Mojave, you can downgrade the macOS without losing data on your own. You need first backup important Mac data to an external hard drive and then you can apply effective methods offered by EaseUS on this page to downgrade Mac OS. Catalina, Mojave, High Sierra, Sierra, and El Capitan, etc. modern Mac OS X are all supported.
Table of Contents
About the Author
Reviews and Awards
Are you trying to revert or downgrade your new macOS or Mac OS X to the previous version on the Mac computer? If yes, stay here. Just follow the provided guidance below to bring your previous macOS or Mac OS XВ back without losing any data:
| Workable Solutions | Step-by-step Troubleshooting |
|---|---|
| Method 1. Use Time Machine | Start Mac and hold Command + R keys > Enter Recovery Mode > Insert Time Machine drive. Full steps |
| Method 2. Use USB Bootable Drive | Back up data first > Plug in USB and launch Disk Utility > Erase USB > Rename it as «My Volume». Full steps |
| Bonus Tip. Recover Data | After reverting macOS or Mac OS X, run EaseUS Mac file recovery software > Scan and recover lost data . Full steps |
Methods on this page can be applied to all Mac systems including the latest Big Sur, Catalina, Mojave, High Sierra, Sierra, and old Mac OS El Capitan, etc.
Tip: Backup Mac data before downgrading macOS or Mac OS X
It’s highly recommended for you to back up all important Mac data first before you start downgrading Mac OS to an older system.
You can either choose third-party Mac backup software to back up Mac data to an external hard drive at once or choose Time Machine to back up all wanted data with ease.В

Considering data security, it’s also highly recommended for you to backup all important data into an external hard drive.
If you prefer to use Time Machine, here are the details:
- ClickВ «Finder» > «Preference»В > Check «Hard disksВ box» underВ Show these items on the desktop.
- Open the backup disk and create a file folder and name it, for example, «My Backup».
- Open the Mac disk and clickВ «Users»В file folder > Select all files and data that you want to back up and drag to the My Backup file folder.
Wait for the process to finish. After backing up all data, then you can start to revert macOSВ with ease. Here, you’ll find two methods for you to downgrade macOSВ without losing data and you can choose either one as a guide.В
Method 1. Downgrade macOS or Mac OS X with Time MachineВ
So if you have created backups for your Mac data and macOS, follow the below steps for a guide. If you haven’t created such a backup, please jump to Method 2 to downgrade Mac OS.
- 1. Start or restart your Mac and holdВ commandВ + RВ keys to enter theВ Recovery Mode, or hold theВ Option/AltВ and then choose the Recovery option.
- 2. Insert the hard drive used for Time Machine and chooseВ toВ Restore from Time Machine BackupВ underВ OS X Utility, choose the inserted hard drive.
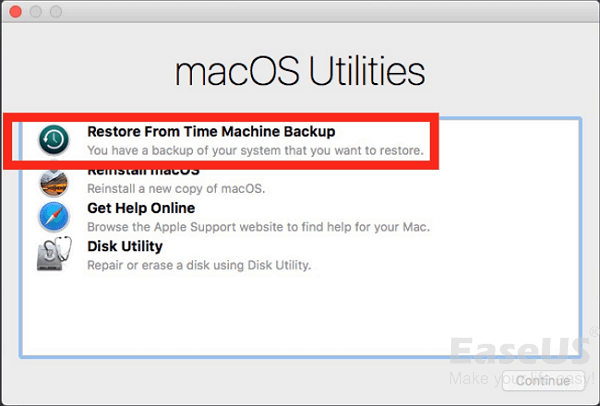
- 3. Choose the most recent data and time when the Mac was still running the current macOS.
- 4. Select the main disk drive where the backup was stored and it is usually namedВ Macintosh HD.В ClickВ Restore.
Then all you need is to wait for the computer to restore and gain Yosemite again. It will usually take a few hours or all day long, depending on how much data need to be restored.
Method 2. Create USB Boot Drive and Revert Back to Old macOS or Mac OS X
This method is set for users who have no Time Machine backups. And if you have no backups of your current macOS or Mac OS, use Time Machine to back up your important data first and the system first.
Then follow the below steps to downgrade Mac OS now: (The ways to download new macOS and old Mac OS X are different. Make sure that you’ve followed the right guide for downgrading the Mac system.)
Downgrade macOS (e.g: Downgrade macOS Mojave to High Sierra)
- 1. Plug an external USB drive (with 16GB min), launch Disk Utility, and select the USB drive, click Erase.В
- 2.В Rename the USB drive as «MyVolume» and choose APFS or Mac OS Extended as the format, click Erase. Quit Disk Utility when the process is done.
3. To to Finder and launch Terminal, type: —sudo /Applications/Install\ macOS\ High\ Sierra.app/Contents/Resources/createinstallmedia —volume /Volumes/MyVolume —applicationpath /Applications/Install\ macOS\ High\ Sierra.app and hit Return.
- 4.В Enter your Admin Password as required, wait until the process is done.
- 5. Restart the Mac, hold the Option key.
- 6.В When the option to select a boot disk appears, choose the installer disk (the external USB drive) you created.
- 7.В High Sierra will start the installing process. When it’s finished, restart your Mac and the Startup Assistant will appear. Then go through the steps to set up your Mac.
If your Mac is shipped with Mojave, you can directly downgrade Catalina to Mojave with the below tips:
- 1.В Restart Mac, hold Command + Option + Shift + R keys to boot into Recovery Mode. You can also press Command + R to enter the Recovery Mode.
- 2.В Click on «Disk Utility», select the disk with Mojave installed, and click «Erase».
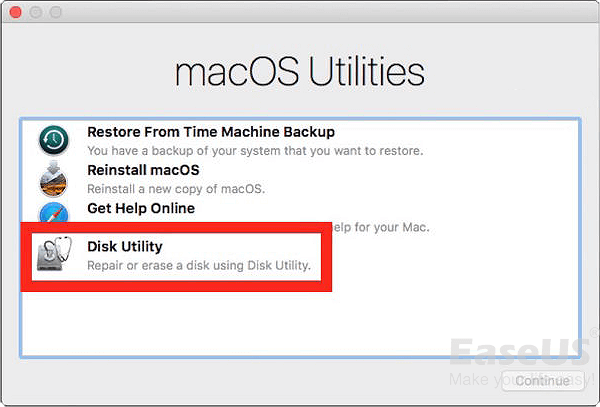
- 3.В Rename the disk, select Mac OS Extended or APFS as the file format, click «Erase». Quick Disk Utility by then.
- 4.В Re-enter the Recovery Mode, and select «Reinstall macOS» and press «Continue».
By doing so, the old High Sierra will be installed on your Mac automatically.
Downgrade Mac OS X (e.g: Downgrade Mac OS X Yosemite to El Capitan)
- 1.В Download theВ OS X Yosemite installerВ fromВ Mac App Store.
- 2.В Download theВ Diskmaker XВ app to create a bootable USB drive for El Capitan’s downgrade.
- 3.В Insert a USB drive into Mac, launchВ Diskmaker X,В and chooseВ OS X Yosemite 10.10. Then the Diskmaker X will do the rest jobs for you.
- 4.В Keep the USB drive inserted into the PC, restart Mac. HoleВ Option/AltВ and choseВ USBВ drive in the menu while rebooting Mac.
- 5.В Go to Utilities and select Disk Utility at the Install OS X menu.
- 6.В SelectВ Macintosh HDВ and chooseВ Erase.В Be sure that selected under theВ FormatВ field is Mac OS Extended (Journaled).В
- 7.В Return toВ Install OS XВ menu and selectВ ContinueВ to begin the installation of OS X Yosemite.В
- 8.В After all these, all you need is to be patient in installing Yosemite on your Mac.
Bonus Tip: Restore Lost Data after Downgrading macOS/Mac OS X(without backups)
This method is for users who have forgotten to back up important data before downgrading Mac OS. And if you lost data after Mac OS reinstallation or downgrading, here is the solution — to restore lost data after Mac OS X downgrading or reinstallation with powerful Mac data recovery software.
EaseUS Mac data recovery software supports to restore whatever you lost in Mac and it’s fully compatible with all Mac OS above 10.8
And if you happen to lost important data after Mac OS downgrading, let EaseUS Data Recovery Wizard for MacВ help you out. Three steps will do all jobs. В
Step 1. Select the disk location (it can be an internal HDD/SSD or a removable storage device) where you lost data and files. Click the «Scan» button.
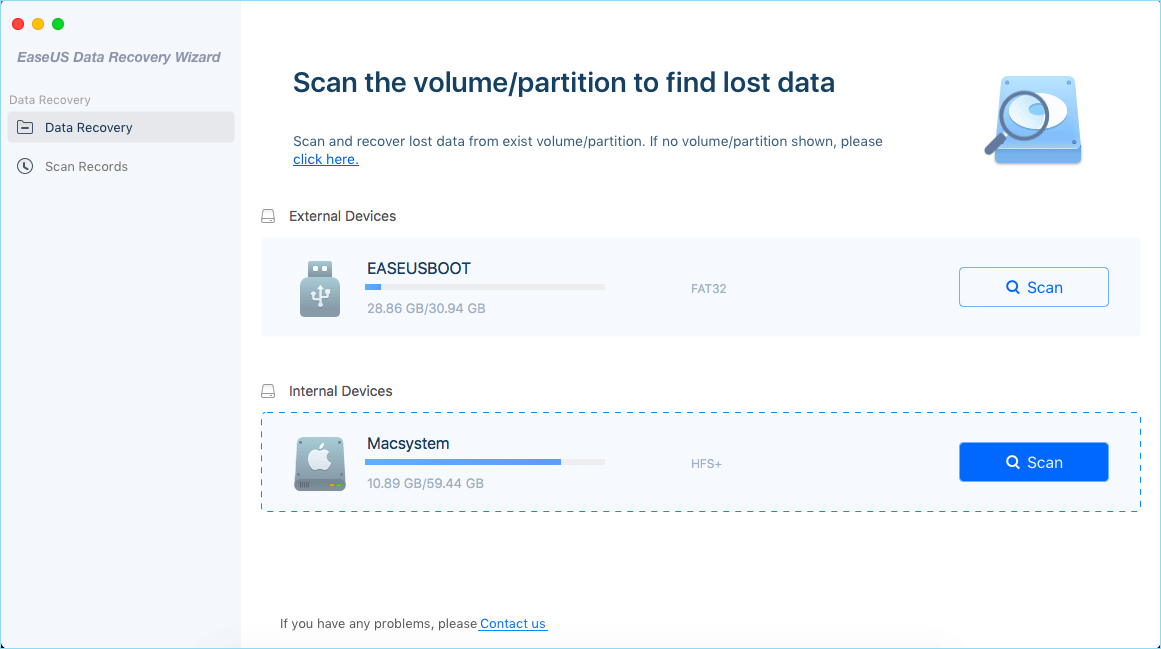
Step 2. EaseUS Data Recovery Wizard for Mac will immediately scan your selected disk volume and display the scanning results on the left pane.
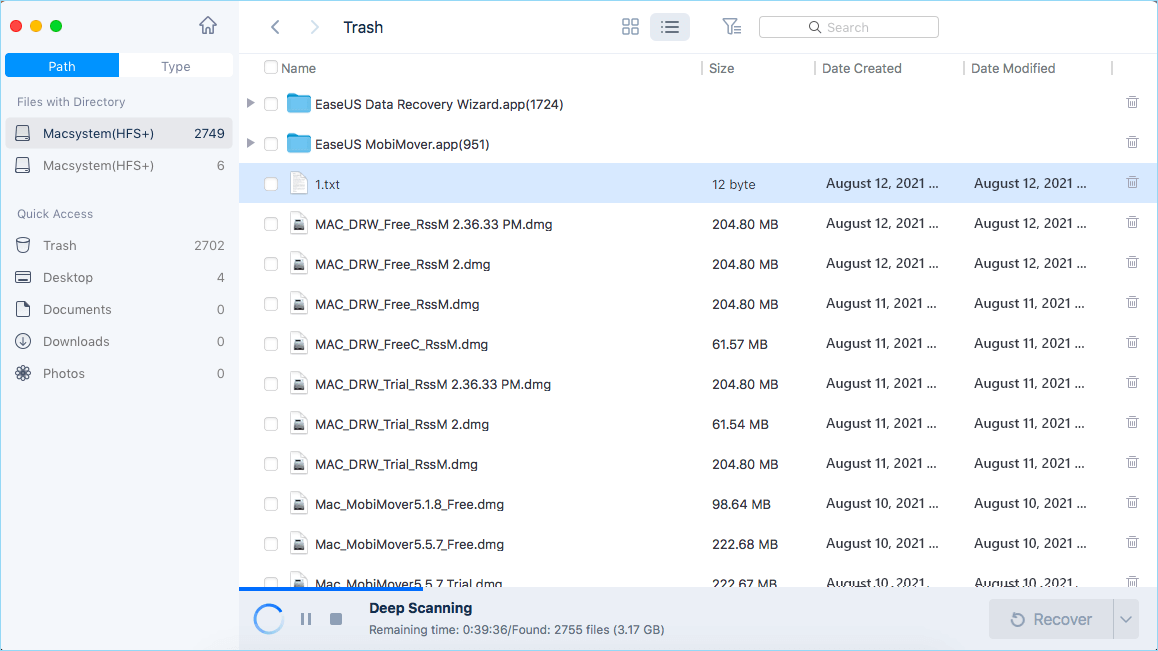
Step 3. In the scan results, select the file(s) and click the «Recover»В button to have them back.
Источник


