- Windows Server Installation Guide
- Enable the Windows Subsystem for Linux
- Download a Linux distribution
- Extract and install a Linux distribution
- Скачивание пакетов дистрибутива подсистемы Windows для Linux вручную Manually download Windows Subsystem for Linux distro packages
- Скачивание дистрибутивов Downloading distributions
- Скачивание дистрибутивов с помощью командной строки Downloading distros via the command line
- Скачивание с помощью PowerShell Download using PowerShell
- Скачивание с помощью cURL Download using curl
- Установка дистрибутива Installing your distro
- How To Install Ubuntu Along With Windows
- Install Ubuntu in dual boot with Windows 10 & Windows 8
- Step 1: Create a live USB or disk
- Step 2: Boot in to live USB
- Step 3: Start the installation
- Step 4: Prepare the partition
- Step 5: Create root, swap and home
- Step 6: Follow the trivial instructions
Windows Server Installation Guide
The Windows Subsystem for Linux is available for installation on Windows Server 2019 (version 1709) and later. This guide will walk through the steps of enabling WSL on your machine.
Enable the Windows Subsystem for Linux
Before you can run Linux distros on Windows, you must enable the «Windows Subsystem for Linux» optional feature and reboot.
Open PowerShell as Administrator and run:
Download a Linux distribution
Follow these instructions to download your favorite Linux distribution.
Extract and install a Linux distribution
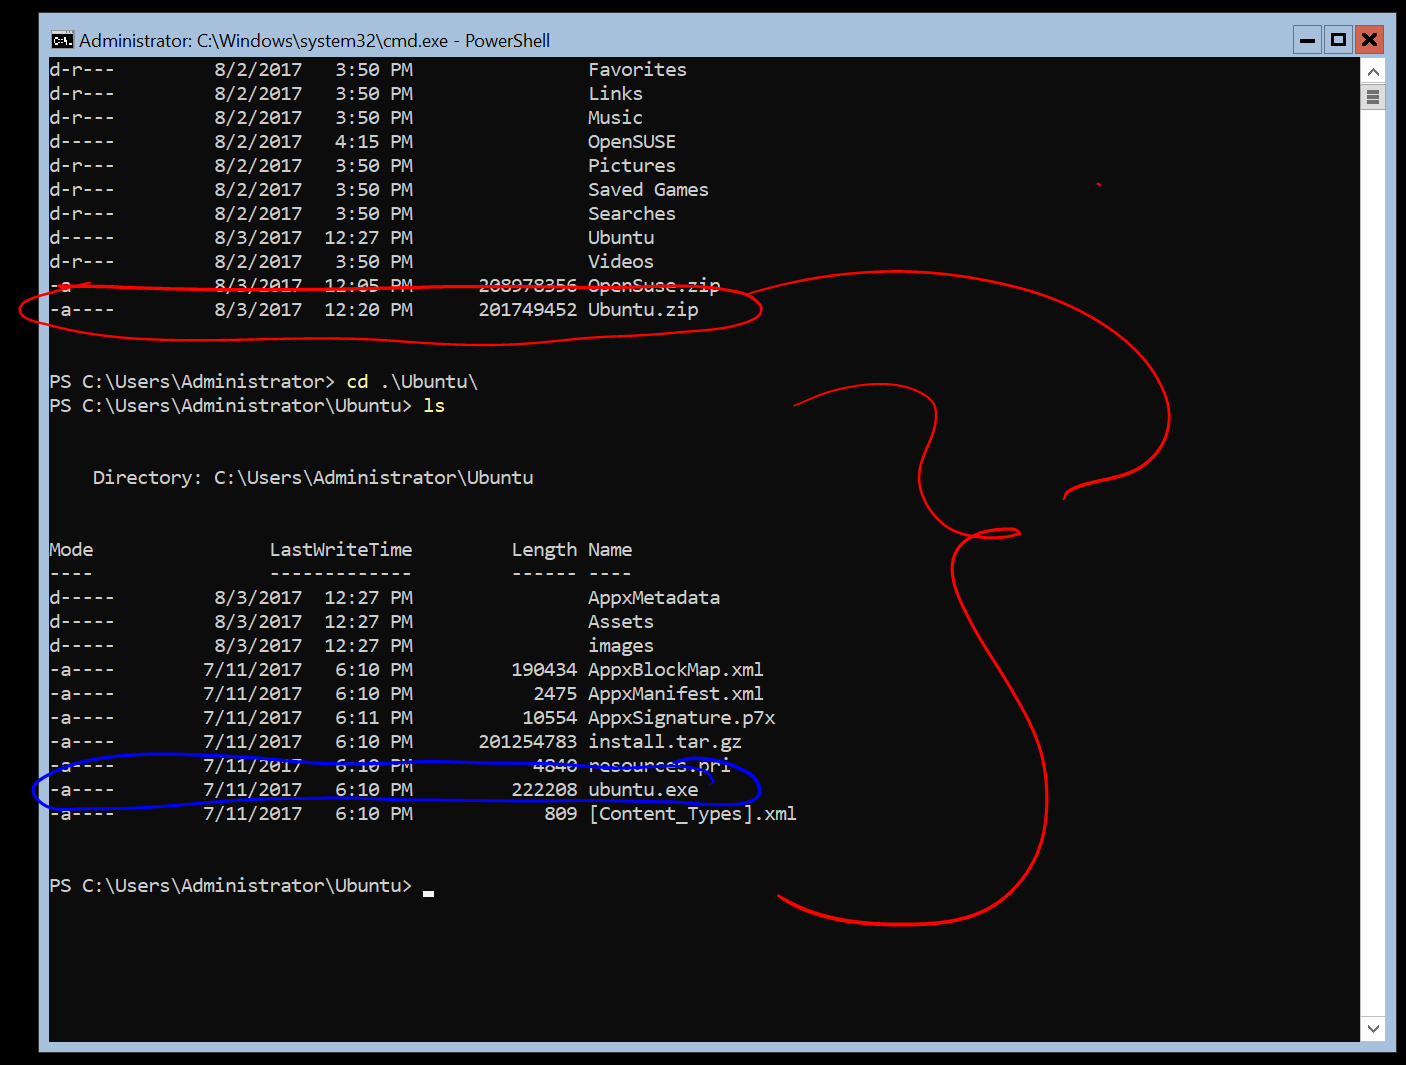
Now that you’ve downloaded a Linux distribution, in order to extract its contents and manually install, follow these steps:
Extract the .appx package’s contents, using PowerShell:
Run the distribution launcher application in the target folder. The launcher is typically named .exe (for example, ubuntu.exe ).
Installation failed with error 0x8007007e: If you receive this error, then your system doesn’t support WSL. Ensure that you’re running Windows build 16215 or later. Check your build. Also check to confirm that WSL is enabled and your computer was restarted after the feature was enabled.
3.Add your distro path to the Windows environment PATH ( C:\Users\Administrator\Ubuntu in this example), using PowerShell:
You can now launch your distribution from any path by typing .exe . For example: ubuntu.exe .
Now that it is installed, you must initialize your new distribution instance before using it.
Скачивание пакетов дистрибутива подсистемы Windows для Linux вручную Manually download Windows Subsystem for Linux distro packages
Существует несколько сценариев, в которых вы не сможете (или не захотите) устанавливать дистрибутивы WSL Linux с помощью Microsoft Store. There are several scenarios in which you may not be able (or want) to, install WSL Linux distros via the Microsoft Store. В частности, вы можете использовать номер SKU классической ОС Windows Server или Long-Term Servicing (LTSC), который не поддерживает Microsoft Store, или политики корпоративной сети и административные параметры, запрещающие использовать Microsoft Store в вашей среде. Specifically, you may be running a Windows Server or Long-Term Servicing (LTSC) desktop OS SKU that doesn’t support Microsoft Store, or your corporate network policies and/or admins to not permit Microsoft Store usage in your environment.
В таких случаях, когда подсистема WSL доступна, как скачать и установить дистрибутивы Linux в WSL, если нет доступа к магазину? In these cases, while WSL itself is available, how do you download and install Linux distros in WSL if you can’t access the store?
Примечание. Среды оболочки командной строки, в том числе дистрибутивы Linux/WSL, Cmd и PowerShell не могут выполняться в S-режиме Windows 10. Note: Command-line shell environments including Cmd, PowerShell, and Linux/WSL distros are not permitted to run on Windows 10 S Mode. Это ограничение существует, чтобы обеспечить целостность и безопасность, которые предоставляет S-режим. Дополнительные сведения см. в этой записи блога. This restriction exists in order to ensure the integrity and safety goals that S Mode delivers: Read this post for more information.
Скачивание дистрибутивов Downloading distributions
Если приложение Microsoft Store недоступно, вы можете скачать и вручную установить дистрибутивы Linux, щелкнув следующие ссылки: If the Microsoft Store app is not available, you can download and manually install Linux distros by clicking these links:
Это приведет к скачиванию пакетов .appx в выбранную папку. This will cause the .appx packages to download to a folder of your choosing. Следуйте инструкциям по установке скачанных дистрибутивов. Follow the installation instructions to install your downloaded distro(s).
Скачивание дистрибутивов с помощью командной строки Downloading distros via the command line
При желании вы также можете скачать предпочтительные дистрибутивы с помощью командной строки. If you prefer, you can also download your preferred distro(s) via the command line:
Скачивание с помощью PowerShell Download using PowerShell
Чтобы скачать дистрибутивы с помощью PowerShell, используйте командлет Invoke-WebRequest. To download distros using PowerShell, use the Invoke-WebRequest cmdlet. Ниже приведены инструкции по скачиванию Ubuntu 16.04. Here’s a sample instruction to download Ubuntu 16.04.
Если загрузка занимает много времени, выключите индикатор выполнения, задав $ProgressPreference = ‘SilentlyContinue’ . If the download is taking a long time, turn off the progress bar by setting $ProgressPreference = ‘SilentlyContinue’
Скачивание с помощью cURL Download using curl
Обновление Windows 10 Spring 2018 (или более поздней версии) содержит популярную служебную программу командной строки cURL, с помощью которой можно вызывать веб-запросы (например, команды HTTP GET, POST, PUT и т. д.) из командной строки. Windows 10 Spring 2018 Update (or later) includes the popular curl command-line utility with which you can invoke web requests (i.e. HTTP GET, POST, PUT, etc. commands) from the command line. Вы можете использовать curl.exe , чтобы скачать приведенные выше дистрибутивы: You can use curl.exe to download the above distros:
В приведенном выше примере выполняется curl.exe (а не только curl ), чтобы убедиться, что в PowerShell вызывается реальный исполняемый файл cURL, а не его псевдоним для Invoke-WebRequest. In the above example, curl.exe is executed (not just curl ) to ensure that, in PowerShell, the real curl executable is invoked, not the PowerShell curl alias for Invoke-WebRequest
Примечание. Использование curl может быть предпочтительным, если необходимо вызвать или создать сценарий для скачивания с помощью командлетов командной строки и сценариев .bat / .cmd . Note: Using curl might be preferable if you have to invoke/script download steps using Cmd shell and/or .bat / .cmd scripts.
Установка дистрибутива Installing your distro
Если вы используете Windows 10, вы можете установить дистрибутив с помощью PowerShell. If you’re using Windows 10 you can install your distro with PowerShell. Просто перейдите в папку, содержащую скачанный выше дистрибутив, и в этом каталоге выполните следующую команду, в которой app_name — это имя APPX-файла дистрибутива. Simply navigate to folder containing the distro downloaded from above, and in that directory run the following command where app_name is the name of your distro .appx file.
Если вы используете Windows Server или у вас возникли проблемы с выполнением приведенной выше команды, можно найти альтернативные инструкции по установке на странице документации Windows Server, чтобы установить файл .appx , изменив его на ZIP-файл. If you are using Windows server, or run into problems running the command above you can find the alternate install instructions on the Windows Server documentation page to install the .appx file by changing it to a zip file.
После установки дистрибутива следуйте обычным инструкциям по * обновлению WSL 1 до WSL 2 или создайте новую учетную запись пользователя и пароль. Once your distribution is installed, follow the normal instructions to * Update from WSL 1 to WSL 2 or create a new user account and password.
How To Install Ubuntu Along With Windows
Last updated November 12, 2020 By Abhishek Prakash 179 Comments
Brief: This detailed guide shows you how to dual boot Ubuntu with Windows legacy BIOS systems. If you are not sure, read this to know if you have BIOS or UEFI system.
Continuing my experimentation with different Linux distribution, I installed Xubuntu last week. Xubuntu is a variant of Ubuntu with Xfce desktop environment instead of the default Unity. Light on resources, Xubuntu can be a good Linux alternative of Windows XP.
I prefer to install Linux in dual boot with Windows. I hardly use Windows but it gives me sort of back up if I mess up with things. Dual booting Linux with Windows is always suggestible for the beginners. In this tutorial, we shall see how to install Ubuntu in dual boot mode with Windows.
This guide covers system with BIOS. You can read this article for dual booting Windows 10 and Ubuntu with UEFI.
Ubuntu, Xubuntu, which one is it? Don’t be confused. The steps given here are equally applicable to Ubuntu, Xubuntu or even Linux Mint.

Before we see how to dual boot Ubuntu with Windows, let me give you some important details.
First, I had Windows 7 installed with 3 partitions on it. Later I installed Linux on it in dual boot mode. I changed the partition and kept around 100 GB of total 320 GB for Linux installation. In the course of time, I upgraded to Windows 8 and subsequently to Windows 8.1. I never had to face the problem of Windows 8′s secure boot thingy. It is just to clarify that this process does not show you how to deal with UEFI .
Install Ubuntu in dual boot with Windows 10 & Windows 8
Follow the steps below to install Ubuntu in dual boot with Windows:
Step 1: Create a live USB or disk
Download and create a live USB or DVD. In Windows, my favorite tool to create a live USB is Universal USB Installer.
Step 2: Boot in to live USB
Plug the live USB or disk in to the computer and restart the computer. While booting the computer press F10 or F12 function key (defers from computer to computer) to go to the boot menu. Now, choose the option to boot from USB or Removable Media.
Step 3: Start the installation
It will take some time to boot in to the live USB or disk. Once booted, you will be immediately provided with option to either try Ubuntu or install Ubuntu. Even if you choose to try, you can find the option to install on the desktop:

First few screens are pretty straight forward. Just choose press continue:

Step 4: Prepare the partition
This is the most important part of the whole dual boot installation. Where to install Ubuntu? Windows is already installed here, so, we’ll prepare a new partition for Ubuntu. In the Installation Type window, choose Something Else:

As you can see, I have 3 NTFS and some ext4 partitions. If you don’t have ext4 partition, don’t worry, we don’t need that. As you can see in the picture below, one of the NTFS partition consists of Windows installation. This should be untouched if you want to keep your Windows installation safe.
I presume that you have more than one NTFS (or FAT 32) partitions (i.e. Drives in Windows term) on your hard disk, with one of them consisting of Windows installation (usually C drive). What you need to do here is to delete a NTFS or existing ext4 partition and create some free space. This will delete all the data in that partition and this is why I asked you to verify if you have Windows installed in a different partition.
Click on the desired partition and press the – to delete the partition.

Step 5: Create root, swap and home
Once you have some free space on your hard drive, its time to install Ubuntu on it. Now, there are several ways to do it. But I prefer to have a Root, a Swap and a Home.
The root should be at least 15 GB for a comfortable use. If you have more disk space, increase the root size. Suppose you have 100 GB of disk space. You can easily devote 30 GB of space to root.
Create a root partition first. Choose the free space available and click on +.

Here, choose the size of root directory (keep it 20 GB or more), choose ext4file system, and mount point as / (i.e. root):

Next step is to create swap partition. It is advised by many that Swap should be double of your system’s RAM size. You can choose the swap size accordingly.

The next step is to create Home. Try to allocate the maximum size to Home because this is where you’ll be downloading and keeping the files.

Once you have created Root, Swap and Home partitions, click on Install Now button.

Step 6: Follow the trivial instructions
If you successfully created the partitions as mentioned above, you have almost won the battle. Rest is just some trivial steps to follow. You will be taken through a number of screens to select options like keyboard layout, login credentials etc. You don’t have to be a genius to figure out what to do here afterwards. I have attached screenshots for reference purpose here.


Once the installation is over, you will be presented with the option to keep trying live version or to restart the system.

And that’s it. On next boot, you will see the option of Ubuntu in the grub screen. And thus you can enjoy the beautiful, beginner friendly and world’s most popular Linux distribution. I hope you found this guide to dual boot Ubuntu with Windows helpful. If you need, you can change the boot order easily to make Windows your default OS. Since you have just installed Ubuntu 14.04, you can check out things to do after installing Ubuntu.
If you have questions, suggestions or a word of thanks, feel free to drop a comment.
Like what you read? Please share it with others.


