- How to enable or disable Windows Installer Service on Windows 10
- Enable or disable Windows Installer Service
- 1] Enable or disable Windows Installer Service via Services console
- 2] Enable or disable Windows Installer Service via Command Prompt
- 3] Enable or disable Windows Installer Service via Registry Editor
- Enable IIS on Windows 10- Internet Information Services
- Jump to:
- How to enable IIS on Windows – Easy Steps:
- How to Check Internet Information Services(IIS) Version on Windows 10:
- Conclusion of the Article:
- How to Enable or Disable Diagnostic Policy Service in Windows 10
- Ways to Enable or Disable Diagnostic Policy Service in Windows 10
- 1] Exploit Services app to manage Diagnostic Policy Service
- 2] Make use of System Configuration
- 3] Do minor change in the registry key
- 4] Execute command through elevated Command Prompt
How to enable or disable Windows Installer Service on Windows 10
Windows Installer service (msiserver) manages all the installation process of the Windows operating system. You will experience issues if the service is faulty. In a disabled state, services depending on Windows Installer will not start properly. In this post, we will show you the 3 ways to enable or disable Windows Installer Service on Windows 10.
Basically, the service works to store application setup along with installation information. Also, it helps to track the location of groups of files, registry entries, and shortcuts that are already installed in your system. Apart from this, msiserver can add, modify and remove applications, features, and many other things.
Enable or disable Windows Installer Service
The following are the ways you can achieve this task;
- Via Services console
- Via Command Prompt
- Via Registry Editor
Let’s see the description of each of the methods.
1] Enable or disable Windows Installer Service via Services console
Do the following:
- Press Windows key + R to invoke the Run dialog.
- In the Run dialog box, type services.msc and hit Enter to open Services.
- In the Services window, scroll and locate the Windows Installer service.
- Double-click on the entry to open its properties window.
- In the properties window, on the General tab, click the dropdown on Startup type and select Automatic.
- Next, move to the Service status section.
- Click the Start button in order to enable the service.
- To disable this specific service, click the Stop button.
- Click Apply >OK to save changes.
You can now exit the Services console.
2] Enable or disable Windows Installer Service via Command Prompt
- Invoke the Run dialog.
- In the Run dialog box, type cmd and then press CTRL + SHIFT + ENTER to open Command Prompt in admin/elevated mode.
- In the command prompt window, type the command below and hit Enter to enable the Windows Installer service.
Note: You can’t start a service if Startup type is on Disabled.
To change the Startup type of the same service, you can execute the following command:
For Automatic:
REG add «HKLM\SYSTEM\CurrentControlSet\services\MSIServer» /v Start /t REG_DWORD /d 2 /f
For Manual:
REG add «HKLM\SYSTEM\CurrentControlSet\services\MSIServer» /v Start /t REG_DWORD /d 3 /f
For Disabled:
REG add «HKLM\SYSTEM\CurrentControlSet\services\MSIServer» /v Start /t REG_DWORD /d 4 /f
For Automatic (Delayed Start):
REG add «HKLM\SYSTEM\CurrentControlSet\services\MSIServer» /v Start /t REG_DWORD /d 2 /f
- To disable the service, type the command below and hit Enter.
You can now exit CMD prompt.
3] Enable or disable Windows Installer Service via Registry Editor
Since this is a registry operation, it is recommended that you back up the registry or create a system restore point as necessary precautionary measures. Once done, you can proceed as follows:
- Invoke the Run dialog.
- In the Run dialog box, type regedit and hit Enter to open Registry Editor.
- Navigate or jump to the registry key path below:
- At the location, on the right pane, double-click the Start entry to edit its properties.
- In the properties dialog, set the Value data to the following as per your requirement:
- Automatic: 2
- Manual: 3
- Disabled: 4
- Automatic (Delayed Start): 2
- Click OK to save changes.
Enable IIS on Windows 10- Internet Information Services
Enable IIS on Windows 10: Enabling Internet Information Services on Windows 10 is really a simple process. Internet Information Services(IIS) is nothing but an extended web server that is made by Microsoft so that it can be made use along with Windows NT. Also, ASP.Net developers will be looking to enable IIS in the first place as IIS is required to host ASP.NET. IIS provides an interactive user interface that helps to set the configuration easy. In this article, we will check out the simple steps involved in the process of Enabling Internet Information Services(IIS) on Windows 10.
Jump to:
- Enable IIS on Windows 10- Simple Steps
- Check Internet Information Services Version
- Conclusion of the Article
How to enable IIS on Windows – Easy Steps:
The steps are explained with images for the easy understanding of the users. Kindly follow the below steps.
- Go to Start Menu and search for Control Panel. Open Control Panel.
 Search for Control Panel
 - Switch the Control Panel view to Category. Switch to Category View
- Click on Programs. Programs
- Now, proceed with “Turn Windows features on or off“. Turn Windows Features on or off
- Windows Features dialog box will appear now.
- Locate Internet Information Services and enable it. Enable IIS on Windows 10
- Finally, Click on OK.
- Windows will search for the required files. Searching for the required files
- Finally, it will apply the changes and complete the requested changes. Click on Close. Close
- Internet Information Services(IIS) is now enabled on Windows 10.
How to Check Internet Information Services(IIS) Version on Windows 10:
Checking the IIS Version on Windows is very easy. Kindly follow the below steps.
- Open Run Command using the shortcut Win Key + R .
- Search for inetmgr. Run inetmgr
- Internet Information Services(IIS) manager will open now.
- Click on Help. Help
- Go to “About Internet Information Services“. About Internet Information Services
- “About Internet Information Services manager dialog box will open now. Internet Information Services Version
- You can find the version of IIS over there.
Conclusion of the Article:
Internet Information Services(IIS) on Windows 10 is one of the essential features for ASP.NET developers. The above article clearly discusses the steps involved in the process of enabling Internet Information Services(IIS) on Windows 10.
If you have any doubts, please let us know in the comments below. For more such awesome posts stay tuned to TecKangaroo.
How to Enable or Disable Diagnostic Policy Service in Windows 10
Here, you will get to know how to Enable or Disable Diagnostic Policy Service in Windows 10. When your system conflict with bugs and problems, DPS service let you know what they are. At the same time, it allows troubleshooting and a workaround for the problematic component of your Windows. By default, the service runs automatically with the OS to keep finding the issues. If you disable the same, the service will no longer function and you will never come to know what is causing trouble in your system.
DPS is Win32 service whose path is “%SystemRoot%\System32\svchost.exe -k LocalServiceNoNetwork -p”. It runs as NT Authority\LocalService in a shared process of “svchost.exe”. Consequently, other services function in the same process too. If the service fails to start, the details are being recorded into Event Log. Next time, when the device starts up, it will notify you that Diagnostic Policy Service failed to start due to the error.
Ways to Enable or Disable Diagnostic Policy Service in Windows 10
Here is How to Enable or Disable Diagnostic Policy Service in Windows 10 –
1] Exploit Services app to manage Diagnostic Policy Service
Step-1: First of all, open Run dialog box by making a joint press of Windows key and R.
Step-2: Type in the command “services.msc” in the empty text field and hit Enter.
Step-3: On the Services console, find out Diagnostic Policy Service located under Name column.
Step-4: Once found, right-click on the same and select Properties.

Step-5: When a new wizard appears, go to its Startup type area and select either Automatic or Manual using the drop-down menu.

Step-6: Thereafter, hover the cursor to Service status and click the Start button to enable Diagnostic Policy Service. To disable the same, hit the Stop button.
Step-7: Finally, click Apply followed by OK in order to save the changes.
2] Make use of System Configuration
- Press Win+Q keyboard shortcut to invoke taskbar search box.
- Write down msconfig in the void space and hit Enter.
- When System Configuration wizard comes into the sight, move to its Services tab.
- Here you will see all the services, locate “Diagnostic Policy Service” from the list.
- Once you get it, click the checkbox located beside the service to put a tick mark.
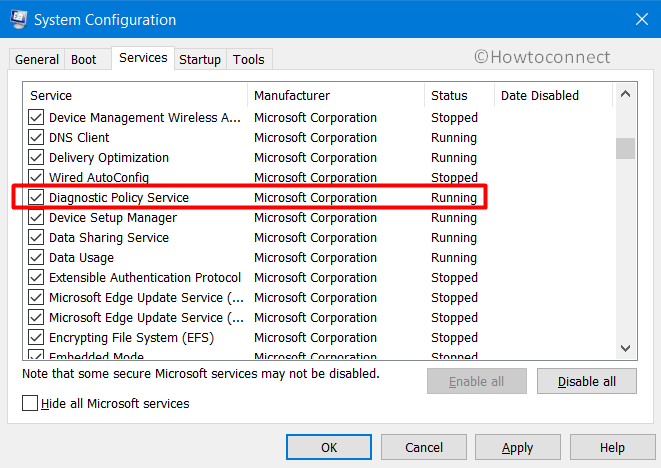
- After that, click on Apply and then OK button to enable DPS Service.
- If you want to disable Diagnostic Policy Service, just withdraw the tick mark you put there.
- To make the changes effective, you need to restart Windows 10 PC.
3] Do minor change in the registry key
Note – While modifying the registry key, be careful as a wrongly allocated value can cause serious damage to your system.
- Right-click on the Start button and select Run from the Power-user menu.
- Once appears, type regedit in the empty area located and click the OK button.
- A UAC will prompt up, click Yes to give consent.
- In the Registry Editor window, navigate the following path –
- After getting there, shift to the right pane of the current window and locate the DWORD namely Start.
- Double click on the same to modify its value.
- A popup will show up entitled Value data box. Place your preferred value followed by clicking OK button.
| Startup Type | Value Data |
| Automatic | 2 |
| Disabled | 4 |
| Manual | 3 |
| Automatic (Delayed Start) | 2 |
4] Execute command through elevated Command Prompt
Step#1: Click on the Start button and type cmd.exe. When you see Command Prompt in the search result, click “Run as administrator”.
Step#2: If a UAC prompts up, click Yes proceed forward.
Step#3: To enable Diagnostic Policy Service, you must set the startup type to either Automatic or Manual. For that, execute the preferred command in the black window –
Automatic –
REG add “HKLM\SYSTEM\CurrentControlSet\services\DPS” /v Start /t REG_DWORD /d 2 /f
Manual –
REG add “HKLM\SYSTEM\CurrentControlSet\services\DPS” /v Start /t REG_DWORD /d 3 /f
Step#4: As you modify the startup type, now write down below command in the same Command prompt and hit Enter to execute it –
This will enable the DPS service immediately.
Step#5: In order to disable Diagnostic Policy Service, execute the below command in the same way –
REG add “HKLM\SYSTEM\CurrentControlSet\services\DPS” /v Start /t REG_DWORD /d 4 /f


