- Troubleshoot problems updating Windows 10
- Have issues installing Windows updates? Start here.
- Still stuck?
- Fix Windows Update errors
- Quick fixes
- List of fixes
- Step by step instructions
- Remove external hardware
- Repair the system drive
- Windows Update Troubleshooter
- Repair system files
- Repair unsigned drivers
- Update Windows
- Uninstall non-Microsoft antivirus software
- Uninstall non-essential software
- Update firmware and drivers
- Ensure that «Download and install updates» is selected
- Verify disk space
- Open an elevated command prompt
Troubleshoot problems updating Windows 10
In Windows 10, you decide when and how to get the latest updates to keep your device running smoothly and securely. This article will help you answer questions and troubleshoot common problems with your Windows 10 update.
If you’re looking for info on how to activate Windows 10 or to verify that your installation of Windows 10 is activated, see Activate Windows 10.
Have issues installing Windows updates? Start here.
Your device may not be able to update to the latest version of Windows 10 for a few reasons. The following tips can help you pinpoint the issue affecting your device.
Before you begin, make sure your device is plugged into a power source and connected to the internet. Then, try the steps listed below to get your PC to update.
Some updates require administrator access. If your account doesn’t have administrator access, see Create a local user or administrator account in Windows 10. Or if someone else at home or in your office has an administrator account on your device, try asking them to install the updates.
Before trying any of the solutions below, make sure you back up your personal files. You can use File History to back up your files to another drive, or insert a USB drive and use File Explorer to drag and copy important files to the USB drive. If you’re signing into Windows with a Microsoft account, your system settings will be automatically restored after updating, once you’re connected to the internet.
You can also back up your files with OneDrive. For more info, go to Back up your Documents, Pictures, and Desktop folders with OneDrive.
Make sure that your device has enough space. Your device requires at least 16 GB of free space to upgrade a 32-bit OS, or 20 GB for a 64-bit OS. If your device has a small hard drive, you may need to insert a USB drive to update it.
If your PC is running low on storage, try the techniques at Free up drive space in Windows 10.
Many updates require you to restart your device. Save your work and close all open applications. Then, select Start > Power , and select either Update and restart or Update and shut down.
Even if you have downloaded some updates, there may be more available. After trying the preceding steps, run Windows Update again by selecting Start > Settings > Update & Security > Windows Update > Check for updates. Download and install any new updates.
Remove any external storage devices and drives, docks, and other hardware plugged into your device that aren’t needed for basic functionality. Then try to run updates again and see if this resolved your issue. If it didn’t, continue to the next tip.
If you’ve added hardware to your device, check for third-party driver updates and installation instructions on the hardware manufacturer’s website. Update any drivers, then try to run updates again and see if this resolved your issue. If it didn’t, continue to the next tip.
In the search box on the taskbar, type device manager, then select Device Manager from the list of results.
In the window that appears, look for any device with a yellow exclamation mark next to it. (You may have to select each category to view the list of devices.) Select the device name.
Select Action, and then choose either Update driver or Uninstall to correct the errors.
Common troubleshooting questions
If you are receiving an error message with a specific error code, try running the Windows Update Troubleshooter. If that doesn’t resolve the issue, see Fix Windows Update errors and follow the instructions to help resolve common update issues.
The time required to download and install updates depends on connection speed, network settings, and the size of the update. If the installation remains stuck at the same percentage, try checking for updates again or running the Windows Update Troubleshooter.
To check for updates, select Start > Settings > Update & Security > Windows Update > Check for updates.
To get help, in the search box on the task bar, type get help, then select Get Help from the list of results. To leave feedback if you run into further problems, in the search box on the taskbar, type feedback hub, then select Feedback Hub from the list of results.
Windows 10 is the most secure Windows ever, and we recommend you stay updated to protect your PC from security risks and to keep it running smoothly. However, you can temporarily pause updates as well as schedule a restart to install updates at a time that’s convenient for you.
Learn how to temporarily pause updates
Find out how to schedule a restart to install updates at a convenient time
You will only receive a notification when it’s time to restart your computer to apply the installed updates.
If you need to know where you left off in your work after an update, use Timeline to jump back in.
To get started with Timeline, select Task View on the taskbar, or press the Windows logo key +Tab and select the activity you want to resume.
Monthly quality updates on Windows 10 are quite small and have a minimal impact on data usage. Feature updates typically happen twice per year, and you can control when to install them. They require more data but are less frequent.
If you’re on a metered connection, some updates for Windows won’t be installed automatically. Metered connections in Windows 10
Your computer might be slow for a number of reasons, but updating to the latest version of Windows 10 can improve its performance. For help with a slow computer, see Tips to improve PC performance in Windows 10.
If you’re having trouble finding your files after an upgrade, see Find lost files after the upgrade to Windows 10 for other things to try.
Warning: Microsoft only recommends trying the procedures in this section if you’re comfortable working in the command line. These procedures require administrator permissions on your device.
In the search box on the taskbar, type command prompt, then select Run as administrator from the list of options. Select Yes. Next, in the window that appears, type the following commands one at a time, including the spaces as shown. After you type each command, press Enter. Then let each command complete before you type the next command.
net stop wuauserv
ren %systemroot%\softwaredistribution softwaredistribution.bak
ren %systemroot%\system32\catroot2 catroot2.bak
net start wuauserv
After all these commands are completed, close the Command Prompt window and restart your computer.
In some instances, third-party antivirus or security software can cause errors when you try to update to the latest version of Windows 10. You can temporarily uninstall this software, update your PC, and then reinstall the software after your device is up to date. We recommend using third-party antivirus or security software that’s compatible with the latest version of Windows 10. You can check compatibility by visiting the software manufacturer’s website.
Note: Before uninstalling software, make sure you know how to reinstall your programs and that you have any necessary product keys.
In the search box on the taskbar, type command prompt, and then select Run as administrator from the list of options. Select Yes. In the window that appears, type the following command, including the space as shown:
chkdsk/f C:
and then press Enter. Repairs will automatically start on your hard drive, and you’ll be asked to restart your device.
A clean restart starts Windows with a minimal set of drivers and startup programs. This helps eliminate software conflicts that occur when you install a program or an update that may cause issues updating your PC.
Learn how to do a clean restart
In the search box on the taskbar, type command prompt, then select Run as administrator from the list of options.
In the window that appears, type this command including spaces as shown:
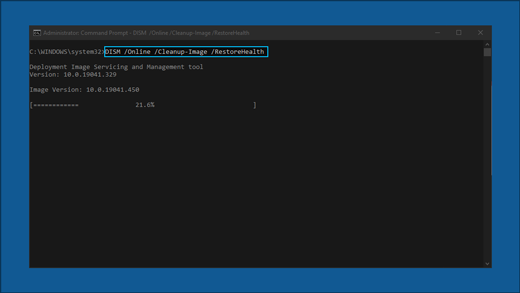
DISM.exe /Online /Cleanup-image /Restorehealth
Press Enter. When the command operation has run successfully, you’ll see a confirmation message from Command Prompt that says, “The restore operation completed successfully” or “The operation completed successfully”.
Note: If you don’t see a confirmation message, retype the command and try again.
Next, type this command, including the space as shown:
sfc /scannow
Press Enter. Wait until the sfc scan verification reaches 100% completion, and then close Command Prompt.
Try running the Windows Update again.
Go to the software download page and select Download tool now to download the clean installation tool. Make sure to carefully read the notes on the software download page before using the tool.
Still stuck?
Contact Microsoft support if you continue to have problems with your Windows updates.
Fix Windows Update errors
What does this guided walk-through do?
This guided walk-through provides steps to fix problems with Windows Updates for Windows 8.1 and 7, such as taking a long time to scan, or error codes while installing updates.
For help with Windows Update issues in Windows 10, see Troubleshoot problems updating Windows 10 instead.
A common cause of errors is inadequate drive space. If you need help freeing up drive space, see Tips to free up drive space on your PC.
Common error codes
The steps in this guided walk-through should help with all Windows Update errors and other issues— you don’t need to search for the specific error to solve it. As an example, here are some commonly seen error codes: 0x0xc1900223223; 0x80240034; 0x8007000E, 0x80242006, 0x80244018, 0x80D02002, 0x80246017, 0x80240438, 0x80070070, 0x8007000D, 0x80246008, 0x80096004, 0x80070020.
The steps provided here should help fix any errors that come up during the Windows Update process.
How does it work?
We’ll begin by asking you questions about the Windows version you’re using and the issue you’re experiencing. Next, we’ll take you through a series of troubleshooting steps that are specific to your situation. At the end of each step, you’ll be asked “Did this resolve the issue?” If it’s resolved, select Yes, and you’re done! If it isn’t resolved, select No and continue with the guided walk-through.
Quick fixes
Applies to
This is a 100 level topic (basic).
See Resolve Windows 10 upgrade errors for a full list of topics in this article.
The following list of fixes can resolve many Windows upgrade problems. You should try these steps before contacting Microsoft support, or attempting a more advanced analysis of a Windows upgrade failure. Also review information at Windows 10 help.
The Microsoft Virtual Agent provided by Microsoft Support can help you to analyze and correct some Windows upgrade errors. To talk to a person about your issue, start the Virtual Agent (click Get started) and enter «Talk to a person» two times.
You might also wish to try a new tool available from Microsoft that helps to diagnose many Windows upgrade errors. For more information and to download this tool, see SetupDiag. The topic is more advanced (300 level) because several advanced options are available for using the tool. However, you can now just download and then double-click the tool to run it. By default when you click Save, the tool is saved in your Downloads folder. Double-click the tool in the folder and wait until it finishes running (it might take a few minutes), then double-click the SetupDiagResults.log file and open it using Notepad to see the results of the analysis.
List of fixes
- Remove nonessential external hardware, such as docks and USB devices. More information.
- Check the system drive for errors and attempt repairs. More information.
- Run the Windows Update troubleshooter. More information.
- Attempt to restore and repair system files. More information.
- Check for unsigned drivers and update or repair them. More information.
- Update Windows so that all available recommended updates are installed, and ensure the computer is rebooted if this is necessary to complete installation of an update. More information.
- Temporarily uninstall non-Microsoft antivirus software. More information.
- Uninstall all nonessential software. More information.
- Update firmware and drivers. More information
- Ensure that «Download and install updates (recommended)» is accepted at the start of the upgrade process. More information.
- Verify at least 16 GB of free space is available to upgrade a 32-bit OS, or 20 GB for a 64-bit OS. More information.
Step by step instructions
Remove external hardware
If the computer is portable and it is currently in a docking station, undock the computer.
Unplug nonessential external hardware devices from the computer, such as:
- Headphones
- Joysticks
- Printers
- Plotters
- Projectors
- Scanners
- Speakers
- USB flash drives
- Portable hard drives
- Portable CD/DVD/Blu-ray drives
- Microphones
- Media card readers
- Cameras/Webcams
- Smart phones
- Secondary monitors, keyboards, mice
For more information about disconnecting external devices, see Safely remove hardware in Windows 10
Repair the system drive
The system drive is the drive that contains the system partition. This is usually the C: drive.
To check and repair errors on the system drive:
Click Start.
Type command.
Right-click Command Prompt and then left-click Run as administrator.
If you are prompted by UAC, click Yes.
Type chkdsk /F and press ENTER.
When you are prompted to schedule a check the next time the system restarts, type Y.
See the following example
Restart the computer. The computer will pause before loading Windows and perform a repair of your hard drive.
Windows Update Troubleshooter
The Windows Update troubleshooter tool will automatically analyze and fix problems with Windows Update, such as a corrupted download. It will also tell you if there is a pending reboot that is preventing Windows from updating.
For Windows 7 and 8.1, the tool is here.
For Windows 10, the tool is here.
To run the tool, click the appropriate link above. Your web browser will prompt you to save or open the file. Select open and the tool will automatically start. The tool will walk you through analyzing and fixing some common problems.
You can also download the Windows Update Troubleshooter by starting the Microsoft Virtual Agent, typing update Windows, selecting the version of Windows you are running, and then answering Yes when asked «Do you need help troubleshooting Windows Update?»
If any errors are displayed in the Windows Update Troubleshooter, use the Microsoft Virtual Agent to ask about these errors. The Virtual Agent will perform a search and provide a list of helpful links.
Repair system files
This fix is also described in detail at answers.microsoft.com.
To check and repair system files:
Click Start.
Type command.
Right-click Command Prompt and then left-click Run as administrator.
If you are prompted by UAC, click Yes.
Type sfc /scannow and press ENTER. See the following example:
If you are running Windows 8.1 or later, type DISM.exe /Online /Cleanup-image /Restorehealth and press ENTER (the DISM command options are not available for Windows 7). See the following example:
It may take several minutes for the command operations to be completed. For more information, see Repair a Windows Image and Use the System File Checker tool.
Repair unsigned drivers
Drivers are files ending in *.dll or *.sys that are used to communicate with hardware components. Because drivers are so important, they are cryptographically signed to ensure they are genuine. Drivers with a *.sys extension that are not properly signed frequently block the upgrade process. Drivers might not be properly signed if you:
- Disabled driver signature verification (highly not recommended).
- A catalog file used to sign a driver is corrupt or missing.
Catalog files (files with a *.cat extension) are used to sign drivers. If a catalog file is corrupt or missing, the driver will appear to be unsigned, even though it should be signed. To restore the catalog file, reinstall the driver or copy the catalog file from another device. You might need to analyze another device to determine the catalog file that is associated with the unsigned driver. All drivers should be signed to ensure the upgrade process works.
To check your system for unsigned drivers:
Click Start.
Type command.
Right-click Command Prompt and then left-click Run as administrator.
If you are prompted by UAC, click Yes.
Type sigverif and press ENTER.
The File Signature Verification tool will open. Click Start.

After the scanning process is complete, if you see Your files have been scanned and verified as digitally signed then you have no unsigned drivers. Otherwise, you will see The following files have not been digitally signed and a list will be provided with name, location, and version of all unsigned drivers.
To view and save a log file, click Advanced, and then click View Log. Save the log file if desired.
Locate drivers in the log file that are unsigned, write down the location and file names. Also write down the catalog that is associated to the driver if it is provided. If the name of a catalog file is not provided you might need to analyze another device that has the same driver with sigverif and sigcheck (described below).
The next step is to check that the driver reported as unsigned by sigverif.exe has a problem. In some cases, sigverif.exe might not be successful at locating the catalog file used to sign a driver, even though the catalog file exists. To perform a detailed driver check, download sigcheck.zip and extract the tool to a directory on your computer, for example: C:\sigcheck.
Sigcheck is a tool that you can download and use to review digital signature details of a file. To use sigcheck:
In the command window, use the cd command to switch to the directory where you extracted sigcheck, for example cd c:\sigcheck.
Using the list of unsigned drivers and their associated paths that you obtained from the File Signature Verification tool, run sigcheck to obtain details about the driver, including the catalog file used for signing. Type sigcheck64 -i and press ENTER (or sigcheck -i for a 32 bit OS). See the following example:
In the example above, the afd.sys driver is properly signed by the catalog file Package_163_for_KB4054518
Optionally, you can generate a list of drivers using driverquery.exe, which is included with Windows. To save a list of signed and unsigned drivers with driverquery, type driverquery /si > c:\drivers.txt and press ENTER. See the following example:
For more information about using driverquery, see Two Minute Drill: DriverQuery.exe and driverquery.
Update Windows
You should ensure that all important updates are installed before attempting to upgrade. This includes updates to hardware drivers on your computer.
The Microsoft Virtual Agent can walk you through the process of making sure that Windows is updated.
Start the Virtual Agent and then type «update windows.»
Answer questions that the agent asks, and follow instructions to ensure that Windows is up to date. You can also run the Windows Update Troubleshooter described above.
Click Start, click power options, and then restart the computer.
Uninstall non-Microsoft antivirus software
Use Windows Defender for protection during the upgrade.
Verify compatibility information, and if desired re-install antivirus applications after the upgrade. If you plan to re-install the application after upgrading, be sure that you have the installation media and all required activation information before removing the program.
To remove the application, go to Control Panel\Programs\Programs and Features and click the antivirus application, then click Uninstall. Choose Yes when you are asked to confirm program removal.
Uninstall non-essential software
Outdated applications can cause problems with a Windows upgrade. Removing old or non-essential applications from the computer can therefore help.
If you plan to reinstall the application later, be sure that you have the installation media and all required activation information before removing it.
To remove programs, use the same steps as are provided above for uninstalling non-Microsoft antivirus software, but instead of removing the antivirus application repeat the steps for all your non-essential, unused, or out-of-date software.
Update firmware and drivers
Updating firmware (such as the BIOS) and installing hardware drivers is a somewhat advanced task. Do not attempt to update BIOS if you aren’t familiar with BIOS settings or are not sure how to restore the previous BIOS version if there are problems. Most BIOS updates are provided as a «flash» update. Your manufacturer might provide a tool to perform the update, or you might be required to enter the BIOS and update it manually. Be sure to save your working BIOS settings, since some updates can reset your configuration and make the computer fail to boot if (for example) a RAID configuration is changed.
Most BIOS and other hardware updates can be obtained from a website maintained by your computer manufacturer. For example, Microsoft Surface device drivers can be obtained at: Download the latest firmware and drivers for Surface devices.
To obtain the proper firmware drivers, search for the most updated driver version provided by your computer manufacturer. Install these updates and reboot the computer after installation. Request assistance from the manufacturer if you have any questions.
Ensure that «Download and install updates» is selected
When you begin a Windows Update, the setup process will ask you to Get important updates. Answer Yes if the computer you are updating is connected to the Internet. See the following example:

Verify disk space
You can see a list of requirements for Windows 10 at Windows 10 Specifications & System Requirements. One of the requirements is that enough hard drive space be available for the installation to take place. At least 16 GB of free space must be available on the system drive to upgrade a 32-bit OS, or 20 GB for a 64-bit OS.
To view how much hard drive space is available on your computer, open File Explorer. In Windows 7, this was called Windows Explorer.
In File Explorer, click on Computer or This PC on the left, then look under Hard Disk Drives or under Devices and drives. If there are multiple drives listed, the system drive is the drive that includes a Microsoft Windows logo above the drive icon.
The amount of space available on the system drive will be displayed under the drive. See the following example:

In the previous example, there is 703 GB of available free space on the system drive (C:).
To free up additional space on the system drive, begin by running Disk Cleanup. You can access Disk Cleanup by right-clicking the hard drive icon and then clicking Properties. See the following example:

For instructions to run Disk Cleanup and other suggestions to free up hard drive space, see Tips to free up drive space on your PC.
When you run Disk Cleanup and enable the option to Clean up system files, you can remove previous Windows installations which can free a large amount of space. You should only do this if you do not plan to restore the old OS version.
Open an elevated command prompt
It is no longer necessary to open an elevated command prompt to run the SetupDiag tool. However, this is still the optimal way to run the tool.
To launch an elevated command prompt, press the Windows key on your keyboard, type cmd, press Ctrl+Shift+Enter, and then Alt+C to confirm the elevation prompt. Screenshots and other steps to open an administrator (aka elevated) command prompt are here.
Note: When you open an elevated command prompt, you will usually start in the C:\WINDOWS\system32 directory. To run a program that you recently downloaded, you must change to the directory where the program is located. Alternatively, you can move or copy the program to a location on the computer that is automatically searched. These directories are listed in the PATH variable.
If this is too complicated for you, then use File Explorer to create a new folder under C: with a short name such as «new» then copy or move the programs you want to run (like SetupDiag) to this folder using File Explorer. When you open an elevated command prompt, change to this directory by typing «cd c:\new» and now you can run the programs in that folder.


