- Troubleshoot problems updating Windows 10
- Have issues installing Windows updates? Start here.
- Still stuck?
- Fix problems with the Start menu
- Show a hidden taskbar
- Troubleshooting Windows Subsystem for Linux
- Search for any existing issues related to your problem
- Submit a bug report
- Submit a feature request
- Contribute to the docs
- Terminal or Command Line
- Common issues
- I’m on Windows 10 version 1903 and I still do not see options for WSL 2
- Error: 0x1bc when wsl —set-default-version 2
- Cannot access WSL files from Windows
- Can’t start WSL 2 distribution and only see ‘WSL 2’ in output
- command not found when executing windows .exe in linux
- «Error: 0x80370102 The virtual machine could not be started because a required feature is not installed.»
- Bash loses network connectivity once connected to a VPN
- Starting WSL or installing a distribution returns an error code
- Updating Bash on Ubuntu on Windows
- Apt-get upgrade errors
- «Error: 0x80040306» on installation
- «Error: 0x80040154» after Windows update
- Changing the display language
- Installation issues after Windows system restore
- No internet access in WSL
- Permission Denied error when using ping
- Bash is hung
- Check your build number
- Confirm WSL is enabled
- OpenSSH-Server connection issues
- «The referenced assembly could not be found.» when enabling the WSL optional feature
- Correct (SSH related) permission errors
- Running Windows commands fails inside a distribution
- Unable to boot after installing WSL 2
Troubleshoot problems updating Windows 10
In Windows 10, you decide when and how to get the latest updates to keep your device running smoothly and securely. This article will help you answer questions and troubleshoot common problems with your Windows 10 update.
If you’re looking for info on how to activate Windows 10 or to verify that your installation of Windows 10 is activated, see Activate Windows 10.
Have issues installing Windows updates? Start here.
Your device may not be able to update to the latest version of Windows 10 for a few reasons. The following tips can help you pinpoint the issue affecting your device.
Before you begin, make sure your device is plugged into a power source and connected to the internet. Then, try the steps listed below to get your PC to update.
Some updates require administrator access. If your account doesn’t have administrator access, see Create a local user or administrator account in Windows 10. Or if someone else at home or in your office has an administrator account on your device, try asking them to install the updates.
Before trying any of the solutions below, make sure you back up your personal files. You can use File History to back up your files to another drive, or insert a USB drive and use File Explorer to drag and copy important files to the USB drive. If you’re signing into Windows with a Microsoft account, your system settings will be automatically restored after updating, once you’re connected to the internet.
You can also back up your files with OneDrive. For more info, go to Back up your Documents, Pictures, and Desktop folders with OneDrive.
Make sure that your device has enough space. Your device requires at least 16 GB of free space to upgrade a 32-bit OS, or 20 GB for a 64-bit OS. If your device has a small hard drive, you may need to insert a USB drive to update it.
If your PC is running low on storage, try the techniques at Free up drive space in Windows 10.
Many updates require you to restart your device. Save your work and close all open applications. Then, select Start > Power , and select either Update and restart or Update and shut down.
Even if you have downloaded some updates, there may be more available. After trying the preceding steps, run Windows Update again by selecting Start > Settings > Update & Security > Windows Update > Check for updates. Download and install any new updates.
Remove any external storage devices and drives, docks, and other hardware plugged into your device that aren’t needed for basic functionality. Then try to run updates again and see if this resolved your issue. If it didn’t, continue to the next tip.
If you’ve added hardware to your device, check for third-party driver updates and installation instructions on the hardware manufacturer’s website. Update any drivers, then try to run updates again and see if this resolved your issue. If it didn’t, continue to the next tip.
In the search box on the taskbar, type device manager, then select Device Manager from the list of results.
In the window that appears, look for any device with a yellow exclamation mark next to it. (You may have to select each category to view the list of devices.) Select the device name.
Select Action, and then choose either Update driver or Uninstall to correct the errors.
Common troubleshooting questions
If you are receiving an error message with a specific error code, try running the Windows Update Troubleshooter. If that doesn’t resolve the issue, see Fix Windows Update errors and follow the instructions to help resolve common update issues.
The time required to download and install updates depends on connection speed, network settings, and the size of the update. If the installation remains stuck at the same percentage, try checking for updates again or running the Windows Update Troubleshooter.
To check for updates, select Start > Settings > Update & Security > Windows Update > Check for updates.
To get help, in the search box on the task bar, type get help, then select Get Help from the list of results. To leave feedback if you run into further problems, in the search box on the taskbar, type feedback hub, then select Feedback Hub from the list of results.
Windows 10 is the most secure Windows ever, and we recommend you stay updated to protect your PC from security risks and to keep it running smoothly. However, you can temporarily pause updates as well as schedule a restart to install updates at a time that’s convenient for you.
Learn how to temporarily pause updates
Find out how to schedule a restart to install updates at a convenient time
You will only receive a notification when it’s time to restart your computer to apply the installed updates.
If you need to know where you left off in your work after an update, use Timeline to jump back in.
To get started with Timeline, select Task View on the taskbar, or press the Windows logo key +Tab and select the activity you want to resume.
Monthly quality updates on Windows 10 are quite small and have a minimal impact on data usage. Feature updates typically happen twice per year, and you can control when to install them. They require more data but are less frequent.
If you’re on a metered connection, some updates for Windows won’t be installed automatically. Metered connections in Windows 10
Your computer might be slow for a number of reasons, but updating to the latest version of Windows 10 can improve its performance. For help with a slow computer, see Tips to improve PC performance in Windows 10.
If you’re having trouble finding your files after an upgrade, see Find lost files after the upgrade to Windows 10 for other things to try.
Warning: Microsoft only recommends trying the procedures in this section if you’re comfortable working in the command line. These procedures require administrator permissions on your device.
In the search box on the taskbar, type command prompt, then select Run as administrator from the list of options. Select Yes. Next, in the window that appears, type the following commands one at a time, including the spaces as shown. After you type each command, press Enter. Then let each command complete before you type the next command.
net stop wuauserv
ren %systemroot%\softwaredistribution softwaredistribution.bak
ren %systemroot%\system32\catroot2 catroot2.bak
net start wuauserv
After all these commands are completed, close the Command Prompt window and restart your computer.
In some instances, third-party antivirus or security software can cause errors when you try to update to the latest version of Windows 10. You can temporarily uninstall this software, update your PC, and then reinstall the software after your device is up to date. We recommend using third-party antivirus or security software that’s compatible with the latest version of Windows 10. You can check compatibility by visiting the software manufacturer’s website.
Note: Before uninstalling software, make sure you know how to reinstall your programs and that you have any necessary product keys.
In the search box on the taskbar, type command prompt, and then select Run as administrator from the list of options. Select Yes. In the window that appears, type the following command, including the space as shown:
chkdsk/f C:
and then press Enter. Repairs will automatically start on your hard drive, and you’ll be asked to restart your device.
A clean restart starts Windows with a minimal set of drivers and startup programs. This helps eliminate software conflicts that occur when you install a program or an update that may cause issues updating your PC.
Learn how to do a clean restart
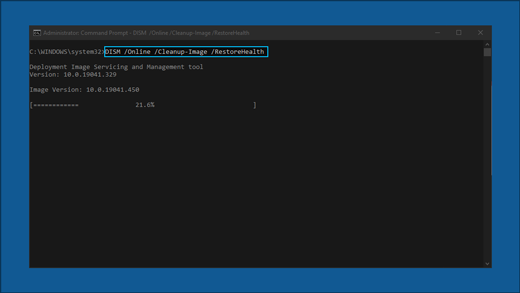
In the search box on the taskbar, type command prompt, then select Run as administrator from the list of options.
In the window that appears, type this command including spaces as shown:
DISM.exe /Online /Cleanup-image /Restorehealth
Press Enter. When the command operation has run successfully, you’ll see a confirmation message from Command Prompt that says, “The restore operation completed successfully” or “The operation completed successfully”.
Note: If you don’t see a confirmation message, retype the command and try again.
Next, type this command, including the space as shown:
sfc /scannow
Press Enter. Wait until the sfc scan verification reaches 100% completion, and then close Command Prompt.
Try running the Windows Update again.
Go to the software download page and select Download tool now to download the clean installation tool. Make sure to carefully read the notes on the software download page before using the tool.
Still stuck?
Contact Microsoft support if you continue to have problems with your Windows updates.
Fix problems with the Start menu
If you can’t see Start on your taskbar, the taskbar may be hidden.
Show a hidden taskbar
Press the Windows logo key + I, then select Personalization > Taskbar .
Turn on Lock the taskbar.
Turn off Automatically hide the taskbar in desktop mode or Automatically hide the taskbar in tablet mode.
If that doesn’t resolve the issue you’re experiencing, select any of the following headings to see steps you can try to get it working again.
Press Ctrl + Shift + Esc to open Task Manager. You may need to select More details at the bottom of the window to see everything.
Select the Processes tab.
Scroll down to Windows Explorer, select it, then select Restart.
The process may take a few seconds, and your taskbar and Start menu may not be visible while Windows Explorer restarts. You can close Task Manager when the process is complete.
Press the Windows logo key + I.
In Settings, choose Update & security > Windows Update , and then select Check for updates. Install any available updates and restart your computer if required.
Note: Need another way to get to Settings? Press the Windows logo key + R, then type ms-settings: (note the colon) in the Open box. Select OK to open Settings.
If you didn’t have any updates that required a restart, it’s still a good idea to restart your device to make sure any pending updates are installed.
To restart your device when you can’t access Start , press Ctrl + Alt + Delete, select Power and then select Restart .
Note: You can also manually shut down your device by pressing and holding the power button. Shutting down this way risks losing unsaved data, so first be sure to save and close everything you’re working on. If you shut down this way, you can restart your device by pressing the power button again.
While it’s likely you have the most recent drivers, if you’re still having trouble with the Start menu, you can try fixing it by manually updating your graphics or audio drivers. For more info, see Update drivers in Windows 10.
If you still can’t fix your problem with the Start menu, try creating a new local administrator account.
If you’re signed in with your Microsoft account, remove the link to that account first by doing the following (if that’s not how you’re signed in, skip to creating a new administrator account):
Press the Windows logo key + I.
In Settings, select Accounts > Your info (in some versions, it may be under Email & accounts instead).
Select Sign in with a local account instead. You’ll see this link only if you’re using a Microsoft account, and you may not see it if your device is on a network.
Type your Microsoft account password and select Next.
Choose a new account name, password, and password hint, and then select Finish and sign out.
Create the new administrator account:
Press the Windows logo key + I.
In Settings, select Accounts > Family & other people (or Other users , if you’re using Windows 10 Enterprise).
Under Other users , select Add someone else to this PC.
On Windows 10 Home and Windows 10 Professional, provide a name for the user and a password, and then select Next. On Windows 10 Enterprise, select I don’t have this person’s sign-in information, and then select Add a user without a Microsoft account.
Set a user name, password, and password hint. Then select Next > Finish.
Next, make the new account an administrator account:
Under Family & other people (or Other users , if you’re using Windows 10 Enterprise), choose the account you created, and then select Change account type.
Under Account type, select Administrator > OK.
Sign out of your account and then sign in to your new account. If everything is fixed, move your personal data and files to the new account.
To move your personal files from your old account to your new account, try opening File Explorer, expanding This PC > OSDisk (C:), and looking in the Users folder, where you should see folders for both accounts. You can then copy and paste your files from the old account folder to similar locations in the new account folder. Or if you prefer, you can upload your files from your old account to OneDrive, and then sign into the new account and download the files from OneDrive.
If the problem still isn’t fixed, try deleting the old administrator account:
Under Other users, select the old administrator account, then select Remove > Delete account and data.
After the old account is removed, restart your device and sign in with the new account again.
If you were using a Microsoft account to sign in before, associate the Microsoft account with the new administrator account.
In Settings , select Accounts > Your info (in some versions, it may be under Email & accounts instead).
Select Sign in with a Microsoft account instead and enter your account info. You’ll see this link only if you’re using a local account, and you may not see it if your device is on a network.
Note: Need another way to get to Settings? Press Windows logo key + R, then type ms-settings: (note the colon) in the Open box. Select OK to open Settings.
If none of the previous options work, try resetting your PC using Recovery options in Windows 10.
Troubleshooting Windows Subsystem for Linux
For support with issues related to WSL, please see our WSL product repo on GitHub.
Search for any existing issues related to your problem
For technical issues, use the product repo.
For issues related to the contents of this documentation, use the docs repo.
Submit a bug report
For bugs related to WSL functions or features, file an issue in the product repo: https://github.com/Microsoft/wsl/issues
Submit a feature request
To request a new feature related to WSL functionality or compatibility, file an issue in the product repo.
Contribute to the docs
To contribute to the WSL documentation, submit a pull request in the docs repo: https://github.com/MicrosoftDocs/wsl/issues
Terminal or Command Line
Lastly, if your issue is related to the Windows Terminal, Windows Console, or the command-line UI, use the Windows terminal repo: https://github.com/microsoft/terminal
Common issues
I’m on Windows 10 version 1903 and I still do not see options for WSL 2
This is likely because your machine has not yet taken the backport for WSL 2. The simplest way to resolve this is by going to Windows Settings and clicking ‘Check for Updates’ to install the latest updates on your system. See the full instructions on taking the backport.
If you hit ‘Check for Updates’ and still do not receive the update you can install KB KB4566116 manually.
Error: 0x1bc when wsl —set-default-version 2
This may happen when ‘Display Language’ or ‘System Locale’ setting is not English.
The actual error for 0x1bc is:
For more information, please refer to issue 5749
Cannot access WSL files from Windows
A 9p protocol file server provides the service on the Linux side to allow Windows to access the Linux file system. If you cannot access WSL using \\wsl$ on Windows, it could be because 9P did not start correctly.
To check this, you can check the start up logs using: dmesg |grep 9p , and this will show you any errors. A successfull output looks like the following:
Please see this Github thread for further discussion on this issue.
Can’t start WSL 2 distribution and only see ‘WSL 2’ in output
If your display language is not English, then it is possible you are seeing a truncated version of an error text.
To resolve this issue, please visit https://aka.ms/wsl2kernel and install the kernel manually by following the directions on that doc page.
command not found when executing windows .exe in linux
Users can run Windows executables like notepad.exe directly from Linux. Sometimes, you may hit «command not found» like below:
If there are no win32 paths in your $PATH, interop isn’t going to find the .exe. You can verify it by running echo $PATH in Linux. It’s expected that you will see a win32 path (for example, /mnt/c/Windows) in the output. If you can’t see any Windows paths then most likely your PATH is being overwritten by your Linux shell.
Here is a an example that /etc/profile on Debian contributed to the problem:
The correct way on Debian is to remove above lines. You may also append $PATH during the assignment like below, but this lead to some other problems with WSL and VSCode..
For more information, see issue 5296 and issue 5779.
«Error: 0x80370102 The virtual machine could not be started because a required feature is not installed.»
Please enable the Virtual Machine Platform Windows feature and ensure virtualization is enabled in the BIOS.
If your machine is a VM, please enable nested virtualization manually. Launch powershell with admin, and run:
Please follow guidelines from your PC’s manufacturer on how to enable virtualization. In general, this can involve using the system BIOS to ensure that these features are enabled on your CPU. Instructions for this process can vary from machine to machine, please see this article from Bleeping Computer for an example.
Restart your machine after enabling the Virtual Machine Platform optional component.
Bash loses network connectivity once connected to a VPN
If after connecting to a VPN on Windows, bash loses network connectivity, try this workaround from within bash. This workaround will allow you to manually override the DNS resolution through /etc/resolv.conf .
- Take a note of the DNS server of the VPN from doing ipconfig.exe /all
- Make a copy of the existing resolv.conf sudo cp /etc/resolv.conf /etc/resolv.conf.new
- Unlink the current resolv.conf sudo unlink /etc/resolv.conf
- sudo mv /etc/resolv.conf.new /etc/resolv.conf
- Open /etc/resolv.conf and
a. Delete the first line from the file, which says «# This file was automatically generated by WSL. To stop automatic generation of this file, remove this line.».
b. Add the DNS entry from (1) above as the very first entry in the list of DNS servers.
c. Close the file.
Once you have disconnected the VPN, you will have to revert the changes to /etc/resolv.conf . To do this, do:
- cd /etc
- sudo mv resolv.conf resolv.conf.new
- sudo ln -s ../run/resolvconf/resolv.conf resolv.conf
Starting WSL or installing a distribution returns an error code
Follow these instructions to collect detailed logs and file an issue on our GitHub.
Updating Bash on Ubuntu on Windows
There are two components of Bash on Ubuntu on Windows that can require updating.
The Windows Subsystem for Linux
Upgrading this portion of Bash on Ubuntu on Windows will enable any new fixes outlines in the release notes. Ensure that you are subscribed to the Windows Insider Program and that your build is up to date. For finer grain control including resetting your Ubuntu instance check out the command reference page.
The Ubuntu user binaries
Upgrading this portion of Bash on Ubuntu on Windows will install any updates to the Ubuntu user binaries including applications that you have installed via apt-get. To update run the following commands in Bash:
Apt-get upgrade errors
Some packages use features that we haven’t implemented yet. udev , for example, isn’t supported yet and causes several apt-get upgrade errors.
To fix issues related to udev , follow the following steps:
Write the following to /usr/sbin/policy-rc.d and save your changes.
Add execute permissions to /usr/sbin/policy-rc.d :
Run the following commands:
«Error: 0x80040306» on installation
This has to do with the fact that we do not support legacy console. To turn off legacy console:
- Open cmd.exe
- Right click title bar -> Properties -> Uncheck Use legacy console
- Click OK
«Error: 0x80040154» after Windows update
The Windows Subsystem for Linux feature may be disabled during a Windows update. If this happens the Windows feature must be re-enabled. Instructions for enabling the Windows Subsystem for Linux can be found in the Installation Guide.
Changing the display language
WSL install will try to automatically change the Ubuntu locale to match the locale of your Windows install. If you do not want this behavior you can run this command to change the Ubuntu locale after install completes. You will have to relaunch bash.exe for this change to take effect.
The below example changes to locale to en-US:
Installation issues after Windows system restore
- Delete the %windir%\System32\Tasks\Microsoft\Windows\Windows Subsystem for Linux folder.
Note: Do not do this if your optional feature is fully installed and working. - Enable the WSL optional feature (if not already)
- Reboot
- lxrun /uninstall /full
- Install bash
No internet access in WSL
Some users have reported issues with specific firewall applications blocking internet access in WSL. The firewalls reported are:
- Kaspersky
- AVG
- Avast
- Symantec Endpoint Protection
In some cases turning off the firewall allows for access. In some cases simply having the firewall installed looks to block access.
Permission Denied error when using ping
For Windows Anniversary Update, version 1607, administrator privileges in Windows are required to run ping in WSL. To run ping, run Bash on Ubuntu on Windows as an administrator, or run bash.exe from a CMD/PowerShell prompt with administrator privileges.
For later versions of Windows, Build 14926+, administrator privileges are no longer required.
Bash is hung
If while working with bash, you find that bash is hung (or deadlocked) and not responding to inputs, help us diagnose the issue by collecting and reporting a memory dump. Note that these steps will crash your system. Do not do this if you are not comfortable with that or save your work prior to doing this.
To collect a memory dump
Change the memory dump type to «complete memory dump». While changing the dump type, take a note of your current type.
Use the steps to configure crash using keyboard control.
Repro the hang or deadlock.
Crash the system using the key sequence from (2).
The system will crash and collect the memory dump.
Once the system reboots, report the memory.dmp to secure@microsoft.com. The default location of the dump file is %SystemRoot%\memory.dmp or C:\Windows\memory.dmp if C: is the system drive. In the email, note that the dump is for the WSL or Bash on Windows team.
Restore the memory dump type to the original setting.
Check your build number
To find your PC’s architecture and Windows build number, open
Settings > System > About
Look for the OS Build and System Type fields. 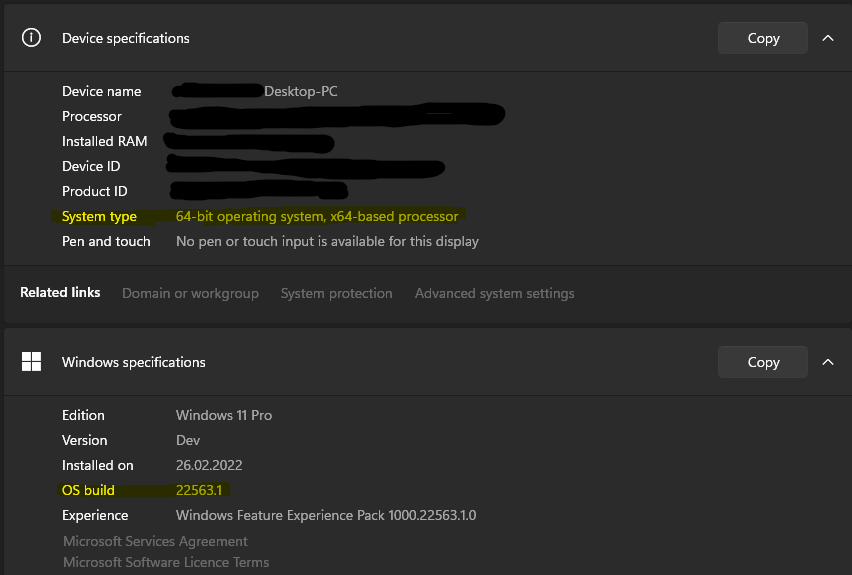
To find your Windows Server build number, run the following in PowerShell:
Confirm WSL is enabled
You can confirm that the Windows Subsystem for Linux is enabled by running the following in PowerShell:
OpenSSH-Server connection issues
Trying to connect your SSH server is failed with the following error: «Connection closed by 127.0.0.1 port 22».
Make sure your OpenSSH Server is running:
Stop the sshd service and start sshd in debug mode:
Check the startup logs and make sure HostKeys are available and you don’t see log messages such as:
If you do see such messages and the keys are missing under /etc/ssh/ , you will have to regenerate the keys or just purge&install openssh-server:
«The referenced assembly could not be found.» when enabling the WSL optional feature
This error is related to being in a bad install state. Please complete the following steps to try and fix this issue:
If you are running the enable WSL feature command from PowerShell, try using the GUI instead by opening the start menu, searching for ‘Turn Windows features on or off’ and then in the list select ‘Windows Subsystem for Linux’ which will install the optional component.
Update your version of Windows by going to Settings, Updates, and clicking ‘Check for Updates’
If both of those fail and you need to access WSL please consider upgrading in place by reinstalling Windows 10 using installation media and selecting ‘Keep Everything’ to ensure your apps and files are preserved. You can find instructions on how to do so at the Reinstall Windows 10 page.
Correct (SSH related) permission errors
If you’re seeing this error:
To fix this, append the following to the the /etc/wsl.conf file:
Please note that adding this command will include metadata and modify the file permissions on the Windows files seen from WSL. Please see the File System Permissions for more information.
Running Windows commands fails inside a distribution
Some distributions available in Microsoft Store are yet not fully compatible to run Windows commands in Terminal out of the box. If you get an error -bash: powershell.exe: command not found running powershell.exe /c start . or any other Windows command, you can resolve it following these steps:
- In your WSL distribution run echo $PATH .
If it does not include: /mnt/c/Windows/system32 something is redefining the standard PATH variable. - Check profile settings with cat /etc/profile .
If it contains assignment of the PATH variable, edit the file to comment out PATH assignment block with a # character. - Check if wsl.conf is present cat /etc/wsl.conf and make sure it does not contain appendWindowsPath=false , otherwise comment it out.
- Restart distribution by typing wsl -t followed by distribution name or run wsl —shutdown either in cmd or PowerShell.
Unable to boot after installing WSL 2
We are aware of an issue affecting users where they are unable to boot after installing WSL 2. While we fully diagnose those issue, users have reported that changing the buffer size or installing the right drivers can help address this. Please view this Github issue to see the latest updates on this issue.


