- How to Fix Advanced Display Settings Missing in Windows 10?
- What causes ‘Advanced display Settings’ to Disappear?
- Solution 1: Using Alternate Options
- Solution 2: Using Third-party Software
- Solution 3: Running Hardware and Device Troubleshooter
- Solution 4: Disabling onboard graphics (if dedicated graphics installed)
- Solution 5: Changing Registry Entries
- Solution 6: Updating Graphics Drivers
- Solution 7: Performing a System Restore
- Solution 8: Clean installing Windows
- What to Do When Windows 10 Settings App Is Not Opening? [MiniTool Tips]
- Summary :
- Quick Navigation :
- Settings Not Opening Windows 10
- How to Fix Windows 10 Settings Not Opening
- Solution 1: Alternative Ways to Open Settings
- Solution 2: Check If the Settings App Is Enabled
- Solution 3: Run System File Checker
- Solution 4: Run the Windows Update Troubleshooter
- Solution 5: Reinstall the Settings App
- Solution 6: Create a New Windows User
- Solution 7: Reinstall Windows 10
- Extra Tip: Create a System Image for Windows 10
- Bottom Line
- Windows 10 Settings Not Opening FAQ
- ABOUT THE AUTHOR
How to Fix Advanced Display Settings Missing in Windows 10?
We came across numerous complaints from users where they complained that they were unable to locate the Advanced Display Settings on their computers after a potential Windows 10 update. This issue was reported globally and occurred to almost everyone who updated to 1703 or Fall Creators update.
 Advanced Display Settings Missing in Windows 10
The most common feature which the users used was the ‘Text Size Setting’. Using the Advanced Display Settings, users were able to easily change their text sizes without going through much hassle. However, this was changed with the updated Windows. In this article, we will go through all the reasons as to why this issue might occur on your computer and what the workarounds are to solve the issue.
What causes ‘Advanced display Settings’ to Disappear?
After analyzing all the user reports, statements from Microsoft and our research, we concluded that the issue occurred due to several different reasons. Some of the reasons why you might find the ‘Advanced Display Settings’ missing are but not limited to:
- Feature Removed in Update: Reportedly, Microsoft officially removed the option available on Windows. This was met with a lot of backlash from the community. At the time of writing this article, Microsoft is still considering to bring it back.
- Bad Graphics Drivers: Another surprising issue which we came across was where bad graphics drivers installed caused the display settings to vanish. Updating or Rolling back the drivers usually solve the problem.
- Clash with on-board graphics: There are also instances where the onboard graphics might conflict with the third-party graphics drivers. Disabling the onboard graphics might help in this.
- Windows corrupt installation files: There might also be instances where the installation files of Windows might be corrupt. Here, restoring a previous version or doing a clean installation might help.
Before starting the solution, make sure that you are logged in as an administrator on your computer. Furthermore, save all your work as we might be restarting your computer again and again.
Solution 1: Using Alternate Options
If your computer was indeed updated and you found the option missing, it is probably because it was removed by Microsoft. They replaced the options present inside the Advanced Display settings to another location in Windows. We will navigate there and access the text formatting/size settings from there.
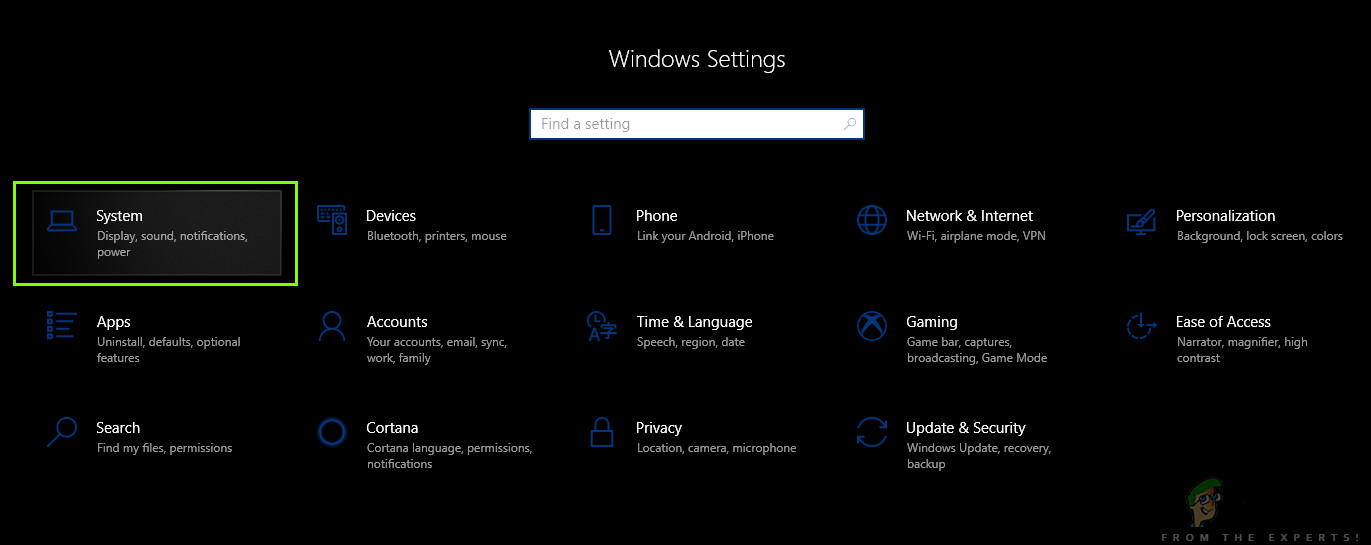
- Press Windows + I to launch your Settings. Now, click on the sub-category of System.
 System – Windows settings
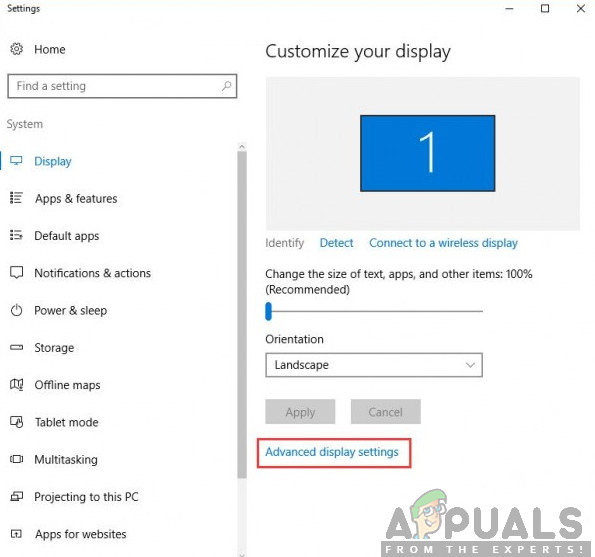
 - Once in the System tab, click on Display from the left-hand side of the screen.
- Now on the right-hand side, scroll down until you find the option of Display adapter properties. Click it. Here, you can also change other settings of your display such as Scale and layout and Multiple displaysDisplay adapter properties
- Now, navigate to Intel HD Graphics Control Panel and then click on Properties
- Now, click on Graphics properties and then go to the Display setting to make changes as required.
 System – Windows settings
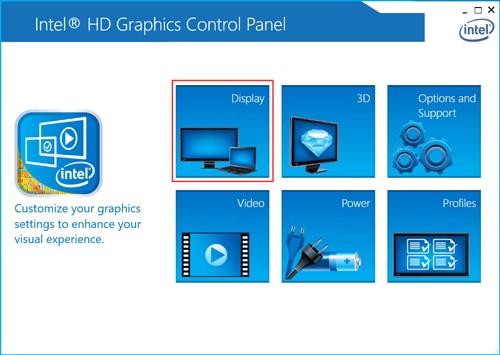 Display adapter properties
Also, if you don’t find your required setting here, you can always navigate to the color management.
- Press Windows + S, type “color management” in the dialogue box and open the application.
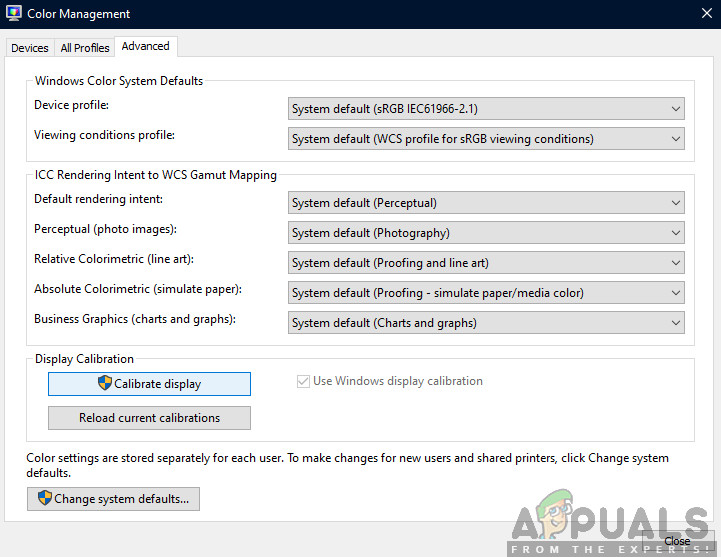
- Once in color management, click on Advanced
- Now if you wish to calibrate the display, click on Calibrate Display. Calibrate Display
- After calibrating your display, click Finish and go to the ClearType Text Tuner. ClearType Text Tuner
- From here, you will be able to change the text type without any issues.
 Calibrate Display
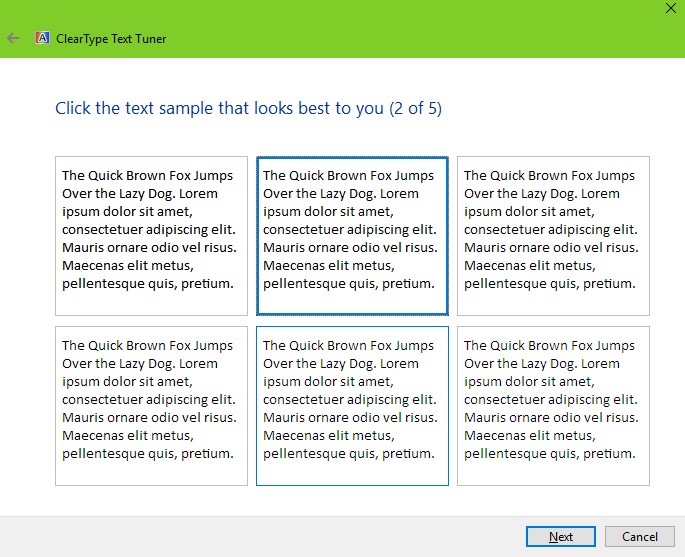 ClearType Text Tuner
Solution 2: Using Third-party Software
If the above method doesn’t work for you and you still having difficulty in changing your settings, we will try downloading a third-party software and see if we can get it to work. This is a workaround given if your computer was indeed updated. If it wasn’t and you see the option missing, proceed to the other solutions listed down below.
 System Font Size Changer
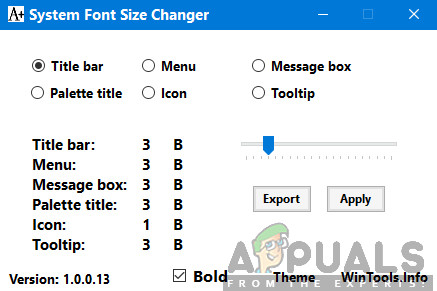
Download System Font Size Changer from WinTools page and install it on your computer. When you launch the application, you will see various options the ability to change their settings. You can also create a shortcut and access the tool whenever required.
Solution 3: Running Hardware and Device Troubleshooter
Every Windows OS has a hardware troubleshooter which helps users in detecting issues with your current operating system and resolve them after a series of steps. This solution applies if you haven’t updated Windows and the display settings option automatically vanished from your screen.
- Right-click on the Windows icon present at the bottom left side of the screen or press Windows + X button and select Control panel. If this doesn’t work, press Windows + S and in the dialogue box, type “control panel” and hit enter.
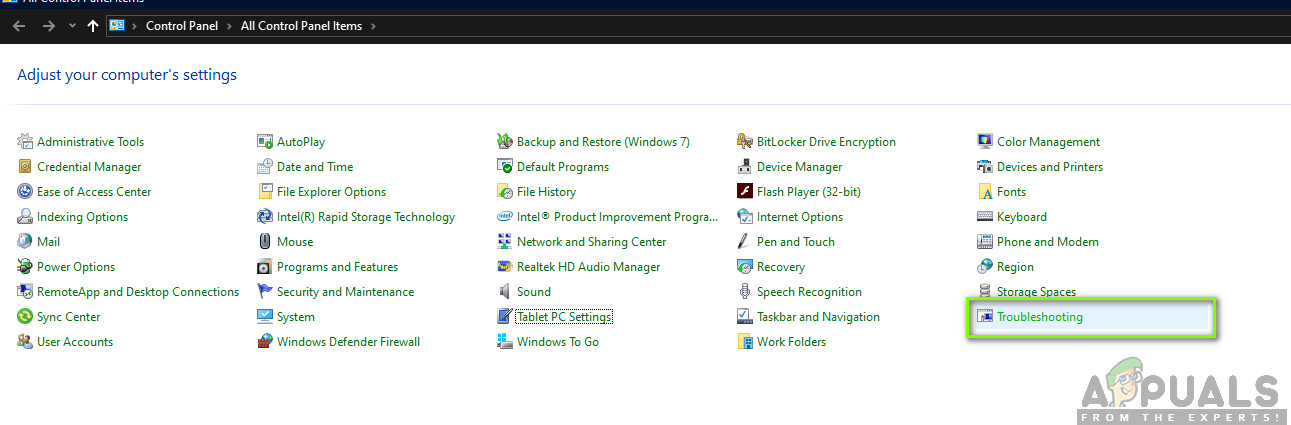
- Now on the top right side of the screen, click on View By and select Large Icons from the list of options available.
- Now select the option of Troubleshooting from the control panel.
 Troubleshooting – Control panel
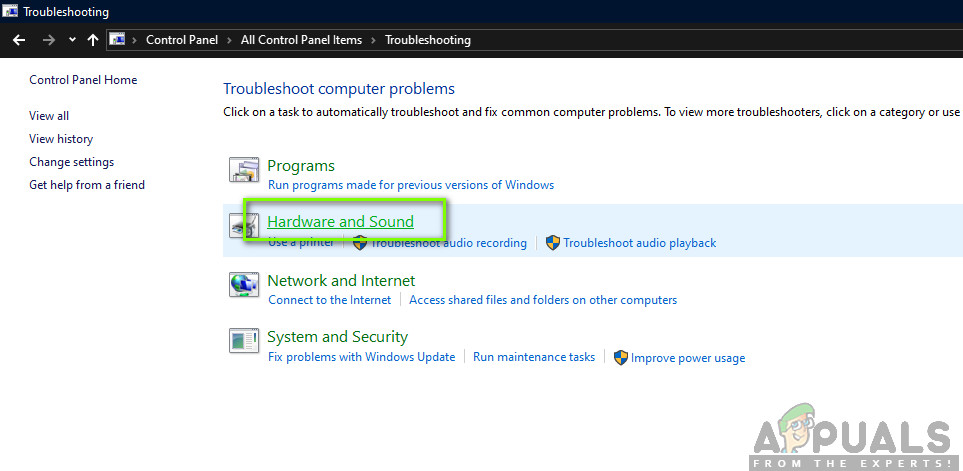
- Now on the left side of the window, select “View all” option to list all the troubleshooting packs available on your computer.
- Now select “Hardware and Devices” or Display from the list of options available and click it.
 Hardware and Devices Troubleshooting
- Now select Next in the new window that pops up in front of you.
- Now Windows will start searching for hardware problems and fix them if it finds any. This process can take some time as all of your hardware is being checked. Be patient and let the process complete successfully.
- Windows might prompt you to restart your PC to fix problems. Don’t delay the request, save your work and press “Apply this Fix”.
Solution 4: Disabling onboard graphics (if dedicated graphics installed)
Another issue which we noticed that plagued users was where dedicated graphics on your computer were causing several issues with the OS. This is very unlikely but usually occurs if there is a conflict of the drivers with the system. In this solution, we will disable the onboard graphics. This will help us determine and troubleshoot whether they are clashing with your dedicated graphics and causing the problem.
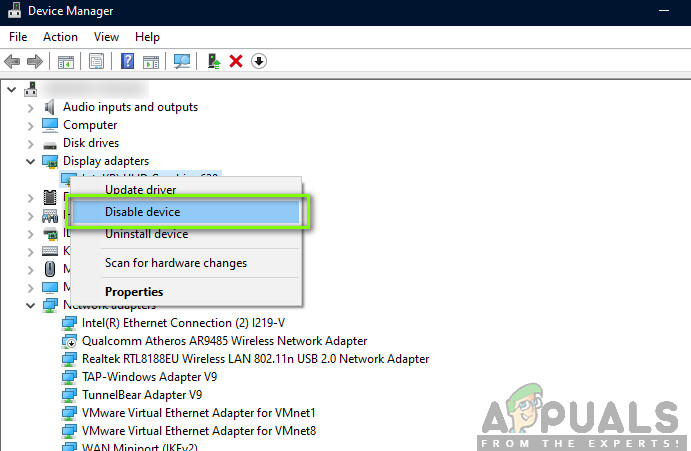
- Press Windows + R, type “devmgmt.msc” in the dialogue box and press Enter.
- Once in the Device Manager, navigate to the entry “Display adapters”, right-click on the on-board graphics and select Disable device. Disabling onboard graphics
- Restart your computer. Now, only your dedicated graphics will be active. Check if the issue is resolved.
 Disabling onboard graphics
Solution 5: Changing Registry Entries
If you indeed want to change the text size of your computer (or some parts of it), you can perform the actions using registry files. Registries are instructions and a type of manual for your computer which informs it what it needs to do when certain actions occur. Here, we will make changes to your Registry by downloading an external one and installing it. When we install it, the computer automatically merges the new and the existing one.
Note: Making changes to the Registry is a risky job so make sure that you proceed at your request and don’t make any changes to any other entries.
- Download the required Registry file from the links down below:
- After downloading the registry file, right-click on it and select Run as administrator.
- If you are prompted with User Access Control, press Yes.
- Now, restart your computer completely. After restarting, check if the issue is resolved indeed. You can always run the opposite registry entry for reverting the entry.
Solution 6: Updating Graphics Drivers
Graphics drivers are the main components in play when you are playing games on your computer. They have the job of relaying the information from the motherboard to your graphics hardware. If the graphics drivers themselves are having issues, it is recommended that you update them as soon as possible and see where things go.
In this solution, we will first try installing default drivers and see if this fixes the problem.
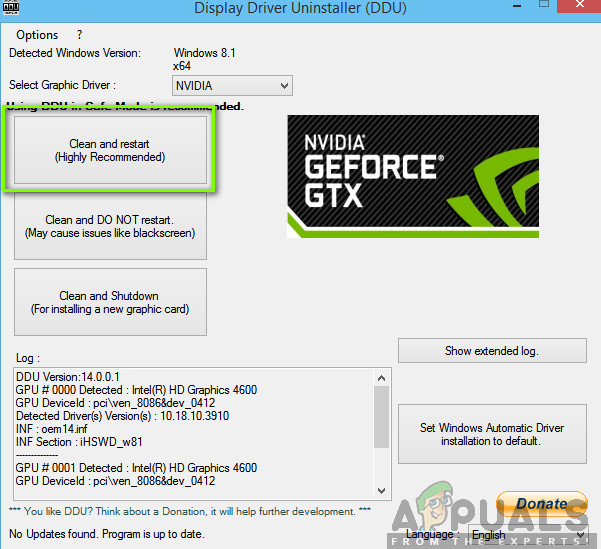
- Download and install DDU (Display driver uninstaller) from its official website.
- After installing Display Driver Uninstaller (DDU), launch your computer in safe mode. You can check our article on how to boot your computer into safe mode.
- After launching the DDU, select the first option “Clean and restart”. This will uninstall the current drivers completely from your computer.
 DDU Clean and Restart
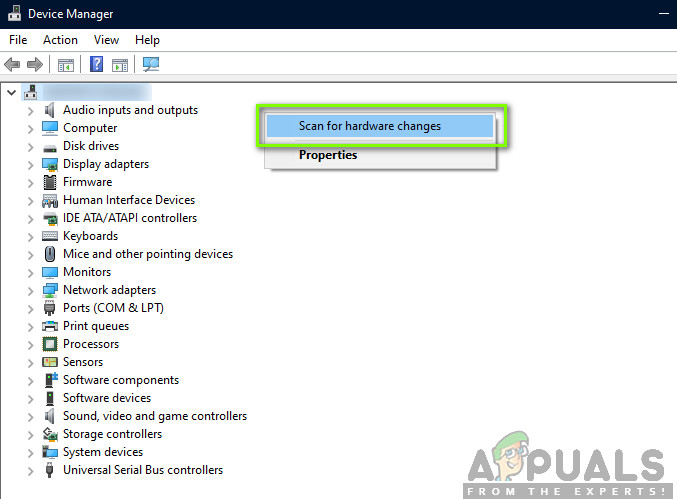
- Now after the uninstallation, boot your computer normally without safe mode. Press Windows + R, type “devmgmt.msc” in the dialogue box and press Enter. Right-click on any space and select “Search for hardware changes”. The default drivers will be installed. Try launching the game and check if this solves the problem.
- In the majority of the cases, the default drivers will not work for you so you can either install the latest drivers through Windows update or navigate to your manufacturer’s website and download the latest ones.
 Search for hardware changes
- After you have installed the drivers, restart your computer and check if the problem is solved.
Solution 7: Performing a System Restore
If all the above methods are not working and you still cannot get any response out of Ctrl + Alt + Del, you can perform a system restore after backing up your data.
System restore rollbacks your Windows to the last time it was working correctly. The restore mechanism automatically creates backups either periodically or in-time whenever you install a new update.
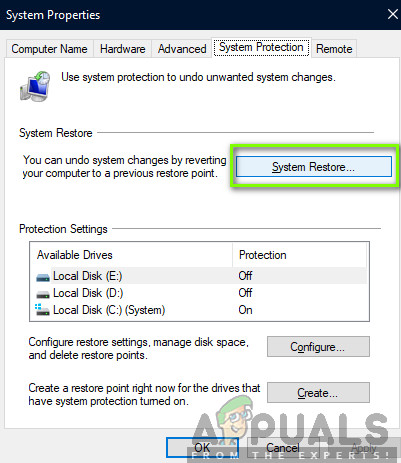
- Press Windows + S to launch the start menu’s search bar. Type “restore” in the dialogue box and select the first program which comes in the result.
- One in the restore settings, press System Restore present at the beginning of the window under the tab of System Protection. System Restore – Windows
- Now a wizard will open navigating you through all the steps to restore your system. You can either select the recommended restore point or choose a different restore point. Press Next and proceed with all the further instructions.
- Now select the restore point from the list of options available. If you have more than one system restore points, they will be listed here. Selecting the restore point
- Now windows will confirm your actions for the last time before it starts the system restore process. Save all your work and backup important files just in case and proceed with the process.
 System Restore – Windows
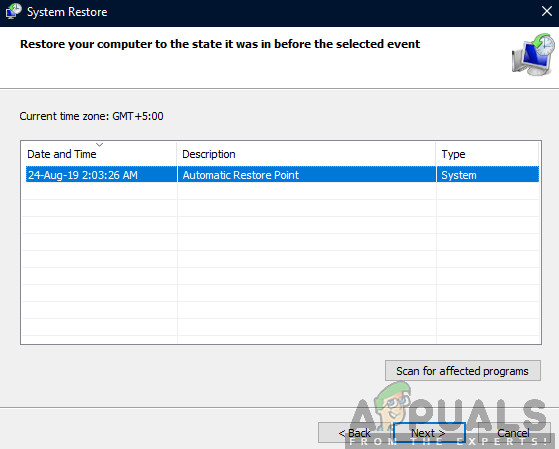 Selecting the restore point
Note: You can also get your hard drive checked if the problem is persisting.
Solution 8: Clean installing Windows
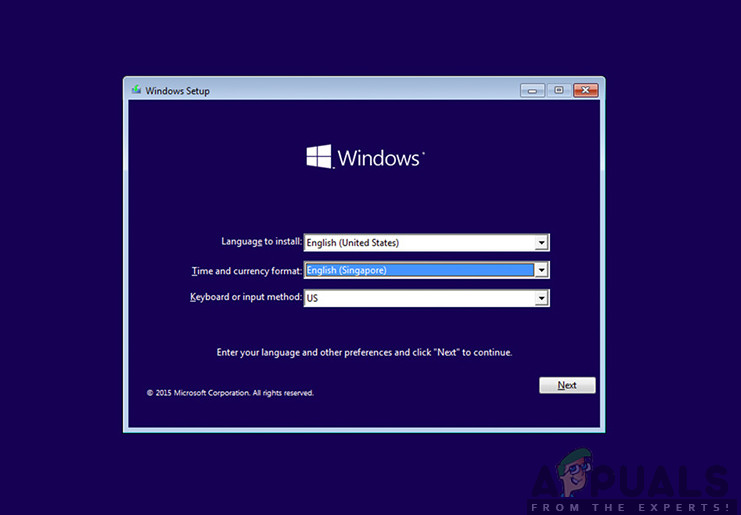
If all the above methods don’t work out and you are still unable to the problem at hand, we can try installer a fresh version of Windows on your computer. This fixes any issues with the installation files (if any) and solves the problem instantly. Make sure that backup all of your data before proceeding as all your information as well as installed applications will be removed.
 Clean installing Windows
You check out our article on how to install Windows 10 on your computer. You can easily make a Windows bootable by either Rufus or by Windows media creation tool. Do note that you would have to manually install the update by updating the version of Windows installed (or if you clean install Windows directly into update 1903, the problem will go away automatically).
What to Do When Windows 10 Settings App Is Not Opening? [MiniTool Tips]
By Vera | Follow | Last Updated March 05, 2021
Summary :

Are you bothered by the issue – Windows 10 Settings not opening? If the Settings app won’t open and you can’t access all the Windows settings, don’t panic. It can be easily solved. Just read this post from MiniTool and you can know how to get rid of trouble.
Quick Navigation :
Settings Not Opening Windows 10
In Windows 10, the Settings feature is introduced and it is simple to work and very user-friendly when comparing to its predecessor — Control Panel. It offers you an easy way to personalize and control many critical operations and features, such as Windows updates, user accounts, privacy, networks, etc.
However, Settings sometimes stops working, for example, Windows 10 can’t open Settings or Settings menu freezes/hangs after opening. The issue of Windows 10 Settings not working is reported by many users and it always occurs because of corrupted system files, corrupted user account files, an update bug, etc.
So, this problem indicates that you may be blocked from installing updates via the Windows Update feature and doing some operations related to Settings if Windows 10 can’t access Settings, so terrible! But don’t worry, we will provide some simple methods to fix this problem and just choose what suits your need.
How to Fix Windows 10 Settings Not Opening
How do you fix Windows 10 Settings not opening? If Windows 10 can’t open Settings, you can try to reboot your computer to check if the issue is solved. If this fails, you can try other methods below.
Solution 1: Alternative Ways to Open Settings
Usually, you open the app by clicking the Windows logo and choosing Settings. If this doesn’t work, you can open it in other ways. Then, you ask — how do I open Settings in Windows 10? It is easy by following the guide.
Have received the message “critical error start menu isn’t working”? This post will walk you through some effective fixes for the start menu error.
- Input settings in the search box and click the result.
- Press the Win + I keys to launch Windows 10 Settings.
- Go to the Action Center and click All settings.
- Press Win + R, input ms-settings: in the Run window and press Enter.
If Windows 10 Settings won’t open all the time after you try these ways, now it’s time to try something else.
Solution 2: Check If the Settings App Is Enabled
Due to some reasons, you may have disabled Windows Settings via Windows Registry Editor or Group Policy, so the issue of Windows 10 Settings not opening happens. Having a check is a good idea.
Registry Editor
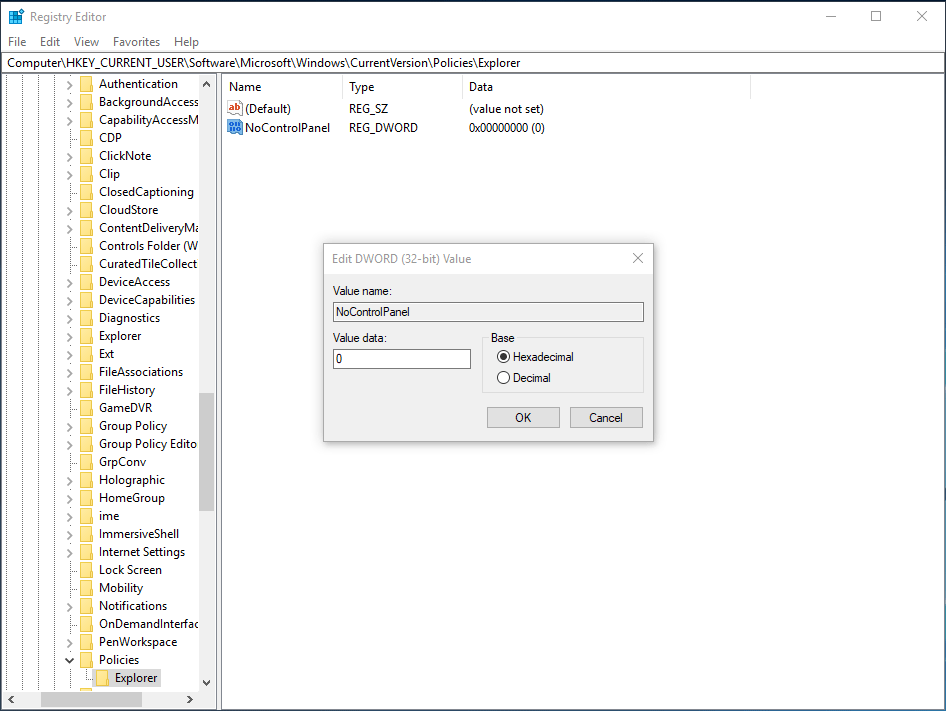
- Input regedit.exe in the search box and click the result to open Registry Editor.
- Head to HKEY_CURRENT_USER\Software\Microsoft\ Windows\CurrentVersion\Policies\Explorer. If Explorer doesn’t exist, right-click on Policies and choose New > key to create it.
- Right-click on the right empty area, choose New > DWORD (32-bit) Value and name it NoControlPanel.
- Double-click the key and ensure its value is 0 (enable Settings).
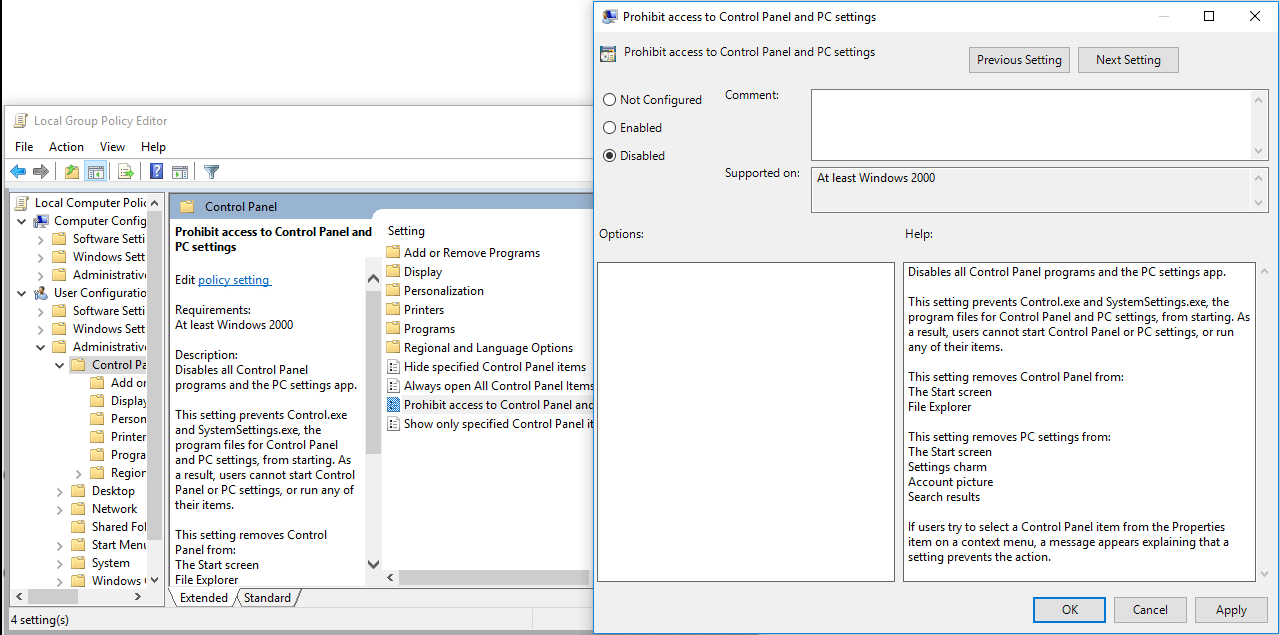
Group Policy
- Type gpedit.msc to the search box and click the result to open Local Group Policy Editor.
- Head to User Configuration > Administrative Templates > Control Panel.
- Double-click Prohibit access to Control Panel and PC Settings from the right panel and change its setting to Disabled.
- Click Apply and OK.
After trying this way, if the Windows 10 Settings not working issue persists, continue using other methods to fix it so as to let it open and work properly.
Solution 3: Run System File Checker
If there are some corrupted system files, perhaps Windows 10 can’t open Settings, so running a SFC scan could be helpful. SFC, short for System File Checker, is a tool that comes with Windows operating system. It can be used to scan for system and restore corruptions in Windows system files.
Here is how to do it:
- Open Command Prompt in admin mode via Search.
- Input SFC /scannow and hit Enter. This will take some time, so wait patiently.

After finishing the scan, check if the issue of Windows Settings not opening is resolved. If not, try another solution.
Solution 4: Run the Windows Update Troubleshooter
As mentioned above, a Windows update could give rise to Windows Settings not working. To let the app open and work normally, you can try the Windows Update Troubleshooter.
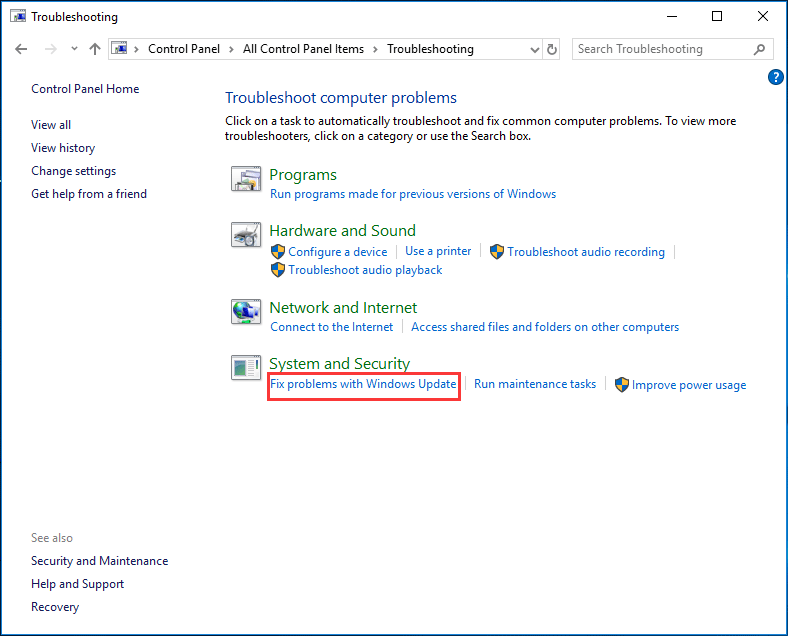
Via Control Panel
- Open Control Panel, view all items by large icons and choose Troubleshoot.
- In the new window, click the Fix problems with Windows Update link under the System and Security Then, follow the on-screen guide to finish fix.
Via the downloaded file
- Go to the Microsoft website and download Update Troubleshooter for Windows 10.
- Double-click the downloaded file and click Next. Then, continue the operations by following the on-screen instructions.

Check if the Settings app is working correctly after reboot. If not, try reinstalling it.
Solution 5: Reinstall the Settings App
How to reinstall the app if Windows 10 Settings won’t open? Do as the following guide:
1. Launch Command Prompt with the rights of administrator by searching for cmd, right-clicking the result and choosing Run as Administrator.
2. Copy and paste the following command to the open the CMD window and press Enter.

If this couldn’t work, you should log on to the system as another valid user with admin rights.
Solution 6: Create a New Windows User
Because of the Windows 10 Settings app not working, you can’t create a new account via the app. If you are running Windows 10 Pro, use Command Prompt instead.
1. Open the Command Prompt window with admin privileges.
2. Run the command: net user newusername newpassword /add and hit Enter. Then, you will get a message saying the command completed successfully.
3. Next, type the command: net localgroup administrators newusername /add and hit Enter to make the new user be an administrator.
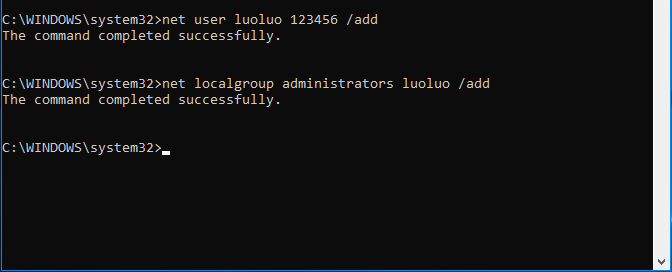
4. Sign out of your current account and log into the new account.
Solution 7: Reinstall Windows 10
If Windows 10 can’t access Settings after you try all of the above methods, maybe you need to reinstall the operating system, which is the last resort.
Next, start reinstalling the OS. This post — How to Reinstall Windows 10 without CD/USB Easily (3 Skills) gives you many methods and just choose one based on your actual situations.
Extra Tip: Create a System Image for Windows 10
After trying these solutions, your Settings app should work properly and you can access it to perform some operations regarding user account, Windows updates, privacy, Internet, etc.
In fact, computer problems – in addition to Windows 10 Settings not working, other issues like Task Manager not responding, File Explorer not opening, blue screen of death, and more always happen due to certain reasons.
Thus, we suggest creating an image for your Windows operating system to ensure that your PC can restore to its normal state when one of the issues occur. How can you back up Windows 10?
MiniTool ShadowMaker, an all-in-one backup software is compatible with Windows 10/8/7, etc. With it, you can easily create a backup for your files & folders, disks, partitions, and Windows operating system on a USB flash drive, external hard disk, a shared folder, etc.
Importantly, it offers you a tool to create a bootable disc, USB hard drive or USB flash drive so that you can boot the unbootable PC and easily and quickly perform a restore. What’s more, it supports Universal Restore so you can restore the system to a computer with different hardware.
Now, get its Trial Edition by hitting the following button and then start to create a system image. Note that this edition only gives you 30-day free use, so upgrade to a full edition if you have a need.
1. Double-click on the icon of MiniTool ShadowMaker you have installed on your PC to open it.
2. Choose Backup from the tool bar.
3. By default, MiniTool ShadowMaker selects system partitions from the Source section, for example, system reserved partition and C drive. Your aim is to back up your system after fixing the issue of Windows 10 Settings not opening, so you can skip this step.
4. Sometimes, the destination path is also selected by this software. If not or the path is not the one you want, you can specify a place for the system image.
5. Finally, click Back up Now at once.

Here are all the steps on backing up Windows 10 operating system with MiniTool ShadowMaker. When Windows 10 won’t open next time or you have any other PC issues regarding Windows system, the system image can be used to restore the PC to the time point where the backup is created. This can save much time of the issue troubleshooting.
Right now, get MiniTool ShadowMaker to back up your operating system. Additionally, you can clone disk, back up files, partitions or disk and sync files. Have a try after fixing the issue of Windows 10 Settings app not working. Of course, you can share this program with your friends if you like it.
Bottom Line
Are you having the issue – Windows 10 Settings not opening? After reading this post, you clearly know this issue and how to fix it if Settings doesn’t launch. Just try them according to your actual cases. Furthermore, it is best to create a system image to perform a quick disaster restore.
While you have any other methods to fix the Settings problem or you have any questions related to MiniTool software, leave your idea to the Comment part or send an email to our team – [email protected] . We will reply to you as soon as possible.
Windows 10 Settings Not Opening FAQ
- Go to Start > Settings.
- Enter settings to the Windows 10’s search box to open Settings.
- Open Run by pressing Win + R, input ms-settings: and click OK.
- In Action Center, click All settings.
- Alternatively, press Win + I to go to the Settings window.
- Restart your computer
- Re-launch Windows Explorer
- Run SFC command
- Delete a registry entry
To use Startup Repair to fix Windows 10 problems, you should follow the guide:
- Go to Windows Recovery Environment (WinRE) by using Restart + Shift or a bootable drive.
- Go to Troubleshoot > Advanced options > Startup Repair.
- Choose your account and enter the password.
- Finish the repair by following the guide on the screen.
- Relog into your account
- Create a new user account
- Run Microsoft Start Menu Troubleshooter
- Check and repair Windows files
- Reinstall Windows apps
- Enable Tablet Mode and start screen
- To get more solutions and details, refer to this article — How Do I Fix Windows 10 Start Menu Not Working Quickly.
ABOUT THE AUTHOR

Position: Columnist
Vera is an editor of the MiniTool Team since 2016 who has more than 5 years’ writing experiences in the field of technical articles. Her articles mainly focus on disk & partition management, PC data recovery, video conversion, as well as PC backup & restore, helping users to solve some errors and issues when using their computers. In her spare times, she likes shopping, playing games and reading some articles.


