How to get access to windowsapps folder in windows 10
С тех пор, как Windows 8 и Windows 10 получили дополнительный способ автоматической установки приложений (таких как Mail и Photos, различные игры) в дополнительную системную папку WindowsApps, у пользователей возникли трудности с доступом к содержимому этой папки. Ниже рассмотрены два способа, как найти эту папку и получить к ней доступ.
[Быстрый способ]
Этот способ основан на смене владельца папки. Специальный скрипт модификации реестра добавит в контекстное меню проводника пункт «Take Ownership» (принять во владение).
1. Скачайте архив TakeOwnership.zip [2], распакуйте, или зайдите в содержимое этого архива.
2. Двойным кликом запустите скрипт InstallTakeOwnership.reg.
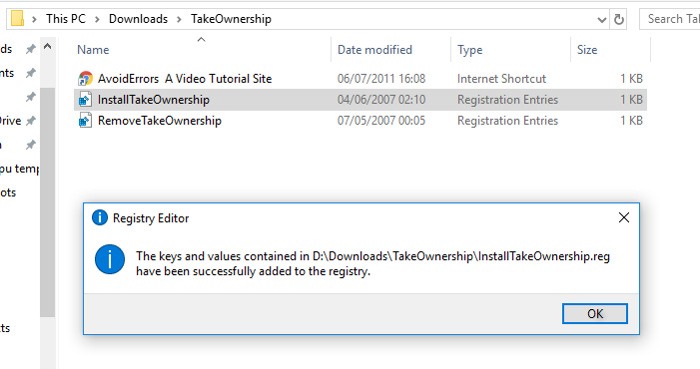
После этого в контекстном меню появится пункт Take Ownership.
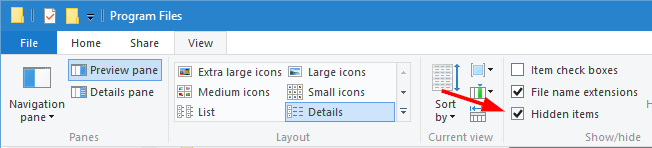
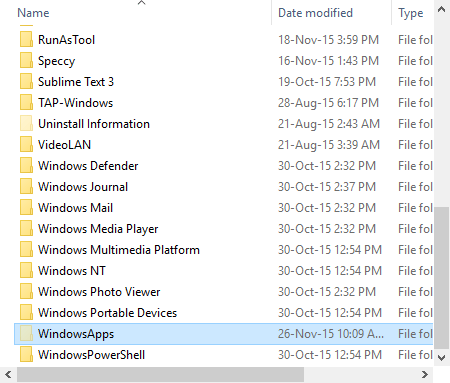
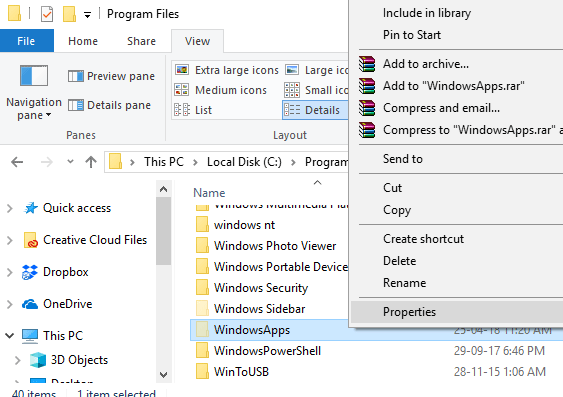
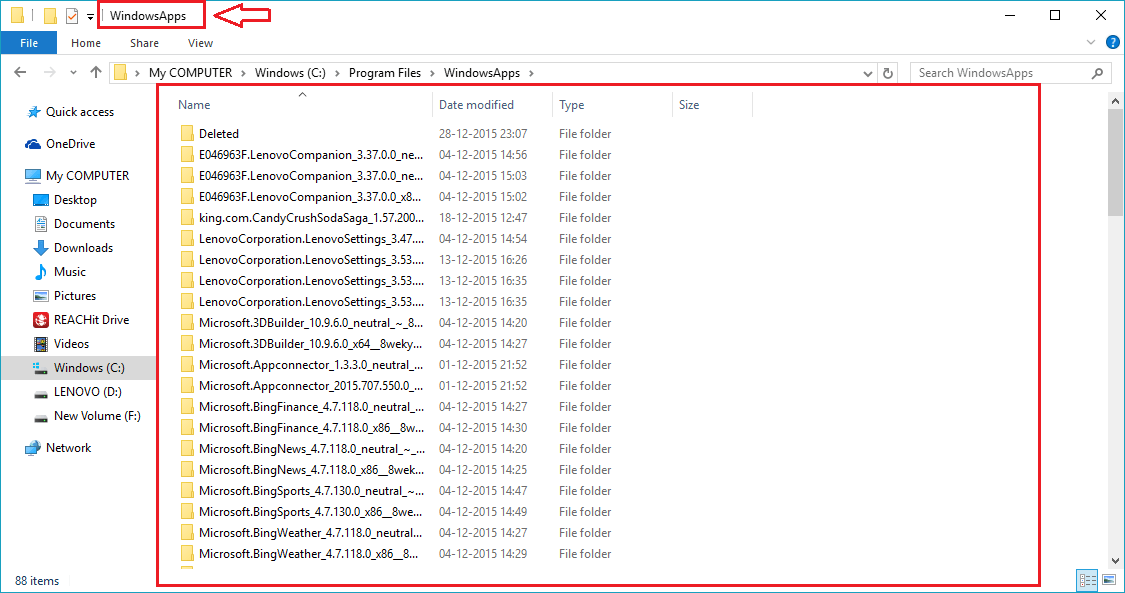
3. Откройте место расположения папки WindowsApps. По умолчанию это каталог «C:\Program Files», однако Вам может понадобиться разрешить отображение этой скрытой папки. Для этого кликните на закладку View в верхней части Проводника, и затем кликните на опции «Hidden items».
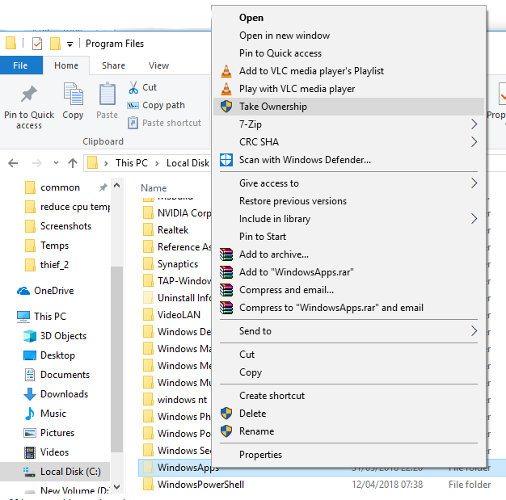
После того, как Вы увидели папку WindowsApps, выполните на ней правый клик, и выберите в контекстном меню «Take Ownership».
На несколько секунд откроется окно Powershell, и в ней запустится команда, которая перенастроит владельца папки на текущего пользователя. После завершения работы этой команды Вы получите доступ к содержимому файлов и папок каталога WindowsApps. Вы сможете менять права доступа, удалять, копировать и создавать файлы.
Имейте в виду, что предоставление прав владельца снижает уровень безопасности системы, потому что любые программы, запущенные от имени текущего пользователя, могут потенциально получить полный контроль над содержимым WindowsApps, в том числе записать туда вредоносный код.
Примечание: в архиве [2] также есть скрипт RemoveTakeOwnership.reg, который удалит пункт «Take Ownership» из контекстного меню Проводника.
[Получение прав доступа вручную]
Если Вы не хотите вставлять команду «Take Ownership» в контекстное меню из-за соображений безопасности или по каким-то другим причинам, то можно добиться того же самого результата вручную. Ниже описан этот процесс по шагам.
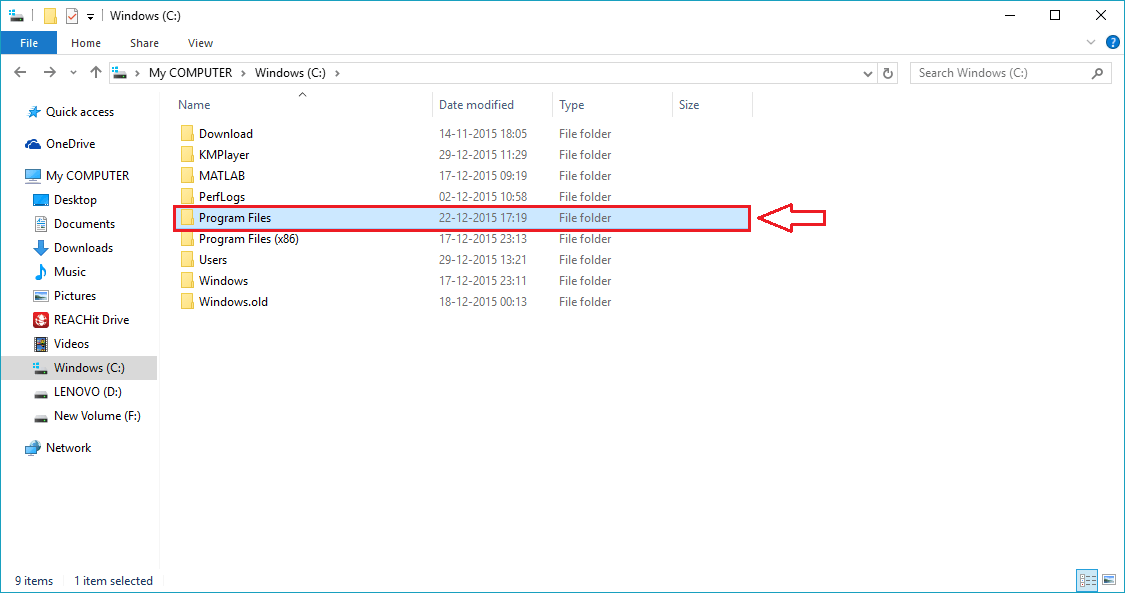
1. Откройте в Проводнике папку Program Files.
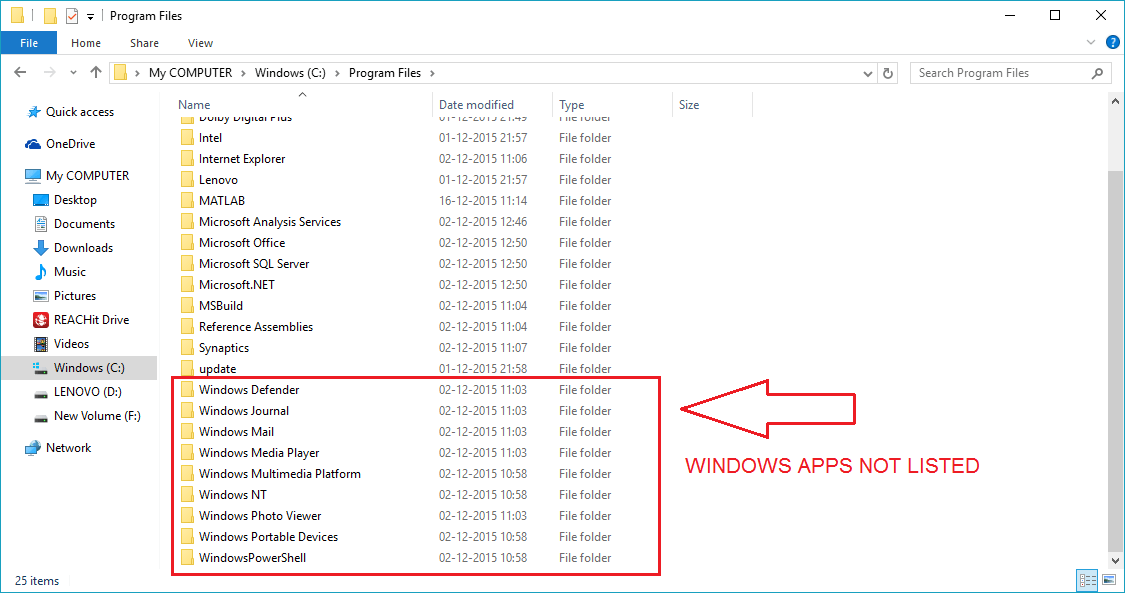
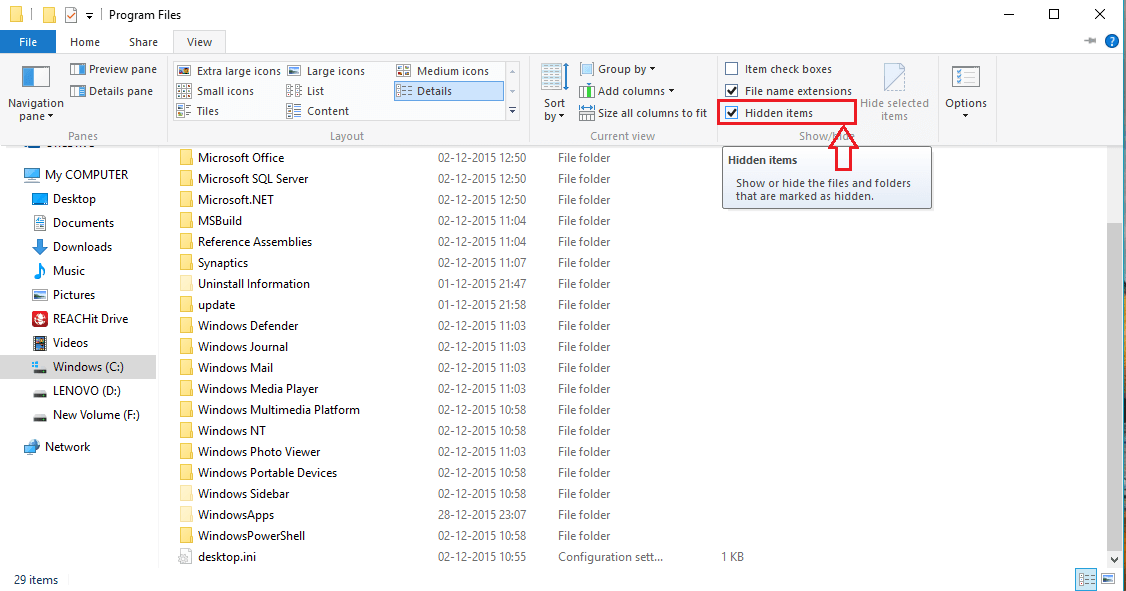
2. В этой папке должна находиться папка WindowsApps, однако по умолчанию она может быть скрыта. Чтобы она стала видна среди всех обычных папок, кликните на закладку View, после чего поставьте галочку «Hidden Items».
Действие разрешит отображение всех скрытых папок, находящихся в папке Program Files. В их числе станет видна и папка WindowsApps.
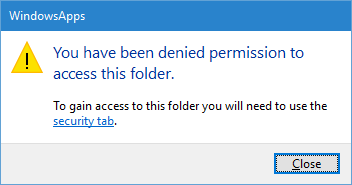
3. Несмотря на то, что папка стала видна, к её содержимому все еще нельзя получить доступ. При попытке открыть папку WindowsApps откроется окно с сообщением, что доступ запрещен, даже если Вы делаете это как администратор компьютера.
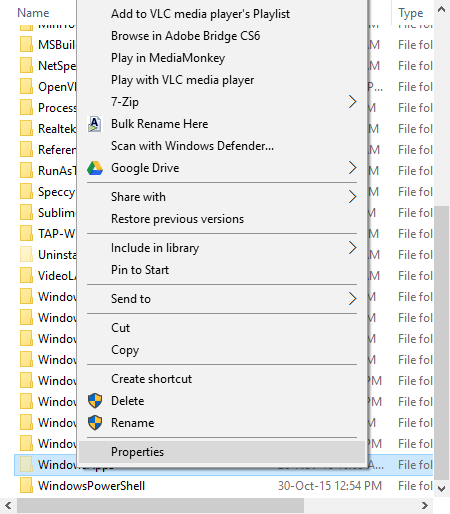
Сделайте правый клик на папке WindowsApps, и выберите пункт свойств в контекстном меню папки (Properties).
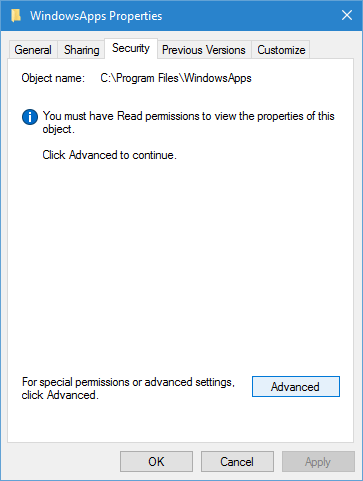
4. Откроется окно свойств папки. Перейдите на закладку Безопасность (Security), и кликните на кнопку Advanced.
5. Откроется окно диалога Advanced Security Settings, кликните в нем на ссылку Change.
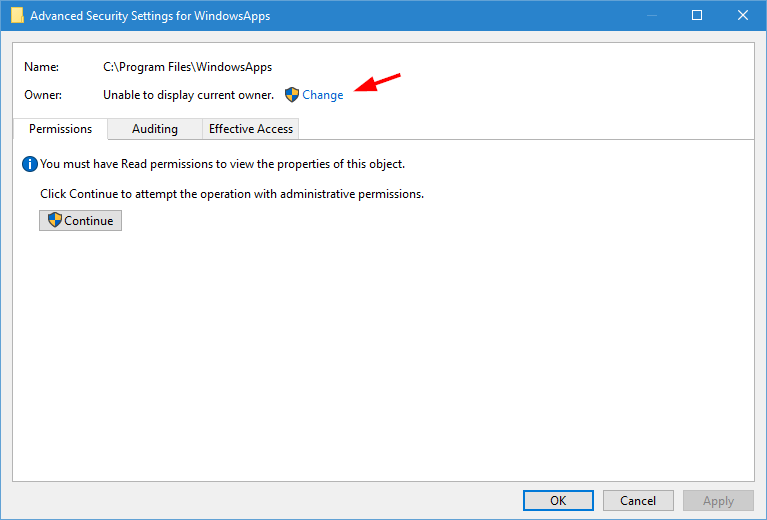
Откроется окно запроса подтверждения UAC (User Access Control). Просто кликните на кнопку «Yes» для продолжения.
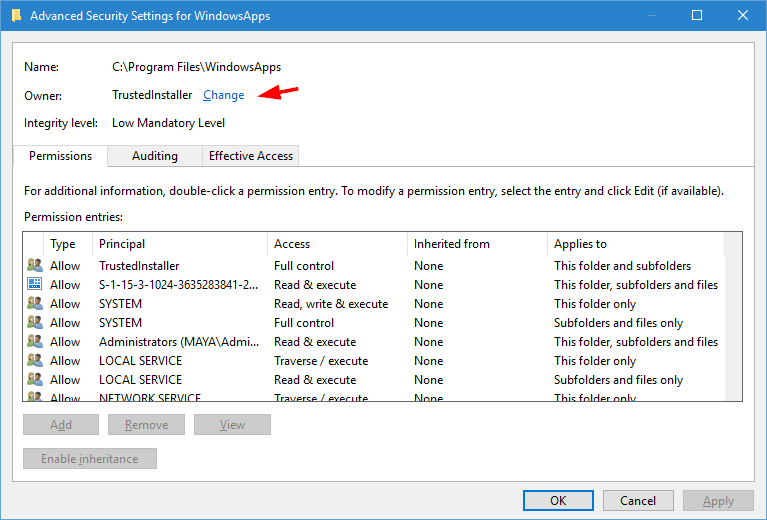
6. Окно покажет все разрешения, которые в настоящий момент настроены для папки WindowsApps. Как Вы можете видеть, эта папка относится к системе, и поэтому Вам просто так нельзя получить к ней доступ. Чтобы изменить это, кликните на ссылку Change, которая находится рядом с текстом «Owner: TrustedInstaller», обозначающим текущего владельца папки.
7. Откроется окно выбора пользователя или группы «Select User or Group». Здесь введите свое имя пользователя с правами администратора, и кликните кнопку «Check Names». Это действие автоматически заполнит имя объекта.
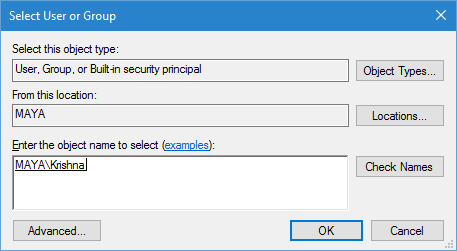
Кликните на кнопку OK для продолжения.
8. В основном окне Вы увидите, что владелец папки поменялся на указанную Вами учетную запись администратора. Перед тем, как применить изменения, установите галочку «Replace owner on sub containers and objects», иначе не получите полный доступ над содержимым папки WindowsApps.
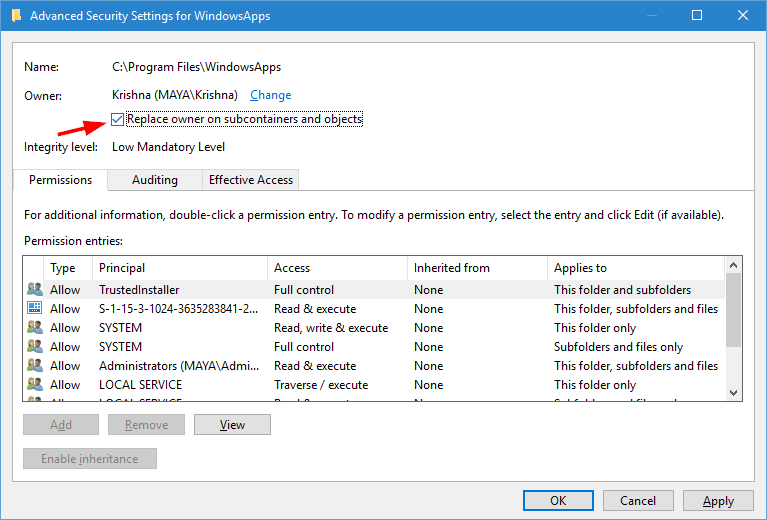
После этого кликните на кнопку OK для сохранения изменений.
Windows начнет менять права доступа на содержимом WindowsApps, этот процесс может занять некоторое время.

Тем же самым способом Вы можете получить полный доступ к любой другой папке Program Files, пока у Вас есть права администратора.
How can I open the WindowsApps folder in windows10
Hi.
I want to give a back up from WindowsApps in windows 10 for next clean installs and when I want to open this folder it says me «change your security access» and when I click the link I don’t know to do what?
and after I click «continue» :
after I go to security tab I don’t know to do what?
thanks.
![]()
Thank you for posting your query in Microsoft Community.
I understand your concern regarding the issue that you are facing.
You may follow the steps provided below and check if it helps to resolve the issue.
Method 1: Folder permission
- In File Explorer, right click on the documents folder.
- Click Properties.
- Click the Security tab.
- Click on Edit to change the permissions.
- Click the box to allow Home Users full control.
- Click OK and make sure the change is applied to all subfolders and files.
That should fix the problem if not try 2 method
Method 2: Try taking ownership of the folder (and by «the» folder, I mean any one having an issue). If they are all in one folder, use that one. If it’s all of them, start with C:\Users\(your username) and work from there.
To take ownership:
Right-click the folder and go to Properties
In Properties, go to Security (tab) > Advanced (button at the bottom) > Owner (tab)
In the Owner tab, the current owner will be listed. Yours will likely say it’s unknown but regardless, if it doesn’t say your current username (and if the username is the same, just do it anyway), click Edit (button).
Under «Change owner to:» select your current account, check the box next to «Replace owner on sub containers and objects» and click OK. Depending on all that’s under the folder, this may take a long time.
After you are the current owner, you should be able to change permissions as you need.
Method 3 :
Perform system file checker. Follow the steps below which will help you:
Open an elevated command prompt.
In the command prompt, type the following command, and then press ENTER: sfc /scannow.
The sfc /scannow command will scan all protected system files, and replace corrupted files with a cached copy that is located in a compressed folder at %WinDir%\System32\dllcache.
Hope this helps. If the issue persists or if you have any Windows related queries please get back to us. We are happy to help you.
How to Get Access to WindowsApps Folder in Windows 10
WindowsApps folder in the Program Files folder is a system folder and hidden by default in Windows 10. Even you already showed the hidden files and folder; you can’t access it. Whenever you try to open it, you will get a message alert “You have been denied permission to access this folder.” People usually need to access this folder when they want to see program files of and application installed through Windows Store. In this guide, we will learn how to view hidden WindowsApps folder and fix the problem and allow access to WindowsApp folder for the Windows user.
What is WindowsApps folder
WindowsApp is a folder where all the program files are stored that installed from the Windows / Microsoft Store. Apps installed from the Microsoft Store like Photos, Paint 3D, Movies & TV, People, Windows Camera and more. All the files related to these Store applications are installed in the WindowsApp folder. WindowsApp folder location is “C:\Program Files” folder and restricted to access by default.
Show hidden WindowsApps folder
If you can’t see WindowsApp folder in the program files folder, then this must be hidden with a windows settings by default.
- To unhide it just open the File Explorer.
- Click the “View” tab at the top and then Check the checkbox “Hidden Items” as shown in the screenshot.


Now all the hidden files and folders will be showing. Open C:\Program Files folder and look for WindowsApp folder here. You can also copy and paste the following path in the Run Window. Press Windows+R from the keyboard and then enter this: %programfiles%\WindowsApps
Get Access to WindowsApps Folder
By default, WindowsApp folder is blocked, and you can’t view its content even you are logged in with an administrator account. To get access to Windows App folder you need to set up permissions. Let’s see how to allow Windows users to access WindowsApp folder.
- First, follow the steps given above how to show hidden WindowsApp folder.
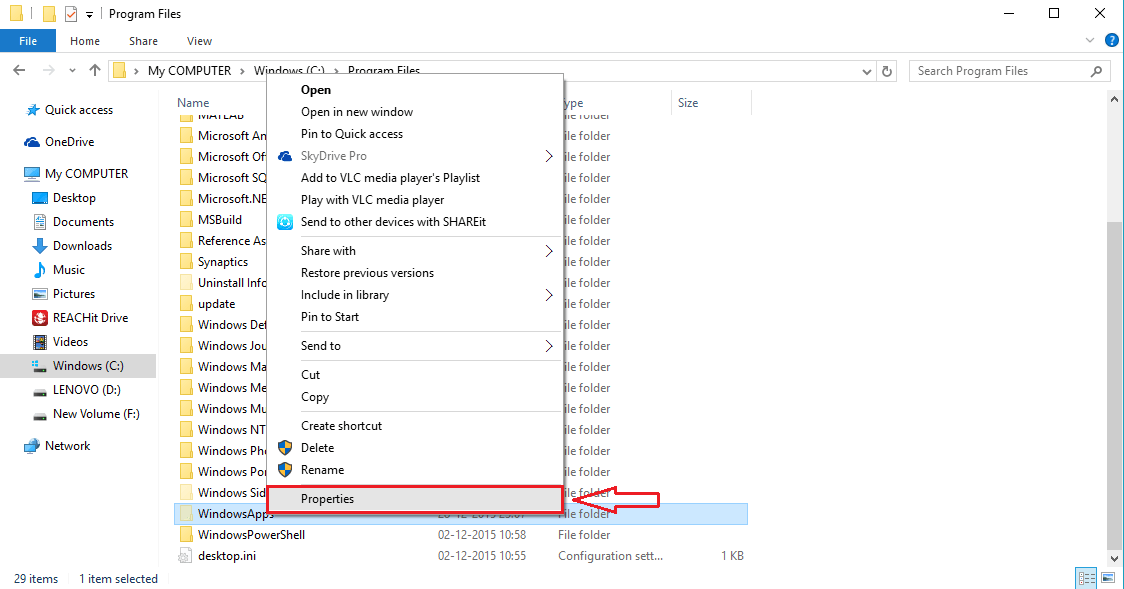
- Right-click on the WindowsApp folder and select Properties option from the menu.
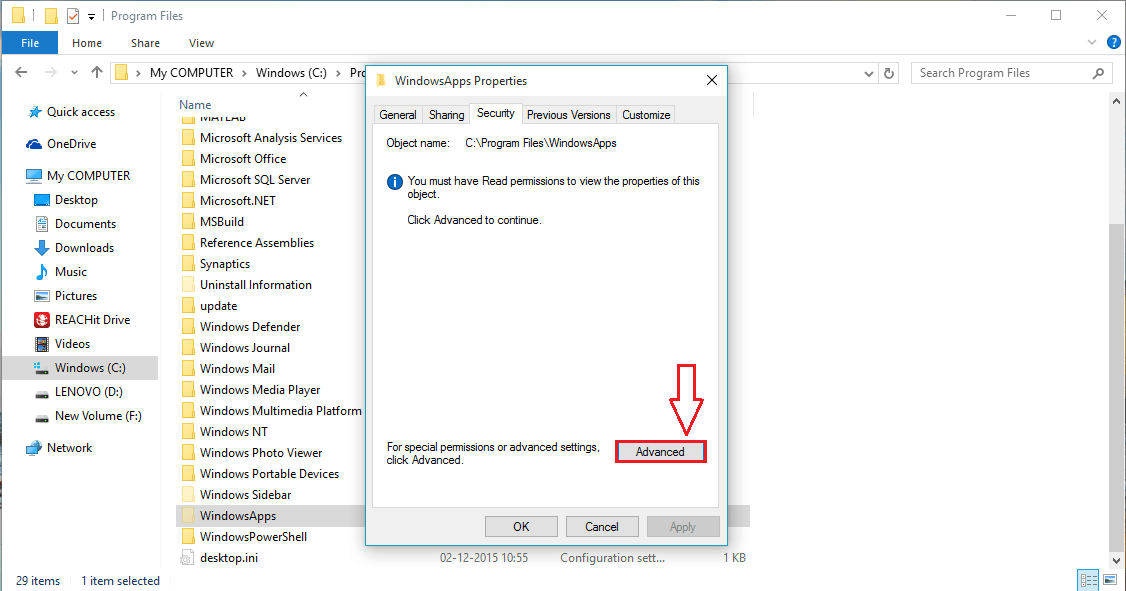
- On the Properties window, click “Security” tab and then click the “Advanced” button.
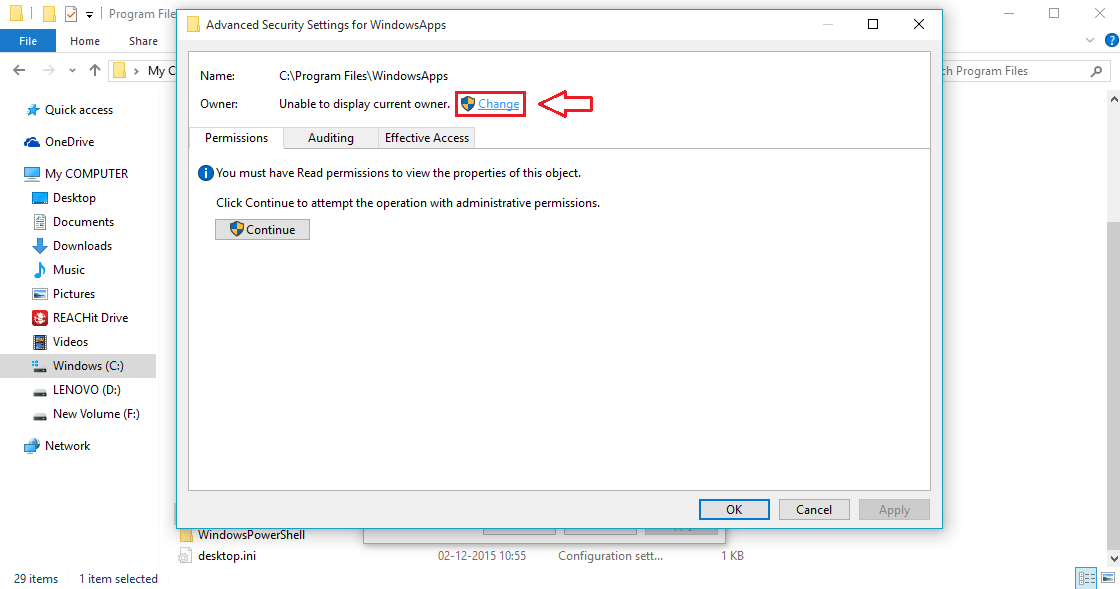
- In the “Advanced Security Settings for WindowsApp folder” window click the “Change” option.
- In “Select User or Group” window Click the “Advanced” button.
- From the advanced options of users or group Click the “Find Now” button. Now, from the search results below select “Administrators” and click OK button. Continue pressing OK buttons on previous windows until you have saved and closed all.
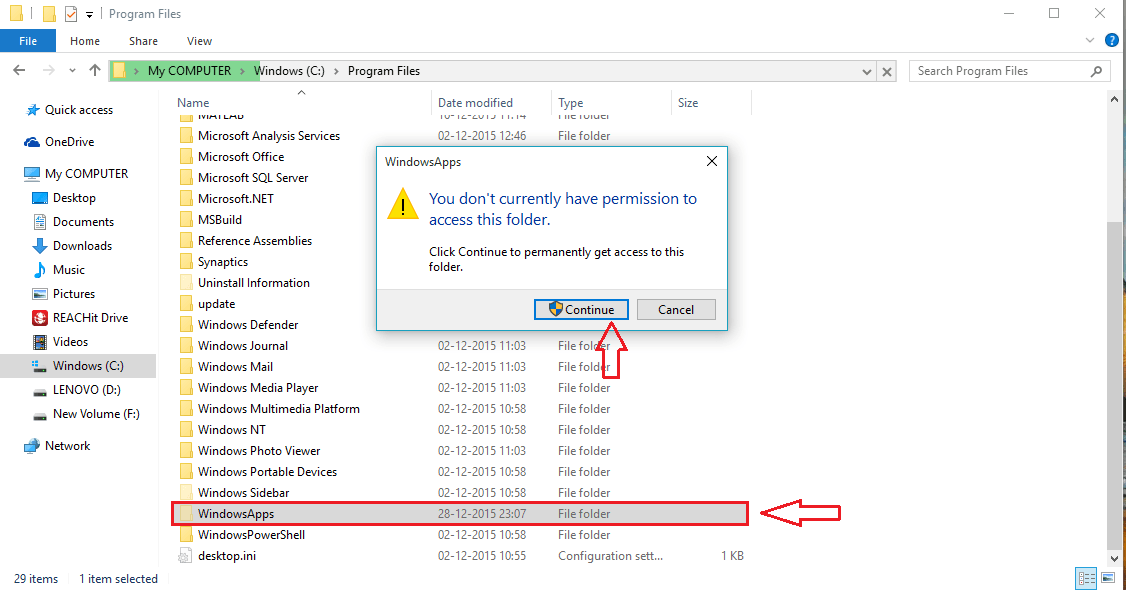
- Now, open then WindowsApp folder, press Windows + R keyboard shortcut to open Run window and then Enter: %programfiles%\WindowsApps and hit OK to open the folder. You can simply go to “C:\Program Files\WindowsApp” directly. When to try to open this folder you will see a message “You don’t currently have permission to access this folder.” Clik Continue to access this folder, and you can see all the files and folders in the WindowsApp folder.


If you still having any problem accessing this directory, please leave a comment below with your Windows version that you have installed. We try our best to fix your WindowsApp folder accessing problem.
How to access Windows Apps folder in Windows 10
How to access Windows Apps folder in your PC in Windows 10: – It’s your system, if you develop a desire to know what’s hidden from you by your system, I wouldn’t blame you. Have you ever wondered where every installation file is kept by windows? Well, what if I say that am going to tell you the big secret and give you access to everything? Wouldn’t you be willing to take up the offer? Yes of course, right? It’s the WindowsApps folder that we should be looking out for. Read on, to learn how to access WindowsApps folder by following a very few number of steps.
STEP 1
- Firstly, open My Computer and double click on C drive.

STEP 2
- Now find out the folder named Program Files and double click on it. This is the folder which houses WindowsApps folder.
STEP 3
- Now if you look at the name of the folders starting with the letter “W”, you will not find WindowsApps there. This is because it is a hidden folder. Let’s discover it first.
STEP 4
- Click on the Viewtab. Now look for a cell named Hidden items. Check the cell corresponding to it to view the hidden folders and files.
STEP 5
- You will now see that WindowsApps folder has been revealed, congratulations on that part. But if you execute a double on the WindowsApps folder, you will be faced with a Permission Denied message. Let’s get to solving this issue.
STEP 6
- Right click on WindowsApps folder and from the context menu that opens up, choose Properties by clicking on it.
STEP 7
- This results in the opening up of a new window named WindowsApps Properties. Down at the bottom, you will see a button named Advanced. Click on it, to change the folder permissions.
STEP 8
- Find the link named Change and click on it to change the owner of the folder.
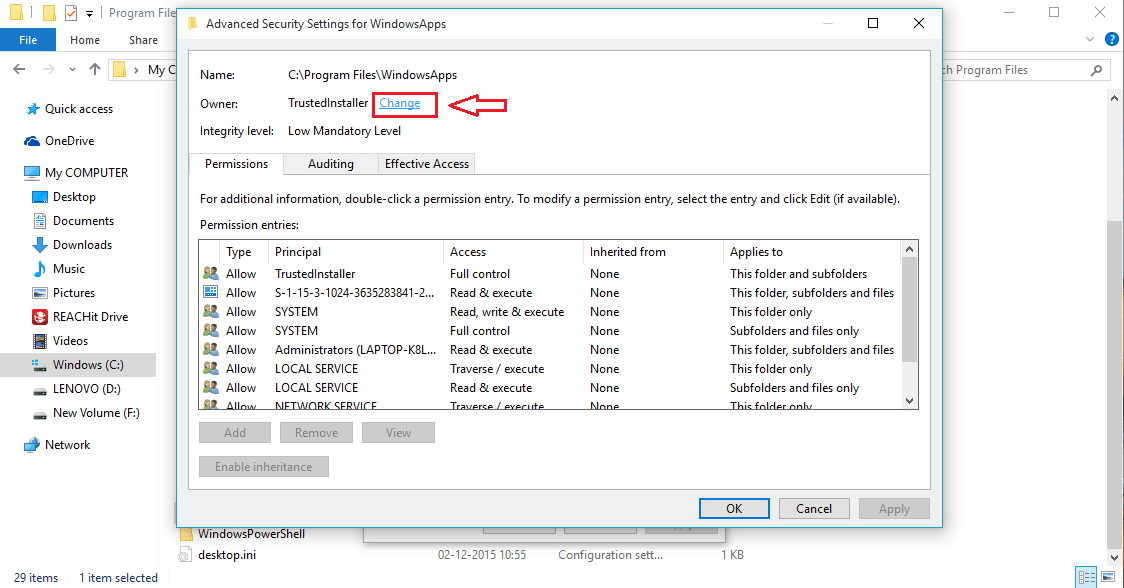
STEP 9
- Now you will see that the owner is listed as TrustedInstaller. Click on Change once again.
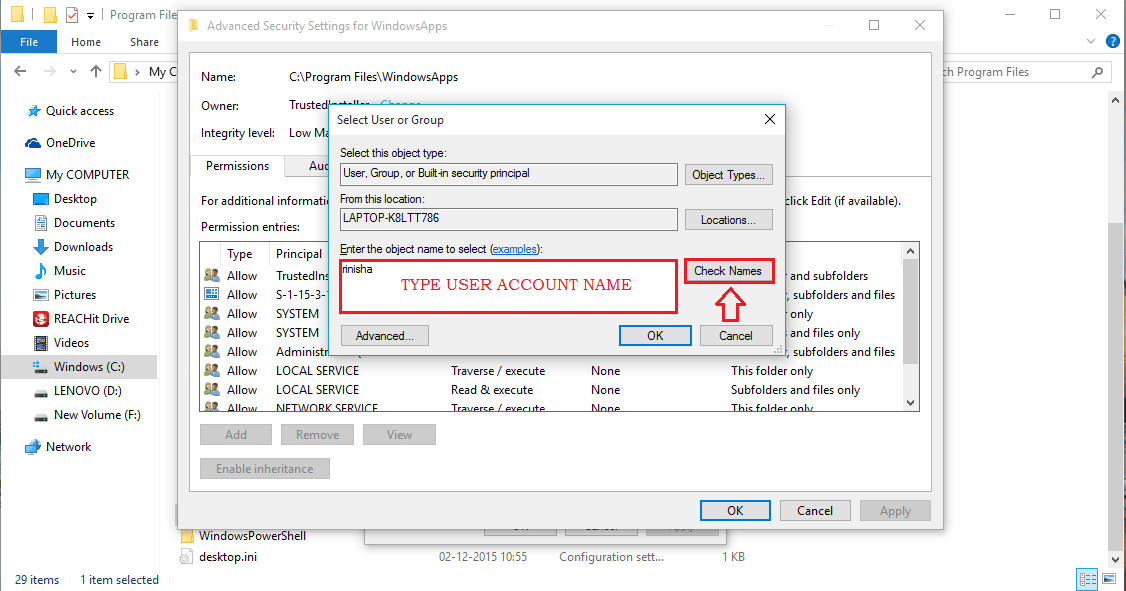
STEP 10
- A new window named Select User or Group opens up. Type-in the user account name which you want to give the ownership of the WindowsApps folder, under the text filed named Enter the object name to select. Once you are done, click on Check Names.
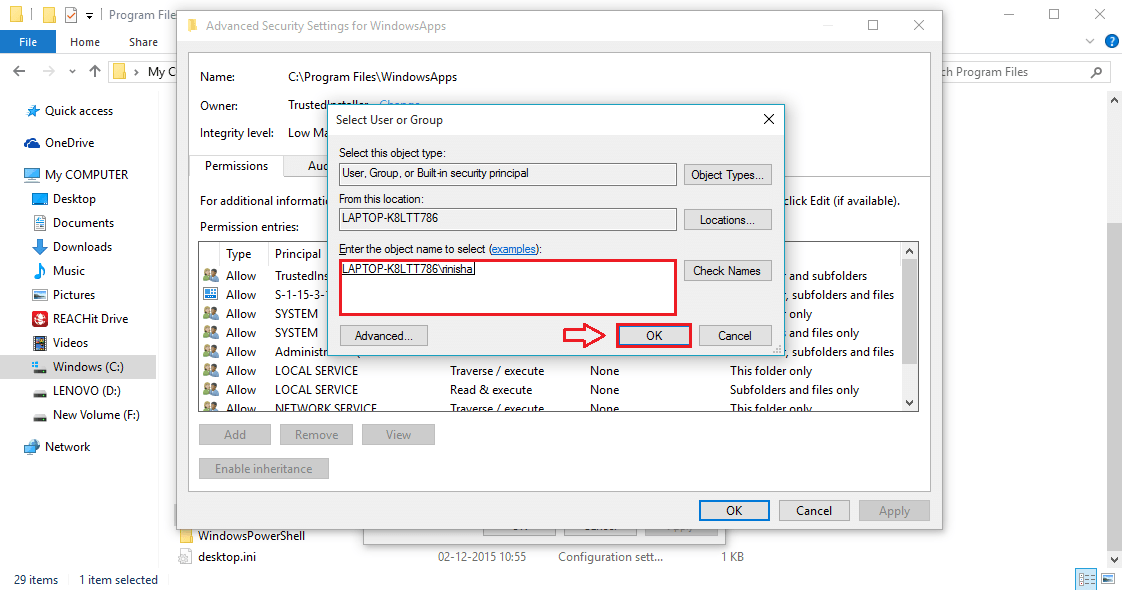
STEP 11
- Clicking on Check Names button will change the entered user name into the object name of the user account as shown in the below screenshot. Click on OK button once you are done.
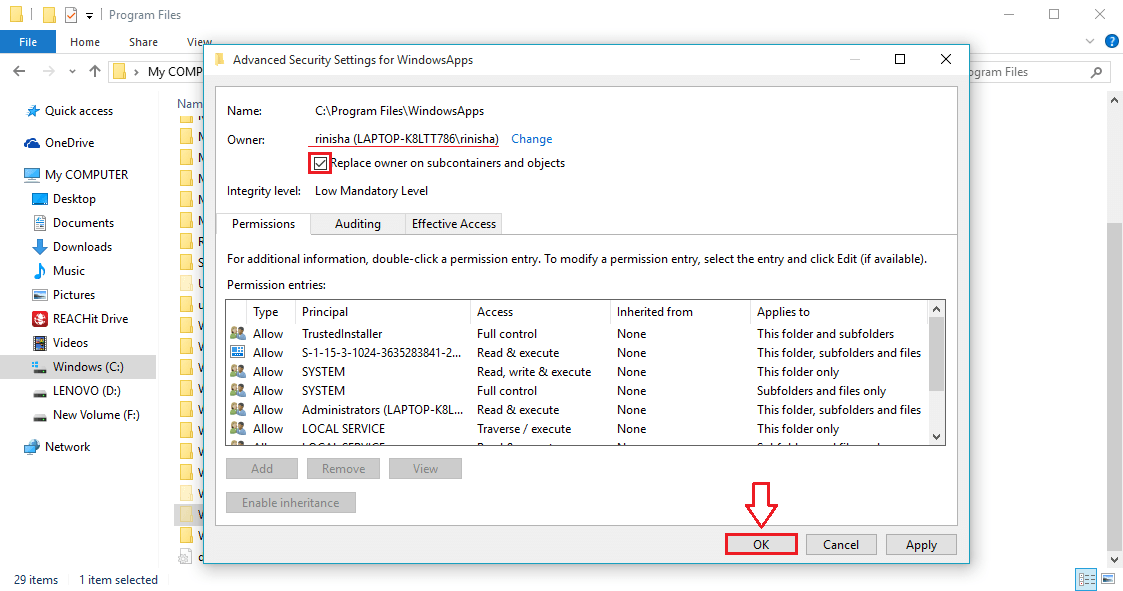
STEP 12
- Do not forget to check the cell corresponding to Replace owner on subcontainers and folders before clicking on the OK button of Advanced Security Settings for WindowsApps window.
STEP 13
- Sit back and relax. Windows will do the job of changing the ownership of the folder and it’s contents.

STEP 14
- Once the ownership is changed and if you open the WindowsApps folder from the Program Files again, you will be able to view the contents in it.
Well, you are done. Doesn’t it feel great to have found out the big secret? Feel free to come back, there is always more waiting. Hope you found the article useful.

Someone who is in love with writing and technical tricks & tips.


