- Take ownership of files or other objects
- Reference
- Possible values
- Best practices
- Location
- Default values
- Policy management
- Group Policy
- Security considerations
- Vulnerability
- Countermeasure
- Potential impact
- How to take ownership of a file or a folder on Windows 10
- Steps to take ownership of a certain folder on Windows 10
- What to do to gain full control over a folder
- How to Take Ownership of a Folder in Windows 10 Using File Explorer
Take ownership of files or other objects
Applies to
Describes the best practices, location, values, policy management, and security considerations for the Take ownership of files or other objects security policy setting.
Reference
This policy setting determines which users can take ownership of any securable object in the device, including Active Directory objects, NTFS files and folders, printers, registry keys, services, processes, and threads.
Every object has an owner, whether the object resides in an NTFS volume or Active Directory database. The owner controls how permissions are set on the object and to whom permissions are granted.
By default, the owner is the person who or the process which created the object. Owners can always change permissions to objects, even when they are denied all access to the object.
Possible values
- User-defined list of accounts
- Not defined
Best practices
- Assigning this user right can be a security risk. Because owners of objects have full control of them, only assign this user right to trusted users.
Location
Computer Configuration\Windows Settings\Security Settings\Local Policies\User Rights Assignment
Default values
By default this setting is Administrators on domain controllers and on stand-alone servers.
The following table lists the actual and effective default policy values. Default values are also listed on the policy’s property page.
| Server type or GPO | Default value |
|---|---|
| Default Domain Policy | Not defined |
| Default Domain Controller Policy | Administrators |
| Stand-Alone Server Default Settings | Administrators |
| Domain Controller Effective Default Settings | Administrators |
| Member Server Effective Default Settings | Administrators |
| Client Computer Effective Default Settings | Administrators |
Policy management
This section describes features, tools, and guidance to help you manage this policy.
A restart of the device is not required for this policy setting to be effective.
Any change to the user rights assignment for an account becomes effective the next time the owner of the account logs on.
Ownership can be taken by:
- An administrator. By default, the Administrators group is given the Take ownership of files or other objects user right.
- Anyone or any group who has the Take ownership user right on the object.
- A user who has the Restore files and directories user right.
Ownership can be transferred in the following ways:
- The current owner can grant the Take ownership user right to another user if that user is a member of a group defined in the current owner’s access token. The user must take ownership to complete the transfer.
- An administrator can take ownership.
- A user who has the Restore files and directories user right can double-click Other users and groups and choose any user or group to assign ownership to.
Group Policy
Settings are applied in the following order through a Group Policy Object (GPO), which will overwrite settings on the local computer at the next Group Policy update:
- Local policy settings
- Site policy settings
- Domain policy settings
- OU policy settings
When a local setting is greyed out, it indicates that a GPO currently controls that setting.
Security considerations
This section describes how an attacker might exploit a feature or its configuration, how to implement the countermeasure, and the possible negative consequences of countermeasure implementation.
Vulnerability
Any users with the Take ownership of files or other objects user right can take control of any object, regardless of the permissions on that object, and then make any changes that they want to make to that object. Such changes could result in exposure of data, corruption of data, or a denial-of-service condition.
Countermeasure
Ensure that only the local Administrators group has the Take ownership of files or other objects user right.
Potential impact
None. Restricting the Take ownership of files or other objects user right to the local Administrators group is the default configuration.
How to take ownership of a file or a folder on Windows 10

- Download Restoro PC Repair Tool that comes with Patented Technologies (patent available here).
- Click Start Scan to find Windows issues that could be causing PC problems.
- Click Repair All to fix issues affecting your computer’s security and performance
- Restoro has been downloaded by 0 readers this month.
In order to access any file or folder on Windows 10, you have to have the appropriate privileges. Unfortunately, certain issues can occur if you don’t have the privilege to edit certain files and folders, and this is when you have to take ownership over that folder or file.
Taking ownership of a certain folder isn’t that complex, and today we’re going to show you how to do it.
Steps to take ownership of a certain folder on Windows 10
As previously mentioned, certain issues on Windows 10 might require you to take ownership of a file or folder, and you can easily do that by following these steps:
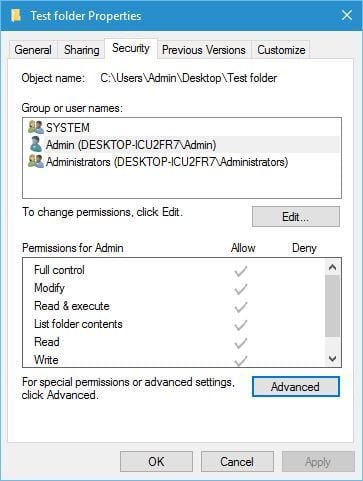
- Right click the folder you want to gain access to and choose Properties.
- When Properties window opens, navigate to Security tab. In group or user name section you can see the list of users and groups on your computer that can access this folder.
- Click the Advanced button.

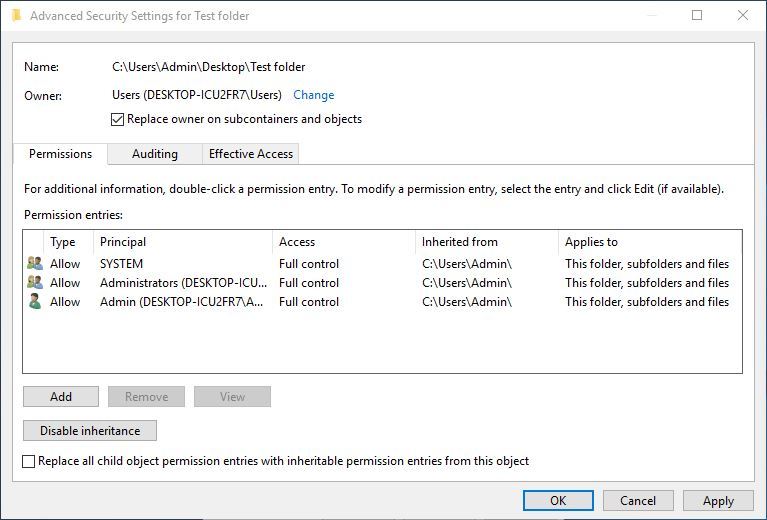
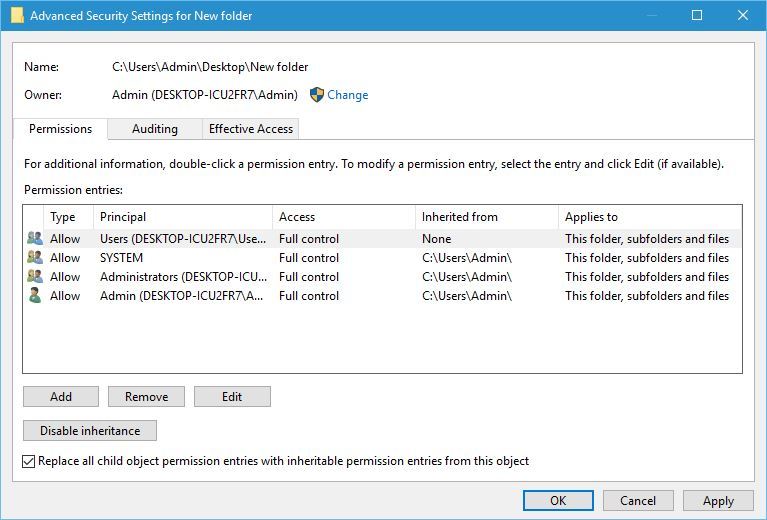
- When Advanced Security Settings windows opens check the Owner section at the top. Click Change in order to change the owner of the folder.
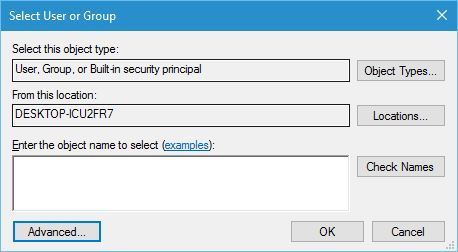
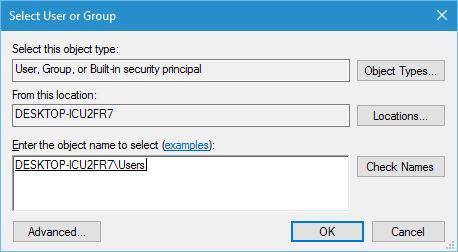
- Select User or Group window will now open. Click Advanced. Optional: If you know the name of the group or the user, you can just enter it in the Enter the object name to select section and click Check Names and OK and skip to Step 8.
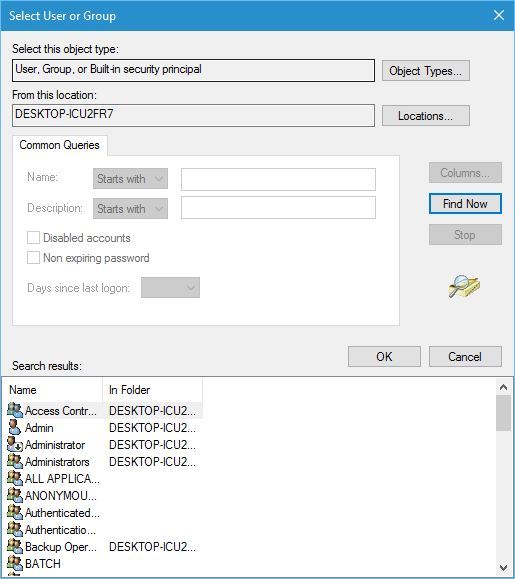
- Click Find Now button and the list of all groups and users on your computer should appear in Search results.
- Select the name or the group from the list and click OK. In our example we selected Users group, but you may select a group or a user that you wish to assign ownership to.
- Click OK again.
- Check Replace owner on subcontainers and objects to change the owner for all subfolders in this folder.
- Click Apply and OK to save changes.

- READ ALSO: How to Encrypt Files and Folders in Windows 10
What to do to gain full control over a folder
Now you have taken the ownership of the folder, but you might not have full control over it, meaning that you cannot make any changes such as modifying the files or folders. To change that, do the following:
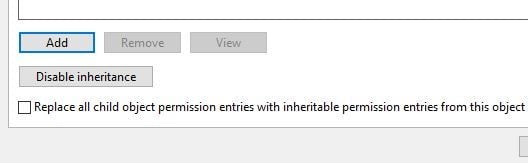
- Right click the same folder and choose Properties. Go to Security tab and click Advanced button.
- When Advanced Security Settings window opens, click the Add button.
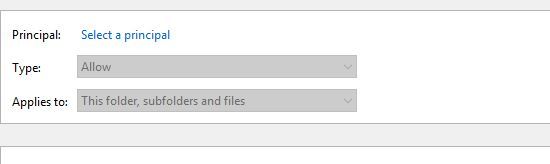
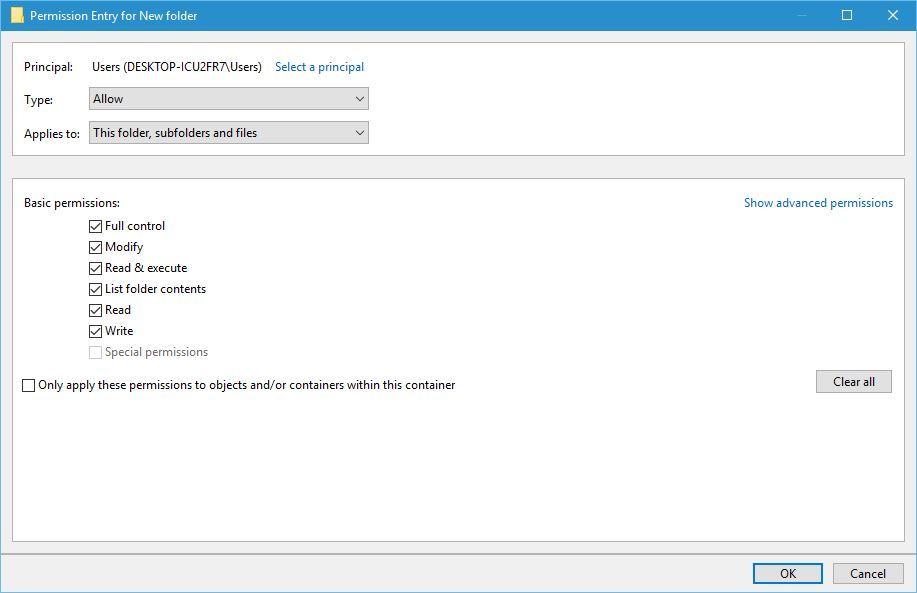
- Now click Select a principal link.
- You should see a familiar Select User or Group window. Enter a user name or a group name in Enter the object name to select section. If you don’t know the name of the user or a group, click the Advanced button and go to the next step.
- Click Find Now and select user or a group from the list of search results. Click OK.
- Click OK again.
- Set Type to Allow and Applies toThis folder, subfolders and files.
- In Basic permissions section check Full control and click OK.
- Select the newly added principal and check Replace all child permissions entries at the bottom.
- Click Apply and OK to save changes.
- READ ALSO:Fix disappearing files and folders in Windows 10 and bring them all back
Alternatively, you can use third-party solutions such as TakeOwnershipEx to take ownership over a certain file or folder. To do that, you can do the following:
- Download TakeOwnershipEx.
- Start TakeOwnershipEx-1.2.0.1-Win8.exe.
- After you’ve installed the program, run it.
- Click Take Ownership button and select a folder.
- Optional: If you wish you can also restore ownership to a folder by clicking the Restore Ownership button.
- READ ALSO: Fix: ‘Your Folder can’t be Shared’ in Windows 10
Taking ownership over a folder isn’t as hard as it seems, and sometimes you might have to take a ownership of a certain file or folder, or even a registry key in order to fix a problem on Windows 10.
We hope that our little guide was useful to you and that you can now easily take ownership over certain files and folders.
If you have any questions or know another way to take ownership of a file or a folder, tell us in the comments section below and we will be sure to check them out.
How to Take Ownership of a Folder in Windows 10 Using File Explorer
By Henry T. Casey 08 May 2019
You may find yourself unable to move, edit or copy a file in Windows 10, and often times that’s because of the permissions attached to it. It may be a file or folder that the system doesn’t want altered or one created by a user that’s been deleted. Fortunately, you can reclaim the file.

Here’s how to take ownership and get full access to files and folders in Windows 10.
1. Right-click on a file or folder.
2. Select Properties.
3. Click the Security tab.
4. Click Advanced.
5. Click «Change» next to the owner name.
6. Click Advanced.
7. Click Find Now.
8. Select your username and click OK.
9. Click OK.
10. Click Apply. If you’re modifying a folder, you might want to
11. Click OK.
12. Click Add. Now it’s time to make sure you have all kinds of permissions.
13. Click Select a principal.
14. Click Advanced.
15. Click Find Now.
16. Select your user name and click OK.
17. Click OK.
19. Click OK.
20. Click OK.
21. Click your user name, it’s time to verify your new permissions.
22. Click OK, as you’ve taken ownership and full permissions for the folder!
With this tutorial under your belt, it’s time to learn more about Windows, including how to password protect a folder in Windows 10 and how to create a new folder in Windows 10, how to create a shortcut to a website in Chrom, how to delete old emails in Gmail so you don’t need to pay for OneDrive and how to map a network drive.


