- How to Show Hidden Files and Folders in Windows 10
- 2 ways to show hidden files and folders in Windows 10:
- How to Find Hidden Files and Folders in Windows
- How to hide files and folders on Windows 10
- How to hide files and folders using File Explorer
- How to hide files and folders using Command Prompt
- Making hidden files and folders visible again
- More Windows 10 resources
- Halo: MCC’s live service elements make it better, not worse
- Microsoft’s Surface Duo is not ‘failing up’
- Here’s what you can do if Windows 10 update KB5001330 is causing issues
- These are the best PC sticks when you’re on the move
- Windows: how to show hidden files and folders
- How do you deal with hidden files and folders?
- Showing hidden files in Windows 10 and 8
- Hidden files in Windows 7
- Showing hidden files using Command Prompt
- How to hide files and folders in Windows yourself
- Windows blue screen (BSOD): How to cure the error
- How to change startup programs in Windows 10
- The Windows shortcuts you should know
- How to format hard drives on Windows
- Windows AppData folder: Show and manage application data
How to Show Hidden Files and Folders in Windows 10
To show the files and folders automatically hidden in your Windows 10 computer, you can use one of the two methods introduced in this text.
Video guide on how to show hidden files and folders in Windows 10:
2 ways to show hidden files and folders in Windows 10:
Way 1: Show hidden files and folders in the View menu.
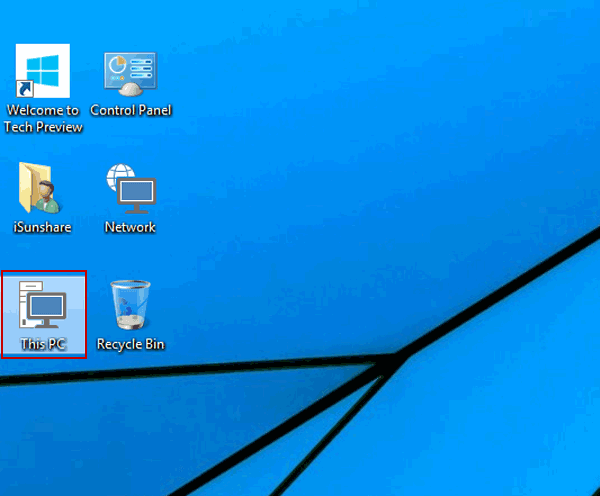
Step 1: Open This PC.
Double-click This PC on the desktop to open it.
Tips:
1. If you have no idea how to add This PC to the desktop, please refer to How to Add Desktop Icons on Windows 10.
2. You can also open another folder such as Network, File Explorer, Recycle Bin, etc.
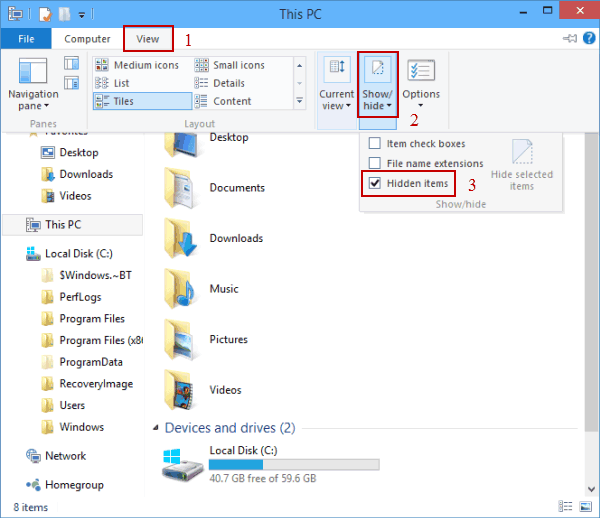
Step 2: Show the hidden files and folders in the View menu.
Click View, tap Show/hide in the menu, and check the small box before Hidden items in the sub-list.
Way 2: Show hidden files and folders in the Folder Options.
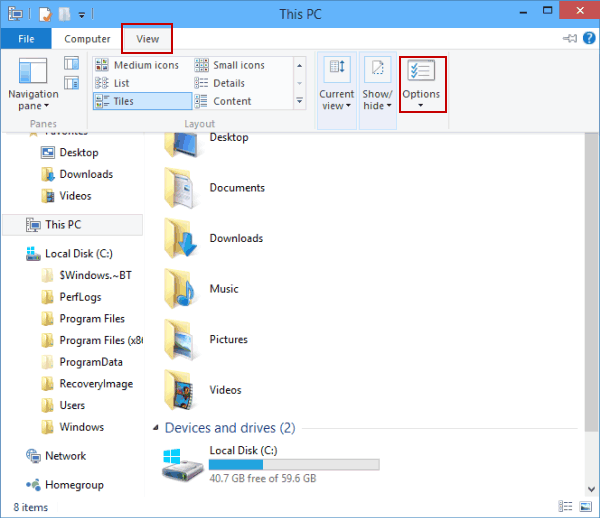
Open This PC, click View and select Options.
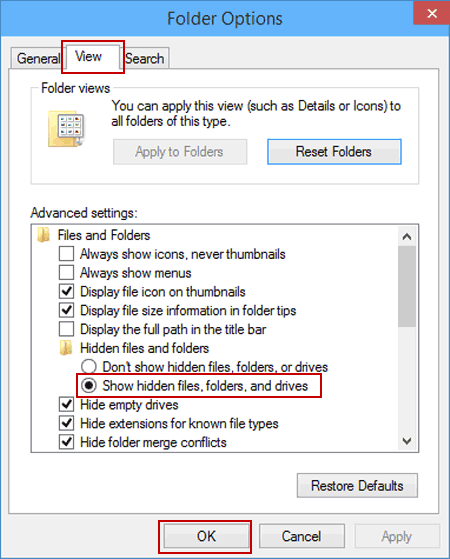
Step 2: Show the hidden files and folders in the View settings.
In the Folder Options window, choose View, select Show hidden files, folders, and drives, and then click OK.
Now, go ahead to put them into practice, and you can show the hidden files and folders on your PC.
How to Find Hidden Files and Folders in Windows
Last Updated: February 9, 2021
This article was co-authored by Mobile Kangaroo. Mobile Kangaroo is a full service repair shop and Apple Authorized Service Provider headquartered in Mountain View, CA. Mobile Kangaroo has been repairing electronic devices such as computers, phones, and tablets, for over 16 years, with locations in over 20 cities.
This article has been viewed 1,290,650 times.
This wikiHow teaches you how to display and locate hidden files and folders in Windows.


Mobile Kangaroo
Computer & Phone Repair Specialists Expert Interview. 11 September 2019. It should be in the middle of the «Advanced settings» window.
- If you don’t see this option, double-click the Hidden files and folders line of text. If you don’t see that option either, first double-click Files and Folders at the top of the «Advanced settings» window.
How to hide files and folders on Windows 10

No matter what kind of content you keep on your computer, you’ll always find reasons to hide certain files and folders. Perhaps you have important documents and videos that you want to keep under wraps, or you simply want to prevent users from accidentally deleting certain files if you’re sharing your PC with other people.
For whatever the reason it might be, on Windows 10, you can quickly hide a file or folder in two different ways, including using File Explorer or using the attrib command using Command Prompt.
In this Windows 10 guide, we’ll walk you through the easy steps to hide a file and folder on your computer. In addition, you’ll learn the steps to access those hidden items as needed.
How to hide files and folders using File Explorer
The easiest way to keep content hidden is using File Explorer.
- Open File Explorer.
- Navigate to the file or folder you want to hide.
Right-click the item and click on Properties.

Click Apply.

Click OK.

Once you’ve completed the steps, the hidden items will not be visible anymore, because by default Windows 10 doesn’t show hidden files.
If you want to access your hidden items you’ll have to type the complete path to the hidden folder or file you want to open and press Enter. For example: C:\Users\admin\Desktop\Files\Secret Files\Great Secret.txt.
Or you can open File Explorer, click on the View tab and make sure to check the Hidden items option. Then you can browse your hidden items as you would normally do with other content.

At any time, you can make the files and folders visible again by using the same steps mentioned above, but this time on step 4 make sure to clear the Hidden option.
How to hide files and folders using Command Prompt
Alternatively, you can also use Command Prompt to hide files and folders on your computer.
- Open Start.
- Do a search for Command Prompt and click the result.
Type the following command to navigate to the items you want to hide and press Enter:
In the command replace the path after cd with the path to your file or folder.
Type the following command to hide a folder or file and press Enter:
attrib +h «Secret Files»
In the command replace «Secret Files» with the name of your folder or file. Quotation marks are only necessary when there are spaces in the name.
If you’re trying to hide a folder with files and subfolders, which you also want to keep hidden, then you’ll need to use these steps as well.
While in Command Prompt type the following command to navigate inside the hidden folder and press Enter:
cd «Secret Files»
In the command replace «Secret Files» with the name of your hidden folder.
Type the following command to hide all files and folders inside the hidden folder and press Enter:
After completing the steps, the items with the hidden attribute will no longer be visible.
Making hidden files and folders visible again
If you change your mind, you can use the following steps to remove the hidden attribute for files and folders.
- Open Start.
- Do a search for Command Prompt and click the result.
Type the following command to navigate to the hidden items location and press Enter:
In the command replace the path after cd with the path to your file or folder.
Type the following command to make the items visible again and press Enter:
attrib -h «Secret Files»
In the command replace «Secret Files» with the name of your folder or file. Quotation marks are only necessary when there are spaces in the name.
In the case you also set the hidden attribute for files and subfolders inside of a folder, then do the following to remove the attribute.
While in Command Prompt type the following command to navigate inside the hidden folder and press Enter:
cd «Secret Files»
In the command replace «Secret Files» with the name of your hidden folder.
Type the following command to remove the hidden attribute from all files and folders inside the folder and press Enter:
Which method do you prefer to hide files and folders on Windows 10? Tell us in the comments below.
More Windows 10 resources
For more help articles, coverage, and answers on Windows 10, you can visit the following resources:
![]()
Halo: MCC’s live service elements make it better, not worse
Halo: The Master Chief Collection is more popular than ever, but some fans don’t agree with the live service approach 343 Industries has taken with it. Here’s why those elements are, at the end of the day, great for the game and for Halo overall.
![]()
Microsoft’s Surface Duo is not ‘failing up’
Microsoft announced this week that it was expanding Surface Duo availability to nine new commercial markets. While Surface Duo is undoubtedly a work in progress, this is not a sign of a disaster. It’s also doesn’t mean that Surface Duo is selling a ton either. Instead, the reason for the expansion is a lot more straightforward.
![]()
Here’s what you can do if Windows 10 update KB5001330 is causing issues
In this guide, we’ll show you the steps to get rid of the update KB5001330 to fix profile, gaming, and BSoD problems with the Windows 10 October 2020 Update and May 2020 Update.
![]()
These are the best PC sticks when you’re on the move
Instant computer — just add a screen. That’s the general idea behind the ultra-portable PC, but it can be hard to know which one you want. Relax, we have you covered!
Windows: how to show hidden files and folders
In addition to the folders in which Windows stores programs and documents, there are also numerous areas in the operating system that are not that easy to access at first glance. Most of the time, these folders contain system-related data, configuration files or device drivers.
One example is the AppData folder, which contains program settings, user profiles and temporary files. This folder and the files in it are hidden by default because they are not normally needed for everyday tasks. Their purpose is to ensure that the operating system runs smoothly in the background.
How do you deal with hidden files and folders?
There’s usually no reason to edit or change these hidden files, nor is it advisable. If you move, rename or accidentally delete these items, certain applications may stop working or the Windows installation may be damaged. In the worst-case scenario, changing these files can cause a total system failure.
Therefore, never make any changes to hidden system files unless you know exactly what you’re doing. When in doubt, you should consult with your system administrator. It’s also advisable to create a system backup beforehand so you can restore your system in the event of an emergency.
Sometimes you still might need to access these hidden files, for example if you want to clean up the Windows.old folder, which contains a backup of the system files of your previous Windows installation. In this case, you have the option of viewing the hidden files. The procedure differs slightly depending on the version of the Windows operating system you’re using.
Showing hidden files in Windows 10 and 8
To show hidden folders and files in Windows 8 and Windows 10, proceed as follows:
- Open the File Explorer using the Windows shortcutWindows + E.
- Then select the “View” tab in the ribbon at the top and click the “Show/Hide” box.
- Select the “Hidden items” checkbox to show the hidden files.

In the File Explorer, you can easily show all hidden files and folders with a click of the mouse.
Once you’ve shown the hidden items, hidden folders in Windows appear slightly transparent.

Once you’ve shown the hidden files, Windows makes them appear slightly transparent.
Alternatively, you can show hidden files via the Folder Options in Windows. To do this, follow these five steps:
- Open the File Explorer as described above.
- Choose View and then the Options box.
- In the Folder Options dialog box, go to View.
- Scroll down in the menu until you reach the Hidden files and folders heading.
- Select the Show hidden files, folders, and drives option and choose OK to confirm.

You can also show hidden files via the Folder Options in Windows 10.
If you need to hide the files again, remove the checkmark in the “Show/hide” menu or change the setting in the Folder Options.
Hidden files in Windows 7
The procedure for showing hidden files and folders is similar in Windows 7. However, there are minor differences in menu navigation. Proceed as follows to show hidden files in Windows 7:
- Open the File Explorer using the keyboard shortcut Windows + E.
- Then click Organize in the toolbar at the top and select Folder and search options from the drop-down menu.
- In the dialog box that appears, select the View tab.
- Scroll down to Hidden files and folders in the menu and select the Show hidden files, folders and drives option.
- Finally, click OK again to confirm and save the setting.

In Windows 7, you can show hidden files and folders via the folder and search options.
Microsoft officially stopped supporting Windows 7 at the beginning of 2020. Security updates are no longer released for the operating system. See our article on end of support for Windows 7 to find out what this means for you and what your current options are.
Showing hidden files using Command Prompt
Another method of showing hidden files in Windows 7 and later versions of Windows is to use Command Prompt. To do this, proceed as follows:
- To open the command line, click Start, type the command cmd in the search box and then open Command Prompt.
- Note the drive where the hidden files are saved, for example the C:\ drive.
- Then enter the following command to display the hidden files (in this case, c stands for the drive C:\): attrib -s -h -r /s /c *.*

You can also use the Windows command line to show hidden files.
How to hide files and folders in Windows yourself
You may also want to hide specific files or entire folders yourself, for example, if you’re using a computer with multiple users. The easiest way to do this is to create a folder, right-click the properties and then select the Hidden option under Attributes. The procedure is the same for individual files, such as Office documents.

You can also hide files yourself by changing the properties of folders and files.
The problem with the above methods for viewing hidden files is that the hidden folders can be easily unhidden by other users. However, you can use a different method to avoid this problem:
- Create a new folder, right-click it and then select the “Properties” option from the menu.
- Click the “Customize” tab and change the folder icon by clicking “Change icon”.
- Select a blank icon from the list displayed (see screenshot below) so that the folder has no icon.
- Then rename the folder by right-clicking it and selecting “Rename”.
- Press the space bar once (or several times). Save the name change by pressing the Enter key.

To make a folder invisible, you can also change the icon and replace it with a blank icon.
This way, you create a folder that has no name and no icon and cannot be made visible by changing the folder options. To open the folder, simply click on its location. Be sure to remember the location because the folder is now invisible.
Are you a Mac user? Follow our step-by-step guide to find out how to show hidden files and folders on a Mac.

Windows blue screen (BSOD): How to cure the error
The infamous blue screen of death usually shows up without any warning. It’s an important indicator of internal problems with hardware, software, or drivers. If Windows can no longer be run as a result of such a problem, then the forced shutdown takes place in the form of a blue screen containing an error message. This may cause unsaved files and documents to be lost. The most important thing with.

How to change startup programs in Windows 10
Like all modern Microsoft operating systems, Windows 10 has a built-in feature that allows you to automatically run system programs, user-defined programs, service applications and processes. In this tutorial, you’ll learn how the startup folder works in Windows 10 and how to add or remove specific applications.

The Windows shortcuts you should know
Windows shortcuts can help you save a lot of time when working on a computer. With a simple hand gesture, you can use shortcuts to perform recurring tasks. In this article, you will find a practical overview of the most important Windows keyboard shortcuts which will make your everyday life easier and working with Windows more convenient.

How to format hard drives on Windows
Formatting a hard drive prepares a disk for use with Windows. It can subsequently be used for file storage or as a backup medium, for example. Formatting is not a major problem with Windows as all the required functions are available as on-board tools. Find out how to format a hard drive and when it is useful to do so.

Windows AppData folder: Show and manage application data
The AppData folder is a hidden system folder on Windows operating systems. If you unhide the AppData folder, you can remove the temporarily stored data inside that is not required to maintain the Windows system. This short guide shows you how to find and manage the Windows AppData folder.


