- How to hide files and folders on Windows 10
- How to hide files and folders using File Explorer
- How to hide files and folders using Command Prompt
- Making hidden files and folders visible again
- More Windows 10 resources
- The Dell XPS 15 is our choice for best 15-inch laptop
- Halo: MCC’s live service elements make it better, not worse
- Microsoft’s Surface Duo is not ‘failing up’
- These are the best PC sticks when you’re on the move
- How to hide the folder in windows
- 1. Using Command Prompt Method
- 2. Using Windows GUI Method
- How to Hide Files and Folders in Windows 10
- Hide Files and Folders in Windows 10
- Hide Single File or Folder in Windows 10
- Hide Multiple Files and Folders in Windows 10
- Unhide Files and Folders in Windows 10
- Truly Hide Files and Folders in Windows 10 Using Command Prompt
- Unhide Files and Folders in Windows 10 Using Command Prompt
How to hide files and folders on Windows 10

No matter what kind of content you keep on your computer, you’ll always find reasons to hide certain files and folders. Perhaps you have important documents and videos that you want to keep under wraps, or you simply want to prevent users from accidentally deleting certain files if you’re sharing your PC with other people.
For whatever the reason it might be, on Windows 10, you can quickly hide a file or folder in two different ways, including using File Explorer or using the attrib command using Command Prompt.
In this Windows 10 guide, we’ll walk you through the easy steps to hide a file and folder on your computer. In addition, you’ll learn the steps to access those hidden items as needed.
How to hide files and folders using File Explorer
The easiest way to keep content hidden is using File Explorer.
- Open File Explorer.
- Navigate to the file or folder you want to hide.
Right-click the item and click on Properties.

Click Apply.

Click OK.

Once you’ve completed the steps, the hidden items will not be visible anymore, because by default Windows 10 doesn’t show hidden files.
If you want to access your hidden items you’ll have to type the complete path to the hidden folder or file you want to open and press Enter. For example: C:\Users\admin\Desktop\Files\Secret Files\Great Secret.txt.
Or you can open File Explorer, click on the View tab and make sure to check the Hidden items option. Then you can browse your hidden items as you would normally do with other content.

At any time, you can make the files and folders visible again by using the same steps mentioned above, but this time on step 4 make sure to clear the Hidden option.
How to hide files and folders using Command Prompt
Alternatively, you can also use Command Prompt to hide files and folders on your computer.
- Open Start.
- Do a search for Command Prompt and click the result.
Type the following command to navigate to the items you want to hide and press Enter:
In the command replace the path after cd with the path to your file or folder.
Type the following command to hide a folder or file and press Enter:
attrib +h «Secret Files»
In the command replace «Secret Files» with the name of your folder or file. Quotation marks are only necessary when there are spaces in the name.
If you’re trying to hide a folder with files and subfolders, which you also want to keep hidden, then you’ll need to use these steps as well.
While in Command Prompt type the following command to navigate inside the hidden folder and press Enter:
cd «Secret Files»
In the command replace «Secret Files» with the name of your hidden folder.
Type the following command to hide all files and folders inside the hidden folder and press Enter:
After completing the steps, the items with the hidden attribute will no longer be visible.
Making hidden files and folders visible again
If you change your mind, you can use the following steps to remove the hidden attribute for files and folders.
- Open Start.
- Do a search for Command Prompt and click the result.
Type the following command to navigate to the hidden items location and press Enter:
In the command replace the path after cd with the path to your file or folder.
Type the following command to make the items visible again and press Enter:
attrib -h «Secret Files»
In the command replace «Secret Files» with the name of your folder or file. Quotation marks are only necessary when there are spaces in the name.
In the case you also set the hidden attribute for files and subfolders inside of a folder, then do the following to remove the attribute.
While in Command Prompt type the following command to navigate inside the hidden folder and press Enter:
cd «Secret Files»
In the command replace «Secret Files» with the name of your hidden folder.
Type the following command to remove the hidden attribute from all files and folders inside the folder and press Enter:
Which method do you prefer to hide files and folders on Windows 10? Tell us in the comments below.
More Windows 10 resources
For more help articles, coverage, and answers on Windows 10, you can visit the following resources:
![]()
The Dell XPS 15 is our choice for best 15-inch laptop
For a lot of people, a 15-inch laptop is a perfect size that offers enough screen for multitasking, and in a lot of cases, some extra performance from powerful hardware. We’ve rounded up the best of the best at this size.
![]()
Halo: MCC’s live service elements make it better, not worse
Halo: The Master Chief Collection is more popular than ever, but some fans don’t agree with the live service approach 343 Industries has taken with it. Here’s why those elements are, at the end of the day, great for the game and for Halo overall.
![]()
Microsoft’s Surface Duo is not ‘failing up’
Microsoft announced this week that it was expanding Surface Duo availability to nine new commercial markets. While Surface Duo is undoubtedly a work in progress, this is not a sign of a disaster. It’s also doesn’t mean that Surface Duo is selling a ton either. Instead, the reason for the expansion is a lot more straightforward.
![]()
These are the best PC sticks when you’re on the move
Instant computer — just add a screen. That’s the general idea behind the ultra-portable PC, but it can be hard to know which one you want. Relax, we have you covered!
How to hide the folder in windows
If there is one thing that Windows is known for, then it is the customization ability that it brings to its users. This ability also extends to the folders one uses in Windows – primarily, the ability to hide them from peering eyes. In this article, we will be going through 2 methods to achieve Hiding and Viewing a Folder in Windows. One of the methods is executing commands in Command Prompt and the other one is using Windows GUI.
1. Using Command Prompt Method
Step 1: Select the folder that you want to hide. (For the purpose of the tutorial, we have created a new folder by right-clicking on the desktop and selecting “Sample Folder”)

Step 2: Copy the file directory of the folder by double-clicking on the same.

Step 3: Now press the windows key plus r and type “cmd” in the Run Box.

Step 4: Once Command Prompt opens, type in the following code.

Step 5: As soon as you press enter, the folder will be hidden.

To view the hidden folders, you can use the following:
- Press the Windows key + R and type “cmd” in the Run Box
Now type the following on the cmd

2. Using Windows GUI Method
Step 1: Select the folder that you want to hide. (For the purposes of this tutorial, we have created a new folder by right-clicking on the desktop and selecting “New Folder”)


Step 2: Right click on the folder you want to hide and then click on “Properties”

Step 3: Once the Properties window opens, select the box that says “Hidden”

Step 4: Then click on “Apply”

Once you click “Apply”, you can clearly see that the folder is Hidden.
To view the hidden folders, you can use the following:
- If you want to bring the folder back, then right-click on the Hidden folder again and go to “Properties”

Deselect the box that says “Hidden”

Once you have clicked “Apply”, the folder reverts back again.
How to Hide Files and Folders in Windows 10
By: Waseem Patwegar
In case of a common home computer, there is always the possibility of important Files or Folders being accidentally modified or deleted by kids or someone else in the family. An easy way to prevent this from happening is to Hide Files and Folders in Windows 10 using methods as listed below.
Hide Files and Folders in Windows 10
The simplest way to Hide Files and Folders in Windows 10 is to access File Properties and designate the selected File as being “Hidden” in the Attributes section of the File Properties.
This easy method of Hiding Files and Folders in Windows 10 should be good enough for Family Computers where the intention is to prevent kids or anyone else in the family from accidentally deleting or modifying important files and folders.
Another method of Hiding Files and Folders in Windows 10 is to make your computer treat your important Files/Folders as System Files, which it automatically hides.
The second method requires the use of command prompt to hide/unhide files, which makes it difficult for anyone with average computer skills to snoop on your files.
Hide Single File or Folder in Windows 10
Follow the steps below to hide individual Files and Folders in Windows 10
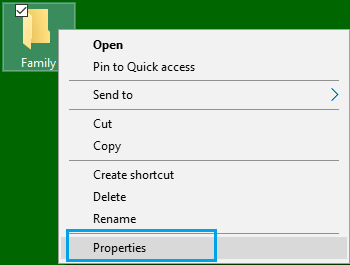
1. Right-click on the File/Folder that you want to hide and then click on Properties option in the menu that appears.
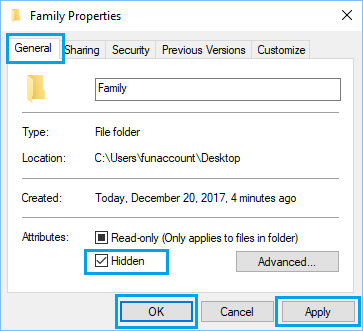
2. In the File Properties window, scroll down to the “Attributes” section and then check the little box next to Hidden and click on Apply (See image below).
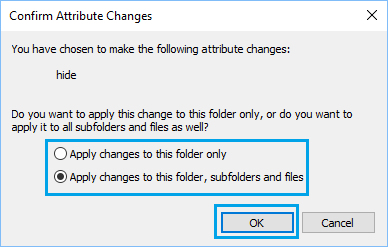
3. On the “Confirm Attribute Changes” pop-up, choose whether you want to “Apply Changes to this Folder only” or “Apply Changes to this Folder, Subfolders and Files” and click on OK (See image below).
Depending on your selection, the selected Folder or the Folder along with all its Subfolders and Files will become hidden, once you click on OK.
Hide Multiple Files and Folders in Windows 10
Follow the steps below to Hide Multiple Files and Folders in Windows 10.
1. Right-click on the Windows Start button and then click on File Explorer option in the menu that appears.

2. In the File Explorer Window, select the Files/Folders that you want to hide, click on the View Tab in the File Explorer top menu bar and then click on Hide selected items option (see image below)
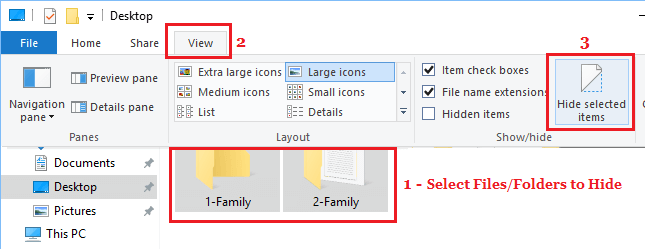
3. On the “Confirm Attribute Changes” pop-up that appears, choose whether you want to “Apply Changes to the selected Folder only” or “Apply Changes to selected Folder, Subfolders and Files” and then click on OK (See image below).
Unhide Files and Folders in Windows 10
When Files and Folders are hidden, they no longer appear in File Explorer. However, you can easily Unhide Files and Folders that you had previously hidden on your computer by following the steps below.
1. Click on the Windows Start button and then click on File Explorer option in the menu that appears.
2. In the File Explorer Window, click on the View tab and then check the ‘ Hidden items ’ option in Show/hide toolbox (See image below).
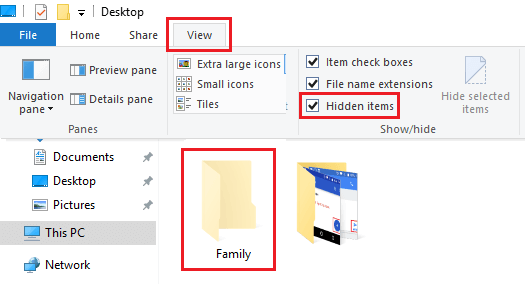
Checking the Hidden Items option will reveal the Hidden Files/Folders in that location. The hidden Files/Folders will appear with partially transparent icons, so that you can clearly distinguish Hidden Files from regular ones (See above image).
Truly Hide Files and Folders in Windows 10 Using Command Prompt
The methods to Hide Files and Folders in Windows 10 as described above are only good for Home or Family Computers, where no one is really trying to snoop on your files.
In order to truly Hide Files and Folders in Windows 10, you can either make use of various Third Party Tools as available in the market or make use of a workaround in Windows 10.
The workaround involves making Windows 10 computer to treat the Files/Folders that you want to Hide as System Files. Once this is done, Windows Operating System will Automatically hide these files, just as it hides other System Files.
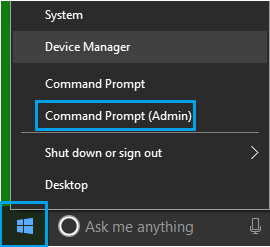
1. Right-click on Windows Start button and then click on Command Prompt Admin option in the menu that appears.
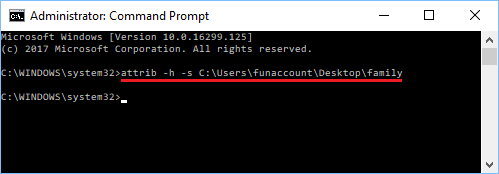
2. In the command prompt window, type attrib +h +s followed by The File Path and hit the enter key on the keyboard of your computer.
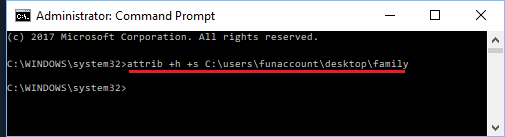
In the above image, a File named as “Family” is located on the desktop and its File Path can be written as C:\users\funaccount\desktop\family.
Hence, in the command prompt window, we are typing the attribute command as attrib +h +s c:\users\funaccount\desktop\family . The letters “h” and “s” in the attribute command instruct your computer to treat the selected File/Folder as Hidden and as a System File.
3. Type the Attribute command as required in your case (depending on the location of your File) and hit the Enter Key on the keyboard of your computer
Once the command is executed, the File/Folder named in the “Attrib” Command will be treated as a System File by your computer and it will become hidden.
Important: Make sure that you note down the file path for the hidden files, you will need this to unhide the file.
Unhide Files and Folders in Windows 10 Using Command Prompt
You can make the Hidden Files visible again by replacing “+” sign with “-” in the “attrib” command and running it again on your computer.
1. Right-click on Windows Start button and then click on Command Prompt Admin option in the menu that appears.
2. In the command prompt window, type attrib -s -h C:\Users\funaccount\Desktop\Family and hit the Enter Key on the keyboard of your computer.
Once the command is executed, you will see the hidden Files/Folders appearing back on your computer.


