- How to Increase Virtual Memory in Windows 10: A Quick Guide
- How to increase Page File size or Virtual Memory in Windows 10
- Increase Page File size on Windows 10
- Page File location
- How to Increase Virtual Memory in Windows 10
- Yes, you can manually adjust your page file
- What Is Virtual Memory in Windows 10?
- Adjusting the Page File in Windows 10
- Should You Change Virtual Memory in Windows 10?
- How to change virtual memory size on Windows 10
- How to increase virtual memory using Settings
- How to increase virtual memory using Command Prompt
- More Windows 10 resources
- Halo: MCC’s live service elements make it better, not worse
- Microsoft’s Surface Duo is not ‘failing up’
- Here’s what you can do if Windows 10 update KB5001330 is causing issues
- These are the best PC sticks when you’re on the move
How to Increase Virtual Memory in Windows 10: A Quick Guide
What is Virtual Memory?
In computing, virtual memory is a memory management technique that provides an «idealized abstraction of the storage resources that are actually available on a given machine» which «creates the illusion to users of a very large memory.» The computer’s operating system, using a combination of hardware and software, maps memory addresses used by a program, called virtual addresses, into physical addresses in computer memory.
Step 1: Go to Start Menu and click on Settings.
Step 2: Now type performance on search bar and select Adjust the appearance and performance of Windows.
Step 3: A new Window will open before you. Go to Advanced tab in it.
Step 4: You’ll see a Virtual memory section in it. Click on Change

Step 5: If the current setting is considerably less than the recommended, unselect the Automatically manage paging file size for all drives box on this window and click on Custom size.
Step 6: Now enter the recommended value in the Initial Size box, and a larger figure in the Maximum size
Step 7: Click on OK to save the changes.
How to increase Page File size or Virtual Memory in Windows 10
If you get a message Your system is low on virtual memory; when you try to start any memory-intensive application, like Microsoft Office, Corel, etc., then you may want to consider the option to increase Page File on Windows. The steps are the same for Windows 10, Windows 8.1 as well as Windows 7.
Increase Page File size on Windows 10
In case you get such an error message, you may have to increase the size of your virtual memory or page file or paging file – although for most users, leaving the Page File size at its default value should be good enough.
To increase Page File size via System Properties in Windows 10, follow these steps:
- In the Taskbar Search, type “Advanced System“. You will see View Advanced System Settings. Click on it.
- Or you can navigate to it via Control Panel
- In System Properties, click Advanced tab
- In Performance section click Settings button
- Performance Options will open. Click Advanced tab
- Here, under Virtual memory, select Change
- Uncheck Automatically manage paging file size for all drives
- Highlight your Windows system drive
- Select Custom size
- Change the Initial size value and the Maximum size value to a higher value
- Click Set
- Finally, Click Apply/OK all the way.
Page File location
The page file or swap file is also known as Virtual memory, and is situated on your system drive; e.,g. C:\pagefile.sys. In addition to physical memory or RAM, Windows and its applications use it as and when required.
Date: June 22, 2020 Tags: Memory, Page File
How to Increase Virtual Memory in Windows 10
Yes, you can manually adjust your page file
:max_bytes(150000):strip_icc()/RyanDube-214359-8f50cb3133cd47c7ae1f3d4f09349f4e.JPG)
There are a lot of reasons why your Windows 10 PC might slow down. One of the most common is a combination of two things: not having enough RAM and not having enough virtual memory.
This combination can lead to poor performance and error messages about low virtual memory. The easiest way to fix both of these issues is to increase virtual memory in Windows 10.
What Is Virtual Memory in Windows 10?
Two terms you may hear used interchageably are «virtual memory» and «paging file.»
Both of these refer to a file on your hard drive where Windows temporarily moves information that it would normally store in RAM. Whenever you no longer have enough RAM memory available, Windows uses this paging file instead.
The configured size and capacity of this file is referred to as virtual memory. While it isn’t an actual hardware memory card like RAM, it serves the same purpose.
The biggest difference between RAM and virtual memory is that the paging file used for virtual memory is stored on your hard drive. Reading and writing to the hard drive is much slower than reading and writing to RAM memory cards. So while using virtual memory allows you to do more than you could without it, you’ll still notice a performance slowdown if your computer has to use virtual memory a lot.
Adjusting the Page File in Windows 10
Are you seeing warning messages like, «Your system is low on virtual memory»?
This is because your Windows 10 PC doesn’t have enough RAM and is trying to write to virtual memory, but the page file that serves as virtual memory has a file size limit that’s too low.
If you don’t want to see these error messages, you need to increase virtual memory on Windows 10.
Open the Control Panel and select System.
While you’re in the System window, make a note of the size of your currently available RAM. You will need this later. In the example shown here, there is 8 GB of available RAM.
:max_bytes(150000):strip_icc()/004-test-and-calibrate-your-pc-monitor-2640280-8abbdc393a9445bba3ac2b035025dc69.jpg)
In the System window, select Change Settings.
:max_bytes(150000):strip_icc()/001-increase-virtual-memory-in-windows-10-4777163-ff6c752a42454cc29ae6c47e8ae82cf5.jpg)
In the System Properties window, select the Advanced tab. In the Performance section, select the Settings button to open the Performance Options window.
:max_bytes(150000):strip_icc()/002-increase-virtual-memory-in-windows-10-4777163-4fbc3af862444e85a640cdda018b8131.jpg)
Under Virtual memory, select the Change button to modify the virtual memory settings.
:max_bytes(150000):strip_icc()/003-increase-virtual-memory-in-windows-10-4777163-9ee6293f36ee43a7b7879030f9cff8a9.jpg)
In the Virtual Memory window, deselect Automatically manage paging file size for all drives. Select Custom size. Now you can set the Initial size and the Maximum size for your paging file.
:max_bytes(150000):strip_icc()/004-increase-virtual-memory-in-windows-10-4777163-2ff00f249b574459a868fd10dc9dedb7.jpg)
As a rule of thumb, the paging file should be a minimum of 1.5 times the size of your installed RAM, and a maximum of 3 times your RAM size. For example, if you have 8 GB RAM, your minumum would be 1024 x 8 x 1.5 = 12,288 MB, and your maximum would be 1024 x 8 x 3 = 24,576 MB.
Keep in mind that if you set your paging file size at the upper limit, you could experience significant system slowdown, since data reads and writes to the hard drive where the paging file is stored are much slower than normal RAM. The minimum recommened size is usually enough of an increase to meet your needs. This is often double the amount that the system automatically sets.
Should You Change Virtual Memory in Windows 10?
Increasing the virtual memory in Windows 10 should only be used as a temporary fix to remove the errors. However, since performance when the system uses the paging file is always slower than when it uses RAM, it’s not a good idea to keep your system running under these conditions.
You can use the increased virtual memory solution so that you can continue using your computer until you have time to purchase additional RAM memory cards and upgrade your system. You shouldn’t use this as a permanent solution.
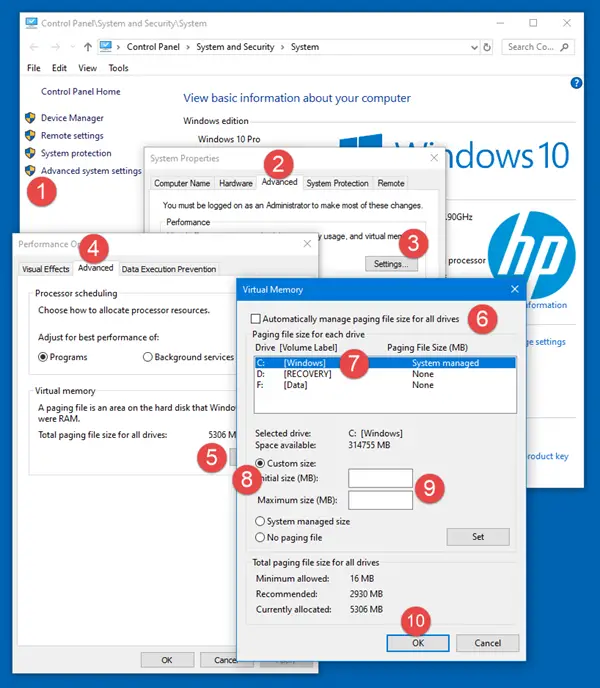
How to change virtual memory size on Windows 10
 Source: Windows Central
On Windows 10, virtual memory (or paging file) is an essential component (hidden file) designed to remove and temporarily store less frequently use modified pages allocated in RAM (random-access memory) to the hard drive. Using this approach allows the system to prioritize faster physical memory for more frequent processes and applications, improving the overall performance and preventing the device from locking up in the event it runs out of system memory.
In addition, the paging file is important to support crash dumps during a system crash (Blue Screen of Death), as without a large enough page file, a dump with all the contents of the system memory won’t be created.
Although the system does a pretty good job managing the paging file size according to various factors automatically, sometimes, you may still need to increase the default virtual memory values manually. For instance, when you see the «Your system is low on virtual memory» message. You’re noticing slow performance over time, or a particular application requires specific parameters to work as intended.
If you’re experiencing issues with virtual memory, the device doesn’t have enough memory, or you’re trying to improve the system performance, Windows 10 allows you to increase the size of the virtual memory in at least two ways using the Settings app and Command Prompt.
In this Windows 10 guide, we’ll walk you through the steps to increase the size of the virtual memory to improve the system responsiveness.
How to increase virtual memory using Settings
To adjust the virtual memory size on Windows 10, use these steps:
Warning: Although anyone can change the paging file size, it’s only recommended to use these instructions if you have a valid reason, and you know what you’re doing.
- Open Settings.
- Click on System.
- Click on About.
Under the «Related settings» section, click the System info option.
 Source: Windows Central
Click the «Advanced system settings» option from the left pane.
Source: Windows Central
Under the «Performance» section, click the Settings button.
![]() Source: Windows Central
Source: Windows Central
Under the «Virtual memory» section, click the Change button.
 Source: Windows Central
Specify the initial and maximum size for the paging file in megabytes.
 Source: Windows Central
Quick tip: The size of the virtual memory is unique to each device, and it can’t be generalized. However, usually, it’s recommended to use a number that’s one and a half times the total available memory for the «Initial size» and three times of available memory for the «Maximum size» when possible.
Once you complete the steps, you should notice an increase in performance when navigating Windows 10 as well as when running multiple apps at the same time.
If you need to revert the changes, you can use the same instructions, but on step No. 10, make sure to check the Automatically manage paging size for all drives option, and restart your device.
How to increase virtual memory using Command Prompt
To modify the paging file size with Command Prompt, use these steps:
- Open Start.
- Search for Command Prompt, right-click the top result, and select the Run as administrator option.
Type the following command to understand the current status of the paging file and press Enter:
wmic pagefile list /format:list
 Source: Windows Central
Type the following command to switch form manage to custom virtual memory and press Enter:
wmic computersystem where name=»%computername%» set AutomaticManagedPagefile=false
 Source: Windows Central
Type the following command to set the initial and maximum size of the virtual memory and press Enter:
wmic pagefileset where name=»C:\\pagefile.sys» set InitialSize=YOUR-INIT-SIZE,MaximumSize=YOUR-MAX-SIZE
This example sets the paging file to «9216» and «12288» megabytes for the initial and maxium size:
wmic pagefileset where name=»C:\\pagefile.sys» set InitialSize=9216,MaximumSize=12288
Source: Windows Central
Type the following command to restart your computer and press Enter:
shutdown -r -t 00
After you complete the steps, the device will start using the new values for virtual memory, which, if done correctly, should help to improve system performance.
If you no longer need to use the custom size for virtual memory, you can always revert the changes and allow Windows 10 to manage this feature using this command: wmic computersystem where name=»%computername%» set AutomaticManagedPagefile=true and restarting your device.
While it’s recommended to use one and a half times the available memory for the initial and three times the memory for the maximum size, make sure to test the changes and adjust the values if you’re experiencing freezes, crashes, and other problems.
Although it’s possible to disable virtual memory on Windows 10, even when you have a large amount of system memory, it’s not recommended to disable this feature. Usually, if you disable paging file, some applications may stop working, some system features may not work efficiently, and you may end up with some weird behaviors.
More Windows 10 resources
For more helpful articles, coverage, and answers to common questions about Windows 10, visit the following resources:
![]()
Halo: MCC’s live service elements make it better, not worse
Halo: The Master Chief Collection is more popular than ever, but some fans don’t agree with the live service approach 343 Industries has taken with it. Here’s why those elements are, at the end of the day, great for the game and for Halo overall.
![]()
Microsoft’s Surface Duo is not ‘failing up’
Microsoft announced this week that it was expanding Surface Duo availability to nine new commercial markets. While Surface Duo is undoubtedly a work in progress, this is not a sign of a disaster. It’s also doesn’t mean that Surface Duo is selling a ton either. Instead, the reason for the expansion is a lot more straightforward.
![]()
Here’s what you can do if Windows 10 update KB5001330 is causing issues
In this guide, we’ll show you the steps to get rid of the update KB5001330 to fix profile, gaming, and BSoD problems with the Windows 10 October 2020 Update and May 2020 Update.
![]()
These are the best PC sticks when you’re on the move
Instant computer — just add a screen. That’s the general idea behind the ultra-portable PC, but it can be hard to know which one you want. Relax, we have you covered!


