- How to install atom on kali linux
- Installing Atom on Mac
- Installing Atom on Windows
- Installing Atom on Linux
- Updating Atom
- Portable Mode
- Building Atom from Source
- Proxy and Firewall Settings
- Установка Atom в Ubuntu
- Установка Atom на Ubuntu
- Установка редактора Atom в Linux
- Установка Atom в Debian/Ubuntu
- Устанавливаем Atom в Fedora
- Установка редактора Atom в Arch/Manjaro
- How to install atom on kali linux
- System Requirements
- Installation Prerequisites
- Preparing for the Installation
- Kali Linux Installation Procedure
- Language
- Network
- User Accounts
- Clock
- Encrypted LVM
- Proxy Information
- Metapackages
- Boot Information
- Reboot
- Post Installation
How to install atom on kali linux
To get started with Atom, we’ll need to get it on your system. This section will go over installing Atom on your system as well as the basics of how to build it from source.
Installing Atom should be fairly simple. Generally, you can go to https://atom.io and you should see a download button as shown here:


The button or buttons should be specific to your platform and the download package should be easily installable. However, let’s go over them here in a bit of detail.
Installing Atom on Mac
Atom follows the standard Mac zip installation process. You can either press the download button from the https://atom.io site or you can go to the Atom releases page to download the atom-mac.zip file explicitly. Once you have that file, you can click on it to extract the application and then drag the new Atom application into your «Applications» folder.
When you first open Atom, it will try to install the atom and apm commands for use in the terminal. In some cases, Atom might not be able to install these commands because it needs an administrator password. To check if Atom was able to install the atom command, for example, open a terminal window and type which atom . If the atom command has been installed, you’ll see something like this:
If the atom command wasn’t installed, the which command won’t return anything:
To install the atom and apm commands, run «Window: Install Shell Commands» from the Command Palette, which will prompt you for an administrator password.
Installing Atom on Windows
Atom is available with Windows installers that can be downloaded from https://atom.io or from the Atom releases page. Use AtomSetup.exe for 32-bit systems and AtomSetup-x64.exe for 64-bit systems. This setup program will install Atom, add the atom and apm commands to your PATH , and create shortcuts on the desktop and in the start menu.

The context menu Open with Atom in File Explorer, and the option to make Atom available for file association using Open with. , is controlled by the System Settings panel as seen above.
With Atom open, click on File > Settings , and then the System tab on the left. Check the boxes next to Show in file context menus , as well as Show in folder context menus . And you’re all set.
Installing Atom on Linux
You can install Atom on Linux using your distribution’s package manager by configuring it to use one of our official package repositories. This will also enable you to update Atom when new releases are published.
Debian and Ubuntu (deb/apt)
To install Atom on Debian, Ubuntu, or related distributions, add our official
package repository to your system by running the following commands:
You can now install Atom using apt-get (or apt on Ubuntu):
Alternatively, you can download the Atom .deb package and install it directly:
Red Hat and CentOS (YUM), or Fedora (DNF)
To install Atom on CentOS, Oracle Linux, Red Hat Enterprise Linux, Scientific Linux, Fedora, or related distributions that use the YUM or DNF package managers, add our official package repository to your system by running the following commands:
You can now install Atom using dnf (or yum depending on your distribution):
Alternatively, you can download the Atom .rpm package and install it directly:
SUSE (zypp)
To install Atom on openSUSE or other distributions that use the Zypp package manager, add our official package repository to your system by running the following commands:
You can now install Atom using zypper :
Alternatively, you can download the Atom .rpm package and install it directly:
Updating Atom
You should consider updating Atom periodically for the latest improvements to the software. Additionally, When Atom receives hotfixes for security vulnerabilities you will want to update your version of Atom as soon as possible.
«Automatically Update» is enabled by default in Core Settings of the Settings View, which will allow Atom to check for updates automatically. If you disable this setting you can update Atom manually.
To perform a manual update:
- Click on the Atom > Check for Update menu item in the menu bar.
- Search for Application: About in the Command Palette and click the Check now button.
Atom will begin to update if an update is available.
«Automatically Update» is enabled by default in Core Settings of the Settings View, which will allow Atom to check for updates automatically. If you disable this setting you can update Atom manually.
To perform a manual update:
- Click on the Help > Check for Update menu item in the menu bar.
- Search for Application: About in the Command Palette and click the Check now button.
Atom will begin to update if an update is available.
If you are using Atom’s official package repositories, use your distribution’s package manager to update Atom. Otherwise, you will need to manually download and install the latest .rpm or .deb package from https://atom.io. For more details, see Installing Atom on Linux.
Portable Mode
Atom stores configuration and state in a .atom directory usually located in your home directory ( %userprofile% on Windows) . You can however run Atom in portable mode where both the app and the configuration are stored together such as on a removable storage device.
To setup Atom in portable mode download the zip/tar.gz package for your system and extract it to your removable storage.
Then create a .atom directory alongside the directory that contains atom.exe, for example:
Then create a .atom directory alongside the Atom.app application, for example:
Then create a .atom directory alongside the directory that contains the Atom binary, for example:
Portable Notes
- The .atom directory must be writeable
- You can move an existing .atom directory to your portable device
- Atom can also store its Electron user data in your .atom directory — just create a subdirectory called electronUserData inside .atom
- Alternatively you can set the ATOM_HOME environment variable to point wherever you want (you can write a .sh or .cmd script to temporarily set it and launch it from that)
- Portable mode installations will not automatically update
Building Atom from Source
The Hacking on Atom Core section of the flight manual covers instructions on how to clone and build the source code if you prefer that option.
Proxy and Firewall Settings
Behind a Firewall?
If you are behind a firewall and seeing SSL errors when installing packages you can disable strict SSL by running:
Using a Proxy?
If you are using a HTTP(S) proxy you can configure apm to use it by running:
You can run apm config get https-proxy to verify it has been set correctly.
Источник
Установка Atom в Ubuntu
Atom — это популярный редактор исходного кода от разработчиков Github доступный для Windows, Linux и MacOS X. Основной особенностью программы можно считать баланс между удобностью и расширяемостью, программа написана с использованием Web технологий на движке Chromium и Node.js с использованием платформы Electron, имеет красивый современный интерфейс и возможность подключения дополнительных модулей.
В этой статье мы рассмотрим как установить Atom Ubuntu. Для установки можно использовать пакет, загруженный из официального сайта проекта или менеджер приложений snap. Но сначала давайте поговорим про основные возможности программы:
- интеграция с chromium;
- подсветка синтаксиса для множества языков программирования;
- автодополнение кода;
- поддержка сниппетов;
- настраиваемость всех особенностей редактора;
- поддержка дополнительных модулей.
Установка Atom на Ubuntu
Для установки Atom в Ubuntu скачайте deb пакет на официальном сайте редактора. Например, для Ubuntu это будет atom-amd64.deb.

Вы можете открыть файл в центре приложений и кликнуть по кнопке Установить:

Или выполните следующие команды в папке с файлом, необходимые зависимости система установит автоматически:
sudo dpkg —install atom-amd64.deb
sudo apt install -f
После завершения установки вы можете запустить программу из главного меню системы:

Для систем на базе Red Hat порядок действий будет примерно аналогичным, только надо загрузить пакет .rpm и открыть его в пакетном менеджере вашей системы.
Кроме того, вы можете установить Atom из центра приложений Ubuntu или с помощью пакетного менеджера snap. Для установки с помощью snap выполните в терминале:
snap install atom

Чтобы удалить atom ubuntu, установленный с помощью snap выполните:
sudo snap remove atom
А для удаления программы полученной из официального сайта используйте:
sudo apt remove atom
Теперь вы знаете как установить Atom Ubuntu. Это довольно мощный редактор, с огромным количеством плагинов. Из него можно сделать полноценную среду разработки для веб-приложений и других проектов. А каким редактором пользуетесь вы? Напишите в комментариях!
Источник
Установка редактора Atom в Linux
Добрый день всем, кто оказался на данном сайте. Я уже писал о текстовых редакторах, например VS Codium или про установку Brackets в Ubuntu. Теперь настала очередь познакомится с редактором под названием Atom. Это бесплатный, с открытым кодом текстовый редактор. Поддерживает плагины написанные на Node.js. Это пожалуй один из самых мощных редакторов для написания или редактирования кода. Полезен так же будет и как обычный текстовый редактор.
Установка Atom в Debian/Ubuntu
И так, установить редактор Atom можно двумя способами, первый способ скачать deb файл, второй способ подключить репозиторий. Давайте сначала разберемся с deb файлом. Что бы скачать deb файл достаточно нажать на данную ссылку . Или перейти на официальный сайт и скачать от туда:
После чего запустить скачанный файл двойным щелчком мыши, если вы будете устанавливать при помощи утилиты gdebi, прочтите статью как ее пропатчить . Теперь давайте подключим репозиторий для Ubuntu. Для этого переходим в терминал и первым делом давайте установим зависимости:
sudo apt install software-properties-common apt-transport-https wget
Далее скачиваем GPG ключ:
wget -q https://packagecloud.io/AtomEditor/atom/gpgkey -O- | sudo apt-key add —
После чего подключаем сам репозиторий:
sudo add-apt-repository «deb [arch=amd64] https://packagecloud.io/AtomEditor/atom/any/ any main»
Теперь обновляем списки пакетов и устанавливаем Atom:
sudo apt update
sudo apt install atom
После успешной установки ищем редактор Atom в установленных приложениях. Запускаем, при необходимости устанавливаем плагины и пользуемся.
Устанавливаем Atom в Fedora
Для того что бы установить редактор Atom в дистрибутиве Fedora, переходим в терминал и сначала скачиваем GPG ключ:
sudo rpm —import https://packagecloud.io/AtomEditor/atom/gpgkey
Затем добавляем репозиторий:
sudo sh -c ‘echo -e «[Atom]\nname=Atom Editor\nbaseurl=https://packagecloud.io/AtomEditor/atom/el/7/\$basearch\nenabled=1\ngpgcheck=0\nrepo_gpgcheck=1\ngpgkey=https://packagecloud.io/AtomEditor/atom/gpgkey» > /etc/yum.repos.d/atom.repo’
После чего следует обновится и можно будет установить редактор Atom:
sudo dnf update
sudo dnf install atom
Так же можно скачать с официального сайта rpm пакет и установить из него. Для того что бы скачать rpm пакет можно щелкнуть по этой ссылке . После чего перейти в папку в которую вы качали данный установочный пакет редактора Atom, и дважды щелкнуть по нему мышкой.
Установка редактора Atom в Arch/Manjaro
Установить Atom в Arch подобных дистрибутивах не составляет труда. В этих дистрибутивах не нужно подключать репозитории, или скачивать установочные пакеты. Все есть в официальных репозиториях, и обычно все программное обеспечение там свежее. Пример установки я буду показывать на дистрибутиве Manjaro. Для установки Atom в Manjaro переходим в терминал и и сначала обновим систему:
sudo pacman -Syyu
Затем вводим команду установки Atom:
sudo pacman -S atom
Далее ищите Atom в установленных приложениях запускаете, при необходимости ставите уже из самого редактора плагины и пользуетесь.
А на этом сегодня все. Надеюсь данная статья будет вам полезна.
С уважением Cyber-X
Источник
How to install atom on kali linux
Installing Kali Linux (single boot) on your computer is an easy process. This guide will cover the basic install (which can be done on bare metal or guest VM), with the option of encrypting the partition. At times, you may have sensitive data you would prefer to encrypt using Full Disk Encryption (FDE). During the setup process you can initiate an LVM encrypted install on either Hard Disk or USB drives.
First, you’ll need compatible computer hardware. Kali Linux is supported on amd64 (x86_64/64-Bit) and i386 (x86/32-Bit) platforms. Where possible, we would recommend using the amd64 images. The hardware requirements are minimal as listed in the section below, although better hardware will naturally provide better performance. You should be able to use Kali Linux on newer hardware with UEFI and older systems with BIOS.
Our i386 images, by default use a PAE kernel, so you can run them on systems with over 4 GB of RAM.
In our example, we will be installing Kali Linux in a fresh guest VM, without any existing operating systems pre-installed. We will explain other possible scenarios throughout the guide.
System Requirements
The installation requirements for Kali Linux will vary depending on what you would like to install and your setup. For system requirements:
- On the low end, you can set up Kali Linux as a basic Secure Shell (SSH) server with no desktop, using as little as 128 MB of RAM (512 MB recommended) and 2 GB of disk space.
- On the higher end, if you opt to install the default Xfce4 desktop and the kali-linux-default metapackage, you should really aim for at least 2 GB of RAM and 20 GB of disk space.
- When using resource-intensive applications, such as Burp Suite, they recommend at least 8 GB of RAM(and even more if it large web application!) or using simultaneous programs at the same time.
Installation Prerequisites
This guide will make also the following assumptions when installing Kali Linux:
- Using the amd64 installer image.
- CD/DVD drive / USB boot support.
- Single disk to install to.
- Connected to a network (with DHCP & DNS enabled) which has outbound Internet access.
We will be wiping any existing data on the hard disk, so please backup any important information on the device to an external media.
Preparing for the Installation
Download Kali Linux (We recommend the image marked Installer).
Burn The Kali Linux ISO to DVD or image Kali Linux Live to USB drive. (If you cannot, check out the Kali Linux Network Install).
Backup any important information on the device to an external media.
Ensure that your computer is set to boot from CD/DVD/USB in your BIOS/UEFI.
Kali Linux Installation Procedure
- To start your installation, boot with your chosen installation medium. You should be greeted with the Kali Linux Boot screen. Choose either Graphical install or Install (Text-Mode). In this example, we chose the Graphical install.
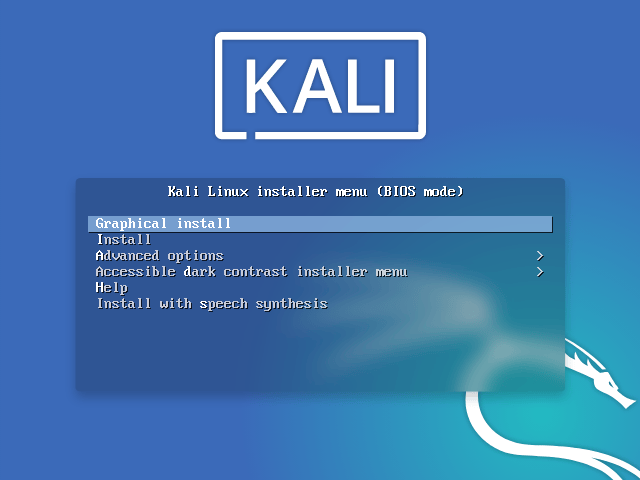
If you’re using the live image instead, you will see another mode, Live, which is also the default boot option. 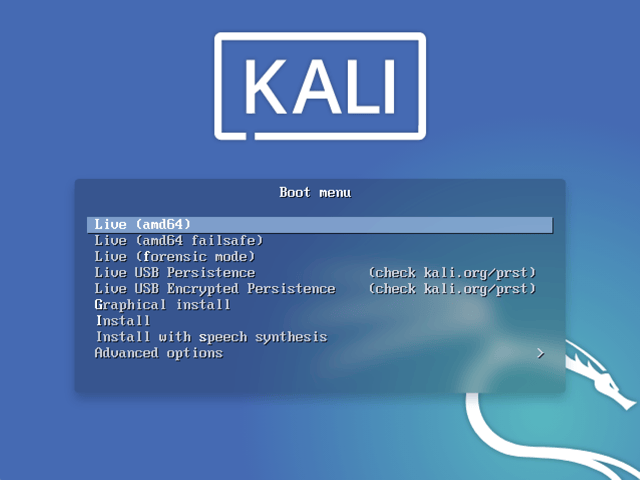
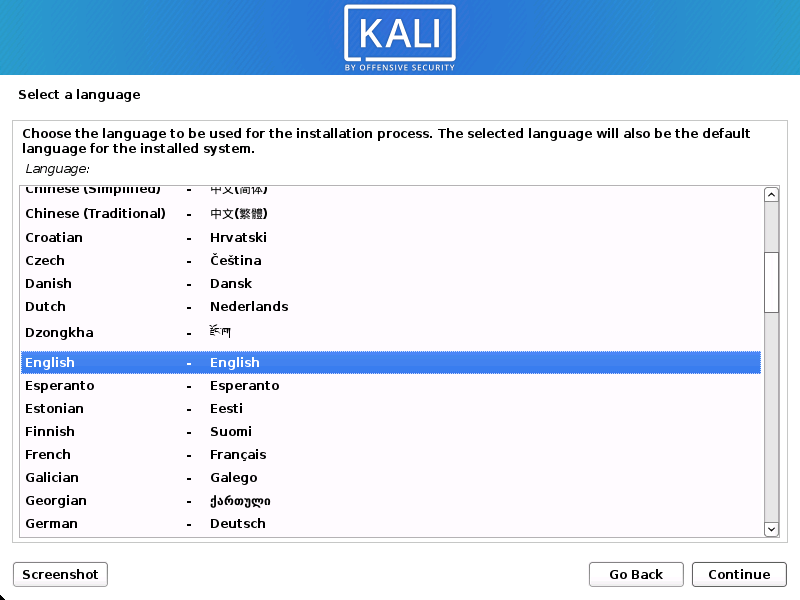
Language
- Select your preferred language. This will be used for both the setup process and once you are using Kali Linux.
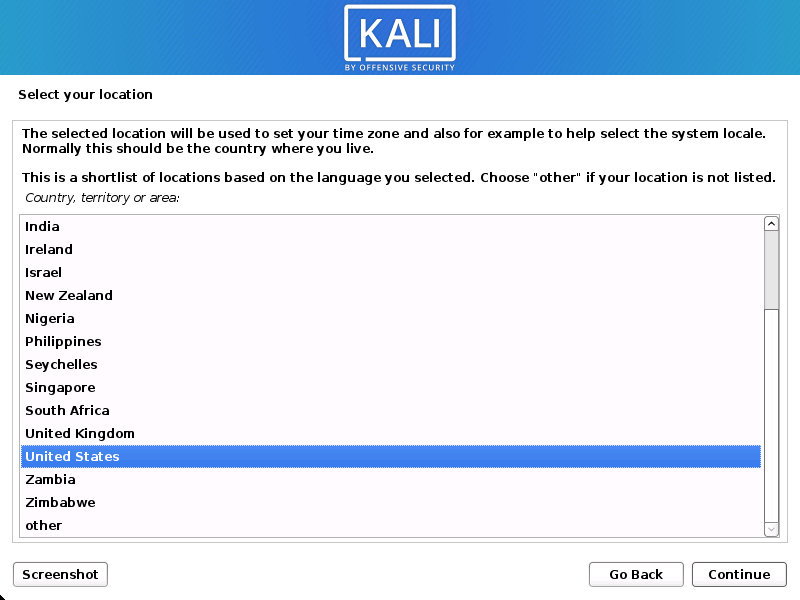
- Specify your geographic location.
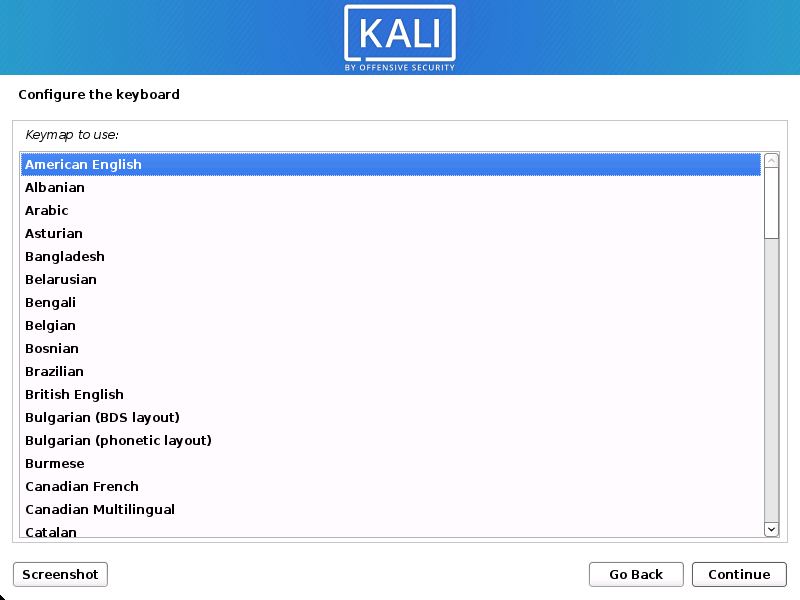
- Select your keyboard layout.
Network
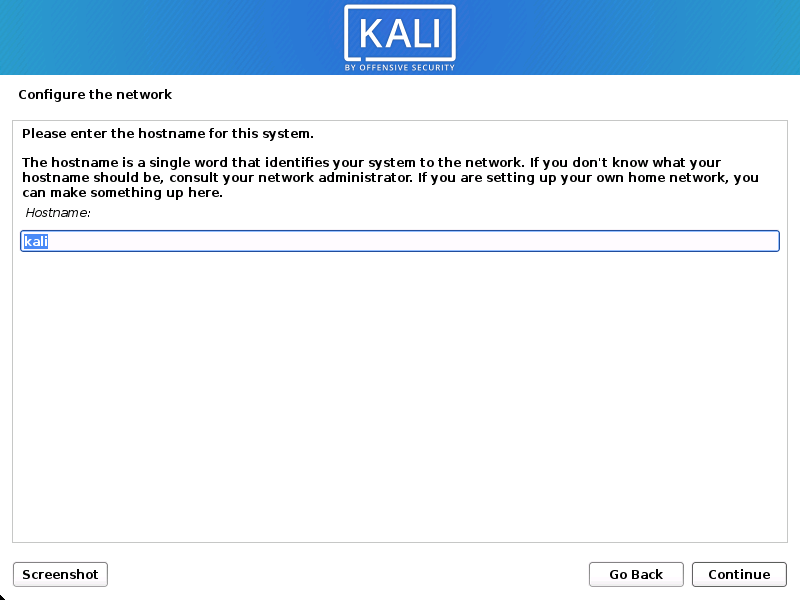
- The setup will now probe your network interfaces, looks for a DHCP service, and then prompt you to enter a hostname for your system. In the example below, we’ve entered kali as our hostname.
If there is no network access with DHCP service detected, you may need to manually configure the network information or do not configure the network at this time.
- If there isn’t a DHCP service running on the network, it will ask you to manually enter the network information after probing for network interfaces, or you can skip.
- If Kali Linux doesn’t detect your NIC, you either need to include the drivers for it when prompted, or generate a custom Kali Linux ISO with them pre-included.
- If the setup detects multiple NICs, it may prompt you which one to use for the install.
- If the chosen NIC is 802.11 based, you will be asked for your wireless network information before being prompted for a hostname.
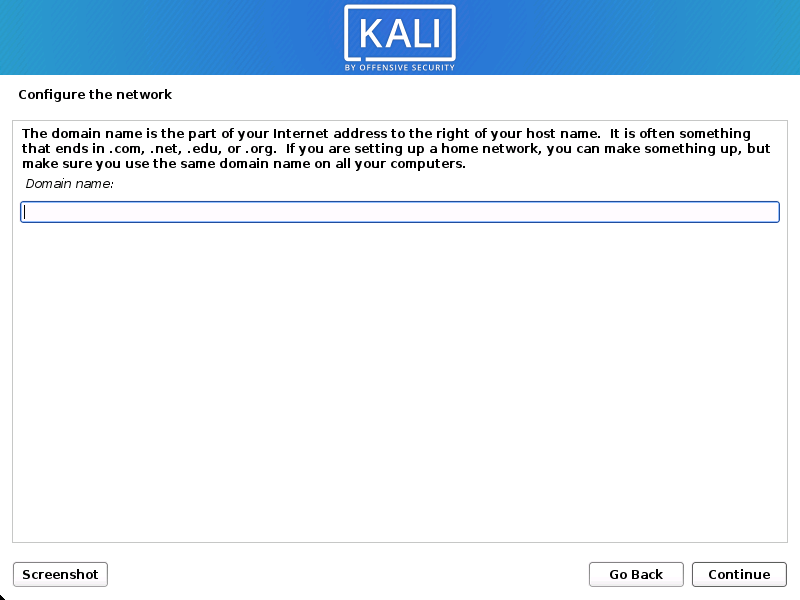
- You may optionally provide a default domain name for this system to use (values may be pulled in from DHCP or if there is an existing operating systems pre-existing).
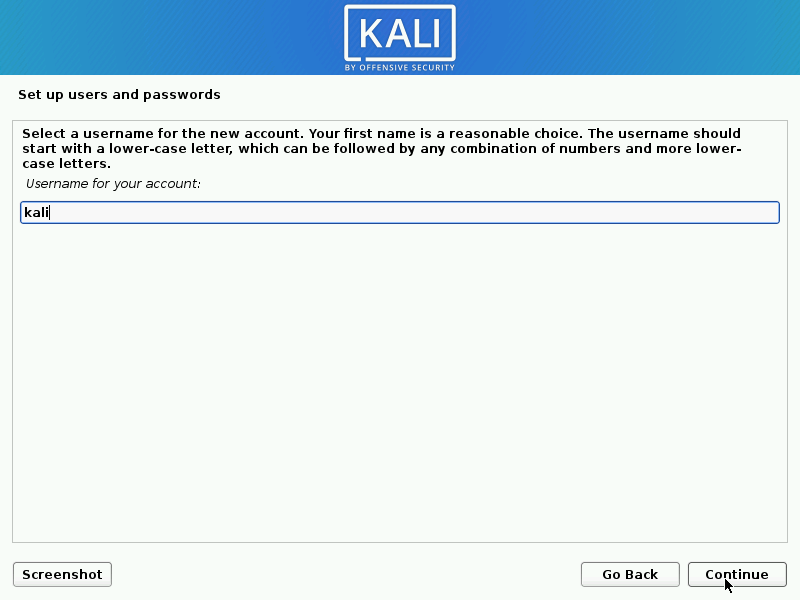
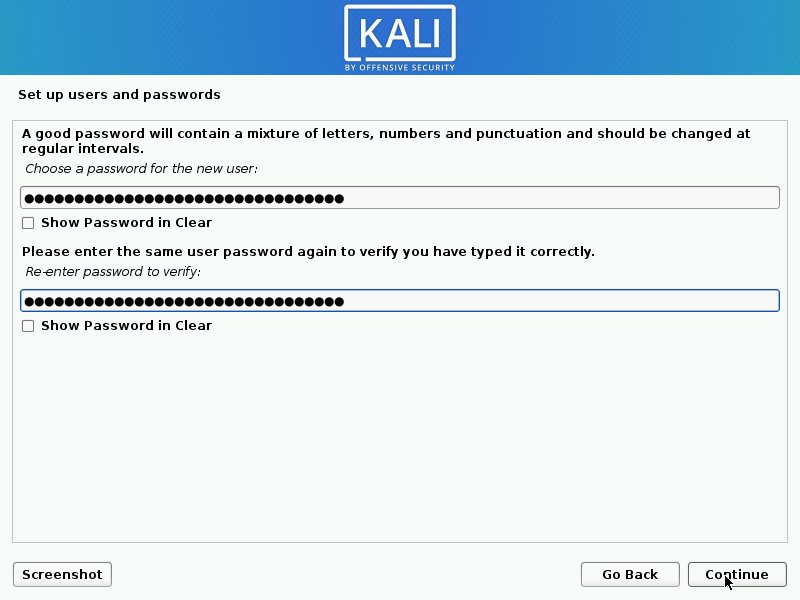
User Accounts
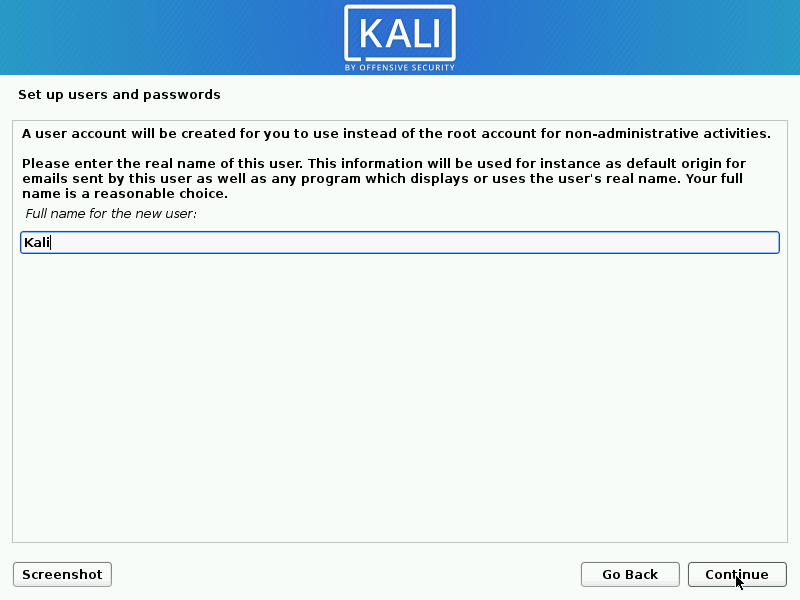
- Next, create the user account for the system (Full name, username and a strong password).
Clock
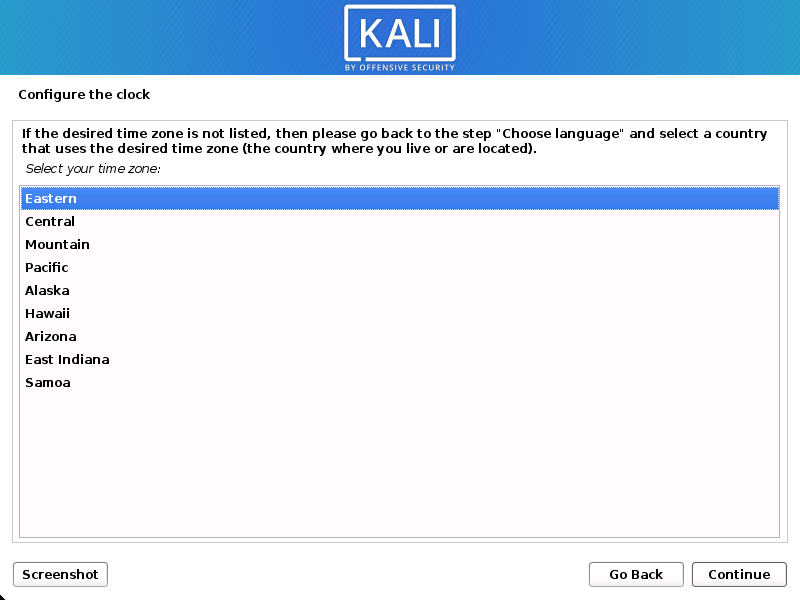
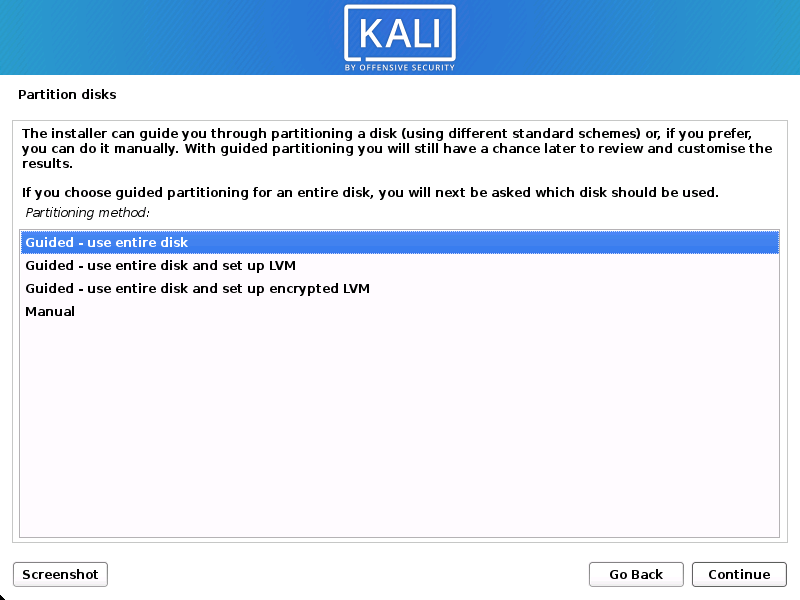
- The installer will now probe your disks and offer you various choices, depending on the setup.
In our guide, we are using a clean disk, so we have four options to pick from. We will select Guided — the entire disk, as this is the single boot installation for Kali Linux, so we do not want any other operating systems installed, so we are happy to wipe the disk.
If there is an pre-existing data on the disk, you will have have an extra option (Guided — use the largest continuous free space) than the example below. This would instruct the setup not to alter any existing data, which is perfect for for dual-booting into another operating system. As this is not the case in this example, it is not visible.
Experienced users can use the “Manual” partitioning method for more granular configuration options, which is covered more in our BTRFS guide.
If you want to encrypt Kali Linux, you can enable Full Disk Encryption (FDE), by selecting Guided — used entire disk and setup encrypted LVM. When selected, later on in the setup (not in this guide) prompt you to enter a password (twice). You will have to enter this password every time you start up Kali Linux.
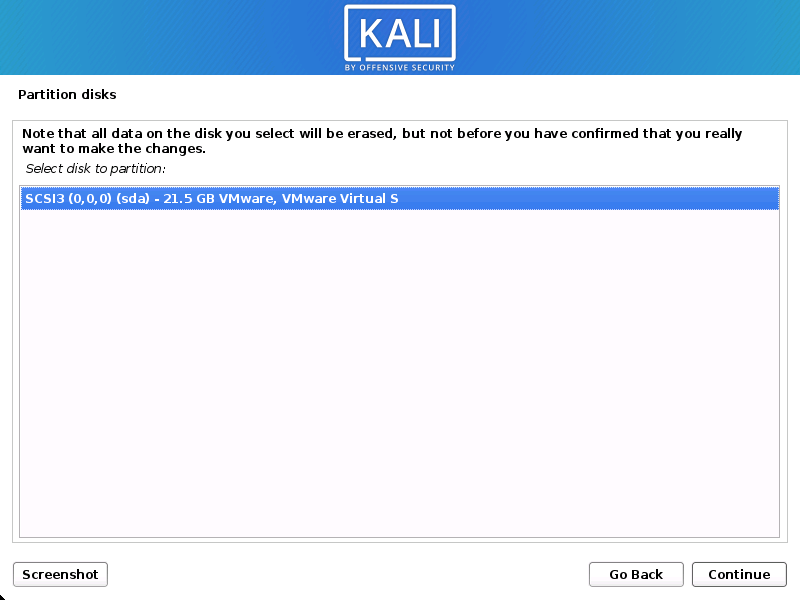
- Select the disk to be partitioned.
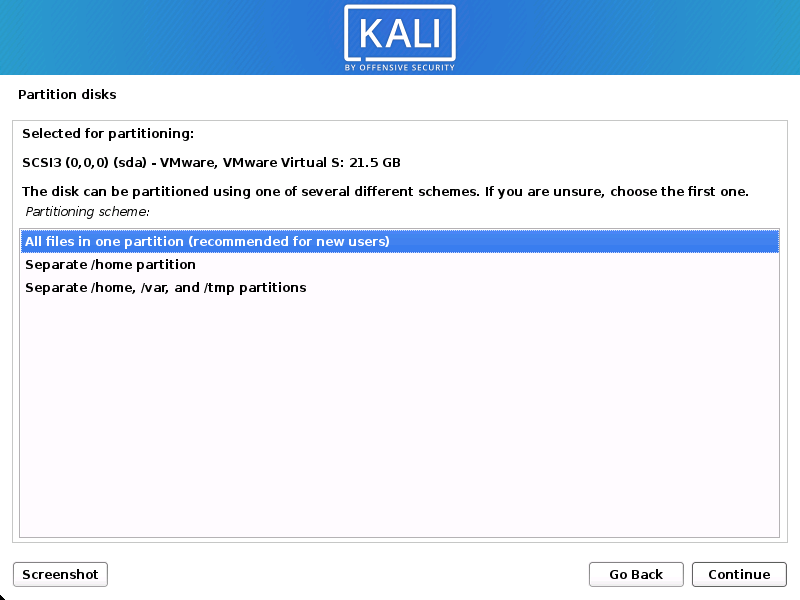
- Depending on your needs, you can choose to keep all your files in a single partition — the default — or to have separate partitions for one or more of the top-level directories.
If you’re not sure which you want, you want “All files in one partition”.
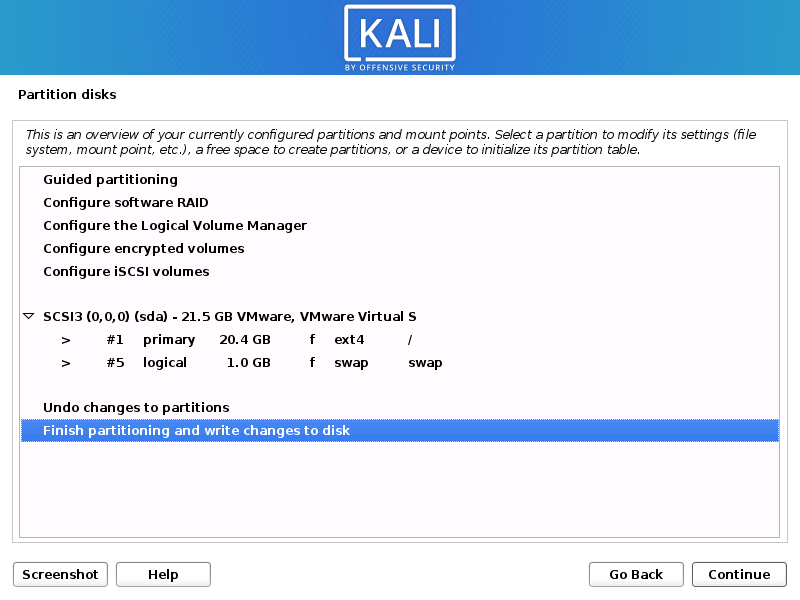
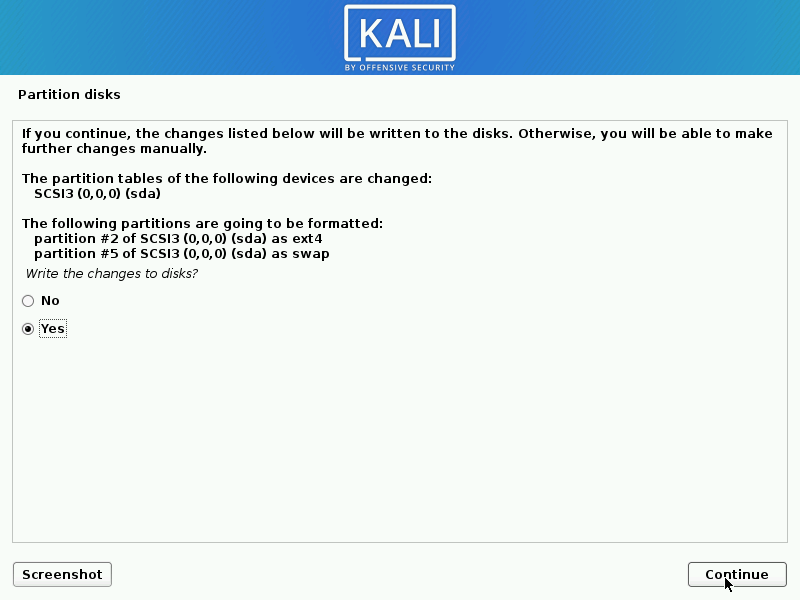
- Next, you’ll have one last chance to review your disk configuration before the installer makes irreversible changes. After you click Continue, the installer will go to work and you’ll have an almost finished installation.
Encrypted LVM
If enabled in the previous step, Kali Linux will now start to perform a secure wipe of the hard disk, before asking you for a LVM password.
Please sure a strong password, else you will have to agree to the warning about a weak passphrase.
This wipe may take “a while” (hours) depending on the size and speed of the drive.
If you wish to risk it, you can skip it.
Proxy Information
- Kali Linux uses a central repository to distribute applications. You’ll need to enter any appropriate proxy information as needed.

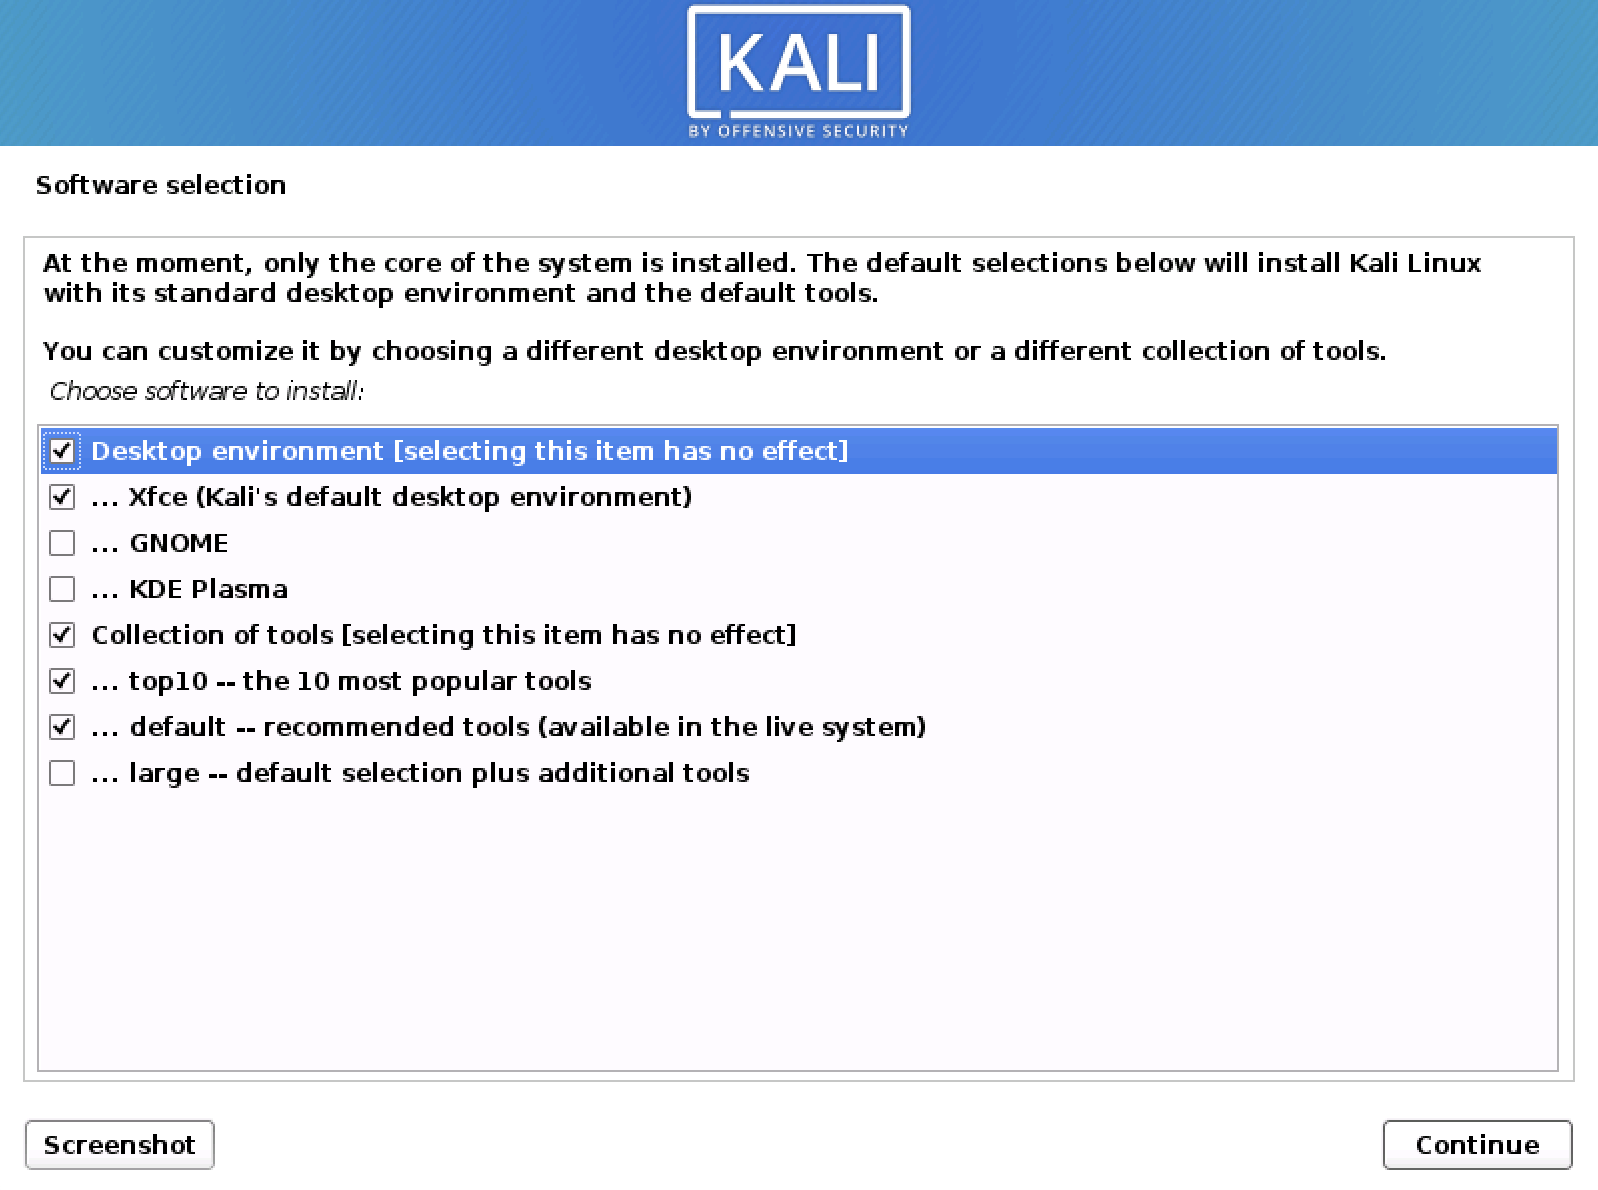
Metapackages
If network access was not setup, you will want to continue with setup when prompt.
If you are using the Live image, you will not have the following stage.
- Next you can select which metapackages you would like to install. The default selections will install a standard Kali Linux system and you don’t really have to change anything here.
Please refer to this guide if you prefer to change the default selections.
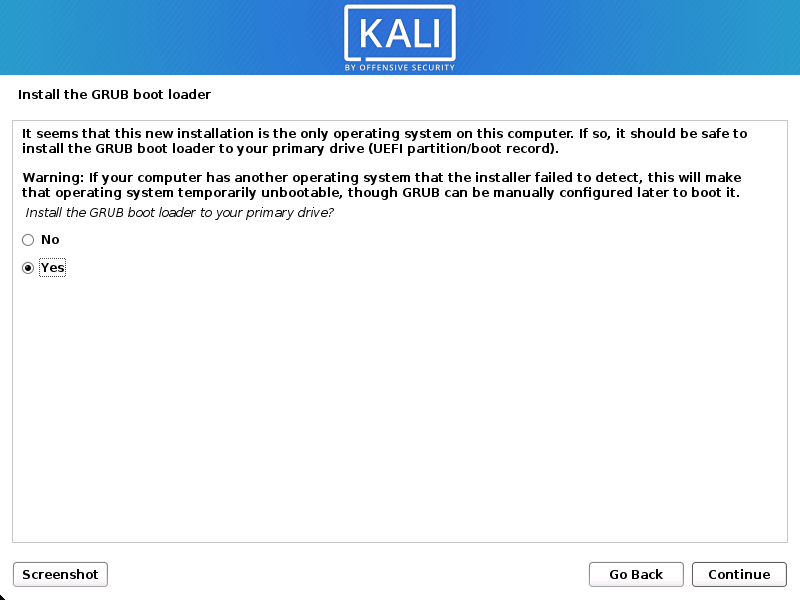
Boot Information
- Next confirm to install the GRUB boot loader.
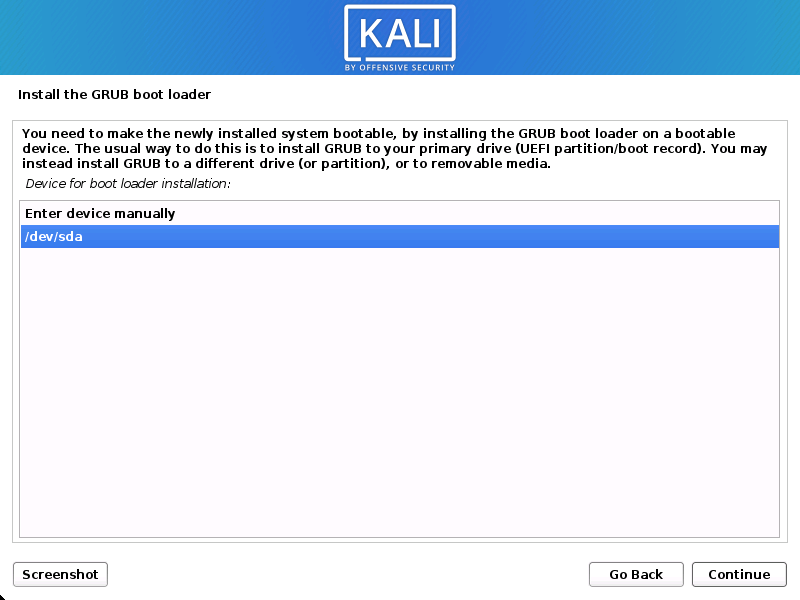
- Select the hard drive to install the GRUB bootloader in (it does not by default select any drive).
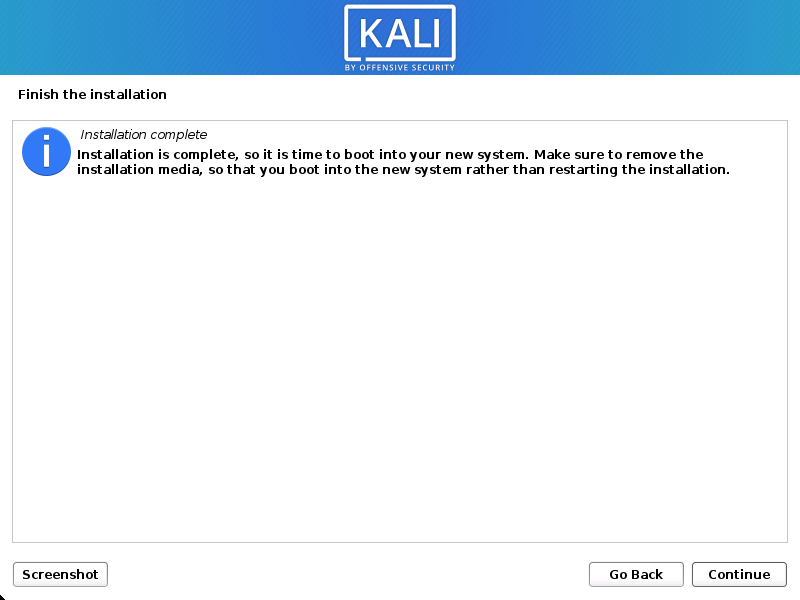
Reboot
- Finally, click Continue to reboot into your new Kali Linux installation.
Post Installation
Now that you’ve completed installing Kali Linux, it’s time to customize your system.
The General Use section has more information and you can also find tips on how to get the most out of Kali Linux in our User Forums.
Updated on: 2021-Sep-27
Author: gamb1t
Источник


