- Documentation – Until April 29, 2021, get PyCharm at 30% off. All money goes to the DSF!
- How to install Django on Windows
- Install Python
- About pip 
- Setting up a virtual environment
- Install Django
- Common pitfalls
- Документация по фреймворку Django
- How to install Django on Windows
- Install Python
- About pip 
- Setting up a virtual environment
- Install Django
- Common pitfalls
- Documentation – Until April 29, 2021, get PyCharm at 30% off. All money goes to the DSF!
- How to install Django
- Install Python
- Install Apache and mod_wsgi 
- Get your database running
- Install the Django code
- Installing an official release with pip 
- Installing a distribution-specific package
- Installing the development version
- Как установить Django на Windows 7
Documentation – Until April 29, 2021, get PyCharm at 30% off. All money goes to the DSF!
How to install Django on Windows
This document will guide you through installing Python 3.8 and Django on Windows. It also provides instructions for setting up a virtual environment, which makes it easier to work on Python projects. This is meant as a beginner’s guide for users working on Django projects and does not reflect how Django should be installed when developing patches for Django itself.
The steps in this guide have been tested with Windows 10. In other versions, the steps would be similar. You will need to be familiar with using the Windows command prompt.
Install Python
Django is a Python web framework, thus requiring Python to be installed on your machine. At the time of writing, Python 3.8 is the latest version.
To install Python on your machine go to https://python.org/downloads/. The website should offer you a download button for the latest Python version. Download the executable installer and run it. Check the boxes next to “Install launcher for all users (recommended)” then click “Install Now”.
After installation, open the command prompt and check that the Python version matches the version you installed by executing:
For more details, see Using Python on Windows documentation.
About pip 
pip is a package manager for Python and is included by default with the Python installer. It helps to install and uninstall Python packages (such as Django!). For the rest of the installation, we’ll use pip to install Python packages from the command line.
Setting up a virtual environment
It is best practice to provide a dedicated environment for each Django project you create. There are many options to manage environments and packages within the Python ecosystem, some of which are recommended in the Python documentation. Python itself comes with venv for managing environments which we will use for this guide.
To create a virtual environment for your project, open a new command prompt, navigate to the folder where you want to create your project and then enter the following:
This will create a folder called ‘project-name’ if it does not already exist and setup the virtual environment. To activate the environment, run:
The virtual environment will be activated and you’ll see “(project-name)” next to the command prompt to designate that. Each time you start a new command prompt, you’ll need to activate the environment again.
Install Django
Django can be installed easily using pip within your virtual environment.
In the command prompt, ensure your virtual environment is active, and execute the following command:
This will download and install the latest Django release.
After the installation has completed, you can verify your Django installation by executing django-admin —version in the command prompt.
See Get your database running for information on database installation with Django.
Common pitfalls
If django-admin only displays the help text no matter what arguments it is given, there is probably a problem with the file association in Windows. Check if there is more than one environment variable set for running Python scripts in PATH . This usually occurs when there is more than one Python version installed.
If you are connecting to the internet behind a proxy, there might be problems in running the command py -m pip install Django . Set the environment variables for proxy configuration in the command prompt as follows:
Документация по фреймворку Django
How to install Django on Windows
This document will guide you through installing Python 3.8 and Django on Windows. It also provides instructions for setting up a virtual environment, which makes it easier to work on Python projects. This is meant as a beginner’s guide for users working on Django projects and does not reflect how Django should be installed when developing patches for Django itself.
The steps in this guide have been tested with Windows 10. In other versions, the steps would be similar. You will need to be familiar with using the Windows command prompt.
Install Python
Django is a Python web framework, thus requiring Python to be installed on your machine. At the time of writing, Python 3.8 is the latest version.
To install Python on your machine go to https://python.org/downloads/. The website should offer you a download button for the latest Python version. Download the executable installer and run it. Check the boxes next to «Install launcher for all users (recommended)» then click «Install Now».
After installation, open the command prompt and check that the Python version matches the version you installed by executing:
For more details, see Using Python on Windows documentation.
About pip 
pip is a package manager for Python and is included by default with the Python installer. It helps to install and uninstall Python packages (such as Django!). For the rest of the installation, we’ll use pip to install Python packages from the command line.
Setting up a virtual environment
It is best practice to provide a dedicated environment for each Django project you create. There are many options to manage environments and packages within the Python ecosystem, some of which are recommended in the Python documentation. Python itself comes with venv for managing environments which we will use for this guide.
To create a virtual environment for your project, open a new command prompt, navigate to the folder where you want to create your project and then enter the following:
This will create a folder called „project-name“ if it does not already exist and setup the virtual environment. To activate the environment, run:
The virtual environment will be activated and you’ll see «(project-name)» next to the command prompt to designate that. Each time you start a new command prompt, you’ll need to activate the environment again.
Install Django
Django can be installed easily using pip within your virtual environment.
In the command prompt, ensure your virtual environment is active, and execute the following command:
This will download and install the latest Django release.
After the installation has completed, you can verify your Django installation by executing django-admin —version in the command prompt.
See Get your database running for information on database installation with Django.
Common pitfalls
If django-admin only displays the help text no matter what arguments it is given, there is probably a problem with the file association in Windows. Check if there is more than one environment variable set for running Python scripts in PATH . This usually occurs when there is more than one Python version installed.
If you are connecting to the internet behind a proxy, there might be problems in running the command py -m pip install Django . Set the environment variables for proxy configuration in the command prompt as follows:
Documentation – Until April 29, 2021, get PyCharm at 30% off. All money goes to the DSF!
How to install Django
This document will get you up and running with Django.
Install Python
Django is a Python Web framework. See What Python version can I use with Django? for details.
Get the latest version of Python at https://www.python.org/downloads/ or with your operating system’s package manager.
Python on Windows
If you are just starting with Django and using Windows, you may find How to install Django on Windows useful.
Install Apache and mod_wsgi 
If you just want to experiment with Django, skip ahead to the next section; Django includes a lightweight web server you can use for testing, so you won’t need to set up Apache until you’re ready to deploy Django in production.
If you want to use Django on a production site, use Apache with mod_wsgi. mod_wsgi operates in one of two modes: embedded mode or daemon mode. In embedded mode, mod_wsgi is similar to mod_perl – it embeds Python within Apache and loads Python code into memory when the server starts. Code stays in memory throughout the life of an Apache process, which leads to significant performance gains over other server arrangements. In daemon mode, mod_wsgi spawns an independent daemon process that handles requests. The daemon process can run as a different user than the Web server, possibly leading to improved security. The daemon process can be restarted without restarting the entire Apache Web server, possibly making refreshing your codebase more seamless. Consult the mod_wsgi documentation to determine which mode is right for your setup. Make sure you have Apache installed with the mod_wsgi module activated. Django will work with any version of Apache that supports mod_wsgi.
See How to use Django with mod_wsgi for information on how to configure mod_wsgi once you have it installed.
If you can’t use mod_wsgi for some reason, fear not: Django supports many other deployment options. One is uWSGI ; it works very well with nginx. Additionally, Django follows the WSGI spec ( PEP 3333), which allows it to run on a variety of server platforms.
Get your database running
If you plan to use Django’s database API functionality, you’ll need to make sure a database server is running. Django supports many different database servers and is officially supported with PostgreSQL, MariaDB, MySQL, Oracle and SQLite.
If you are developing a small project or something you don’t plan to deploy in a production environment, SQLite is generally the best option as it doesn’t require running a separate server. However, SQLite has many differences from other databases, so if you are working on something substantial, it’s recommended to develop with the same database that you plan on using in production.
In addition to the officially supported databases, there are backends provided by 3rd parties that allow you to use other databases with Django.
In addition to a database backend, you’ll need to make sure your Python database bindings are installed.
- If you’re using PostgreSQL, you’ll need the psycopg2 package. Refer to the PostgreSQL notes for further details.
- If you’re using MySQL or MariaDB, you’ll need a DB API driver like mysqlclient . See notes for the MySQL backend for details.
- If you’re using SQLite you might want to read the SQLite backend notes .
- If you’re using Oracle, you’ll need a copy of cx_Oracle, but please read the notes for the Oracle backend for details regarding supported versions of both Oracle and cx_Oracle .
- If you’re using an unofficial 3rd party backend, please consult the documentation provided for any additional requirements.
If you plan to use Django’s manage.py migrate command to automatically create database tables for your models (after first installing Django and creating a project), you’ll need to ensure that Django has permission to create and alter tables in the database you’re using; if you plan to manually create the tables, you can grant Django SELECT , INSERT , UPDATE and DELETE permissions. After creating a database user with these permissions, you’ll specify the details in your project’s settings file, see DATABASES for details.
If you’re using Django’s testing framework to test database queries, Django will need permission to create a test database.
Install the Django code
Installation instructions are slightly different depending on whether you’re installing a distribution-specific package, downloading the latest official release, or fetching the latest development version.
Installing an official release with pip 
This is the recommended way to install Django.
Install pip. The easiest is to use the standalone pip installer. If your distribution already has pip installed, you might need to update it if it’s outdated. If it’s outdated, you’ll know because installation won’t work.
Take a look at venv . This tool provides isolated Python environments, which are more practical than installing packages systemwide. It also allows installing packages without administrator privileges. The contributing tutorial walks through how to create a virtual environment.
After you’ve created and activated a virtual environment, enter the command:
Installing a distribution-specific package
Check the distribution specific notes to see if your platform/distribution provides official Django packages/installers. Distribution-provided packages will typically allow for automatic installation of dependencies and supported upgrade paths; however, these packages will rarely contain the latest release of Django.
Installing the development version
Tracking Django development
If you decide to use the latest development version of Django, you’ll want to pay close attention to the development timeline, and you’ll want to keep an eye on the release notes for the upcoming release . This will help you stay on top of any new features you might want to use, as well as any changes you’ll need to make to your code when updating your copy of Django. (For stable releases, any necessary changes are documented in the release notes.)
If you’d like to be able to update your Django code occasionally with the latest bug fixes and improvements, follow these instructions:
Make sure that you have Git installed and that you can run its commands from a shell. (Enter git help at a shell prompt to test this.)
Check out Django’s main development branch like so:
This will create a directory django in your current directory.
Make sure that the Python interpreter can load Django’s code. The most convenient way to do this is to use a virtual environment and pip. The contributing tutorial walks through how to create a virtual environment.
After setting up and activating the virtual environment, run the following command:
This will make Django’s code importable, and will also make the django-admin utility command available. In other words, you’re all set!
When you want to update your copy of the Django source code, run the command git pull from within the django directory. When you do this, Git will download any changes.
Как установить Django на Windows 7
Решил для себя, что хочу познакомиться с фреймворком именуемым, как Django. Т.к. я все еще изучаю Python, то в паре это будет вдвойне полезно. Да и к тому же у меня есть цель, собрать свой аналог системы MajorDoMo, но использовать python+django, а не php. Главное ведь поставить себе цель и двигаться к ней каждый день понемногу и не бросать. Это не 100% руководство, а лишь часть что я себе сделал пока прочитывал различные заметки и просматривал YouTube. Это шпаргалка для самого себя в первую очередь.
Итак начну пожалуй, задача: как установить Python и Django на Windows 7
Шаг №1: Устанавливаю Python под архитектуру системы, т. е. Под Windows 7 x86_64 в каталог на диске C. Скачивать буду самый последний релиз:
Запускаю: python-3.6.3.exe и следую указаниям мастера установки нажав на Customize installation (расширенная установка). Отмечаю галочкой установку всех компонентов, а именно:
- Documentation
- pip
- tcp/tk and IDLE
- Python test suite
- py launcher
- for all users
и нажимаю кнопку Next, затем расширенные опции установки:
- Associate files with Python (requires the py launcher)
- Create shortcuts for installed applications
- Add Python to environment variables
- Customize install location: C:\Python363
и нажимаю кнопку Install
Шаг №2: Проверяю наличие системный переменных окружения, дабы вызвав консоль командной строки я мог запустить python и менеджер пакетов pip
«Пуск» — «Панель управления» — «Система» — «Дополнительные параметры системы» — вкладка «Дополнительно» — «Переменные среды», но вот строк ответственных за запуск интерпретатора Python ней в системной переменной PATH, а значит добавляю.
- Выделяю переменную PATH
- Нажимаю «Изменить»
- И через символ точка с запятой добавляю пути к уже имеющимся: ;C:\Python363;C:\Python363\scripts
а после нажимаем кнопку OK окна «Переменные среды» и еще раз OK окна «Свойства системы».
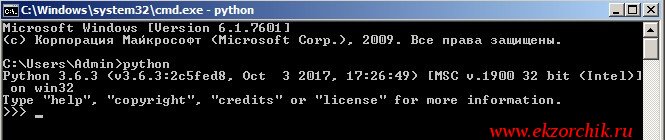
Шаг №3: Проверяю, работает ли запуск python и pip
Win + R → cmd.exe
C:\Users\Admin>python
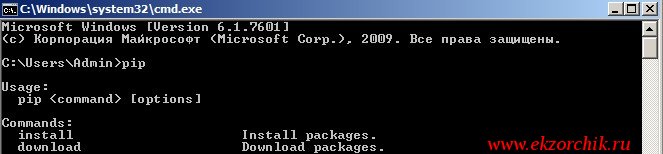
 C:\Users\Admin>pip → это менеджер пакетов под Python
А чтобы обновить версию пакета менеджера pip до самого последнего состояния поможет вот эта команда:
C:\Users\Admin>python -m pip install —upgrade pip
Шаг №4: Устанавливаю самую последнюю версию фреймворка Django:
C:\Users\Admin>pip install django
Downloading Django-1.11.6-py2.py3-none-any.whl (6.9MB)
Collecting pytz (from django)
Downloading pytz-2017.2-py2.py3-none-any.whl (484kB)
Installing collected packages: pytz, django
Successfully installed django-1.11.6 pytz-2017.2
Шаг №5: Воспользуюсь редактором PyCharm (Evaluate for free) для создания тестового проекта: Create New Project
На заметку: Проект нельзя называть, как test

и нажимаю Create после чего запустить редактор где в левой части будет дефолтный шаблон проекта Django, он единый для всех. А уже потом каждый сам расширяет его под свои задачи.
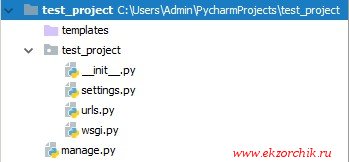
- Templates — пользовательские файлы, к примеру страницы на html
- settings.py — конфигурационный файл с настройками проекта
- urls.py — как обрабатывать если в строке адреса имеется путь обращения, т. е. Если к примеру /admin то содержимое обработки описано в файле urls.py
- wsgi.py — это вроде как Web-интерфейс
- manage.py — для управления проектом.
В файл settings.py нужно внести:
STATIC_ROOT = os.path.join(BASE_DIR, ‘static’)
На заметку: из каталога static обычно подключаю статичные файлы, к примеру каскадные таблицы стилей (css).
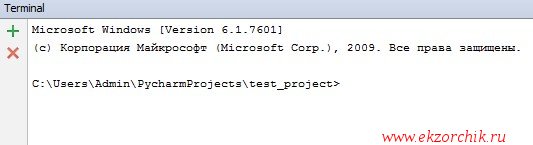
Теперь нужно запустить Терминал (Terminal) чтобы можно было все также находясь в редакторе PyCharm запускать Web-интерфейс отладки Вашего проекта.
View — Tool Windows — Terminal (или сочетание клавиш Alt + F12 )
Чтобы запустить тестовый проект (дефолтный) нужно:
C:\Users\Admin\PycharmProjects\test_project>python manage.py runserver
Django version 1.11.6, using settings ‘test_project.settings’
Starting development server at http://127.0.0.1:8000/
Quit the server with CTRL-BREAK.
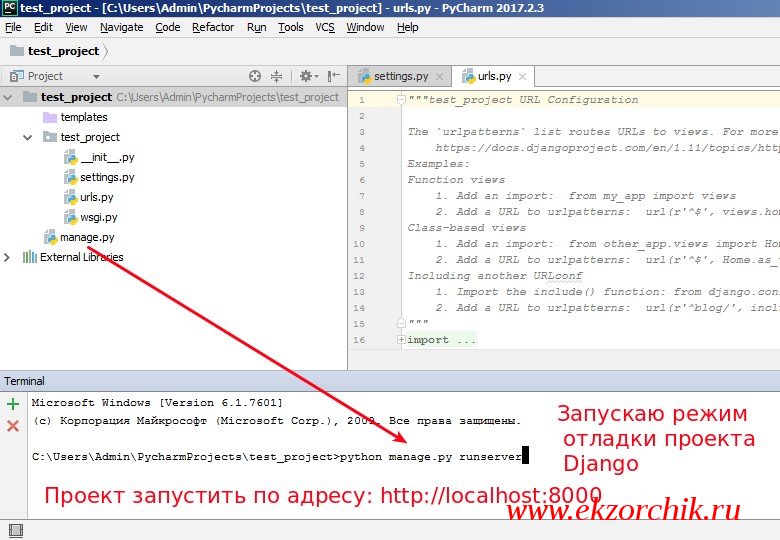 Если открыть браузер (любой на Вашем компьютере) и перейти по ссылке: http://localhost:8000 то вы должны увидеть дефолтное приветствие
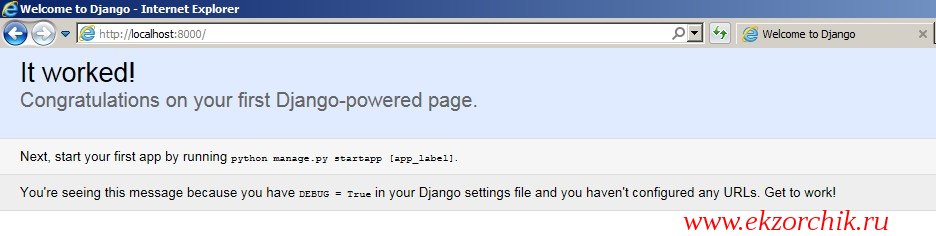
Если обратить внимание на Terminal то можно наблюдать диагностические сообщения, к примеру когда я обратился по адресу http://localhost:8000 то в ответ выдалось успешно сообщение:
[20/Oct/2017 11:55:14] «GET / HTTP/1.1» 200 1716 (код 200 как раз это подтверждает).
Шаг №6: Если вы не хотите использовать данный монстрообразный редактор, то проекты можно вести и через консоль:
C:\Users\Admin>django-admin startproject example
C:\Users\Admin>tree /f example
Серийный номер тома: D45D-6484
Просто помимо где за тебя все делает навороченный редактор нужно еще и самим уметь по старинке через консоль.
Что по итогу, я для себя разобрал как поставить на Windows систему интерпретатор Python и как поставить фреймворк Django, а также как запустить тестовый проект. Для меня важно все делать и разбирать в виде вот таких вот заметок. Просто когда я отложу то или иную заметку, а потом вернусь к этой теме то смогу посредством своего блога быстро вспомнить те или иные нюансы. Пока я прощаюсь, до новых встреч на моем блоге, с уважением автор Олло Александр aka ekzorchik.
Используйте прокси ((заблокировано роскомнадзором, используйте vpn или proxy)) при использовании Telegram клиента:
Поблагодари автора и новые статьи
будут появляться чаще 🙂
Карта МКБ: 4432-7300-2472-8059
Yandex-деньги: 41001520055047
Большое спасибо тем кто благодарит автора за практические заметки небольшими пожертвованиями. С уважением, Олло Александр aka ekzorchik.


