- How to install iso image file in windows
- How do I mount ISO Image File In Windows 7?
- Create an ISO File from a Folder in Windows
- Use AnyBurn To Create ISO From The Folders On Your PC
- Create An ISO In Windows 10 Using WinCDEmu
- Use ImgBurn To Create ISO Files From Folders On Windows
- Use a Portable Tool To Create An ISO From Folders
- Open ISO Files in Windows 10/7/XP with ISO Viewer
- Method 1: How to Quickly Open ISO Image with ISO Editor
- Why Choose UUByte ISO Editor
- Step 1: Get Prepared
- Step 2: Load ISO Image
- Step 3: Open ISO File Directly
- Method 2: Open ISO File with Pismo File Mount Audit Package
- Method 3: How to View ISO Image in Windows via WinRAR
- Method 4: Unzip ISO File on Windows 10/7/XP with 7-Zip
- Bonus: How to Open ISO Files on Mac Computer
- Conclusion:
How to install iso image file in windows

How do I mount ISO Image File In Windows 7?
In Windows 7, to mount an ISO disk image for installing software or recover backup files, you need to install a third-party utility. Now here comes WinISO Standard 6 which will allow these older versions of Windows mount ISO files as virtual CD-ROM/ DVD-ROM drives.
Mount ISO is one of the main features of WinISO. It’s dead simple so that the novice can also handle it with ease.
Here we will show you the way to mount ISO image in Windows 7 step by step.
Step 1: Download and Run WinISO
Free Download WinISO from our official website and install it. It will just take you several seconds.

Step 2: Click «Mount»
Run WinISO, open the ISO file. Click «Mount» on the toolbar, or you can also click «Tools» on the menu, then choose «Mount Image».

Step 3: Click «Open in Explorer»
A few seconds later, you will get a message: Current image has been mounted to Drive H(as an example). Then click «Open in Explorer». The extracted file list will appear in the drive.

Furthermore, you can also stop mounting the image files by pressing «Unmount».
For more guides, please take closer look here:
Create an ISO File from a Folder in Windows
A great tool for distribution or backups
If you don’t already know, an ISO file is a container that can hold a number of files in it. It’s usually used to create backups of your CD and DVD discs. However, you can create an ISO from the folders on your Windows PC as well. There are actually multiple apps that help you do it on your machine.
There are many reasons why you may want to create an ISO on your Windows 10 PC. Maybe you want to keep all of your folders in a single place. Or maybe you want to keep some of your folders handy ready to burn to your discs.
Regardless of the reasoning, it’s pretty easy to create an ISO from folders on a Windows computer. Also, check out the video from our sister site where we walk you through the steps in a short video.
Use AnyBurn To Create ISO From The Folders On Your PC
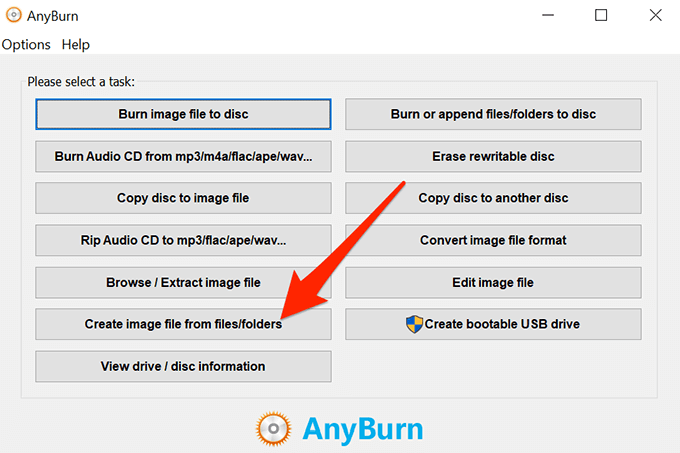
One of the free apps you can use to create an ISO from your folders is AnyBurn. It’s actually an app that helps you burn your data to your discs but you can use it to create ISO files as well. It has an option on the main interface that helps add your chosen folders to an ISO which you can then save anywhere on your computer.
- Download, install, and launch AnyBurn on your computer.
- You’ll find several options regarding creating ISOs on the main interface. Find the one that says Create image file from files/folders and click on it.
- The following screen will let you choose the folders that you want to add to your ISO. Click on the Add button at the top to add your folders.

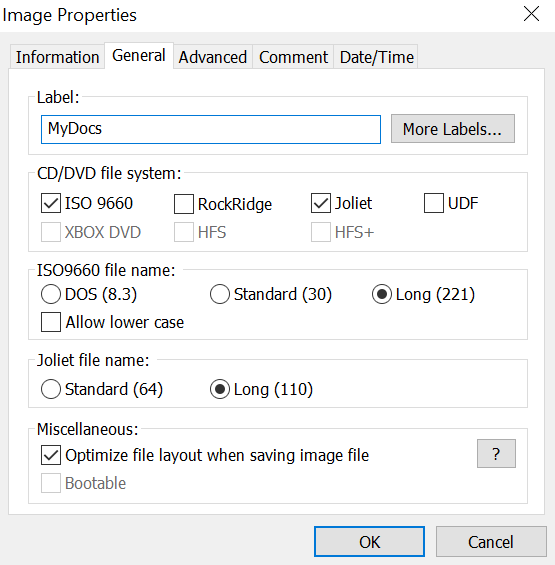
- If you want to specify any custom settings for your file, click on the Properties button at the top. It’ll then let you modify options like the file system for your ISO, file naming standard, compression level, and so on. Click on OK when you’ve configured them.
- Click on the Next button to go to the next screen of the ISO creation process.
- On the following screen, click on the folder icon to choose the folder where you want to save your ISO. You can also enter a name for your file on the same screen.
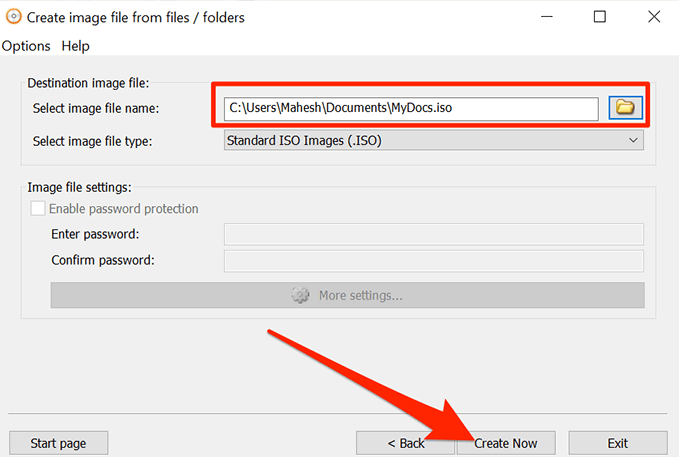
- Finally, click on Create Now to start creating an ISO out of your chosen folders.
Create An ISO In Windows 10 Using WinCDEmu
WinCDEmu is an open-source tool that lets you create virtual drives out of various image file formats on your computer. If you have downloaded an ISO file and you want to view its contents, this app can help you mount that as a drive on your machine.
You can use the app to create ISO files from folders in Windows as well, and it actually provides you with the easiest way to make an ISO from your folders. All you basically need to do is install the app and it’ll add an option to your context menu. You can then use that option to generate an ISO from your folders.
- Download and install the WinCDEmu app on your PC.
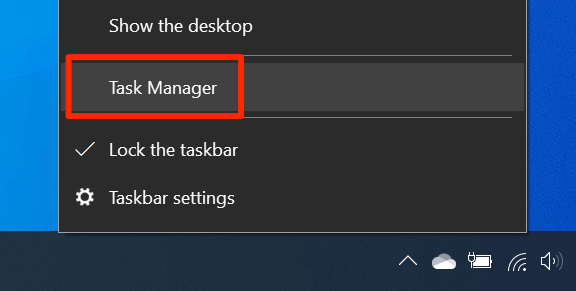
- Right-click on your taskbar and select Task Manager.
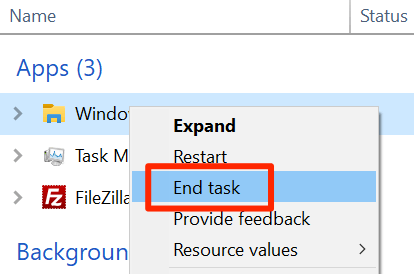
- Right-click on the process that says Windows Explorer and select End task. You need to close the Explorer before you can see the newly added item in the context menu.
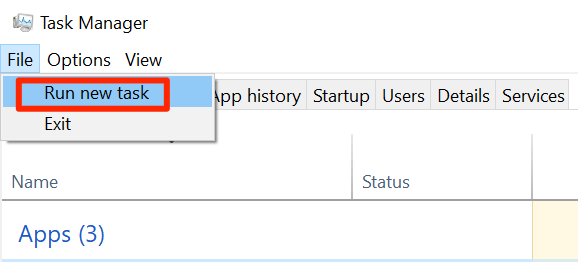
- Click on the File menu in Task Manager and select Run new task.
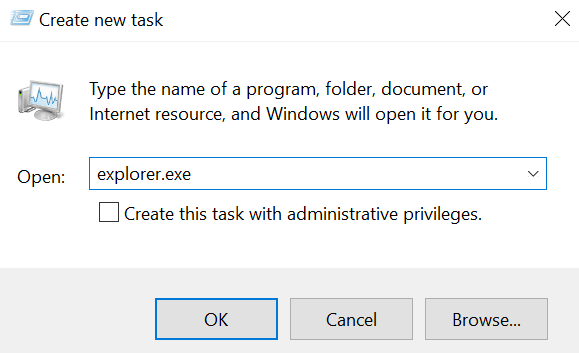
- Type in explorer.exe and hit Enter. It’ll relaunch the Windows File Explorer.
- Find the folder that you want to create an ISO for, right-click on it, and select Build an ISO image.
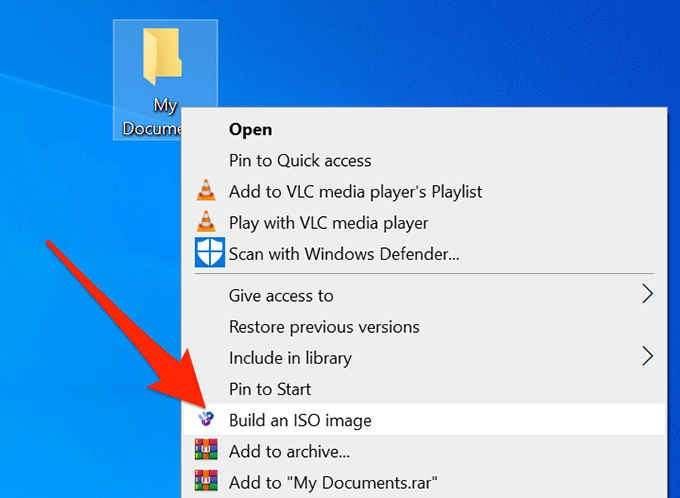
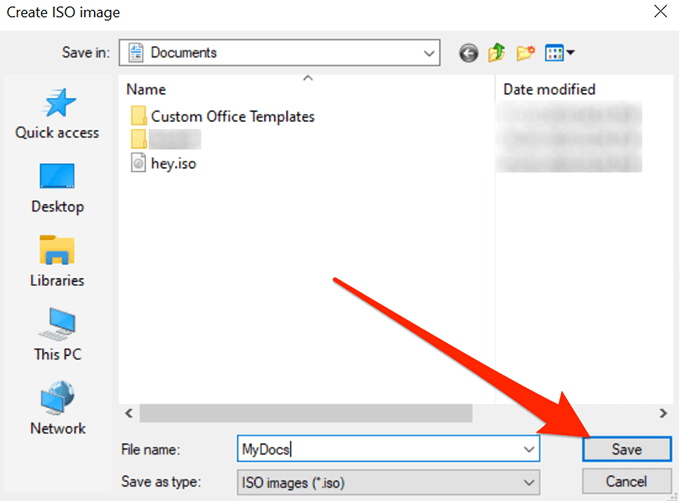
- It’ll ask you to enter a name for your ISO and the location where you want to save it. Enter these details and click on Save.
- It’ll quickly create the ISO for you and let you know when it’s fully built.
Use ImgBurn To Create ISO Files From Folders On Windows
ImgBurn has been a popular app to create and burn image files for a long time. If you’ve ever created a backup of your discs or you’ve burned a disc, you’ll likely recognize the app.
The app can be used to create ISO files from your folders as well.
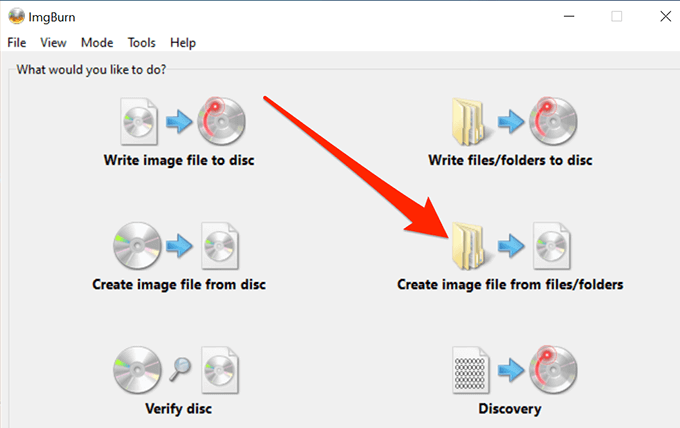
- Download, install, and open the ImgBurn app on your computer.
- On the main interface, find and click on the option that says Create image file from files/folders.
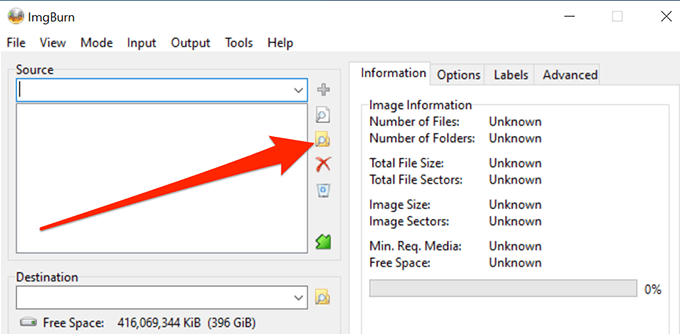
- You’ll see a screen that lets you add the folders you want to include in your ISO. Click on the little folder icon and add the folders for your ISO file.
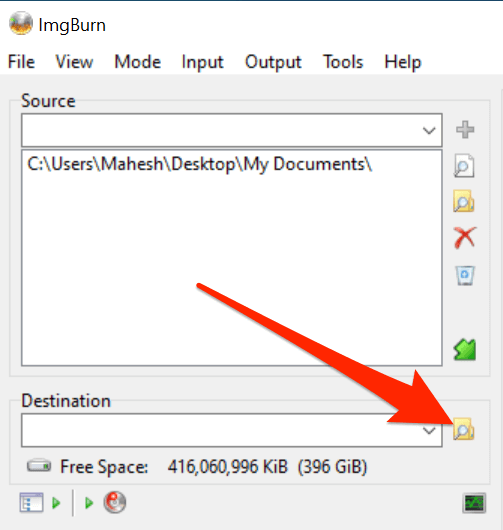
- Click on the tiny folder icon next to where it says Destination and select a name and target folder for your ISO file.
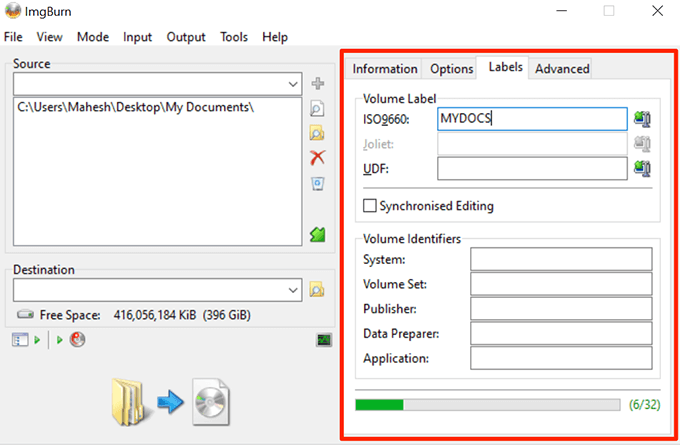
- On the right-hand side pane, you’ll find various options to configure for your ISO. With these options, you can change your image type, enter a label for your image, specify restrictions, and do a few other things.
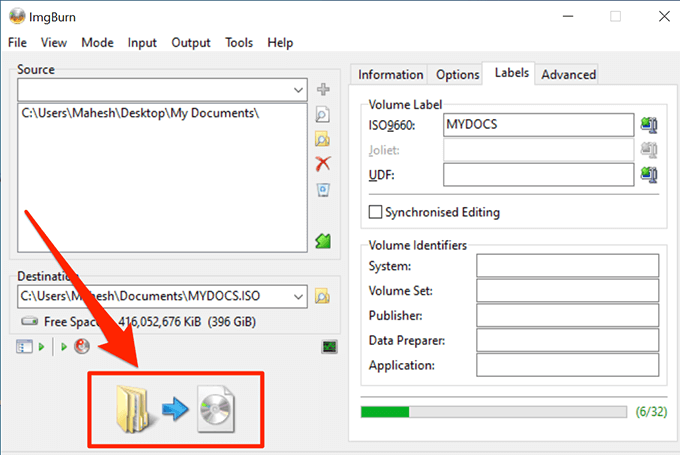
- Finally, click on the large Build button on your screen to start building an ISO file out of your selected folders.
Use a Portable Tool To Create An ISO From Folders
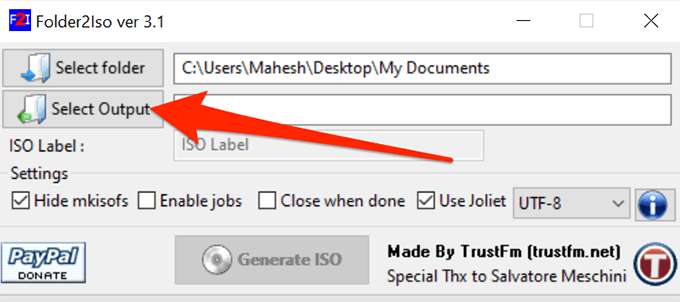
If it’s just a single ISO that you’ll be making and you don’t think you’ll be doing it again anytime soon, you might prefer something that doesn’t require an installation. Folder2Iso can actually help you out as it’s a free and portable tool that helps quickly create ISOs without any hassle.
It works on many versions of Windows including Windows 7, 8, 10, and Linux.
- Download the Folder2Iso app and double-click on it to extract the actual app contents.
- Run the executable file that you extracted from the archive.
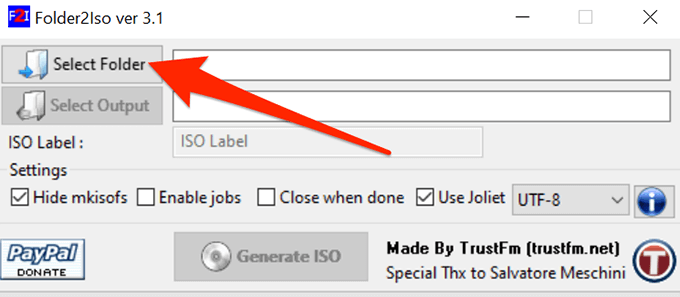
- You’ll see a simple interface with only a few options on it. Click on the Select Folder option and select the folder you want to add to your ISO.
- Click on the Select Output button and choose the folder where you’d like to save your ISO file. Remember you can’t choose the folder that you’ve chosen to include in your ISO.
- You can then specify the extra options available on your screen, if you want.
- Click on the Generate ISO button to make an ISO out of your chosen folders.

- The progress bar will go all green when the ISO has been generated.
It’s a good idea to create an ISO from your folders in Windows so you can mount them all as a single drive on your PC. If you have done it on your computer already, let us know what app you chose to do it and why. We await your response in the comments below!
Mahesh has been obsessed with technology since he got his first gadget a decade or so ago. Over the last few years, he’s written a number of tech articles on various online publications including but not limited to MakeTechEasier and Android AppStorm. Read Mahesh’s Full Bio
Open ISO Files in Windows 10/7/XP with ISO Viewer
By Petty Madison | Last Updated: Sep. 10, 2018
ISO file can be extremely useful when you need to install an operating system or even a software utility. Essentially, an ISO file is a copy of all the content from a DVD/CD/BD in archived format. The files inside can be anything: media files like music and videos, installation files and so on. The image file itself is uncompressed, and the structure it uses to store the data will be based on the file system that was on the disk that contained the original data.
The problem with ISO files is that you can’t view the contents or even open the file without special utilities or native support. In Windows, native support for ISO files only came with Windows 8, which means older versions like Windows 7 require tools to be able to do this. In Windows 10 there is native support, but you also have other utilities that allow you to view the contents of an ISO file without having to burn it to a disk or drive.
The easiest way to view the files of an ISO file on Windows 10 is to use its virtual drive mounting capability. This feature allows you to mount the ISO file on a virtual drive rather than a physical drive or a disk. The advantage is that you don’t have to burn the file to a disk to see the content, so no diskc would be wasted for this purpose.
However, there are often problems with mounting the file on Windows 10. It could show an error if the ISO image wasn’t created properly in the first place. If you’re facing such an issue, then a third-party application may be required to see inside the ISO file.
Method 1: How to Quickly Open ISO Image with ISO Editor
Opening ISO file on Windows 10 is not a rocket science. Actually, there are many free and paid applications that can complete this task. However, some of them are extremely hard to use and have compatibility issues with latest Windows 10 update. So in here, we will go with the one that has works well on all versions of Windows 10.
UUByte ISO Editor is a cross-platform ISO toolkits that has several core functions to deal with ISO image files. It can open any ISO image files in a quick way on both Windows PC and Mac.
Why Choose UUByte ISO Editor
- Open all kinds of ISO image files.
- Load ISO image file instantly.
- Create bootable USB for OS installation.
- Freely edit ISO image.
- Create new ISO image from folders or files.
Step 1: Get Prepared
Please install UUByte ISO editor on your Windows 10 PC where the ISO image file sits. There is an installtion wizard that comes with the program. Just follow the prompt and install it on your computer.
Step 2: Load ISO Image
Open UUByte ISO Editor from desktop shortcut and click «Extract» tab on the welcome screen. Now, click the «Load ISO» button from upper right corner and you will be asked to import the ISO file into the program.
Step 3: Open ISO File Directly
Now, check the little squre bot at the left side of File Name field. This action will select all the files and folders compressed in ISO image. Then click «Extract» button to save all the content into local folder. Wait a few seconds and the ISO file is opened.
This is one of the best ways to open ISO image file on Windows 10 computer. It is fast and powerful! Most importantly, it comes with an easy-to-understand user interface. No hassle at all when using this great application.
Method 2: Open ISO File with Pismo File Mount Audit Package
Pismo File Mount Audit Package is a favorite of many developers because it is non-invasive and easy to use. It is also free. The utility is called PFMAP for short, and allows you to mount ISO images quickly, extract the files and then unmount them. It does this by converting the ISO file into a file folder that you can double-click to open and view. Let’s see how PFMAP works:
Step 1 : Download the PFMAP software on your Windows 10 PC and install it.
Step 2: Once the installation is done, you can simply right-click on the ISO file in File Explorer and click on «Mount». You’ll notice that the ISO icon for the file is now replaced with another, meaning that it is now a file folder. Double-click on this and the file will open, showing you the contents of the ISO file.
Step 3: If you don’t need to copy or extract anything, simply right-click on the main file folder and select «Unmount» to change it back into the ISO format.
A lot of people prefer this utility over the next one — WinRAR — because the latter is known to create some issues while extracting files from an ISO image. Nevertheless, it’s a popular tool for the purpose.
Method 3: How to View ISO Image in Windows via WinRAR
WinRAR is essentially a paid utility, but there’s a long trial period before you need to pay anything. In certain countries like China there’s also a fully free edition available. It’s basically an archiving tool for compressing files, but it allows you to view the contents of an ISO file so you can copy or extract it.
Step 1 : Download and install WinRAR on your Windows 10 PC.
Step 2: Navigate to the file and right-click on it, then «Open with…» and select «WinRAR».
Step 3: You should now be able to see the contents of the image file in the form of subfolders and files. Just close the WinRAR application when you’re done.
As mentioned, there are certain issues you may come across while using WinRAR. The problem is generally seen when the files in the ISO image are corrupted, but it can also be because of the software application itself. If WinRAR doesn’t work for you, then try the method described below.
Method 4: Unzip ISO File on Windows 10/7/XP with 7-Zip
7-Zip is an open source archiving and file compression software utility that has gained tremendous popularity among Windows users. There’s also a modified version called Easy 7-Zip that has the same features but is easier to use. You can use either of them to view the contents of an ISO file.
Step 1: Download 7-Zip or Easy 7-Zip on your Windows 10 PC and install the application.
Step 2: Launch the program, after which you will see a navigation windows similar to Windows Explorer.
Step 3: Find the ISO file that you want to view, right-click on it, go to 7-Zip and then click on вЂOpen archive’. This will open the ISO file and you will be able to see the folders and files inside.
There are also other things you can do with Easy 7-Zip, such as delete archive files after extraction, have the software open the output location and even close the program automatically once the extraction is complete.
Bonus: How to Open ISO Files on Mac Computer
Disk Utility is extremely useful for Mac users because it lets you view the contents of ISO files without having to burn them on a CD first. It works by creating a disk image of the ISO file that you can open and view like it was on a CD or DVD. The process is simple, but the files need to be extracted to the disk image. Here’s how that happens:
Step 1: Go to «Applications» in the Mac Finder and select «Utilities». Double-click on «Disk Utility». You can also get there by clicking on the «Go» menu in Finder and then clicking on Disk Utility from there.
Step 2: Once it’s open, go to the File menu and look for the Open Disk Image option that you see there.
Step 3: This will open a navigation window where you need to find the ISO file and select it. Then click on вЂOpen’ on the bottom right hand corner of this window.
This will extract the contents of the ISO file and copy it to a disk image on your desktop. Go to your desktop, double-click the disk image and you’ll see all the contents of the ISO image there.
Conclusion:
You can try using 7-Zip for Mac if the Disk Utility method doesn’t work for you. There are also several alternatives to this software, such as The Unarchiver, WinZip for Mac, Zipeg and so on. All of these are for the macOS environment and their usage is very similar to how it works on Windows, although you may see significant UI differences.
Petty is editor in chief at UUByte and writes various topics about Windows and Mac to help people make the most of current technology.


