- How to Install Jenkins on Windows, Ubuntu and CentOS?
- Prerequisite
- Jenkins Installation on Windows
- Jenkins Installation on Ubuntu
- Installation Steps:
- Jenkins Installation on CentOS
- Installation Steps
- Configuring Jenkins
- Conclusion
- Windows
- Prerequisites
- Installation steps using Windows MSI installer
- Post-installation setup wizard
- Unlocking Jenkins
- Customizing Jenkins with plugins
- Creating the first administrator user
- Troubleshooting Windows installation
- Invalid service logon credentials
How to Install Jenkins on Windows, Ubuntu and CentOS?
![]()
A step-by-step Jenkins installation guide.
In this article, we will learn how to install Jenkins on the following operating systems.
For all the above operating systems, Jenkins installation steps slightly vary, but configuration steps are the same.
Jenkins is an open-source automation building tool for developers to run around projects and applications. It is used for building and deploying software and application. It is a powerful automation application that allows constant integration and continuous delivery of projects, regardless of the platform you are working on.
Since Jenkins is a Java application, it runs standalone by any machine with a Java Runtime Environment (JRE) installed.
If you are looking to learn Jenkins then check out this online course to become a hero from zero.
Prerequisite
JDK8+ is mandatory for all operating systems. So first we need to install JDK8 or higher version. You can download and install it from here.
Jenkins Installation on Windows
Once JDK is installed and running, we are ready to download and install Jenkins. Click here to download the latest Jenkins MSI package for Windows.
- Double click on jenkins.msi to begin the installation.

- Click on Next and then install

- Click on the Change button if you want to install it in another directory. In this example, we will keep the default option, click Next

- When done with the installation process, click the Finish button to complete the installation.

As you can see the Jenkins installation in Windows is really easy. Just like any other standard software.
Jenkins Installation on Ubuntu
As mentioned earlier, make sure JDK8+ is installed and running on the Ubuntu machine. If it is not installed execute below command to install it.
sudo apt install default-jdk-headless
To verify Java has been installed successfully, execute the below command:
Once it is installed, then we are good to go for Jenkins installation.
Installation Steps:
Step 1 : First, Open command terminal (Ctrl + Alt + T)
Step 2: For installing Jenkins, Let’s ad ding repository key to the system
wget -q -O — http://pkg.jenkins-ci.org/debian/jenkins-ci.org.key | sudo apt-key add —
Step 3: Once the key is added, we need to append the Debian package repos address to the machine.
sudo sh -c ‘echo deb http://pkg.jenkins-ci.org/debian-stable binary/ > /etc/apt/sources.list.d/jenkins.list’
Step 4: Now u pdate Ubuntu packages
sudo apt update
Step 5: Finally to install Jenkins, execute below command
sudo apt install jenkins
Jenkins installed successfully. Now we can start Jenkins server.
Step 6: Starting Jenkins through systemctl command
sudo systemctl start jenkins
systemctl does not show the output so we can check the status through the below command. Through this command, we can check whether Jenkins is active or not.
sudo systemctl status jenkins
Step 6: Configuring port (Optional)
By default, Jenkins is run on 8080 port, and we need to make this port accessible from anywhere(if it is not accessible).
Let’s open the port :
sudo ufw allow 8080
We can check the status of the port below the following command:
sudo ufw status
If the status showing of firewall inactive then run the following command otherwise it is not required
sudo ufw allow OpenSSH
sudo ufw enable
Jenkins Installation on CentOS
First, make sure JDK8+ is installed and running on the machine. If it is not installed execute below command to install OpenJDK 8 package.
To verify Java has been installed successfully, execute the below command
Once it is installed, then we are good to go for Jenkins installation.
Installation Steps
Step 1: First, Open Command Terminal
Step 2: To install Jenkins, First, we need to d ownload and add Jenkins GPG key:
Step 3: After downloading and adding Jenkins GPS key, next Import Jenkins GPG Key :
Step 4: Update CentOS packages
Step 5: After update centos packages, we are ready to install, Jenkins:
Step 6: Starting Jenkins through systemctl
Since systemctl does not show the output so you can check the status through the below command. And through this command, you can check whether Jenkins is active or not.
Step 7: Configuring the port(Optional)
By default, Jenkins is run on 8080 port, and we need to make this port accessible from anywhere(only if it is not accessible). Let’s open the port,
After configure port reload firewall the
Configuring Jenkins
Once Jenkins is installed, it will be running on port 8080, Let’s configure it by navigating to http://localhost:8080 on our favorite browser.

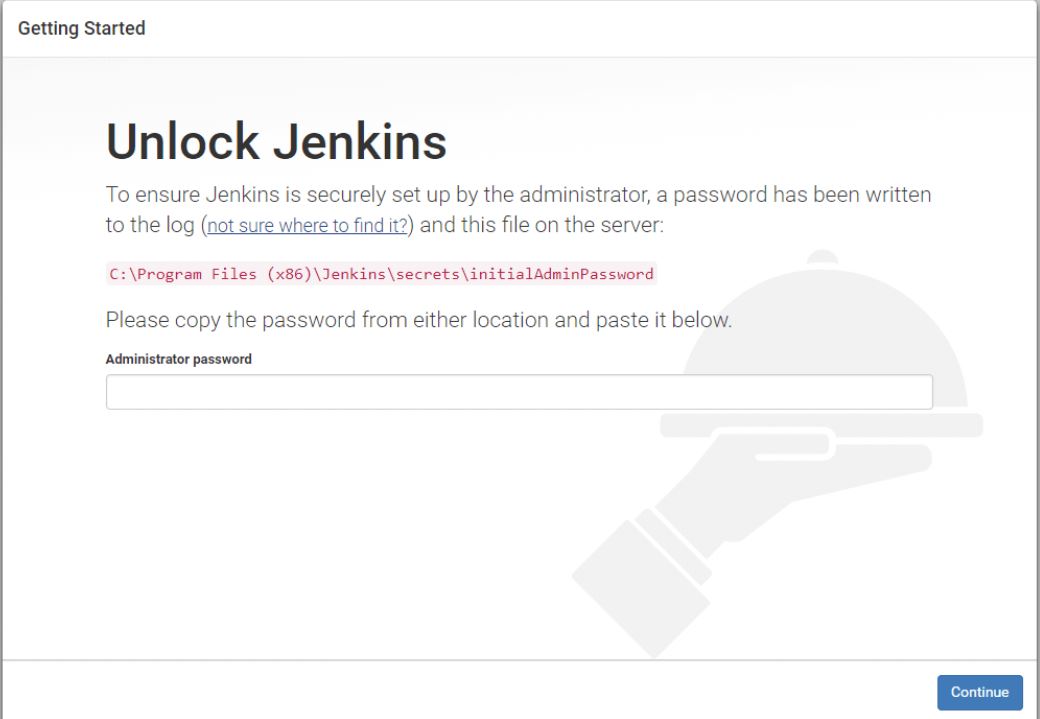
Step-2: To unlock the Jenkins, copy the administrator password from the file located at
C:\Program Files (x86)\Jenkins\secrets\initialAdminPassword
- For CentOS and Ubuntu
Now, paste it in the Administrator password field. Then, click the Continue button.

Step-3: You can install either suggested plugins or you can select plugins depending on your use case. Here, we will install the suggested plugins.

Step-4: Please wait until all plugin is installed. When installation is done, click on Continue.

Step-5: Create an admin profile for Jenkins. Enter the required details and Click on Save and Continue.

Step-6: We can change the Jenkins URL if required, Let’s keep it default http://localhost:8080. Click Save and Finish to complete the configuration process. Now click on Start Using Jenkins

Finally, the configuration process is done, and the above one is the default, Welcome to Jenkins! page.
The Jenkins configuration step is similar for all OS, except Step 2 where we need to retrieve and enter the administrator password. This password could be retrieved from the file, store at the path shown on to Unlock Jenkins UI.

Conclusion
So the above were steps to install Jenkins on your favorite OS. Next, learn how to create your first Jenkins Pipelines.
Jenkins installation is easy and if you are setting up for the remote team then you can either get some Cloud VM and install it yourself or go for Jenkins hosting platform.
Windows
The simplest way to install Jenkins on Windows is to use the Jenkins Windows installer. That program will install Jenkins as a service using a 64 bit JVM chosen by the user. Keep in mind that to run Jenkins as a service, the account that runs Jenkins must have permission to login as a service.
Prerequisites
Minimum hardware requirements:
1 GB of drive space (although 10 GB is a recommended minimum if running Jenkins as a Docker container)
Recommended hardware configuration for a small team:
50 GB+ of drive space
Comprehensive hardware recommendations:
For Windows operating system: Windows Support Policy
Installation steps using Windows MSI installer
Refer to the Windows section of the Downloading Jenkins page to download either an LTS release or a weekly release of the Windows installer. After the download completes, open the Windows installer and follow the steps below to install Jenkins.
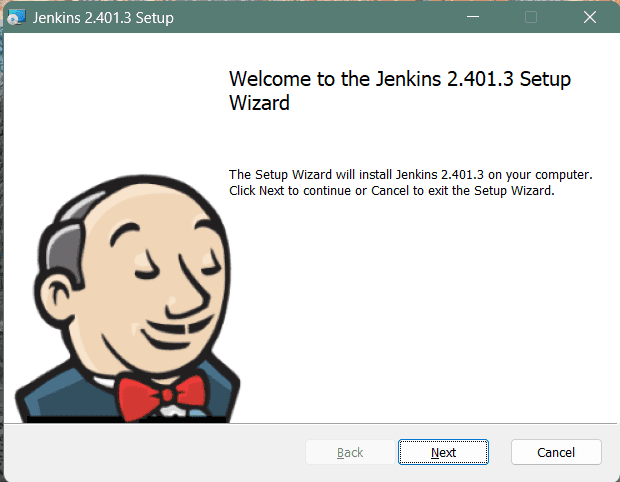
On opening the Windows Installer, an Installation Setup Wizard appears, Click Next on the Setup Wizard to start your installation.
Select the destination folder to store your Jenkins Installation and click Next to continue.

When Installing Jenkins, it is recommended to install and run Jenkins as an independent windows service using a local or domain user as it is much safer than running Jenkins using LocalSystem(Windows equivalent of root) which will grant Jenkins full access to your machine and services.
To run Jenkins service using a local or domain user, specify the domain user name and password with which you want to run Jenkins, click on Test Credentials to test your domain credentials and click on Next.
| If you get Invalid Logon Error pop-up while trying to test your credentials, follow the steps explained here to resolve it. |
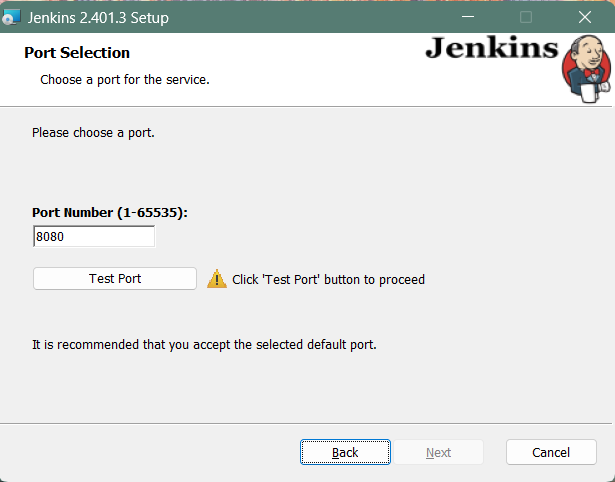
Specify the port on which Jenkins will be running, Test Port button to validate whether the specified port if free on your machine or not. Consequently, if the port is free, it will show a green tick mark as shown below, then click on Next.
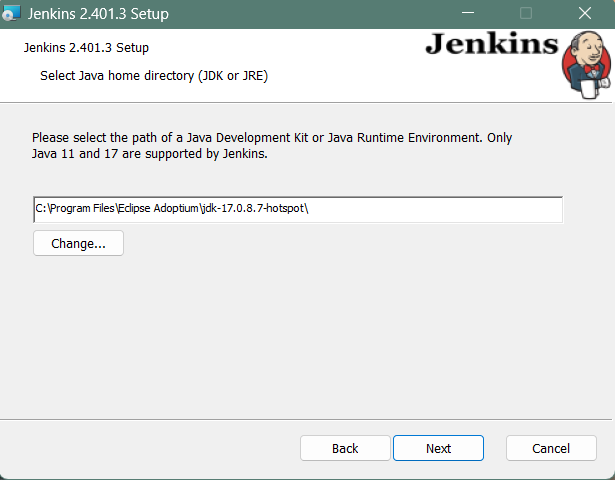
The installation process checks for Java on your machine and prefills the dialog with the Java home directory. If the needed Java version is not installed on your machine, you will be prompted to install it.
Once your Java home directory has been selected, click on Next to continue.
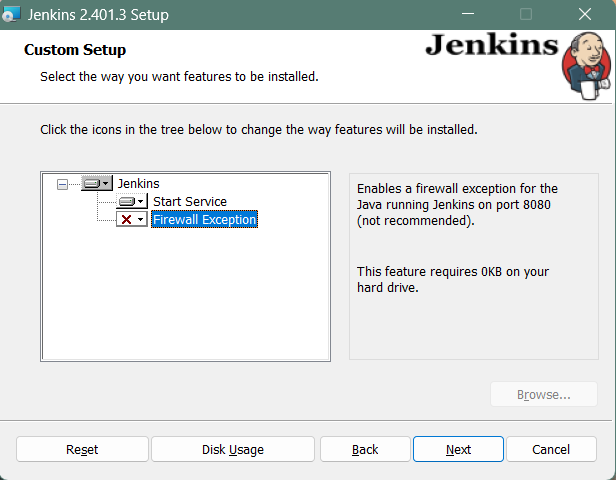
Select other services that need to be installed with Jenkins and click on Next.
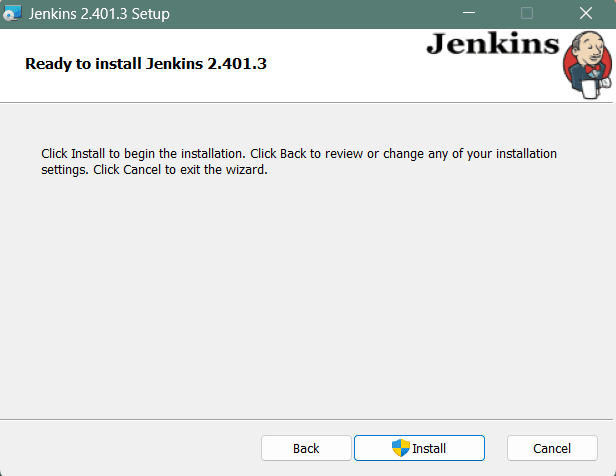
Click on the Install button to start the installation of Jenkins.
Additionally, clicking on the Install button will show the progress bar of installation, as shown below:
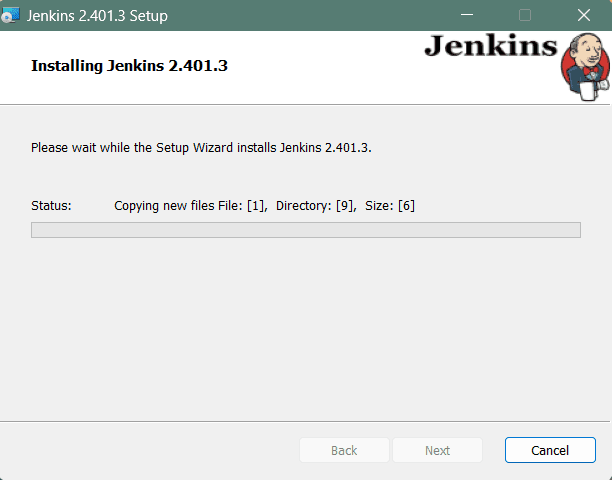
Once the installation completes, click on Finish to complete the installation.
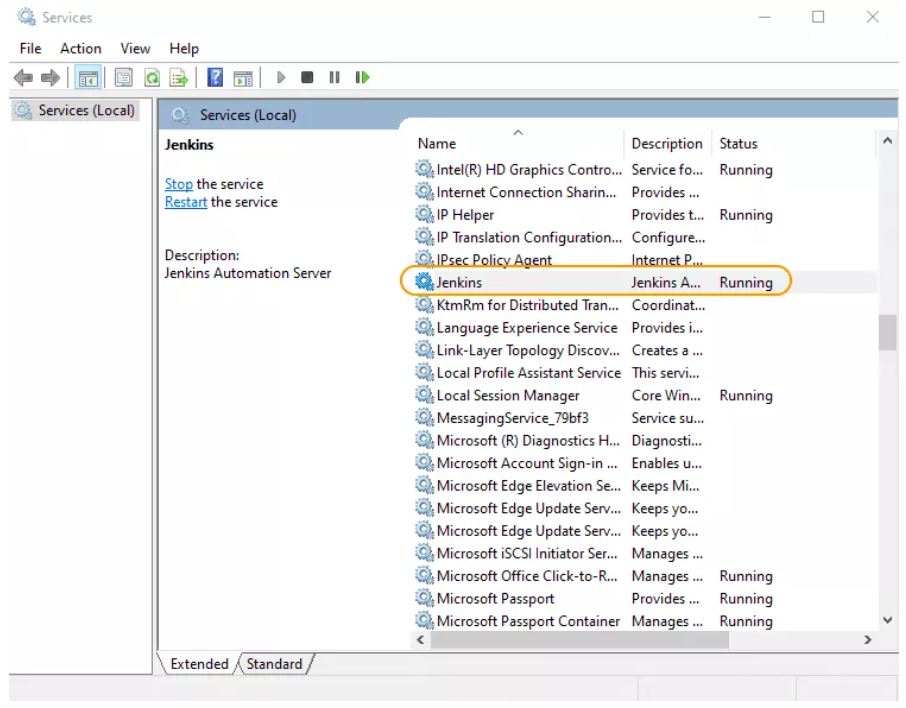
Jenkins will be installed as a Windows Service. You can validate this by browsing the services section, as shown below:
| See the upgrade steps when you upgrade to a new release. |
Post-installation setup wizard
After downloading, installing and running Jenkins, the post-installation setup wizard begins.
This setup wizard takes you through a few quick «one-off» steps to unlock Jenkins, customize it with plugins and create the first administrator user through which you can continue accessing Jenkins.
Unlocking Jenkins
When you first access a new Jenkins instance, you are asked to unlock it using an automatically-generated password.
Browse to http://localhost:8080 (or whichever port you configured for Jenkins when installing it) and wait until the Unlock Jenkins page appears.
The initial Administrator password should be found under the Jenkins installation path (set at Step 2 in Jenkins Installation).
For default installation location to C:\Program Files\Jenkins, a file called initialAdminPassword can be found under C:\Program Files\Jenkins\secrets.
However, If a custom path for Jenkins installation was selected, then you should check that location for initialAdminPassword file.
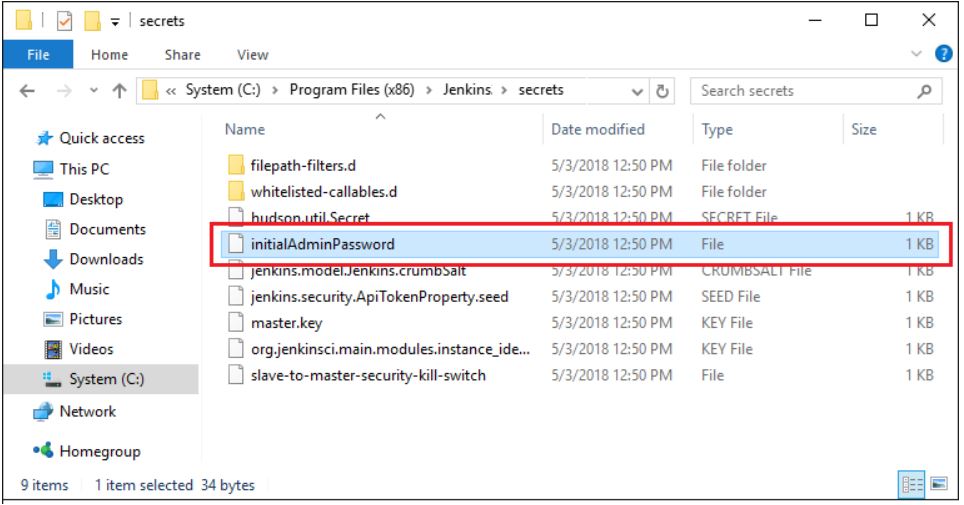
Open the highlighted file and copy the content of the initialAdminPassword file.

On the Unlock Jenkins page, paste this password into the Administrator password field and click Continue.
Notes:
You can also access Jenkins logs in the jenkins.err.log file in your Jenkins directory specified during the installation.
The Jenkins log file is another location (in the Jenkins home directory) where the initial password can also be obtained. 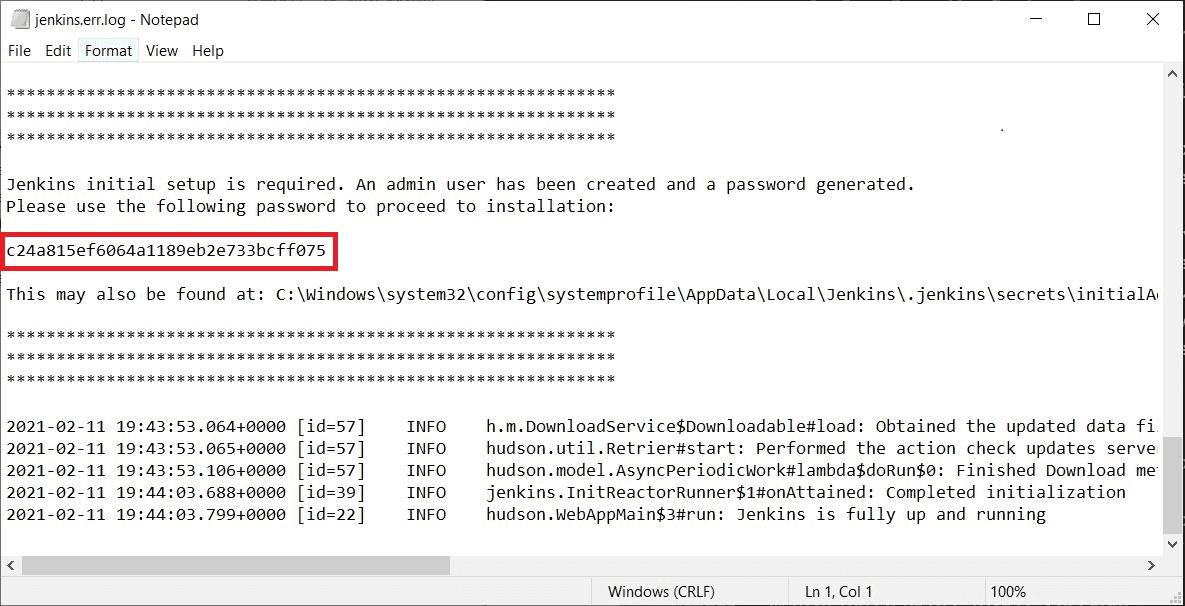 This password must be entered in the setup wizard on new Jenkins installations before you can access Jenkins’s main UI. This password also serves as the default admininstrator account’s password (with username «admin») if you happen to skip the subsequent user-creation step in the setup wizard.
Customizing Jenkins with plugins
After unlocking Jenkins, the Customize Jenkins page appears. Here you can install any number of useful plugins as part of your initial setup.
Click one of the two options shown:
Install suggested plugins — to install the recommended set of plugins, which are based on most common use cases.
Select plugins to install — to choose which set of plugins to initially install. When you first access the plugin selection page, the suggested plugins are selected by default.
| If you are not sure what plugins you need, choose Install suggested plugins. You can install (or remove) additional Jenkins plugins at a later point in time via the Manage Jenkins > Manage Plugins page in Jenkins. |
The setup wizard shows the progression of Jenkins being configured and your chosen set of Jenkins plugins being installed. This process may take a few minutes.
Creating the first administrator user
Finally, after customizing Jenkins with plugins, Jenkins asks you to create your first administrator user.
When the Create First Admin User page appears, specify the details for your administrator user in the respective fields and click Save and Finish.
When the Jenkins is ready page appears, click Start using Jenkins.
Notes:
This page may indicate Jenkins is almost ready! instead and if so, click Restart.
If the page does not automatically refresh after a minute, use your web browser to refresh the page manually.
If required, log in to Jenkins with the credentials of the user you just created and you are ready to start using Jenkins!
Troubleshooting Windows installation
Invalid service logon credentials
When installing a service to run under a domain user account, the account must have the right to logon as a service. This logon permission applies strictly to the local computer and must be granted in the Local Security Policy.
Perform the following steps below to edit the Local Security Policy of the computer you want to define the вЂlogon as a service’ permission:
Logon to the computer with administrative privileges.
Open the Administrative Tools and open the Local Security Policy
Expand Local Policy and click on User Rights Assignment
In the right pane, right-click Log on as a service and select properties.
Click on the Add User or Group… button to add the new user.
In the Select Users or Groups dialogue, find the user you wish to enter and click OK
Click OK in the Log on as a service Properties to save changes.
After completing the steps above, try logging in again with the added user.


