- How to install linux on android tablet
- Переселение души: linux на android планшете
- How to Run Linux on Android Devices
- Access the Linux kernel on your Android smartphone or tablet
- Can You Run Linux on Android?
- How to Install Linux on Android
- How to Use Linux on Android
- Pros and Cons of Running Linux on Android
How to install linux on android tablet
Краткое описание:
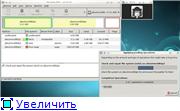
Установка Linux на Android в Termux без рут-прав
Andronix lets you install a Linux system on your Android Device without root. We found out that using Linux on Android is quite useful and lets you do many heavy tasks on your Android device.
This app lets you install various popular Linux distributions on your Android device by using Termux and PRoot functionality on the Android system. The application also provides you a graphics layer or Desktop environment (Xfce, MATE, LXDE, LXQT and KDE) on the top of the Linux shell which makes the user experience much better than working on a Linux command line.
* Manjaro is now available with xfce, lxqt, lxde and mate.
* Ubuntu KDE is now available which is great success.
* KDE Performance optimization — Better performance.
* Added multiple Window manager — Better look in KDE.
* Prinstalled softwares and themes — Makes a better aesthetic.
* AndroNix Premium — We have released AndroNix Premium with tons of features.
* Dark Mode — Use AndroNix at night comfortably.
* AndroNix Commands — A special addition to the family of AndroNix. It’s all you need to manage your commands throughout your life. Just copy and paste!
* AndroNix Web App — We have also released our web app to compliment AndroNix commands on Android, so you can now access Commands on any internet connected device.
* AndroNix Feed — We saw that since the last release you guys were really happy about the blogs we posted. So now we have a dedicated blog feed to make a better use of Linux and the power it offers.
* Offline Downloads — Internet can be unpredictable sometimes, but don’t worry we’re introducing offline support of Linux distros, though you’ll be still needing internet to download some files depending upon your device at the time of installing.
* Robust Documentation — We’ve been working on writing some documentations for weeks now. This will enable you to help yourself without waiting for us to reply.
* Priority Support — AndroNix Premium bring priority support with it at no extra cost. IF you’re an AndroNix Premium member just enjoy the blazing fast support, on the platform you like!
* Communities budding — We now support official AndroNix communities on Telegram and WhatsApp. We will soon expand to other platforms as well.
* UI overhaul — We’ve redisgned almost every element the our app and worked on user experience more than ever
* Automation Added — If you choose AndroNix Premium, we’ll handle everything for you. Just login and forget the rest.
* Profile Tab Added — Profile let’s you see your current status (Premium or not). If you’re a premium member, profile section has many things for you.
* Termux is now available offline — We now offer an offline copy of Termux within
AndroNix.
If you are new to Linux, we provide you easy and hassle-free instructions which makes your first impression of Linux a lot better. In case you still face some issues you can easily contact us on various platforms mentioned in the app. We ensure you that we will contact you as soon as possible.
— No root permissions required.
— Distros we support:
* Manjaro
* Ubuntu
* Kali Linux
* Debian
* Parrot OS
* Fedora
* Arch Linux
— Desktop environments we support:
* KDE
* LXDE
* LXQT
* MATE
* XFCE
— One click install/uninstall feature.
— Features multiboot linux system.
— Termux in required.
— Android version should be at least 5.1
— Device architecture supported: ARMv7, ARM64, x64.
Требуется Android: 5.1 и выше
Русский интерфейс: Нет
Источник
Переселение души: linux на android планшете
Доброго времени суток всем.
Моя история начинается с прочтения данной статьи, после которой я и решился приобрести чудо китайского планшетостроения: superpad. Данный планшет брался как игрушка для «поковырять немного», по совместительству, читалка, игралка на пары и смотрелка в долгую дорогу… Сразу отмечу, что у меня два usb винчестера на 500 гб и 1тб, на которых и хранится все самое важное для веселой жизни, и разбиты они в ntfs и ext4. И, естественно, планшет их не видит.
Вот мой доброволец 
Вот и первая причина поковыряться. После просмотра 200 страниц форума на xda-developers.com очертились определенные
| минусы | плюсы |
|---|---|
| нужны соответствующие модули ядра linux | обновление прошивки до 2.2, заботливо собранную народными умельцами из стекла и картона + прошивки superpad 2 |
| ушлые китайцы исходных кодов ядра под данный девайс не дают и всячески препятствуют их получению… |
На данном этапе все попытки вскрытия данного планшета отложились в долгий ящик. До славного времени для студента – сессии. А так как на сессии студенты делают абсолютно все, лишь бы не по предмету, то веселые ночные посиделки в интернете на заведомо буржуйских сайтах возобновились. И пришла гениальная идея поставить на данный планшет православный linux, в моем случае – ubuntu.
Что из этого вышло, смотрим ниже.
Понятно, что просто так взять и установить не получится… ну что же, где наша не пропадала…
нам понадобятся:
- Linux – у меня kubuntu
- windows – xp проще всего
- хорошее усвоение сознанием двух фраз: «just for fun!» и «спокойствие, только спокойствие».
- образ linux, тут смотреть, как создать свой ; созавать образ нужно под свою архитектура процессора, у меня процессор семейства arm11 с архитектурой arm6, так что ubuntu выше 9.10 – мечта…
Если у вас arm cortex – то вам повезло и для вас открываются славные возможности последней ubuntu и заточенной под планшеты unity. - microsd флэшкарта, отформатированная в три раздела: fat, ext2, куда записывается образ, и swap

рассмотрим основные этапы загрузки android и linux
| 1. Power on and boot ROM code execution | Power on and boot ROM code execution |
| 2. The boot loader | The boot loader |
| 3. The Linux kernel | The Linux kernel |
| 4. The init process | The init process |
| 5. Zygote and Dalvik | console(bash, zsh. ) / wm(kde, gnome. ) |
| 6. The system server | Boot completed |
| 7. Boot completed |
Как видно, отличия начинаются с этапа выполнения init.
Его-то и проще всего поменять.
Честно напишу, думал, что можно использовать только адроидовский инит и что он намертво прикручен к ядру. И даже получив пример рабочего ramdiskа от другого планшета, не думал, что он заведется…
содержимое ramdiska
bin dev etc home init init.rc lib linuxrc mnt newroot opt proc root sbin sys tmp usr var
В /bin лежит busybox, в /sbin – switch_root ссылкой на него.
Код init из ramdiskа от zt-180
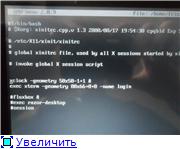
Остается прошить ramdisk в память (я использовал burntool под xp) и — вуаля, этап загрузки. Да, прошивал я вместо recovery, так что для запуска Linux приходится зажимать клавиши при старте.
Так, этап загрузки пройден и стоит запастись терпением, так как консоль не подает признаков жизни, а все грузится достаточно медлительно. 
Настраиваем автологин на первую консоль
/.bashrc можно прописать команды, которые будут стартовать при автоматическом логине.
Боремся с икс-сервером
Боремся с рабочей средой
Я захотел поставить kde, так как мне безумно нравится отрисовка графики библиотекой qt. Сразу скажу: да, поставилось и завелось, но КАК…
Во-первых, сразу настроил автологин:
в /etc/kde4/kdm/kdmrc находим и меняем под себя следующее
и, как написано, делаем chmod 600 kdmrc в консоли под рутом, чтобы нехорошие личности не подсмотрели наш пароль.
Во-вторых, при входе подозрительно долго висела заставка, и я, засомневавшись, вызвал startkde из консоли. После долгого и нудного показа всевозможных ошибок наконец загрузилась плазма в режиме нетбука. Графические эффекты выключены, так как мы сидим под framebufferом, и наблюдаются местами дичайшие тормоза, но все же это kde и оно загрузилось! 
Тонкая подстройка всего и вся под себя
У каждого своя, оптимизацию я пока что не проводил, а сделать предстоит очень многое: ускорить загрузку, оптимизировать рабочее пространство. Посматриваю в сторону более легковесного wm – e16 – но пока основным не сделал. так же нужно откалибровать тачскрин, благо что виртуальная клавиатура уже есть в kde.
Посматриваю в сторону openbox + razor-qt .
«Наслаждаемся!»
Итоги
Подключил репозитории debian 6. Не работает в упор звук, не настроен тач и рабочее пространство. Очень не хватает модулей ядра, так что попытаюсь собрать и прикрутить…
Сбиты многие службы и политики, в интернет ходит только под root, но интернет настроен и это радует.
Ps: Да, без модулей ядра подключается только разделы в fat и ext2, что не радует.
usb клавиатура + мышь будут очень ценными при отладке и настройке.
Источник
How to Run Linux on Android Devices
Access the Linux kernel on your Android smartphone or tablet
:max_bytes(150000):strip_icc()/JackWallen-56a71ed248bb42a48cf703edd2a2c3b4.jpg)
:max_bytes(150000):strip_icc()/GlamProfile-7bfa34647d8e4c8e82097cc1daf8f5ec.jpeg)
Android devices are powered by a modified Linux kernel. While the kernel is restrictive, it is possible to run Linux on Android phones and tablets.
The information below applies regardless of your phone’s manufacturer: Samsung, Google, Huawei, Xiaomi, etc.
Can You Run Linux on Android?
With apps like UserLAnd, anyone can install a full Linux distribution on an Android device. You don’t need to root the device, so there’s no risk of bricking the phone or voiding the warranty.
With the UserLAnd app, you can install Arch Linux, Debian, Kali Linux, and Ubuntu on a device. The program installs an additional layer on the device that runs the chosen version of Linux, allowing you to connect to a Linux session using SSH or VNC with the assistance of the bVNC app.
The Linux desktop doesn’t always scale correctly. You may need to move the screen around while working in windows.
How to Install Linux on Android
To run Ubuntu on an Android device with UserLAnd:
:max_bytes(150000):strip_icc()/001_run-linux-on-android-4586926-326e28fe5ffb4999bc0c65143f370f03.jpg)
Launch the UserLAnd app, then tap Ubuntu.
:max_bytes(150000):strip_icc()/001-run-linux-on-android-4586926-978c3362915c4b098ab3759e721f26c5.jpg)
Tap OK, then tap Allow to grant the necessary app permissions.
:max_bytes(150000):strip_icc()/002-run-linux-on-android-4586926-3465111b39e345089adf52e91ac7515f.jpg)
Enter a Username, Password, and VNC Password for the Ubuntu session, then tap Continue.
:max_bytes(150000):strip_icc()/003-run-linux-on-android-4586926-d576275e813e410db6ecc9593e7a5744.jpg)
Select VNC, then tap Continue.
At this point, UserLAnd downloads the necessary assets for the Ubuntu session. Depending on the speed of your connection, this process can take a while. It also consumes significant bandwidth, so use Wi-Fi instead of a cellular data connection if you’re on a metered plan.
:max_bytes(150000):strip_icc()/004-run-linux-on-android-4586926-edba0faaa18449cba19456a1522ae036.jpg)
You are redirected to the Google Play Store, where you can download bVNC (if you haven’t done so). Tap Install, then tap the Back button on your device to return to UserLAnd.
If asked to grant bVNC access to your Android files, tap Allow.
:max_bytes(150000):strip_icc()/005-run-linux-on-android-4586926-566e29a003dd44cfb49155414dc291ba.jpg)
Tap Sessions at the bottom of the screen, then tap the plus sign (+) in the upper-right corner.
If you see an option for ubuntu listed, tap it to begin your Linux session.
:max_bytes(150000):strip_icc()/006-run-linux-on-android-4586926-a2f6afa2f589487986edea54b93ae5cd.jpg)
Name the session ubuntu, select apps:Ubuntu from the Filesystem drop-down menu, then select SSH for the Service Type. Tap Save (the icon in the upper-right corner) when you’re done.
:max_bytes(150000):strip_icc()/007-run-linux-on-android-4586926-2f497e9ebea84690ba8e020402953739.jpg)
Tap Sessions, then tap ubuntu to launch your Linux session.
:max_bytes(150000):strip_icc()/009_run-linux-on-android-4586926-c17a0fb136a34809a47c4718bc8deb95.jpg)
How to Use Linux on Android
The Ubuntu session opens to a desktop environment, where you can zoom in with your fingers. From here, open applications by tapping the start menu in the lower-left corner. To install new Linux programs using the command terminal, tap System Tools > LXTerminal.
To close the desktop and return to Android, tap anywhere on the screen, tap the three vertical dots that appear, then tap Disconnect.
Pros and Cons of Running Linux on Android
Linux is more flexible than Android. There are many tasks you can undertake with Linux that you can’t on Android, including app development, advanced image editing, and working in a real desktop environment.
That said, the small form factor of smartphones makes it difficult to pack an entire desktop GUI into a small screen. You have to use your finger to move the mouse cursor, and you won’t be able to use your phone app while the Linux desktop is running.
In 2013, Canonical developed a mobile device that ran a special version of Ubuntu called Ubuntu Touch. It was a commercial flop, so the device was discontinued. No other companies have attempted to release a Linux phone due to the challenges of the GUI. The desktop would have to be completely reimagined to function on a small screen.
Источник


