- Install WSL
- Prerequisites
- Install
- Change the default Linux distribution installed
- Set up your Linux user info
- Set up and best practices
- Want to try the latest WSL preview features?
- Установка WSL
- Предварительные требования
- Установка
- Изменение установленного дистрибутива Linux по умолчанию
- Настройка сведений о пользователе Linux
- Советы и рекомендации
- Хотите испытать новейшие предварительные версии функций WSL?
- How to Install Linux on Windows 10
- How to Partition a Hard Drive in Windows 10
- How to Make a Linux Bootable USB
- How to Install Linux from USB
- How to install Linux distros properly on Windows 10
- How to install Windows Subsystem for Linux
- Installing Windows Subsystem for Linux using PowerShell
- How to install Linux distros on Windows 10
- Installing Linux distros using Command Prompt
- Installing Linux distros using Windows Store
- More Windows 10 resources
- Surface Laptop Studio and an eGPU sound great, but are the pair practical?
- Review: Acer’s Swift 3 ups battery life and performance in a crowded market
- Review: You can see right through MelGeek’s Mojo68 mechanical keyboard
- These apps help you customize the look of Windows 11
Install WSL
Prerequisites
You must be running Windows 10 version 2004 and higher (Build 19041 and higher) or Windows 11.
To check your Windows version and build number, select Windows logo key + R, type winver, select OK. You can update to the latest Windows version in the Settings menu or using the Windows Update Assistant.
If you’re running an older build, or just prefer not to use the install command and would like step-by-step directions, see WSL manual installation steps for older versions.
Install
You can now install everything you need to run Windows Subsystem for Linux (WSL) by entering this command in PowerShell or Windows Command Prompt and then restarting your machine.
This command will enable the required optional components, download the latest Linux kernel, set WSL 2 as your default, and install a Linux distribution for you (Ubuntu by default, see below to change this).
The first time you launch a newly installed Linux distribution, a console window will open and you’ll be asked to wait for files to de-compress and be stored on your machine. All future launches should take less than a second.
Change the default Linux distribution installed
By default, the installed Linux distribution will be Ubuntu. This can be changed using the -d flag.
- To change the distribution installed, enter: wsl —install -d . Replace with the name of the distribution you would like to install.
- To see a list of available Linux distributions available for download through the online store, enter: wsl —list —online or wsl -l -o .
- To install additional Linux distributions after the initial install, you may also use the command: wsl —install -d .
If you want to install additional distributions from inside a Linux/Bash command line (rather than from PowerShell or Command Prompt), you must use .exe in the command: wsl.exe —install -d or to list available distributions: wsl.exe -l -o .
If you run into an issue during the install process, check the installation section of the troubleshooting guide.
Set up your Linux user info
Once you have installed WSL, you will need to create a user account and password for your newly installed Linux distribution. See the Best practices for setting up a WSL development environment guide to learn more.
Set up and best practices
We recommend following our Best practices for setting up a WSL development environment guide for a step-by-step walk-through of how to set up a user name and password for your installed Linux distribution(s), using basic WSL commands, installing and customizing Windows Terminal, set up for Git version control, code editing and debugging using the VS Code remote server, good practices for file storage, setting up a database, mounting an external drive, setting up GPU acceleration, and more.
Want to try the latest WSL preview features?
Try the most recent features or updates to WSL by joining the Windows Insiders Program. Once you have joined Windows Insiders, you can choose the channel you would like to receive preview builds from inside the Windows settings menu to automatically receive any WSL updates or preview features associated with that build. You can choose from:
- Dev channel: Most recent updates, but low stability.
- Beta channel: Ideal for early adopters, more reliable builds than the Dev channel.
- Release Preview channel: Preview fixes and key features on the next version of Windows just before its available to the general public.
Источник
Установка WSL
Предварительные требования
Вам следует использовать Windows 10 версии 2004 и выше (сборка 19041 и выше) или Windows 11.
Чтобы проверить версию и номер сборки Windows, нажмите клавиши WINDOWS+R, введите winver и щелкните ОК. Вы можете выполнить обновление до последней версии Windows в меню параметров или с помощью помощника по Центру обновления Windows.
Если вы используете более раннюю сборку или не хотите использовать команду для установки и вам нужны пошаговые инструкции, см. статью Действия по установке WSL вручную для старых версий .
Установка
Теперь вы можете установить все необходимое для запуска подсистемы Windows для Linux (WSL), введя эту команду в PowerShell или командной строке Windows, а затем перезапустив компьютер.
Эта команда позволяет включить необходимые дополнительные компоненты, скачать последнюю версию ядра Linux, установить WSL 2 в качестве компонента по умолчанию и установить дистрибутив Linux (по умолчанию Ubuntu; инструкции по установке другого дистрибутива см. ниже) .
При первом запуске недавно установленного дистрибутива Linux откроется окно консоли. Вам будет предложено подождать, пока файлы будут распакованы и сохранены на компьютере. Все будущие запуски должны занимать меньше секунды.
Изменение установленного дистрибутива Linux по умолчанию
По умолчанию в качестве устанавливаемого дистрибутива Linux используется Ubuntu. Для этого используйте флаг -d .
- Чтобы изменить установленный дистрибутив, введите wsl —install -d . Замените именем дистрибутива, который хотите установить.
- Чтобы просмотреть список доступных дистрибутивов Linux, доступных для скачивания через Интернет-магазин, введите wsl —list —online или wsl -l -o .
- Чтобы установить дополнительные дистрибутивы Linux после исходной установки, можно также использовать команду wsl —install -d .
Если вы хотите установить дополнительные дистрибутивы из командной строки Linux или Bash (а не из PowerShell или командной строки), используйте .exe в команде wsl.exe —install -d . Чтобы получить список доступных дистрибутивов, используйте wsl.exe -l -o .
Если во время установки возникла проблема, см. раздел Установка руководства по устранению неполадок.
Настройка сведений о пользователе Linux
После установки WSL необходимо создать учетную запись пользователя и пароль для установленного дистрибутива Linux. Дополнительные сведения см. в статье Рекомендации по настройке среды разработки WSL.
Советы и рекомендации
Мы рекомендуем использовать наше пошаговое руководство Рекомендации по настройке среды разработки WSL. В нем описано, как настроить имя пользователя и пароль для установленных дистрибутивов Linux, использовать основные команды WSL, установить и настроить Терминал Windows, настроить управление версиями Git, отредактировать код и выполнить отладку с помощью удаленного сервера VS Code. Кроме того, в руководстве приведены рекомендации по хранению файлов, настройке базы данных, подключению внешнего диска, настройке ускорения GPU и пр.
Хотите испытать новейшие предварительные версии функций WSL?
Чтобы поработать с самыми последними функциями или обновлениями для WSL, присоединитесь к Программе предварительной оценки Windows. Когда вы присоединитесь к участникам Программы предварительной оценки Windows, вы сможете выбрать канал для получения предварительных сборок в меню параметров Windows и будете автоматически получать предварительные версии функций и обновления для WSL, связанные с этой сборкой. Можно выбрать одно из следующих значений.
- Канал разработчика: последние обновления, но низкая стабильность.
- Бета-канал: идеально подходит для ранних последователей; более надежные сборки, чем в канале разработки.
- Канал предварительного выпуска: предварительные версии исправлений и основных функций следующей версии Windows непосредственно перед предоставлением их общедоступной версии.
Источник
How to Install Linux on Windows 10
Linux is a family of open-source operating systems. They are based on the Linux kernel and are free to download. They can be installed on either a Mac or Windows computer. Here’s how to install Linux on a Windows 10 PC.
If you want to dual boot Linux and Windows, you will need to create a space for your Linux OS to live. In order to do this, you will have to partition your main hard drive. Here’s how to do that:
How to Partition a Hard Drive in Windows 10
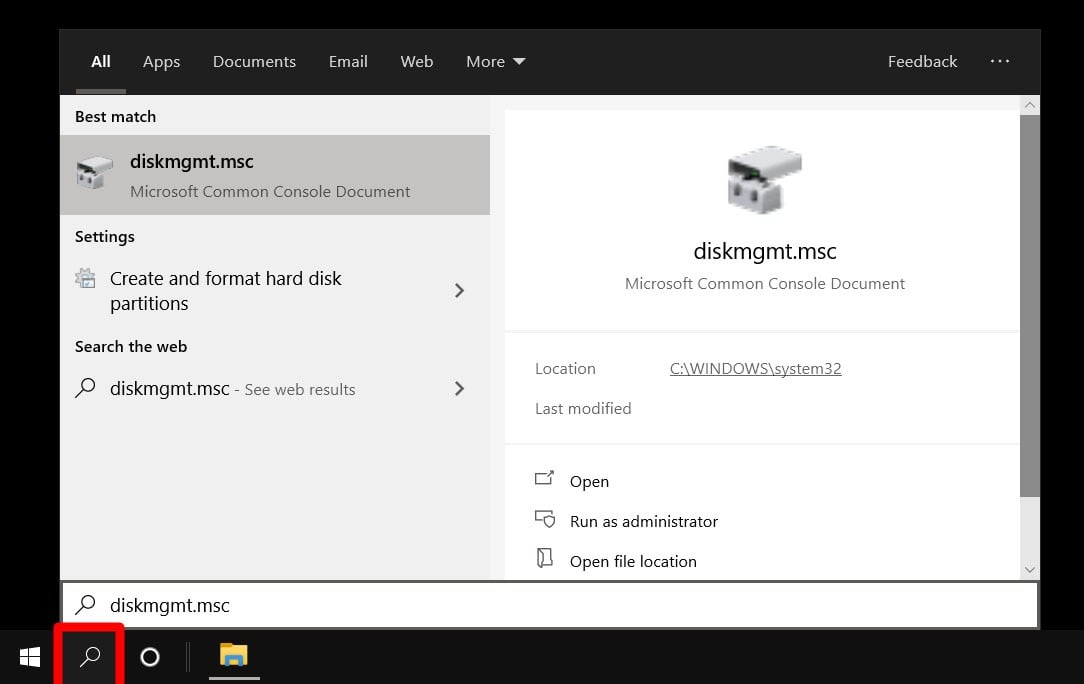
- Open the Windows Search Bar. This is the magnifying glass-shaped icon in the bottom-left corner of your screen.
- Then type “DISKMGMT.MSC” in the search bar and hit enter.

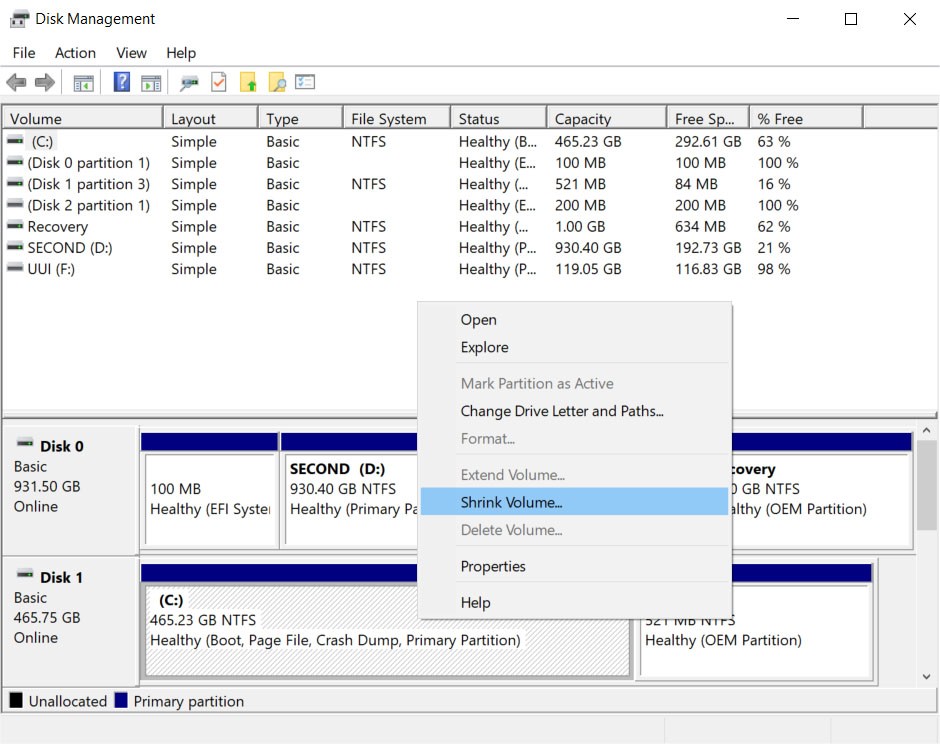
- Right-click on your main hard drive and select Shrink Volume. If you have more than one drive, make sure to choose the one that says Primary Partition. This will usually be labeled as the C: drive.
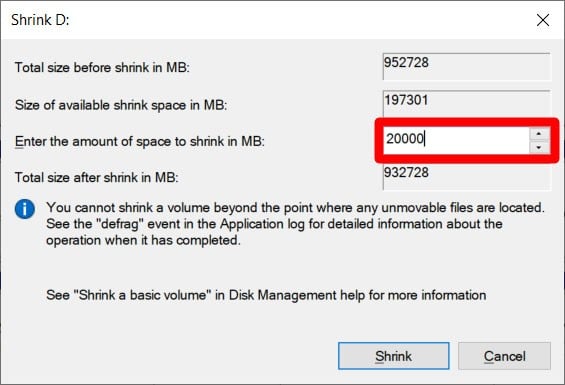
- Then choose how much you want to shrink your drive. It is recommended that you set aside at least 20GB (20,000MB) for Linux.
- Finally, click Shrink.
Once you have a designated space to install Linux, you’ll need to write a Linux Distro onto a USB thumb drive or external drive 4GB or larger. Here’s how to do that:
How to Make a Linux Bootable USB
- Download a Linux distro in ISO format. An ISO file is a disk image. Some of the top options are Ubuntu, Mint, or Fedora. They are free to download from each distribution’s main website. For this article, we are using Ubuntu.
- Insert the USB drive into your computer. You might be asked to format your drive. This will erase all the data stored on your drive, so make sure to back up your files before you begin.
- Download Rufus. You can find the latest version of the application here.
- Open Rufus and select your USB drive from the Device list. If you don’t know which drive to use, eject all other drives until you only have one to choose from.
- Under Boot Selection, click the Select button and choose the ISO file you downloaded earlier. Don’t change the other default settings.
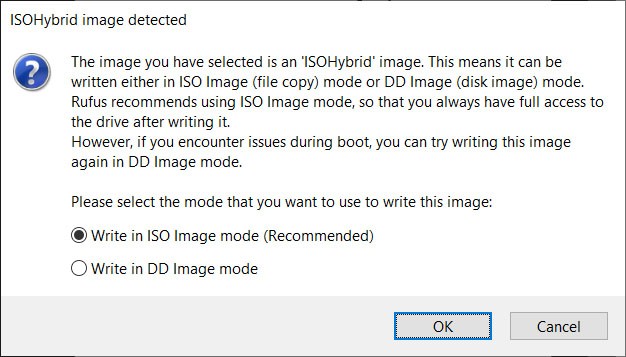
- Finally, click Start. If you get a pop-up message asking you to select a mode that you want to use to write the image, choose ISO.

Then wait for Rufus to mount your ISO file onto your drive. This might take some time, so be patient if the progress bar gets stuck.
Warning: This will erase all the data on your drive, so make sure to back up any important files.

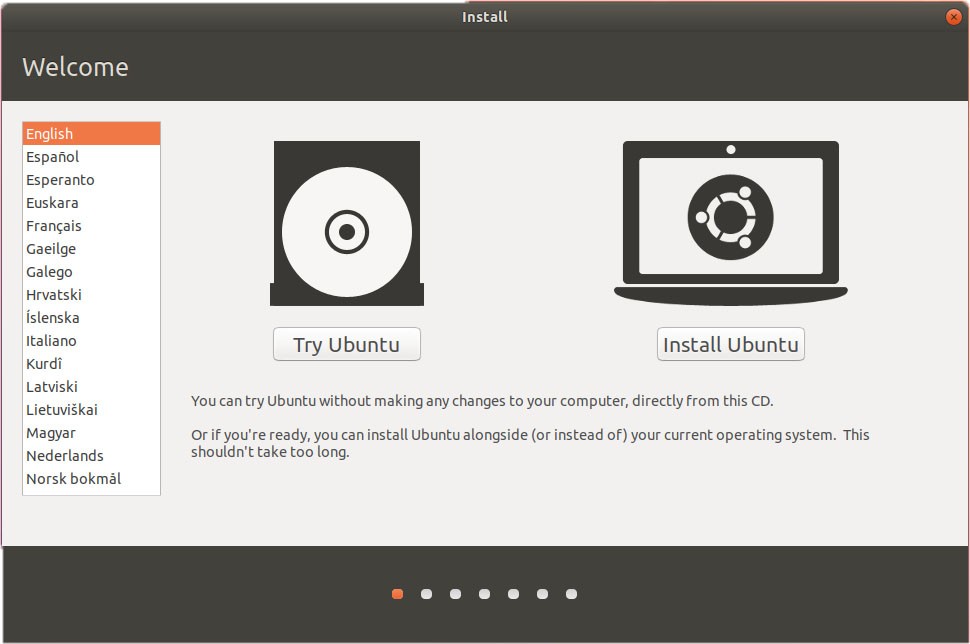
How to Install Linux from USB
Now that you have your Linux distro on a USB, here’s how to
- Insert a bootable Linux USB drive.
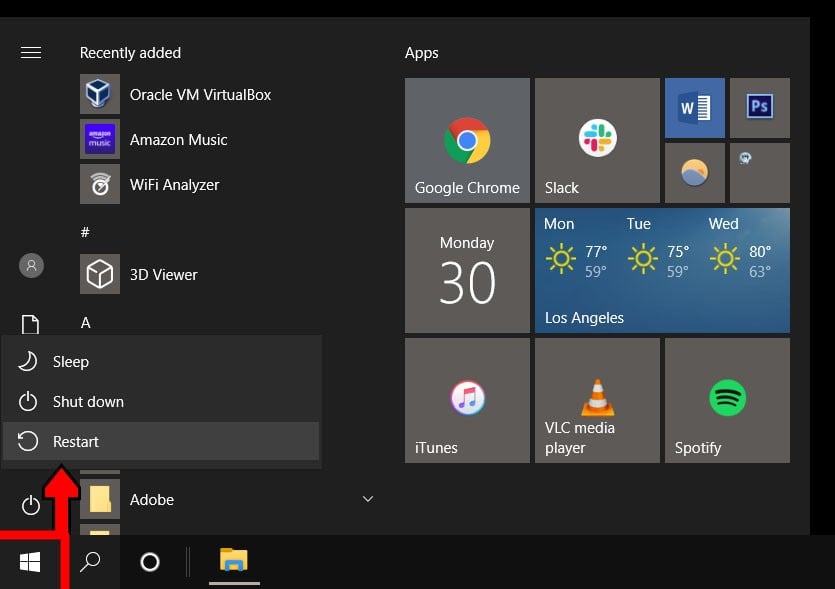
- Click the start menu. This is the button in the lower-left corner of your screen that looks like the Windows logo.
- Then hold down the SHIFT key while clicking Restart. This will take you into the Windows Recovery Environment.
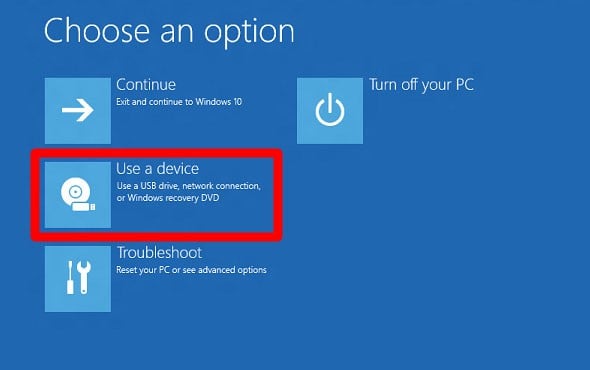
- Then select Use a Device.
- Find your device in the list. If you don’t see your drive, choose EFI USB Device, then pick your drive from the next screen.
- Your computer will now boot Linux. If your computer reboots Windows, there was either an issue with your drive, or you might have to change settings in your BIOS.

Warning: Changing BIOS settings can damage your computer if you don’t know what you’re doing.
Warning: Erasing your disk will mean you will lose your settings, files, and Windows operating system. Only select Erase if you have saved copies of all your files before starting the install process.
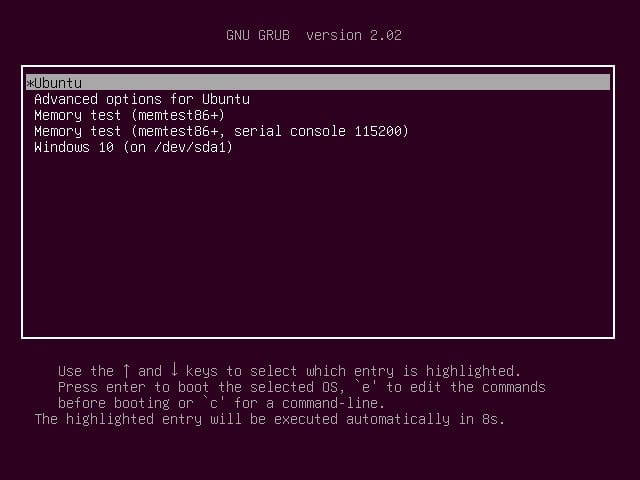
If you do not see a GRUB screen when you boot up your computer, you can try moving your Linux distro higher on your boot list in BIOS.
When you’re done, you can do a hardware check. In some cases, you may need to download additional drivers to make some hardware work. The option to download drivers can be found in the Systems Settings of your new Linux OS. After verifying that your hardware is working properly, you can start exploring and using your Linux distro.
If you’re a Mac user, check out our blog on how to install Linux on your Mac.

HelloTech editors choose the products and services we write about. When you buy through our links, we may earn a commission.
Источник
How to install Linux distros properly on Windows 10
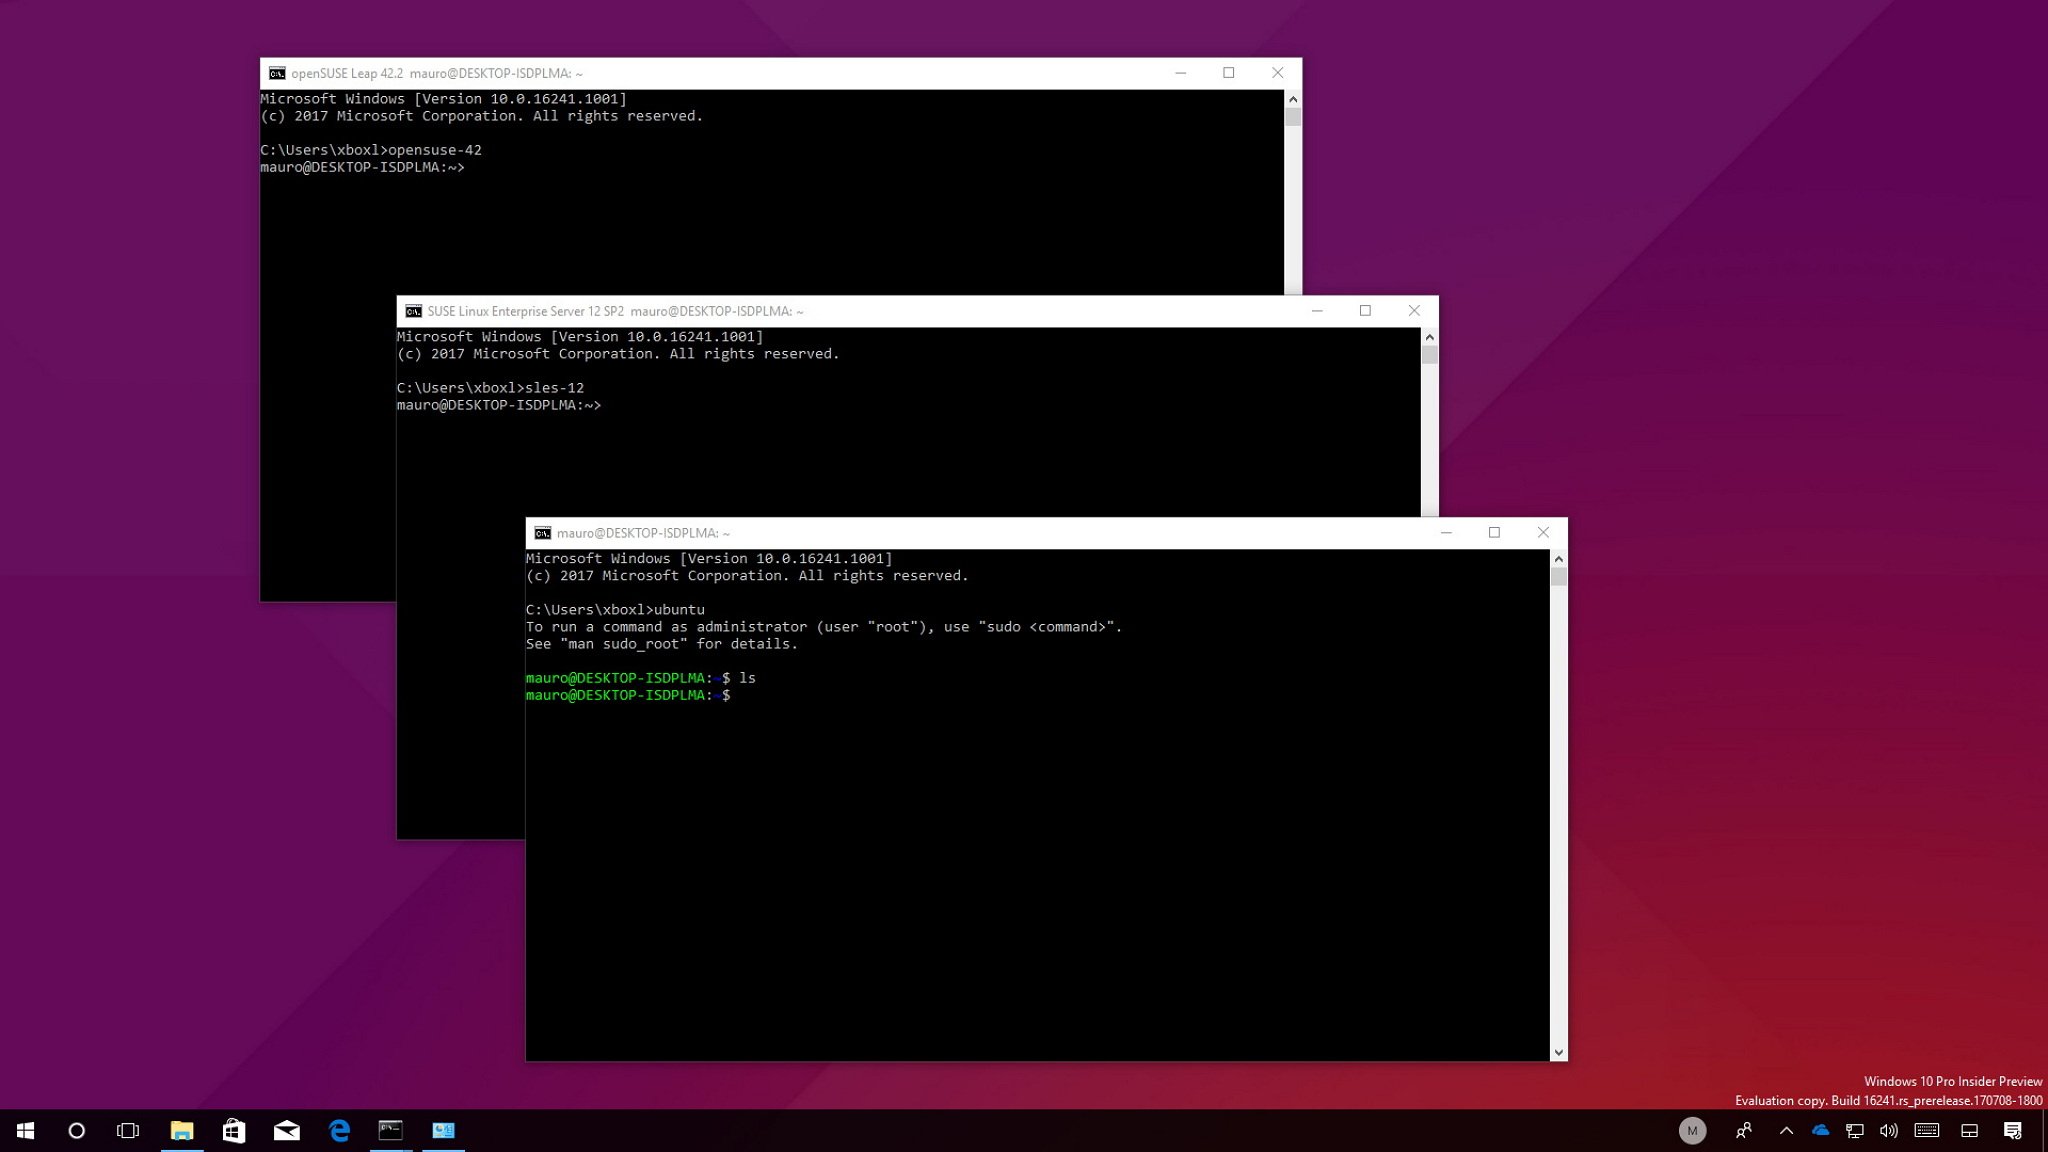
Starting with the Windows 10 Fall Creators Update, Microsoft is making some Linux distros, including Ubuntu, SUSE Linux Enterprise Server 12, and OpenSUSE Leap 42 available in the Windows Store. Additionally, it’s no longer a prerequisite to enable Developer mode, which makes the installation of Linux distros a lot easier.
However, a number of users a seeing an error code 0x8007007e as they try to install any of the distros, but it’s not a bug in the software. Instead, users are seeing this error because the Windows Subsystem for Linux (WSL), the compatibility layer to run Linux binary executables on Windows 10 is missing.
In this Windows 10 guide, we’ll walk you through the steps to successfully install Ubuntu, SUSE Linux Enterprise Server 12, and openSUSE Leap 42 on your device.
How to install Windows Subsystem for Linux
Before you can install any version of Linux on Windows 10, you must install WSL using Control Panel.
- Open Settings.
- Click on Apps.
- Click on Apps & features.
Under «Related settings,» on the right side, click the Programs and Features link.

Click the Turn Windows features on or off link.

On «Windows Features,» check the Windows Subsystem for Linux (Beta) option.
![]()
After completing the steps, you can open the Windows Store to get the Linux distro you want to use.
Installing Windows Subsystem for Linux using PowerShell
If you prefer using the command line method, it’s also possible to install the Windows Subsystem for Linux using PowerShell.
- Open Start.
- Search for PowerShell, right-click the result, and click Run as administrator.
Type the following command to add the required module and press Enter:
Enable-WindowsOptionalFeature -Online -FeatureName Microsoft-Windows-Subsystem-Linux
Type Y to complete the installation and restart your computer.

How to install Linux distros on Windows 10
After adding the Windows System for Linux module to your computer, there are two ways to install Ubuntu or SUSE Linux distros on Windows 10: you can use Command Prompt or the Windows Store.
Installing Linux distros using Command Prompt
- Open Start.
- Search for Command Prompt, right-click the result, and click Run as administrator.
Type one of the following commands to install Ubuntu, SUSE Linux Enterprise Server 12, or openSUSE Leap 42 and press Enter:
As you execute the command, the required files will download and install automatically on your device. Then simply follow the on-screen directions to complete the setup.
Installing Linux distros using Windows Store
Perhaps an easier way to install Linux distros on Windows 10 is to use the Windows Store using the following links:
Once the installation completes, launch the app, and complete the on-screen directions.
Remember that you’re not limited to install just one version of Linux. If you want, you can also install all three, including Fedora Linux when it becomes available in the Store, and run them all simultaneously.
You can install Linux distros using the Store starting with the release of the Windows 10 Fall Creators Update. However, if you have a device enrolled in the Windows Insider Program running the latest test build for PC, you can try any of them immediately. Also, note that devices running the Windows 10 Creators Update only supports Ubuntu, which can be installed using these steps.
More Windows 10 resources
For more helpful articles, coverage, and answers to common questions about Windows 10, visit the following resources:
We may earn a commission for purchases using our links. Learn more.
![]()
Surface Laptop Studio and an eGPU sound great, but are the pair practical?
The Surface Laptop Studio packs a lot of power for its size, but is adding an external GPU (eGPU) the best choice? While it can work, some hiccups are possible. Here’s what we’ve learned after running a 3080 Ti for 24 hours.
![]()
Review: Acer’s Swift 3 ups battery life and performance in a crowded market
The Acer Swift 3 (SF314-511) has outstanding battery life and strong performance from the 11th Gen Intel Core i7 CPU. But at the $1,000 mark there are some truly killer PCs that might catch your eye instead.
![]()
Review: You can see right through MelGeek’s Mojo68 mechanical keyboard
MelGeek just released a 68% mechanical keyboard that’s both transparent and friendly to modding with hot-swappable switches. It’s a little pricey, but an excellent place to start with custom keyboards.
![]()
These apps help you customize the look of Windows 11
Windows 11 has a new look, including a new Start menu and redesigned taskbar. If you don’t like the look of Windows 11, you can customize it with these apps.
Источник


