- How to restore a Windows 7-based computer to a previous Windows installation by using the Windows.old folder
- INTRODUCTION
- More Information
- Step 1: Determine whether there is a Windows.old folder and whether there is sufficient free space on the Windows hard disk
- Step 2: Start the Windows Recovery Environment
- Step 3: Move the Windows 7 folders to a new Win7 folder
- Step 4: Copy the contents or move the contents of the Windows.old folder
- Step 5: Restore the boot sector for the previous Windows installation
- Step 6: Restore the Boot.ini file for the previous Windows installation of Windows XP or of Windows 2000
- Step 7: Close the Command Prompt window, and then click Restart
- Восстановление файлов предыдущей версии Windows (Windows.old)
- Содержание:
- Как вернуть систему до предыдущей версии
- Восстановление данных из папки Windows.old
- Как удалить папку Windows.old?
- Часто задаваемые вопросы
How to restore a Windows 7-based computer to a previous Windows installation by using the Windows.old folder
INTRODUCTION
In certain scenarios you may need to restore your Windows 7 Computer back to the previous installation of Windows. This article walks you through the steps to manually restore your computer back to the previous version of Windows.
Note: To do this, you must use the command prompt, and you must type specific commands at the command prompt to rename and to move folders between the different versions of Windows.
Note: If you currently have Service Pack 1 for Windows 7 installed, the uninstall steps are the same as with Windows 7 without any service packs installed. If you are restoring back to a previous Windows 7 installation, you may need to Install Windows 7 Service Pack 1 to that installation.
This article is intended for a beginning to intermediate computer user.
More Information
To resolve this issue, follow the steps listed below to restore your computer back to a previous version of Windows using the Windows.OLD folder.
TIP: You may find it easier to follow the steps if you print this article first.
Step 1: Determine whether there is a Windows.old folder and whether there is sufficient free space on the Windows hard disk
Click Start 
On the View menu, click Details.
In the Free Space column, note how much space is available for Local Disk (C:) under the Hard Disk Drives area.
In the Hard Disk Drives area, double-click Local Disk (C:), and then determine whether the Windows.old folder exists.
Important If the Windows.old folder does not exist, you cannot follow the steps in this article to restore the previous Windows installation to this computer. You must backup and restore or transfer your files to the previous operating system.
Right-click the Windows.old folder.
Windows 7 will determine the size of the folder after several seconds.
Determine whether the Windows.old folder is smaller than the free space that is available for Local Disk (C:) in step 1.2.
Note If the Windows.old folder is two times as large as the free space that is available for the Local Disk (C:) entry, you may be unable to restore the previous Windows installation.
Step 2: Start the Windows Recovery Environment
Put the Windows 7 installation disc in the DVD drive, and then restart the computer.
Press a key when you are prompted to restart from the disc.
In the Install Windows window, select a language, a time, a currency, a keyboard input method or other input method, and then click Next.
In the Install Windows window, click Repair your computer.
In the System Recovery Options window, click the version of the Windows 7 operating system that you want to repair, and then click Next.
In the System Recovery Options window, click Command Prompt.
The Command Prompt window opens, and it displays the command prompt. The command prompt is where you will type the commands that are described in the following steps.
Step 3: Move the Windows 7 folders to a new Win7 folder
Note When you type one or more of the commands at the command prompt in the following steps and press ENTER, you may receive the following message:
The system cannot find the file specified.
If you receive this message, go to the next step in this section, and then type the command in that next step.
Type the following commands and press ENTER after each command:
Move Windows Win7\Windows
Move «Program Files» «Win7\Program Files»
Move Users Win7\Users
Attrib –h –s –r ProgramData
Move ProgramData Win7\ProgramData
Rd «Documents and Settings»
Step 4: Copy the contents or move the contents of the Windows.old folder
Note When you type one or more of the commands at the command prompt in the following steps and press ENTER, you may receive the following message:
The system cannot find the file specified.
If you receive this message, go to the next step in this section, and then type the command in the next step.
Type the following commands and press ENTER after each command:
move /y c:\Windows.old\Windows c:\
move /y «c:\Windows.old\Program Files» c:\
move /y c:\Windows.old\ProgramData c:\
move /y c:\Windows.old\Users c:\
move /y «c:\Windows.old\Documents and Settings» c:\
Step 5: Restore the boot sector for the previous Windows installation
Type one of the following commands at the command prompt, as appropriate for your situation.
Note In the following commands, D: represents the DVD drive. If the DVD drive on the computer is represented by a different letter, such as E:, use that letter in the command.
When the previous Windows installation was Windows Server 2003, Windows XP, or Microsoft Windows 2000
Type the following command, and then press ENTER:
D:\boot\bootsect /nt52 c:
When the previous Windows installation was Windows Vista
Type the following command, and then press ENTER:
D:\boot\bootsect /nt60 c:
Step 6: Restore the Boot.ini file for the previous Windows installation of Windows XP or of Windows 2000
Note Follow these steps only when the previous installation is Windows XP or Windows 2000.
Type the following commands and press ENTER after each command:
Attrib –h –s –r boot.ini.saved
Copy boot.ini.saved boot.ini
Step 7: Close the Command Prompt window, and then click Restart
Type the following command at the command prompt, and then press ENTER:
Click Restart to restart your computer.
Note After you have verified that Windows XP is functional, you can remove the C:\Win7 folder if it is not needed for data recovery.
How to restore a Windows 7-based computer to a previous Windows installation by using the Windows.old folder
INTRODUCTION
In certain scenarios you may need to restore your Windows 7 Computer back to the previous installation of Windows. This article walks you through the steps to manually restore your computer back to the previous version of Windows.
Note: To do this, you must use the command prompt, and you must type specific commands at the command prompt to rename and to move folders between the different versions of Windows.
Note: If you currently have Service Pack 1 for Windows 7 installed, the uninstall steps are the same as with Windows 7 without any service packs installed. If you are restoring back to a previous Windows 7 installation, you may need to Install Windows 7 Service Pack 1 to that installation.
This article is intended for a beginning to intermediate computer user.
More Information
To resolve this issue, follow the steps listed below to restore your computer back to a previous version of Windows using the Windows.OLD folder.
TIP: You may find it easier to follow the steps if you print this article first.
Step 1: Determine whether there is a Windows.old folder and whether there is sufficient free space on the Windows hard disk
Click Start 
On the View menu, click Details.
In the Free Space column, note how much space is available for Local Disk (C:) under the Hard Disk Drives area.
In the Hard Disk Drives area, double-click Local Disk (C:), and then determine whether the Windows.old folder exists.
Important If the Windows.old folder does not exist, you cannot follow the steps in this article to restore the previous Windows installation to this computer. You must backup and restore or transfer your files to the previous operating system.
Right-click the Windows.old folder.
Windows 7 will determine the size of the folder after several seconds.
Determine whether the Windows.old folder is smaller than the free space that is available for Local Disk (C:) in step 1.2.
Note If the Windows.old folder is two times as large as the free space that is available for the Local Disk (C:) entry, you may be unable to restore the previous Windows installation.
Step 2: Start the Windows Recovery Environment
Put the Windows 7 installation disc in the DVD drive, and then restart the computer.
Press a key when you are prompted to restart from the disc.
In the Install Windows window, select a language, a time, a currency, a keyboard input method or other input method, and then click Next.
In the Install Windows window, click Repair your computer.
In the System Recovery Options window, click the version of the Windows 7 operating system that you want to repair, and then click Next.
In the System Recovery Options window, click Command Prompt.
The Command Prompt window opens, and it displays the command prompt. The command prompt is where you will type the commands that are described in the following steps.
Step 3: Move the Windows 7 folders to a new Win7 folder
Note When you type one or more of the commands at the command prompt in the following steps and press ENTER, you may receive the following message:
The system cannot find the file specified.
If you receive this message, go to the next step in this section, and then type the command in that next step.
Type the following commands and press ENTER after each command:
Move Windows Win7\Windows
Move «Program Files» «Win7\Program Files»
Move Users Win7\Users
Attrib –h –s –r ProgramData
Move ProgramData Win7\ProgramData
Rd «Documents and Settings»
Step 4: Copy the contents or move the contents of the Windows.old folder
Note When you type one or more of the commands at the command prompt in the following steps and press ENTER, you may receive the following message:
The system cannot find the file specified.
If you receive this message, go to the next step in this section, and then type the command in the next step.
Type the following commands and press ENTER after each command:
move /y c:\Windows.old\Windows c:\
move /y «c:\Windows.old\Program Files» c:\
move /y c:\Windows.old\ProgramData c:\
move /y c:\Windows.old\Users c:\
move /y «c:\Windows.old\Documents and Settings» c:\
Step 5: Restore the boot sector for the previous Windows installation
Type one of the following commands at the command prompt, as appropriate for your situation.
Note In the following commands, D: represents the DVD drive. If the DVD drive on the computer is represented by a different letter, such as E:, use that letter in the command.
When the previous Windows installation was Windows Server 2003, Windows XP, or Microsoft Windows 2000
Type the following command, and then press ENTER:
D:\boot\bootsect /nt52 c:
When the previous Windows installation was Windows Vista
Type the following command, and then press ENTER:
D:\boot\bootsect /nt60 c:
Step 6: Restore the Boot.ini file for the previous Windows installation of Windows XP or of Windows 2000
Note Follow these steps only when the previous installation is Windows XP or Windows 2000.
Type the following commands and press ENTER after each command:
Attrib –h –s –r boot.ini.saved
Copy boot.ini.saved boot.ini
Step 7: Close the Command Prompt window, and then click Restart
Type the following command at the command prompt, and then press ENTER:
Click Restart to restart your computer.
Note After you have verified that Windows XP is functional, you can remove the C:\Win7 folder if it is not needed for data recovery.
Восстановление файлов предыдущей версии Windows (Windows.old)
Сегодня мы разберем: как вернуть предыдущую версию Windows, если была установлена Windows 8/10, зачем нужна папка Windows.old, почему она занимает много места и как её можно удалить.
Содержание:
Папка Windows.old представляет собой специальный каталог, внутри которого располагаются все данные предыдущей версии операционной системы. Данная папка появляется если пользователь обновил свою ОС до новой версии (к примеру, было произведено обновление Windows 8 до Windows 10).
Основное предназначение Windows.old – возможность быстрого отката текущей операционной системы до предыдущей версии, которая была установлена до обновления. Это может быть полезно, если пользователю не подошла более новая Windows по системным требованиям, функциям, дизайну или любым другим параметрам.
Стоит отметить, что помимо возврата операционной системы до предыдущего состояния, пользователь сможет вернуть все установленные приложения, настройки и файлы. Таким образом компьютер сможет вернуться до того состояния, когда была начата установка новой версии Windows.
Поскольку на каждом компьютере используются индивидуальный набор программного обеспечения, папка Windows.old может иметь различный размер, зависящий от количества хранящихся файлов, установленных программ и другой информации.
Важно! Папка Windows.old является временным каталогом, который будет автоматически удален через тридцать дней после установки системы.
Как вернуть систему до предыдущей версии
Если пользователь решил вернуть свою старую версию Windows после установки Windows 10, то такую процедуру можно быстро совершить при помощи интерфейса системы:
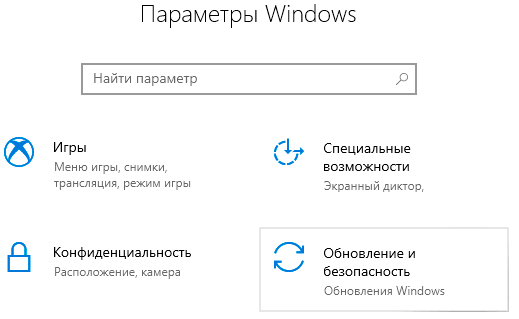
Шаг 1. Нажимаем правой кнопкой мыши по кнопке «Пуск» и в открывшемся меню выбираем пункт «Параметры».
Шаг 2. В открывшемся окне выбираем «Обновление и безопасность».
Шаг 3. В меню обновления следует перейти в графу «Восстановление», найти пункт «Вернуться к Windows» и нажать кнопку «Начать».
После этого будет произведена автоматическая установка предыдущей версии Windows, файлы которой располагались в папке Windows.old.
Восстановление данных из папки Windows.old
Помимо отката системы, папка Windows.old может использоваться для ручного восстановления файлов и данных, присутствовавших на старой версии ОС. Для этого достаточно перейти по пути «C:\Windows.old.» и отрыть в проводнике папку «C:\Windows.old.\Users\Имя пользователя», где будут находится данные со старой версии.
Если Вы обнаружили что некоторых важных файлов не хватает или они не сохранились в папке Windows.old – это может быть причиной некорректной работы переноса файлов во время установки новой Windows.
Данная проблема может возникать в редких случаях, поэтому разработчики операционной системы всегда рекомендуют создавать резервные копии важных данных, которые могут быть утеряны в процессе переноса.
Проблему удаления данных и файлов невозможно решить при помощи встроенных средств системы, а пользователю необходимо воспользоваться сторонними программами для восстановления файлов. Для этих целей компания Recovery Software предлагает воспользоваться одной из своих утилит, которые предназначены для восстановления информации после удаления, форматирования, уничтожения при изменениях логической структуры накопителя или действии вредоносных программ.
В арсенале Recovery Software, присутствуют следующие утилиты, способные быстро вернуть утерянные данные:
- RS Partition Recovery – специализированная утилита для комплексного восстановления утраченной информации. Функционал программы позволяет восстанавливать данные после форматирования, изменения файловой системы и перераспределения разделов диска. RS Partition Recovery подойдет для всех типов файлов.
- RS Office Recovery – программа для восстановления текстовых файлов, офисных документов и файлов, созданных в Microsoft Office, OpenOffice, Adobe и т.д. Возможности утилиты позволяют быстро отыскать важные документы, используя выборочный поиск по расширениям файлов, дате создания и другим характеристикам.
- RS Photo Recovery – программа для экстренного восстановления изображений, фотографий, картинок и других графических файлов любых типов. Утилита станет незаменимым помощником для фотографов, снимающих в RAW или хранящих обработанные фотографии в psd. RS Photo Recovery с легкостью восстановит случайно удаленную фотосессию с карты памяти, независимо от её формата.
Каждая из утилит поможет вернуть удаленные важные данные необходимого типа. Для работы программ используются сложные алгоритмы, позволяющие сканировать поверхность диска и проводить глубокую проверку для поиска всей возможной информации, которую можно восстановить. Программное обеспечение Recovery Software имеет доступные системные требования, что позволяет использовать утилиты на любом ноутбуке или офисном компьютере. Помимо этого, утилиты обладают интуитивно понятным интерфейсом и встроенными помощниками, которые помогут восстановить данные всего в несколько кликов.
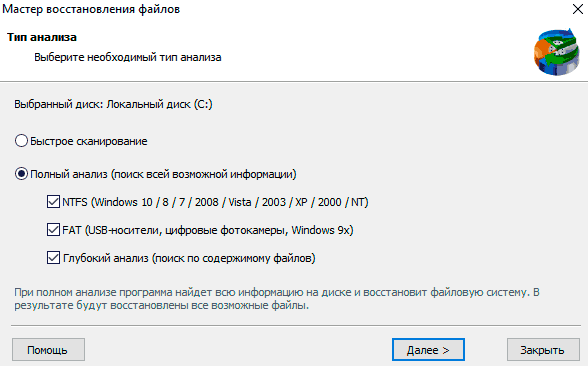
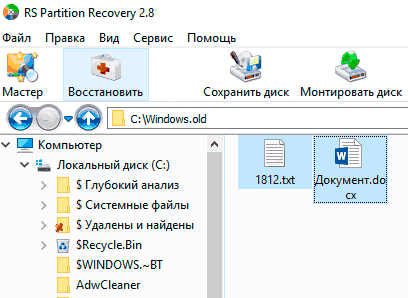
Для восстановления файлов в каталоге Windows.old, достаточно просканировать системный диск глубоким или быстрым сканированием и зайти через интерфейс программы в папку, где хранились данные.
Восстановить удаленные файлы можно соответствующей кнопкой, расположенной в левом верхнем углу окна программы для восстановления.
Как удалить папку Windows.old?
Если Вы убедились в том, что все важные данные были перенесены на новую операционную систему, то в папке Windows.old более нет нужды и её можно удалить, не дожидаясь месяца, когда произойдет автоматическая очистка.
Стоит отметить, что размер папки может достигать более 20 гигабайт, что может составлять значительную часть системного раздела, поэтому для удаления папки советуем проследовать таким шагам:
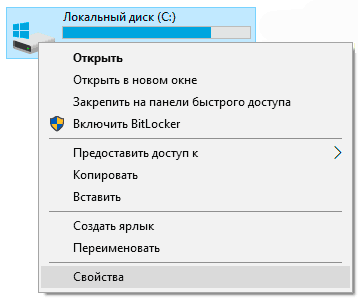
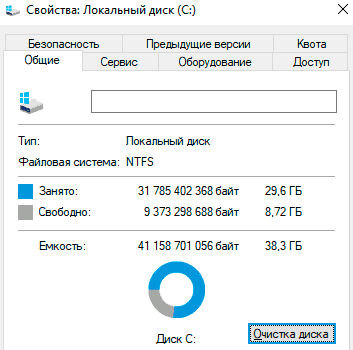
Шаг 1. Заходим в папку «Мой компьютер» или «Этот компьютер» и нажимаем правой кнопкой мышки по системному разделу (как правило это «Диск С»). В открывшемся меню выбираем пункт «Свойства».
Шаг 2. В открывшемся окне выбираем пункт «Очистка диска».
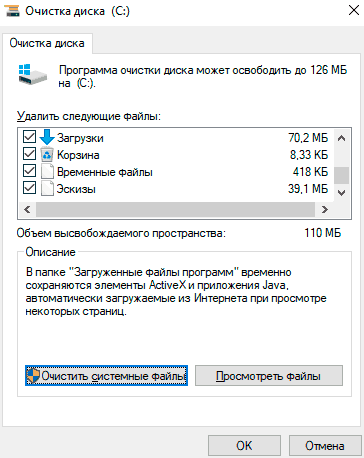
Шаг 3. В следующем окне следует нажать по кнопке «Очистить системные файлы».
Шаг 3. Для очистки папки Windows.old следует в графе «Удалить следующие данные» отметить пункт «Предыдущие установки Windows» и подтвердить действие кнопкой «Ок».
Помимо папки Windows.old на компьютере может храниться еще большое количество лишней информации, занимающей место на диске. Как с этим бороться, можно ознакомиться в статье «Безопасное удаление файлов с помощью функции Windows очистка диска».
Часто задаваемые вопросы
Это сильно зависит от емкости вашего жесткого диска и производительности вашего компьютера. В основном, большинство операций восстановления жесткого диска можно выполнить примерно за 3-12 часов для жесткого диска объемом 1 ТБ в обычных условиях.
Если файл не открывается, это означает, что файл был поврежден или испорчен до восстановления.
Используйте функцию «Предварительного просмотра» для оценки качества восстанавливаемого файла.
Когда вы пытаетесь получить доступ к диску, то получаете сообщение диск «X: \ не доступен». или «Вам нужно отформатировать раздел на диске X:», структура каталога вашего диска может быть повреждена. В большинстве случаев данные, вероятно, все еще остаются доступными. Просто запустите программу для восстановления данных и отсканируйте нужный раздел, чтобы вернуть их.
Пожалуйста, используйте бесплатные версии программ, с которыми вы можете проанализировать носитель и просмотреть файлы, доступные для восстановления.
Сохранить их можно после регистрации программы – повторное сканирование для этого не потребуется.


