- Windows Package Manager (preview)
- Windows Package Manager for developers
- Windows Package Manager for ISVs
- Understanding package managers
- Quickstart: Install and use a package in Visual Studio (Windows only)
- Prerequisites
- Create a project
- Add the Newtonsoft.Json NuGet package
- NuGet Package Manager
- Package Manager Console
- Use the Newtonsoft.Json API in the app
- Related video
- Next steps
- Install-Package
- Syntax
- Description
- Examples
- Example 1: Install a package by package name
- Example 2: Use Find-Package to install a package
- Example 3: Install packages by specifying a range of versions
- Parameters
- Inputs
- Outputs
- Notes
Windows Package Manager (preview)
Windows Package Manager and the winget tool are in public preview and may be substantially modified before they are generally available. Microsoft makes no warranties, express or implied, with respect to the information provided here.
Windows Package Manager is a comprehensive package manager solution that consists of a command line tool and set of services for installing applications on Windows 10.
Windows Package Manager for developers
Developers use the winget command line tool to discover, install, upgrade, remove and configure a curated set of applications. After it is installed, developers can access winget via the Windows Terminal, PowerShell, or the Command Prompt.
Windows Package Manager for ISVs
Independent Software Vendors (ISVs) can use Windows Package Manager as a distribution channel for software packages containing their tools and applications. To submit software packages (containing .msix, .msi, or .exe installers) to Windows Package Manager, we provide the open source Microsoft Community Package Manifest Repository on GitHub where ISVs can upload package manifests to have their software packages considered for inclusion with Windows Package Manager. Manifests are automatically validated and may also be reviewed manually.
Understanding package managers
A package manager is a system or set of tools used to automate installing, upgrading, configuring and using software. Most package managers are designed for discovering and installing developer tools.
Ideally, developers use a package manager to specify the prerequisites for the tools they need to develop solutions for a given project. The package manager then follows the declarative instructions to install and configure the tools. The package manager reduces the time spent getting an environment ready, and it helps ensure the same versions of packages are installed on their machine.
Third party package managers can leverage the Microsoft Community Package Manifest Repository to increase the size of their software catalog.
Quickstart: Install and use a package in Visual Studio (Windows only)
NuGet packages contain reusable code that other developers make available to you for use in your projects. See What is NuGet? for background. Packages are installed into a Visual Studio project using the NuGet Package Manager, the Package Manager Console, or the dotnet CLI. This article demonstrates the process using the popular Newtonsoft.Json package and a Windows Presentation Foundation (WPF) project. The same process applies to any other .NET or .NET Core project.
Once installed, refer to the package in code with using where is specific to the package you’re using. Once the reference is made, you can call the package through its API.
Start with nuget.org: Browsing nuget.org is how .NET developers typically find components they can reuse in their own applications. You can search nuget.org directly or find and install packages within Visual Studio as shown in this article. For general information, see Find and evaluate NuGet packages.
Prerequisites
- Visual Studio 2019 with the .NET Desktop Development workload.
You can install the 2019 Community edition for free from visualstudio.com or use the Professional or Enterprise editions.
Create a project
NuGet packages can be installed into any .NET project, provided that the package supports the same target framework as the project.
For this walkthrough, use a simple WPF app. Create a project in Visual Studio using File > New Project, typing .NET in the search box, and then selecting the WPF App (.NET Framework). Click Next. Accept the default values for Framework when prompted.
Visual Studio creates the project, which opens in Solution Explorer.
Add the Newtonsoft.Json NuGet package
To install the package, you can use either the NuGet Package Manager or the Package Manager Console. When you install a package, NuGet records the dependency in either your project file or a packages.config file (depending on the project format). For more information, see Package consumption overview and workflow.
NuGet Package Manager
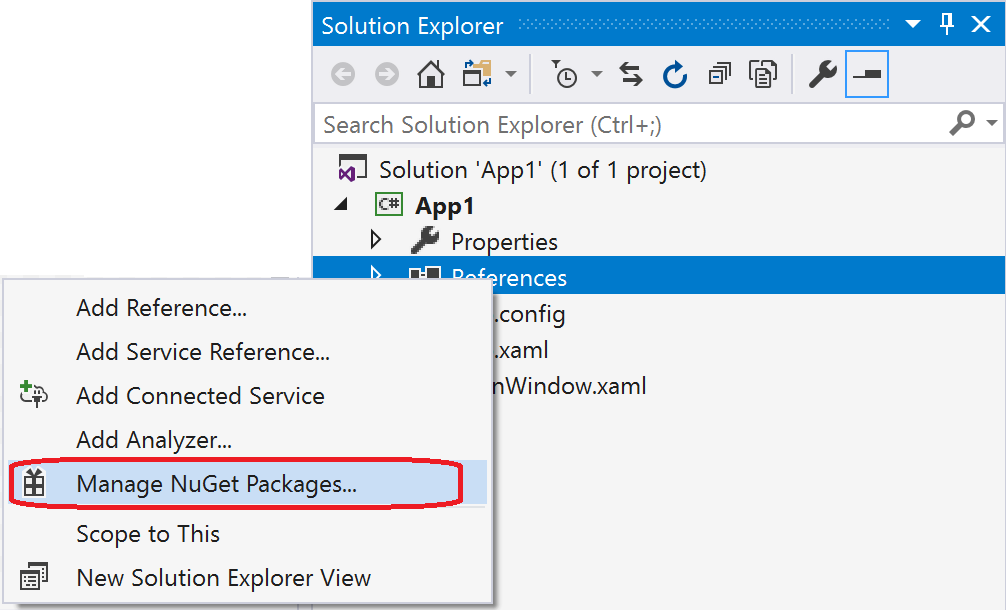
In Solution Explorer, right-click References and choose Manage NuGet Packages.
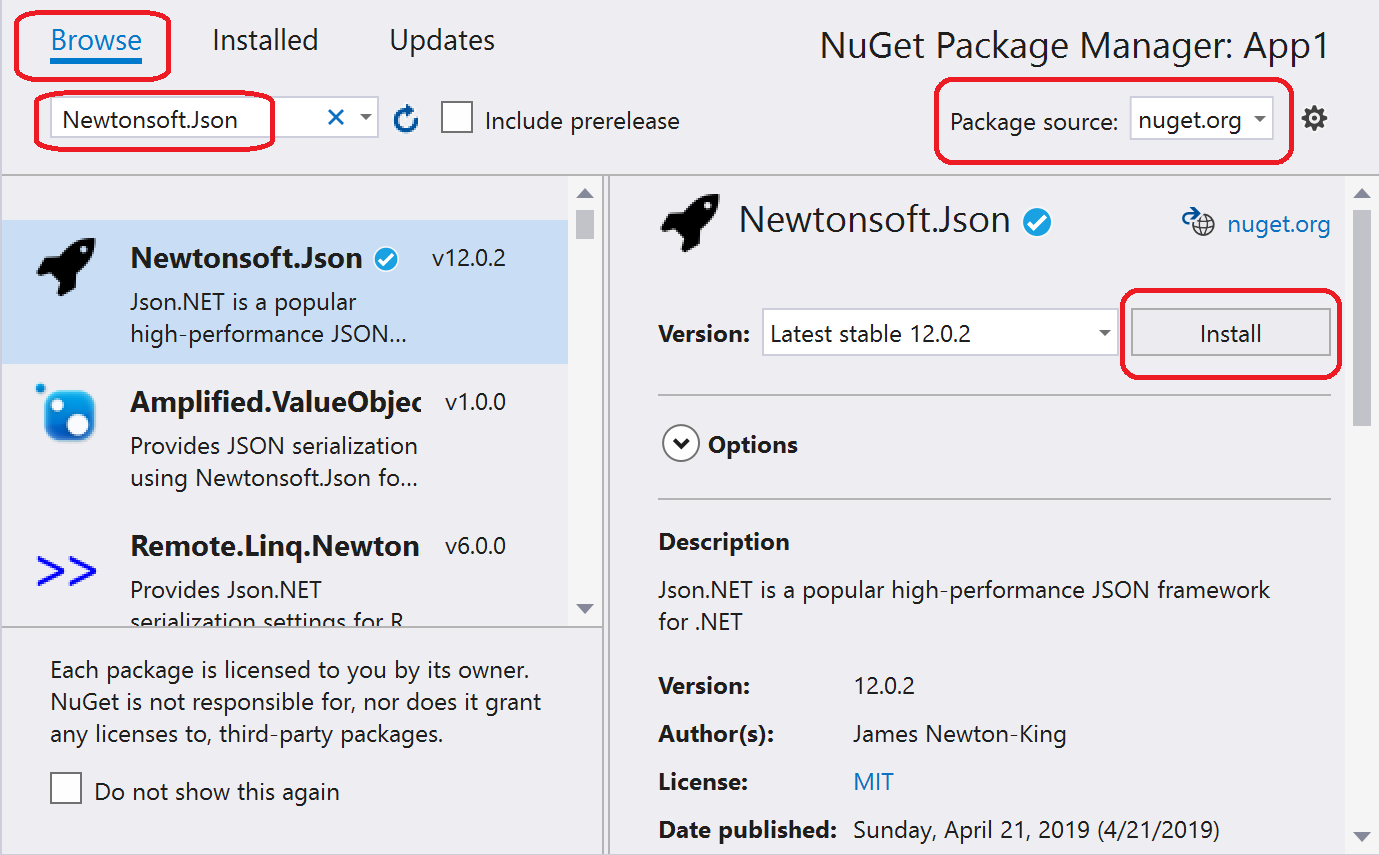
Choose «nuget.org» as the Package source, select the Browse tab, search for Newtonsoft.Json, select that package in the list, and select Install:
If you want more information on the NuGet Package Manager, see Install and manage packages using Visual Studio.
Accept any license prompts.
(Visual Studio 2017 only) If prompted to select a package management format, select PackageReference in project file:

If prompted to review changes, select OK.
Package Manager Console
Select the Tools > NuGet Package Manager > Package Manager Console menu command.
Once the console opens, check that the Default project drop-down list shows the project into which you want to install the package. If you have a single project in the solution, it is already selected.
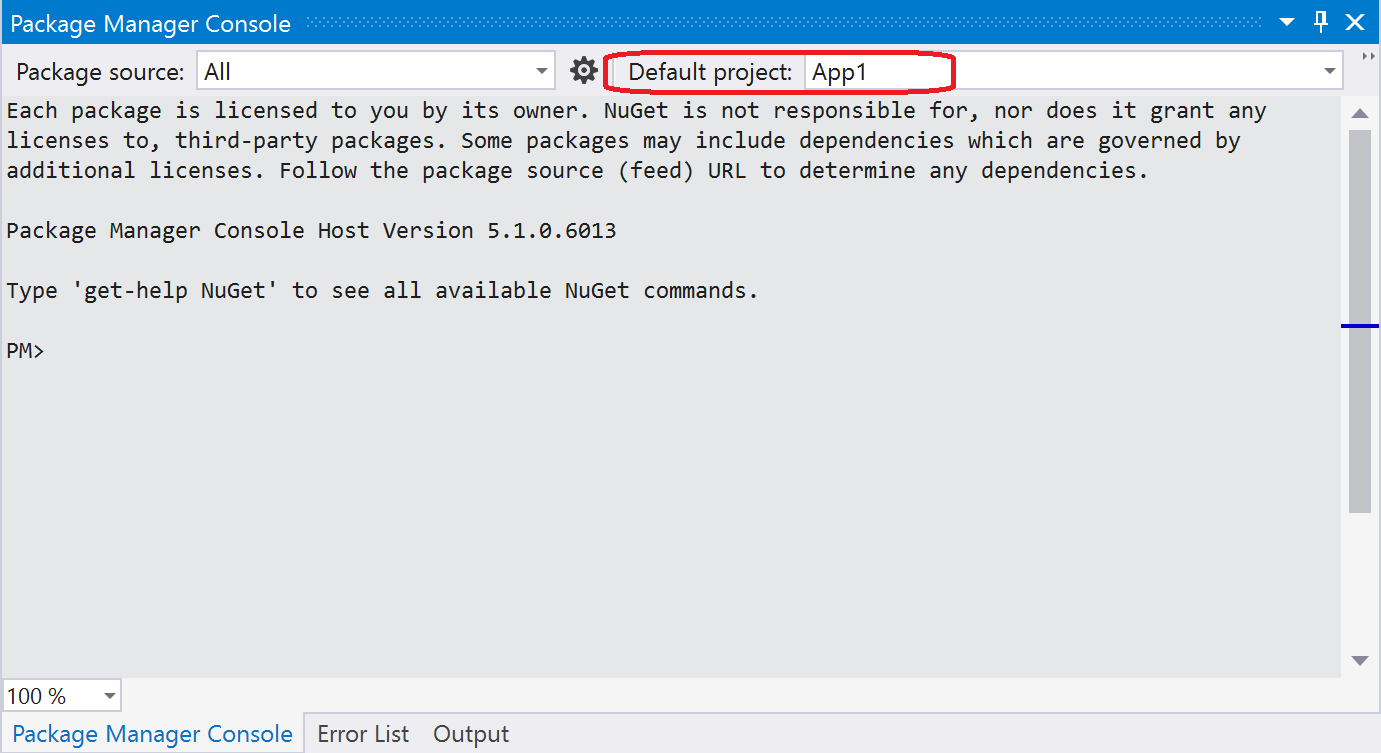
Enter the command Install-Package Newtonsoft.Json (see Install-Package). The console window shows output for the command. Errors typically indicate that the package isn’t compatible with the project’s target framework.
If you want more information on the Package Manager Console, see Install and manage packages using Package Manager Console.
Use the Newtonsoft.Json API in the app
With the Newtonsoft.Json package in the project, you can call its JsonConvert.SerializeObject method to convert an object to a human-readable string.
Open MainWindow.xaml and replace the existing Grid element with the following:
Open the MainWindow.xaml.cs file (located in Solution Explorer under the MainWindow.xaml node), and insert the following code inside the MainWindow class:
Even though you added the Newtonsoft.Json package to the project, red squiggles appears under JsonConvert because you need a using statement at the top of the code file:
Build and run the app by pressing F5 or selecting Debug > Start Debugging:

Select on the button to see the contents of the TextBlock replaced with some JSON text:

Related video
Find more NuGet videos on Channel 9 and YouTube.
Next steps
Congratulations on installing and using your first NuGet package!
To explore more that NuGet has to offer, select the links below.
Install-Package
Installs one or more software packages.
Syntax
Description
The Install-Package cmdlet installs one or more software packages on the local computer. If you have multiple software sources, use Get-PackageProvider and Get-PackageSource to display details about your providers.
Examples
Example 1: Install a package by package name
The Install-Package cmdlet installs a software package and its dependencies.
Install-Package uses parameters to specify the packages Name and Source. The Credential parameter uses a domain user account with permissions to install packages. The command prompts you for the user account password.
Example 2: Use Find-Package to install a package
In this example, the object returned by Find-Package is sent down the pipeline and installed by Install-Package .
Find-Package uses the Name and Source parameters to locate a package. The object is sent down the pipeline and Install-Package installs the package on the local computer.
Example 3: Install packages by specifying a range of versions
Install-Package uses the MinimumVersion and MaximumVersion parameters to specify a range of software versions.
Install-Package uses the Name and Source parameters to find a package. The MinimumVersion and MaximumVersion parameters specify a range of software versions. The highest version in the range is installed.
Parameters
AcceptLicense automatically accepts the license agreement during installation.
| Type: | SwitchParameter |
| Position: | Named |
| Default value: | None |
| Accept pipeline input: | False |
| Accept wildcard characters: | False |
Overrides warning messages about conflicts with existing commands. Overwrites existing commands that have the same name as commands being installed.
| Type: | SwitchParameter |
| Position: | Named |
| Default value: | None |
| Accept pipeline input: | False |
| Accept wildcard characters: | False |
Allows the installation of packages marked as prerelease.
| Type: | SwitchParameter |
| Position: | Named |
| Default value: | None |
| Accept pipeline input: | False |
| Accept wildcard characters: | False |
Install-Package installs all available versions of the package. By default, only the newest version is installed.
| Type: | SwitchParameter |
| Position: | Named |
| Default value: | None |
| Accept pipeline input: | False |
| Accept wildcard characters: | False |
Specifies one or more commands that Install-Package searches.
| Type: | String [ ] |
| Position: | Named |
| Default value: | None |
| Accept pipeline input: | False |
| Accept wildcard characters: | False |
Specifies a path that contains a configuration file.
| Type: | String |
| Position: | Named |
| Default value: | None |
| Accept pipeline input: | False |
| Accept wildcard characters: | False |
Prompts you for confirmation before running the cmdlet.
| Type: | SwitchParameter |
| Aliases: | cf |
| Position: | Named |
| Default value: | False |
| Accept pipeline input: | False |
| Accept wildcard characters: | False |
Install-Package gets objects if the Contains parameter specifies a value that matches any of the object’s property values.
| Type: | String |
| Position: | Named |
| Default value: | None |
| Accept pipeline input: | False |
| Accept wildcard characters: | False |
Specifies a user account that has permission to access the computer and run commands. Type a user name, such as User01, Domain01\User01, or enter a PSCredential object, generated by the Get-Credential cmdlet. If you type a user name, you’re prompted for a password.
When the Credential parameter isn’t specified, Install-Package uses the current user.
| Type: | PSCredential |
| Position: | Named |
| Default value: | None |
| Accept pipeline input: | False |
| Accept wildcard characters: | False |
Specifies a path to an input object.
| Type: | String |
| Position: | Named |
| Default value: | None |
| Accept pipeline input: | False |
| Accept wildcard characters: | False |
Specifies one or more Desired State Configuration (DSC) resources that are searched by Install-Package . Use the Find-DscResource cmdlet to find DSC resources.
| Type: | String [ ] |
| Position: | Named |
| Default value: | None |
| Accept pipeline input: | False |
| Accept wildcard characters: | False |
Switch to exclude the version number in the folder path.
| Type: | SwitchParameter |
| Position: | Named |
| Default value: | None |
| Accept pipeline input: | False |
| Accept wildcard characters: | False |
Specifies terms to search for within the Name and Description properties.
| Type: | String |
| Position: | Named |
| Default value: | None |
| Accept pipeline input: | False |
| Accept wildcard characters: | False |
Specifies a tag that filters results and excludes results that don’t contain the specified tag.
| Type: | String [ ] |
| Position: | Named |
| Default value: | None |
| Accept pipeline input: | False |
| Accept wildcard characters: | False |
Forces the command to run without asking for user confirmation. Overrides restrictions that prevent Install-Package from succeeding, with the exception of security.
| Type: | SwitchParameter |
| Position: | Named |
| Default value: | None |
| Accept pipeline input: | False |
| Accept wildcard characters: | False |
Forces PackageManagement to automatically install the package provider for the specified package.
| Type: | SwitchParameter |
| Position: | Named |
| Default value: | None |
| Accept pipeline input: | False |
| Accept wildcard characters: | False |
Specifies the package headers.
| Type: | String [ ] |
| Position: | Named |
| Default value: | None |
| Accept pipeline input: | False |
| Accept wildcard characters: | False |
Specifies whether Install-Package should find all package types. The acceptable values for this parameter are as follows:
- Cmdlet
- DscResource
- Function
- RoleCapability
- Workflow
| Type: | String [ ] |
| Accepted values: | Cmdlet, DscResource, Function, RoleCapability, Workflow |
| Position: | Named |
| Default value: | None |
| Accept pipeline input: | False |
| Accept wildcard characters: | False |
Accepts pipeline input. Specifies a package by using the package’s SoftwareIdentity type. Find-Package outputs a SoftwareIdentity object.
| Type: | Microsoft.PackageManagement.Packaging.SoftwareIdentity [ ] |
| Position: | 0 |
| Default value: | None |
| Accept pipeline input: | True |
| Accept wildcard characters: | False |
Indicates that Install-Package installs updates.
| Type: | SwitchParameter |
| Position: | Named |
| Default value: | None |
| Accept pipeline input: | False |
| Accept wildcard characters: | False |
Specifies the maximum allowed package version that you want to install. If you don’t specify this parameter, Install-Package installs the package’s newest version.
| Type: | String |
| Position: | Named |
| Default value: | None |
| Accept pipeline input: | False |
| Accept wildcard characters: | False |
Specifies the minimum allowed package version that you want to install. If you don’t add this parameter, Install-Package installs the package’s newest version that satisfies any version specified by the MaximumVersion parameter.
| Type: | String |
| Position: | Named |
| Default value: | None |
| Accept pipeline input: | False |
| Accept wildcard characters: | False |
Specifies one or more package names. Multiple package names must be separated by commas.
| Type: | String [ ] |
| Position: | 0 |
| Default value: | None |
| Accept pipeline input: | False |
| Accept wildcard characters: | False |
NoPathUpdate only applies to the Install-Script cmdlet. NoPathUpdate is a dynamic parameter added by the provider and isn’t supported by Install-Package .
| Type: | SwitchParameter |
| Position: | Named |
| Default value: | None |
| Accept pipeline input: | False |
| Accept wildcard characters: | False |
Specifies the name of the PackageManagement provider.
| Type: | String |
| Position: | Named |
| Default value: | None |
| Accept pipeline input: | False |
| Accept wildcard characters: | False |
Specifies one or more package provider names to which to scope your package search. You can get package provider names by running the Get-PackageProvider cmdlet.
| Type: | String [ ] |
| Aliases: | Provider |
| Accepted values: | Bootstrap, NuGet, PowerShellGet |
| Position: | Named |
| Default value: | None |
| Accept pipeline input: | True |
| Accept wildcard characters: | False |
Specifies a proxy server for the request, rather than connecting directly to an internet resource.
| Type: | Uri |
| Position: | Named |
| Default value: | None |
| Accept pipeline input: | False |
| Accept wildcard characters: | False |
Specifies a user account that has permission to use the proxy server specified by the Proxy parameter.
| Type: | PSCredential |
| Position: | Named |
| Default value: | None |
| Accept pipeline input: | False |
| Accept wildcard characters: | False |
Specifies the path to a package’s published location.
| Type: | String |
| Position: | Named |
| Default value: | None |
| Accept pipeline input: | False |
| Accept wildcard characters: | False |
Specifies the exact allowed version of the package that you want to install. If you don’t add this parameter, Install-Package installs the package’s newest version that satisfies any version specified by the MaximumVersion parameter.
| Type: | String |
| Position: | Named |
| Default value: | None |
| Accept pipeline input: | False |
| Accept wildcard characters: | False |
Specifies an array of role capabilities.
| Type: | String [ ] |
| Position: | Named |
| Default value: | None |
| Accept pipeline input: | False |
| Accept wildcard characters: | False |
Specifies the scope for which to install the package. The acceptable values for this parameter are as follows:
- CurrentUser
- AllUsers
| Type: | String |
| Accepted values: | CurrentUser, AllUsers |
| Position: | Named |
| Default value: | None |
| Accept pipeline input: | False |
| Accept wildcard characters: | False |
Specifies the path to a script’s published location.
| Type: | String |
| Position: | Named |
| Default value: | None |
| Accept pipeline input: | False |
| Accept wildcard characters: | False |
Specifies the script source location.
| Type: | String |
| Position: | Named |
| Default value: | None |
| Accept pipeline input: | False |
| Accept wildcard characters: | False |
Skips the installation of software dependencies.
| Type: | SwitchParameter |
| Position: | Named |
| Default value: | None |
| Accept pipeline input: | False |
| Accept wildcard characters: | False |
Allows you to get a package version that is newer than your installed version. For example, an installed package that is digitally signed by a trusted publisher but a new version isn’t digitally signed.
| Type: | SwitchParameter |
| Position: | Named |
| Default value: | None |
| Accept pipeline input: | False |
| Accept wildcard characters: | False |
Switch that skips validating the credentials of a package.
| Type: | SwitchParameter |
| Position: | Named |
| Default value: | None |
| Accept pipeline input: | False |
| Accept wildcard characters: | False |
Specifies one or more package sources. Multiple package source names must be separated by commas. You can get package source names by running the Get-PackageSource cmdlet.
| Type: | String [ ] |
| Position: | Named |
| Default value: | None |
| Accept pipeline input: | True |
| Accept wildcard characters: | False |
Specifies one or more strings to search for in the package metadata.
| Type: | String [ ] |
| Position: | Named |
| Default value: | None |
| Accept pipeline input: | False |
| Accept wildcard characters: | False |
Specifies whether to search for packages with a module, a script, or both. The acceptable values for this parameter are as follows:
- Module
- Script
- All
| Type: | String |
| Accepted values: | Module, Script, All |
| Position: | Named |
| Default value: | None |
| Accept pipeline input: | False |
| Accept wildcard characters: | False |
Shows what would happen if Install-Package cmdlet is run. The cmdlet is not run.
| Type: | SwitchParameter |
| Aliases: | wi |
| Position: | Named |
| Default value: | False |
| Accept pipeline input: | False |
| Accept wildcard characters: | False |
Inputs
`Install-Package` accepts input from the pipeline.
Outputs
SoftwareIdentity [ ]
Notes
Including a package provider in a command can make dynamic parameters available to a cmdlet. Dynamic parameters are specific to a package provider. The Get-Help cmdlet lists a cmdlet’s parameter sets and includes the provider’s parameter set. For example, Install-Package has the PowerShellGet parameter set that includes -NoPathUpdate , AllowClobber , and SkipPublisherCheck .
As of April 2020, the PowerShell Gallery no longer supports Transport Layer Security (TLS) versions 1.0 and 1.1. If you are not using TLS 1.2 or higher, you will receive an error when trying to access the PowerShell Gallery. Use the following command to ensure you are using TLS 1.2:
For more information, see the announcement in the PowerShell blog.


