- Введение в библиотеку pandas: установка и первые шаги / pd 1
- Библиотека Python для анализа данных
- Установка pandas
- Установка в Anaconda
- Установка из PyPI
- Установка в Linux
- Установка из источника
- Репозиторий для Windows
- Проверка установки pandas
- Первые шаги с pandas
- How to Install Python Pandas on Windows and Linux?
- What if Python already exists? Let’s check
- Downloading and Installing Pandas
- Windows
- Install Pandas using pip
- Install Pandas using Anaconda
- Linux
- # Installation
- # Plan for dropping Python 2.7
- # Python version support
- # Installing pandas
- # Installing with Anaconda
- # Installing with Miniconda
- # Installing from PyPI
- # Installing with ActivePython
- # Installing using your Linux distribution’s package manager.
- # Installing from source
- # Running the test suite
- # Dependencies
- # Recommended dependencies
- # Optional dependencies
- # Optional dependencies for parsing HTML
Введение в библиотеку pandas: установка и первые шаги / pd 1
Библиотека pandas в Python — это идеальный инструмент для тех, кто занимается анализом данных, используя для этого язык программирования Python.
В этом материале речь сначала пойдет об основных аспектах библиотеки и о том, как установить ее в систему. Потом вы познакомитесь с двумя структурам данных: series и dataframes . Сможете поработать с базовым набором функций, предоставленных библиотекой pandas, для выполнения основных операций по обработке. Знакомство с ними — ключевой навык для специалиста в этой сфере. Поэтому так важно перечитать материал до тех, пока он не станет понятен на 100%.
А на примерах сможете разобраться с новыми концепциями, появившимися в библиотеке — индексацией структур данных. Научитесь правильно ее использовать для управления данными. В конце концов, разберетесь с тем, как расширить возможности индексации для работы с несколькими уровнями одновременно, используя для этого иерархическую индексацию.
Библиотека Python для анализа данных
Pandas — это библиотека Python с открытым исходным кодом для специализированного анализа данных. Сегодня все, кто использует Python для изучения статистических целей анализа и принятия решений, должны быть с ней знакомы.
Библиотека была спроектирована и разработана преимущественно Уэсом Маккини в 2008 году. В 2012 к нему присоединился коллега Чан Шэ. Вместе они создали одну из самых используемых библиотек в сообществе Python.
Pandas появилась из необходимости в простом инструменте для обработки, извлечения и управления данными.
Этот пакет Python спроектирован на основе библиотеки NumPy. Такой выбор обуславливает успех и быстрое распространение pandas. Он также пользуется всеми преимуществами NumPy и делает pandas совместимой с большинством другим модулей.
Еще одно важное решение — разработка специальных структур для анализа данных. Вместо того, чтобы использовать встроенные в Python или предоставляемые другими библиотеками структуры, были разработаны две новых.
Они спроектированы для работы с реляционными и классифицированными данными, что позволяет управлять данными способом, похожим на тот, что используется в реляционных базах SQL и таблицах Excel.
Дальше вы встретите примеры базовых операций для анализа данных, которые обычно используются на реляционных или таблицах Excel. Pandas предоставляет даже более расширенный набор функций и методов, позволяющих выполнять эти операции эффективнее.
Основная задача pandas — предоставить все строительные блоки для всех, кто погружается в мир анализа данных.
Установка pandas
Простейший способ установки библиотеки pandas — использование собранного решения, то есть установка через Anaconda или Enthought.
Установка в Anaconda
В Anaconda установка занимает пару минут. В первую очередь нужно проверить, не установлен ли уже pandas, и если да, то какая это версия. Для этого введите следующую команду в терминале:
Если модуль уже установлен (например в Windows), вы получите приблизительно следующий результат:
Если pandas не установлена, ее необходимо установить. Введите следующую команду:
Anaconda тут же проверит все зависимости и установит дополнительные модули.
Если требуется обновить пакет до более новой версии, используется эта интуитивная команда:
Система проверит версию pandas и версию всех модулей, а затем предложит соответствующие обновления. Затем предложит перейти к обновлению.
Установка из PyPI
Pandas можно установить и с помощью PyPI, используя эту команду:
Установка в Linux
Если вы работаете в дистрибутиве Linux и решили не использовать эти решения, то pandas можно установить как и любой другой пакет.
В Debian и Ubuntu используется команда:
А для OpenSuse и Fedora — эта:
Установка из источника
Если есть желание скомпилировать модуль pandas из исходного кода, тогда его можно найти на GitHub по ссылке https://github.com/pandas-dev/pandas:
Убедитесь, что Cython установлен. Больше об этом способе можно прочесть в документации: (http://pandas.pydata.org/pandas-docs/stable/install.html).
Репозиторий для Windows
Если вы работаете в Windows и предпочитаете управлять пакетами так, чтобы всегда была установлена последняя версия, то существует ресурс, где всегда можно загрузить модули для Windows: Christoph Gohlke’s Python Extension Packages for Windows (www.lfd.uci.edu/
gohlke/pythonlibs/). Каждый модуль поставляется в формате WHL для 32 и 64-битных систем. Для установки нужно использовать приложение pip:
Например, для установки pandas потребуется найти и загрузить следующий пакет:
При выборе модуля важно выбрать нужную версию Python и архитектуру. Более того, если для NumPy пакеты не требуются, то у pandas есть зависимости. Их также необходимо установить. Порядок установки не имеет значения.
Недостаток такого подхода в том, что нужно устанавливать пакеты отдельно без менеджера, который бы помог подобрать нужные версии и зависимости между разными пакетами. Плюс же в том, что появляется возможность освоиться с модулями и получить последние версии вне зависимости от того, что выберет дистрибутив.
Проверка установки pandas
Библиотека pandas может запустить проверку после установки для верификации управляющих элементов (документация утверждает, что тест покрывает 97% всего кода).
Во-первых, нужно убедиться, что установлен модуль nose . Если он имеется, то тестирование проводится с помощью следующей команды:
Оно займет несколько минут и в конце покажет список проблем.
Этот модуль спроектирован для проверки кода Python во время этапов разработки проекта или модуля Python. Он расширяет возможности модуль unittest . Nose используется для проверки кода и упрощает процесс.
Здесь о нем можно почитать подробнее: _http://pythontesting.net/framework/nose/nose-introduction/.
Первые шаги с pandas
Лучший способ начать знакомство с pandas — открыть консоль Python и вводить команды одна за одной. Таким образом вы познакомитесь со всеми функциями и структурами данных.
Более того, данные и функции, определенные здесь, будут работать и в примерах будущих материалов. Однако в конце каждого примера вы вольны экспериментировать с ними.
Для начала откройте терминал Python и импортируйте библиотеку pandas. Стандартная практика для импорта модуля pandas следующая:
Теперь, каждый раз встречая pd и np вы будете ссылаться на объект или метод, связанный с этими двумя библиотеками, хотя часто будет возникать желание импортировать модуль таким образом:
В таком случае ссылаться на функцию, объект или метод с помощью pd уже не нужно, а это считается не очень хорошей практикой в среде разработчиков Python.
Источник
How to Install Python Pandas on Windows and Linux?
Pandas in Python is a package that is written for data analysis and manipulation. Pandas offer various operations and data structures to perform numerical data manipulations and time series. Pandas is an open-source library that is built over Numpy libraries. Pandas library is known for its high productivity and high performance. Pandas is popular because it makes importing and analyzing data much easier.
Pandas programs can be written on any plain text editor like notepad, notepad++, or anything of that sort and saved with a .py extension. To begin with, writing Pandas Codes and performing various intriguing and useful operations, one must have Python installed on their System. This can be done by following the step by step instructions provided below:
Attention geek! Strengthen your foundations with the Python Programming Foundation Course and learn the basics.
To begin with, your interview preparations Enhance your Data Structures concepts with the Python DS Course. And to begin with your Machine Learning Journey, join the Machine Learning — Basic Level Course
What if Python already exists? Let’s check
To check if your device is pre-installed with Python or not, just go to the Command line(search for cmd in the Run dialog( + R).
Now run the following command:
If Python is already installed, it will generate a message with the Python version available.
To install Python, please visit: How to Install Python on Windows or Linux?
Downloading and Installing Pandas
Pandas can be installed in multiple ways on Windows and on Linux. Various different ways are listed below:
Windows
Python Pandas can be installed on Windows in two ways:
- Using pip
- Using Anaconda
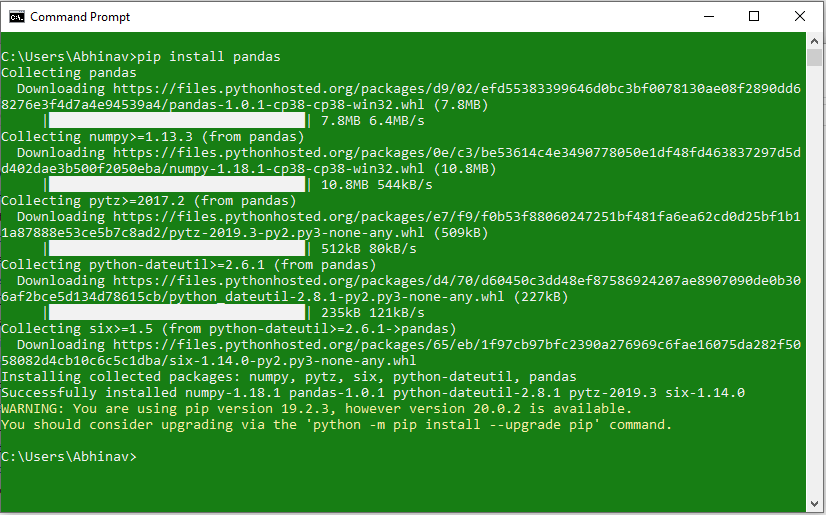
Install Pandas using pip
PIP is a package management system used to install and manage software packages/libraries written in Python. These files are stored in a large “on-line repository” termed as Python Package Index (PyPI).
Pandas can be installed using PIP by the use of the following command:
Install Pandas using Anaconda
Anaconda is open-source software that contains Jupyter, spyder, etc that are used for large data processing, data analytics, heavy scientific computing. If your system is not pre-equipped with Anaconda Navigator, you can learn how to install Anaconda Navigator on Windows or Linux?
Steps to Install Pandas using Anaconda Navigator:
Step 1: Search for Anaconda Navigator in Start Menu and open it.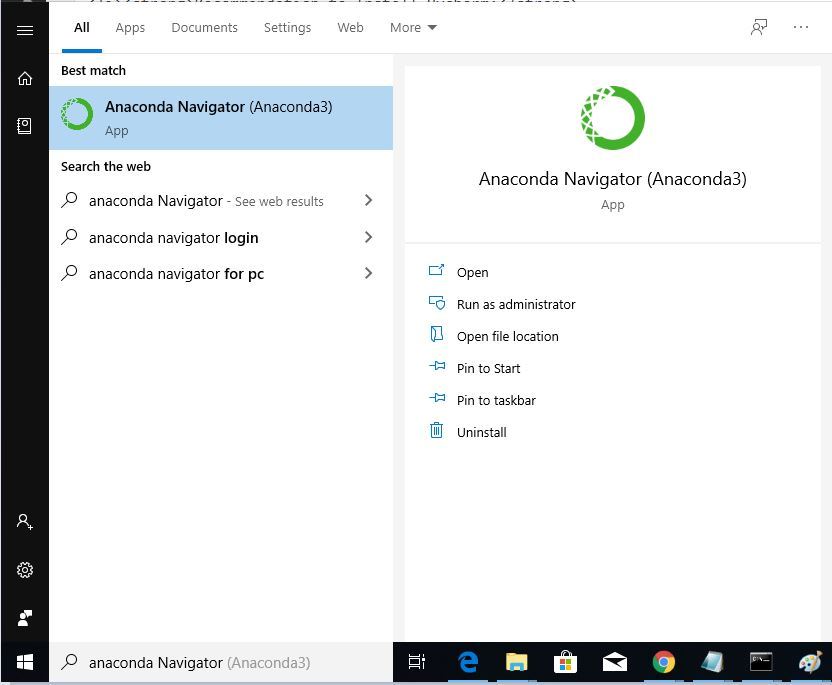
Step 2: Click on the Environment tab and then click on the create button to create a new Pandas Environment.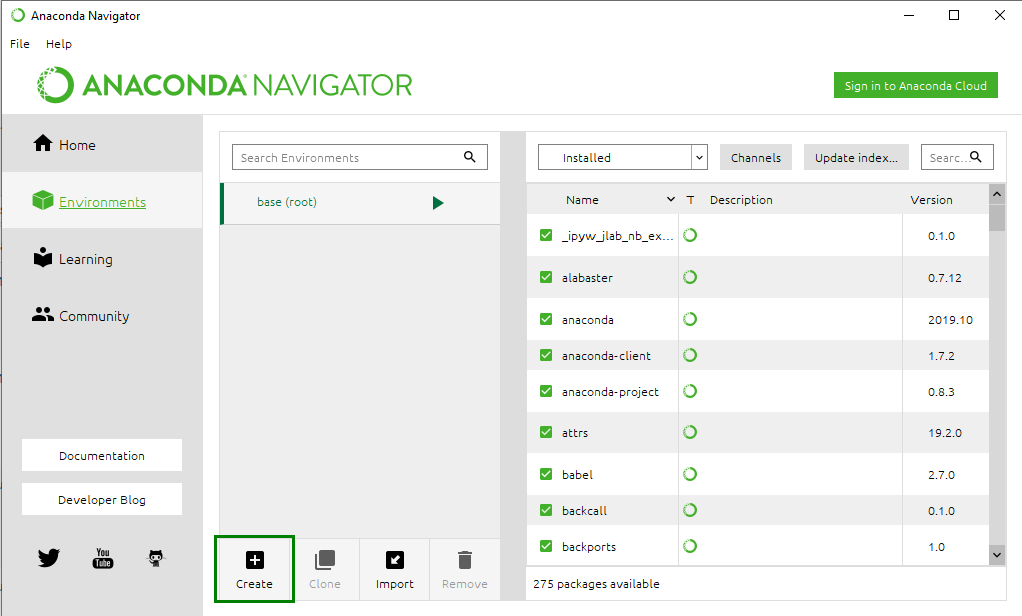
Step 3: Give a name to your Environment, e.g. Pandas and then choose a python version to run in the environment. Now click on the Create button to create Pandas Environment.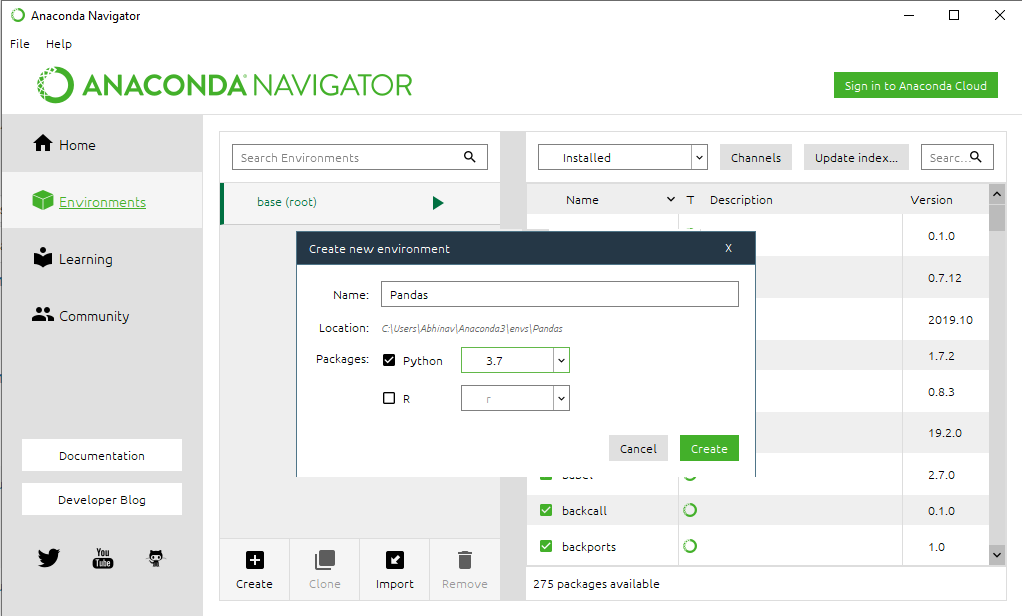
Step 4: Now click on the Pandas Environment created to activate it.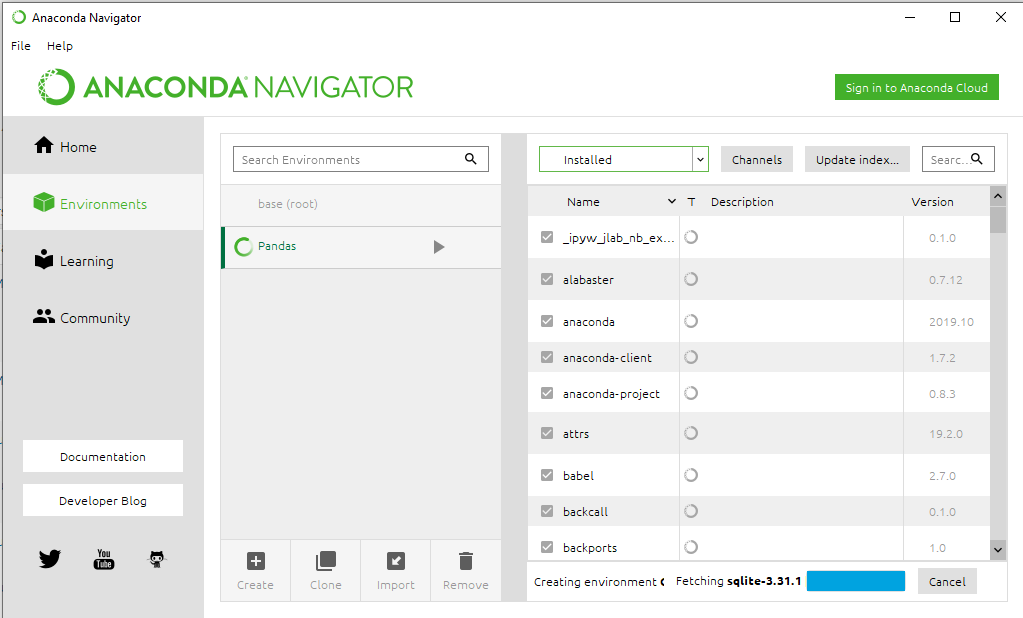
Step 5: In the list above package names, select All to filter all the packages.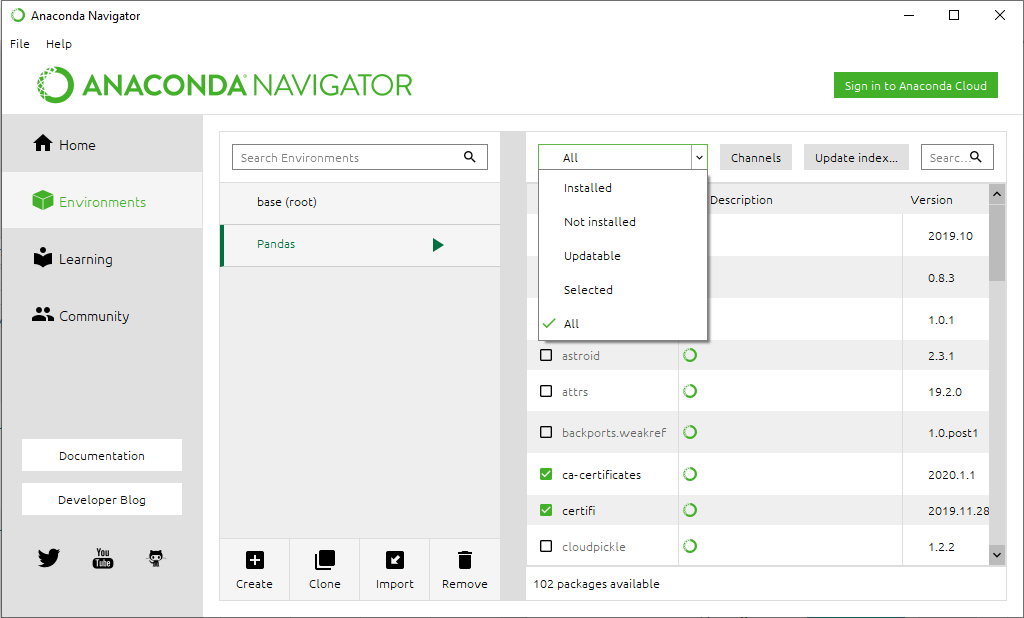
Step 6: Now in the Search Bar, look for ‘Pandas‘. Select the Pandas package for Installation.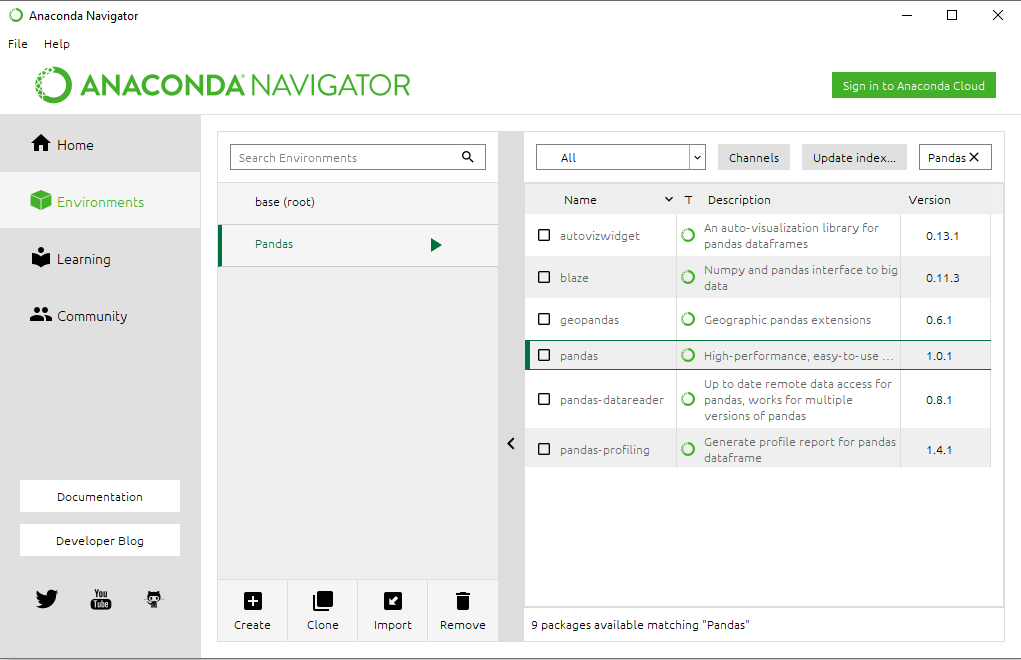
Step 7: Now Right Click on the checkbox given before the name of the package and then go to ‘Mark for specific version installation‘. Now select the version that you want to install.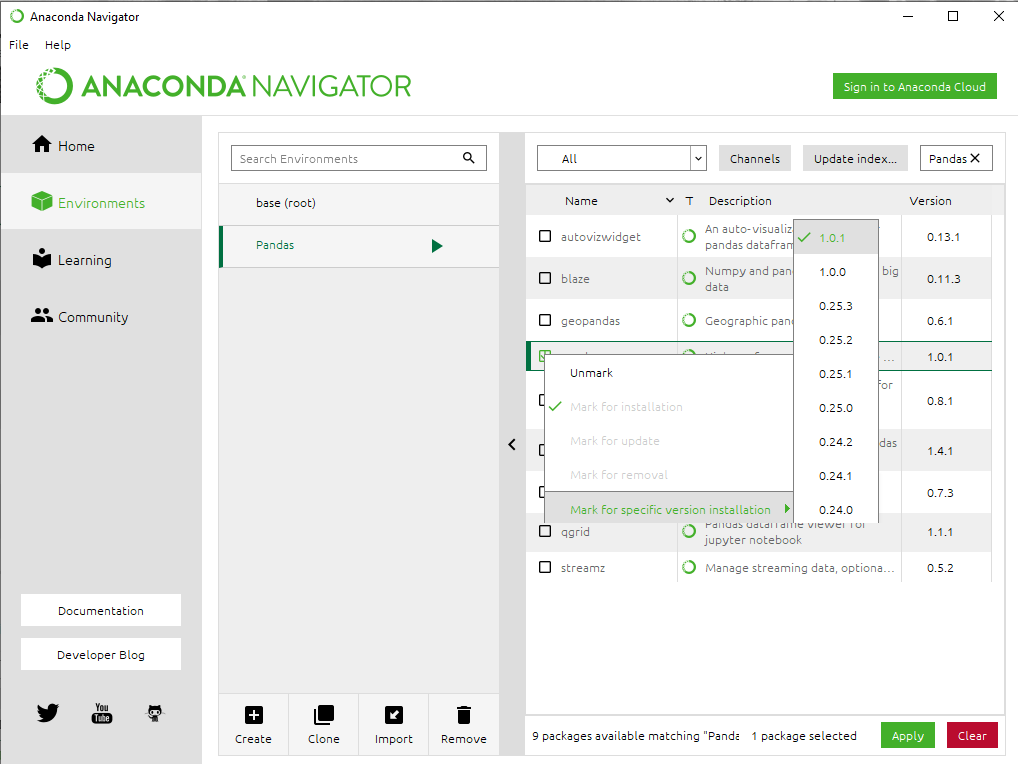
Step 8: Click on the Apply button to install the Pandas Package.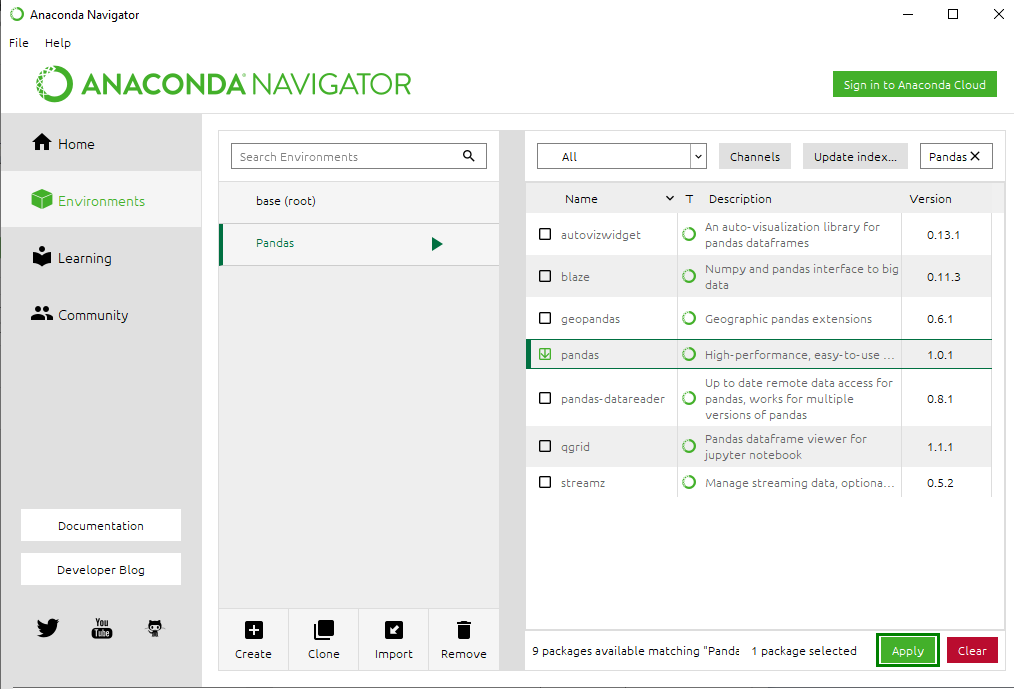
Step 9: Finish the Installation process by clicking on the Apply button.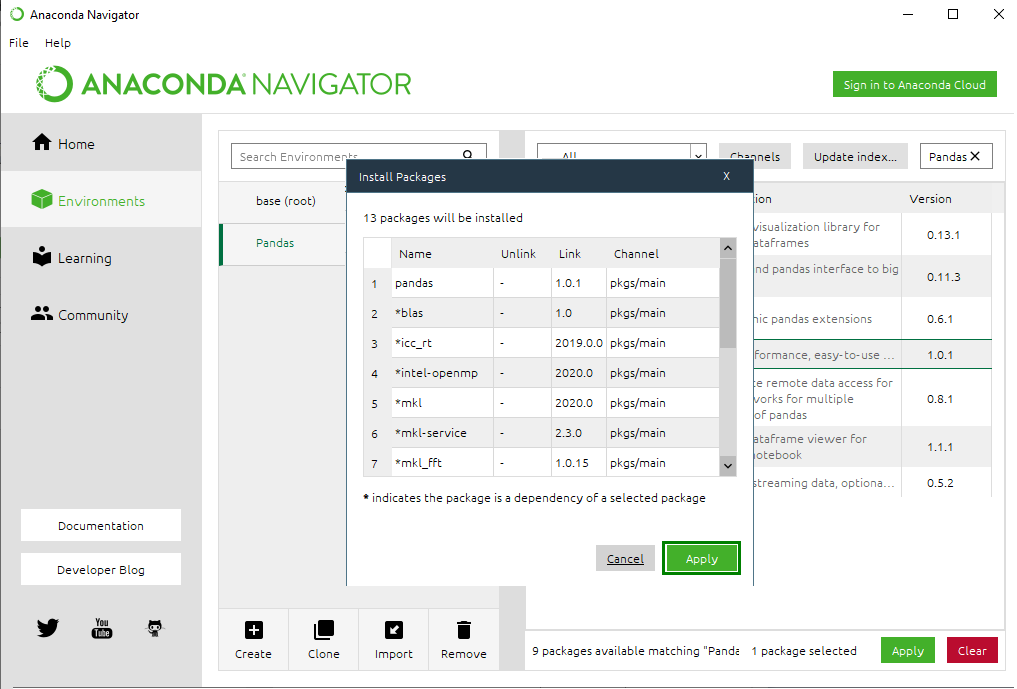
Step 10: Now to open the Pandas Environment, click on the Green Arrow on the right of package name and select the Console with which you want to begin your Pandas programming.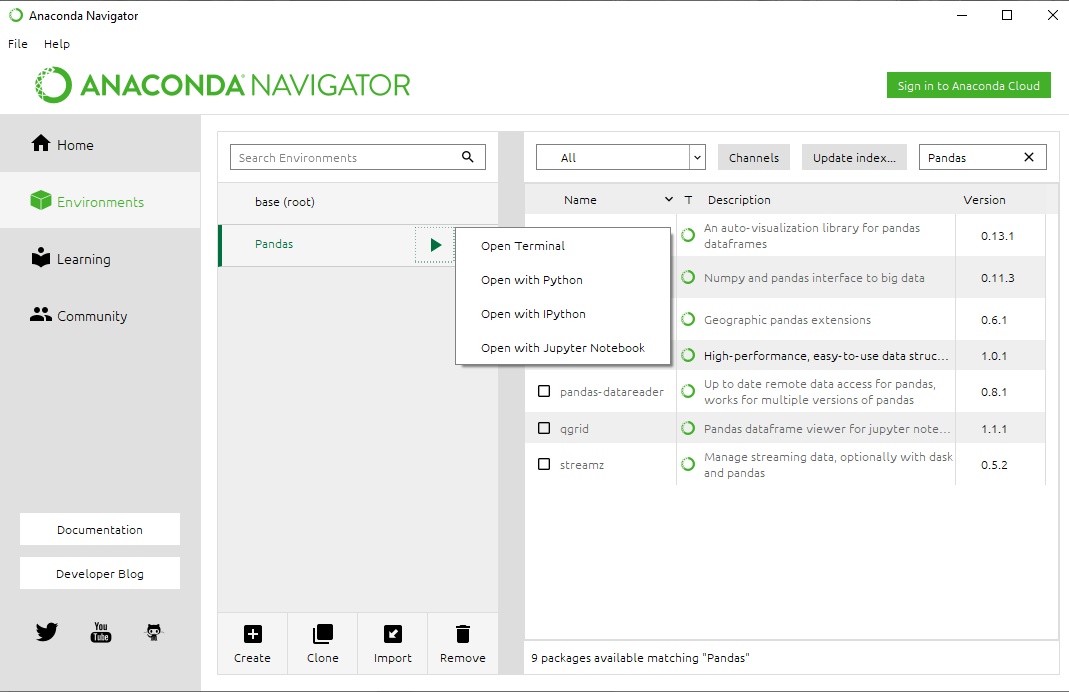
Pandas Terminal Window:
Linux
To install Pandas on Linux, just type the following command in the Terminal Window and press Enter. Linux will automatically download and install the packages and files required to run Pandas Environment in Python:
Источник
# Installation
The easiest way to install pandas is to install it as part of the Anaconda
(opens new window) distribution, a cross platform distribution for data analysis and scientific computing. This is the recommended installation method for most users.
Instructions for installing from source, PyPI
# Plan for dropping Python 2.7
The Python core team plans to stop supporting Python 2.7 on January 1st, 2020. In line with NumPy’s plans
(opens new window) , all pandas releases through December 31, 2018 will support Python 2.
The 0.24.x feature release will be the last release to support Python 2. The released package will continue to be available on PyPI and through conda.
If there are people interested in continued support for Python 2.7 past December 31, 2018 (either backporting bug fixes or funding) please reach out to the maintainers on the issue tracker.
For more information, see the Python 3 statement
# Python version support
Officially Python 2.7, 3.5, 3.6, and 3.7.
# Installing pandas
# Installing with Anaconda
Installing pandas and the rest of the NumPy
(opens new window) stack can be a little difficult for inexperienced users.
The simplest way to install not only pandas, but Python and the most popular packages that make up the SciPy
(opens new window) , a cross-platform (Linux, Mac OS X, Windows) Python distribution for data analytics and scientific computing.
After running the installer, the user will have access to pandas and the rest of the SciPy
(opens new window) stack without needing to install anything else, and without needing to wait for any software to be compiled.
Installation instructions for Anaconda
A full list of the packages available as part of the Anaconda
Another advantage to installing Anaconda is that you don’t need admin rights to install it. Anaconda can install in the user’s home directory, which makes it trivial to delete Anaconda if you decide (just delete that folder).
# Installing with Miniconda
The previous section outlined how to get pandas installed as part of the Anaconda
(opens new window) distribution. However this approach means you will install well over one hundred packages and involves downloading the installer which is a few hundred megabytes in size.
If you want to have more control on which packages, or have a limited internet bandwidth, then installing pandas with Miniconda
(opens new window) may be a better solution.
(opens new window) is the package manager that the Anaconda
(opens new window) distribution is built upon. It is a package manager that is both cross-platform and language agnostic (it can play a similar role to a pip and virtualenv combination).
(opens new window) allows you to create a minimal self contained Python installation, and then use the Conda
(opens new window) command to install additional packages.
First you will need Conda
(opens new window) to be installed and downloading and running the Miniconda
(opens new window) will do this for you. The installer can be found here
The next step is to create a new conda environment. A conda environment is like a virtualenv that allows you to specify a specific version of Python and set of libraries. Run the following commands from a terminal window:
This will create a minimal environment with only Python installed in it. To put your self inside this environment run:
On Windows the command is:
The final step required is to install pandas. This can be done with the following command:
To install a specific pandas version:
To install other packages, IPython for example:
To install the full Anaconda
If you need packages that are available to pip but not conda, then install pip, and then use pip to install those packages:
# Installing from PyPI
pandas can be installed via pip from PyPI
# Installing with ActivePython
Installation instructions for ActivePython
(opens new window) . Versions 2.7 and 3.5 include pandas.
# Installing using your Linux distribution’s package manager.
The commands in this table will install pandas for Python 3 from your distribution. To install pandas for Python 2, you may need to use the python-pandas package.
| Distribution | Status | Download / Repository Link | Install method |
|---|---|---|---|
| Debian | stable | official Debian repository (opens new window) | sudo apt-get install python3-pandas |
| Debian & Ubuntu | unstable (latest packages) | NeuroDebian (opens new window) | sudo apt-get install python3-pandas |
| Ubuntu | stable | official Ubuntu repository (opens new window) | sudo apt-get install python3-pandas |
| OpenSuse | stable | OpenSuse Repository (opens new window) | zypper in python3-pandas |
| Fedora | stable | official Fedora repository (opens new window) | dnf install python3-pandas |
| Centos/RHEL | stable | EPEL repository (opens new window) | yum install python3-pandas |
However, the packages in the linux package managers are often a few versions behind, so to get the newest version of pandas, it’s recommended to install using the pip or conda methods described above.
# Installing from source
See the contributing guide for complete instructions on building from the git source tree. Further, see creating a development environment if you wish to create a pandas development environment.
# Running the test suite
pandas is equipped with an exhaustive set of unit tests, covering about 97% of the code base as of this writing. To run it on your machine to verify that everything is working (and that you have all of the dependencies, soft and hard, installed), make sure you have pytest
# Dependencies
| Package | Minimum supported version |
|---|---|
| setuptools |
# Recommended dependencies
(opens new window) : for accelerating certain numerical operations. numexpr uses multiple cores as well as smart chunking and caching to achieve large speedups. If installed, must be Version 2.6.2 or higher.
bottleneck
(opens new window) : for accelerating certain types of nan evaluations. bottleneck uses specialized cython routines to achieve large speedups. If installed, must be Version 1.2.1 or higher.
You are highly encouraged to install these libraries, as they provide speed improvements, especially when working with large data sets.
# Optional dependencies
Pandas has many optional dependencies that are only used for specific methods. For example, pandas.read_hdf() requires the pytables package. If the optional dependency is not installed, pandas will raise an ImportError when the method requiring that dependency is called.
| Dependency | Minimum Version | Notes |
|---|---|---|
| BeautifulSoup4 | 4.6.0 | HTML parser for read_html (see [[note](#optional-html)](#optional-html)) |
| Jinja2 | Conditional formatting with DataFrame.style | |
| PyQt4 | Clipboard I/O | |
| PyQt5 | Clipboard I/O | |
| PyTables | 3.4.2 | HDF5-based reading / writing |
| SQLAlchemy | 1.1.4 | SQL support for databases other than sqlite |
| SciPy | 0.19.0 | Miscellaneous statistical functions |
| XLsxWriter | 0.9.8 | Excel writing |
| blosc | Compression for msgpack | |
| fastparquet | 0.2.1 | Parquet reading / writing |
| gcsfs | 0.2.2 | Google Cloud Storage access |
| html5lib | HTML parser for read_html (see note) | |
| lxml | 3.8.0 | HTML parser for read_html (see note) |
| matplotlib | 2.2.2 | Visualization |
| openpyxl | 2.4.8 | Reading / writing for xlsx files |
| pandas-gbq | 0.8.0 | Google Big Query access |
| psycopg2 | PostgreSQL engine for sqlalchemy | |
| pyarrow | 0.9.0 | Parquet and feather reading / writing |
| pymysql | 0.7.11 | MySQL engine for sqlalchemy |
| pyreadstat | SPSS files (.sav) reading | |
| pytables | 3.4.2 | HDF5 reading / writing |
| qtpy | Clipboard I/O | |
| s3fs | 0.0.8 | Amazon S3 access |
| xarray | 0.8.2 | pandas-like API for N-dimensional data |
| xclip | Clipboard I/O on linux | |
| xlrd | 1.1.0 | Excel reading |
| xlwt | 1.2.0 | Excel writing |
| xsel | Clipboard I/O on linux | |
| zlib | Compression for msgpack |
# Optional dependencies for parsing HTML
One of the following combinations of libraries is needed to use the top-level read_html() function:
Источник


