- Install RubyMine
- System requirements
- Install using the Toolbox App
- Install the Toolbox App
- Install the Toolbox App
- Install the Toolbox App
- Standalone installation
- Silent installation on Windows
- Silent configuration file
- Install as a snap package on Linux
- Как установить RubyMine на Ubuntu 20.04 LTS
- Как установить RubyMine на Ubuntu 20.04 LTS
- Установите RubyMine на Ubuntu 20.04 LTS Focal Fossa
- Шаг 1. Во-первых, убедитесь, что все ваши системные пакеты обновлены, выполнив следующие apt команды в терминале.
- Шаг 2. Установка RubyMine в Ubuntu 20.04.
- Шаг 3. Доступ к RubyMine в Ubuntu.
- Get started with RubyMine
- Open a project
- Select the Ruby interpreter and install gems
- Install JavaScript dependencies
- Run migrations
- Navigate through a project
- Project view
- Go to declaration
- Find usages
- Navigate between Rails entities
- Search everywhere
- Edit code
- Code completion
- Intentions
- Refactor code
- Extract variable
- Reformat code
- Analyze code
- Run tests
- Run all tests
- Run specific tests
- Rerun failed tests
- Run an application
- Debug an application
- Set a breakpoint and start debugging
- Examine variables
- Step over
- Step into
- Debug in console
Install RubyMine
RubyMine is a cross-platform IDE that provides consistent experience on the Windows, macOS, and Linux operating systems.
System requirements
Officially released 64-bit versions of the following:
Microsoft Windows 8 or later
macOS 10.13 or later
Any Linux distribution that supports Gnome, KDE, or Unity DE.
Pre-release versions are not supported.
| Requirement | Minimum | Recommended |
|---|---|---|
| RAM | 2 GB of free RAM | 8 GB of total system RAM |
| CPU | Any modern CPU | Multi-core CPU. RubyMine supports multithreading for different operations and processes making it faster the more CPU cores it can use. |
| Disk space | 2.5 GB and another 1 GB for caches | SSD drive with at least 5 GB of free space |
| Monitor resolution | 1024×768 | 1920×1080 |
| Operating system | Latest 64-bit version of Windows, macOS, or Linux (for example, Debian, Ubuntu, or RHEL) |
You do not need to install Java to run RubyMine because JetBrains Runtime is bundled with the IDE (based on JRE 11).
Install using the Toolbox App
The JetBrains Toolbox App is the recommended tool to install JetBrains products. Use it to install and manage different products or several versions of the same product, including Early Access Program (EAP) and Nightly releases, update and roll back when necessary, and easily remove any tool. The Toolbox App maintains a list of all your projects to quickly open any project in the right IDE and version.
Install the Toolbox App
Download the installer .exe from the Toolbox App web page.
Run the installer and follow the wizard steps.
After you run the Toolbox App, click its icon in the notification area and select which product and version you want to install.
Log in to your JetBrains Account from the Toolbox App and it will automatically activate the available licenses for any IDE that you install.
Install the Toolbox App
Download the disk image .dmg from the Toolbox App web page.
There are separate disk images for Intel and Apple Silicon processors.
Mount the image and drag the JetBrains Toolbox app to the Applications folder.
After you run the Toolbox App, click its icon in the main menu and select which product and version you want to install.
Log in to your JetBrains Account from the Toolbox App and it will automatically activate the available licenses for any IDE that you install.
Install the Toolbox App
Download the tarball .tar.gz from the Toolbox App web page.
Extract the tarball to a directory that supports file execution.
For example, if the downloaded version is 1.17.7391, you can extract it to the recommended /opt directory using the following command:
Execute the jetbrains-toolbox binary from the extracted directory to run the Toolbox App and select which product and version you want to install. After you run the Toolbox App for the first time, it will automatically add the Toolbox App icon to the main menu.
Log in to your JetBrains Account from the Toolbox App and it will automatically activate the available licenses for any IDE that you install.
You can use this shell script that automatically downloads the tarball with the latest version of the Toolbox App, extracts it to the recommended /opt directory, and creates a symbolic link in the /usr/local/bin directory.
Standalone installation
Install RubyMine manually to manage the location of every instance and all the configuration files. For example, if you have a policy that requires specific install locations.
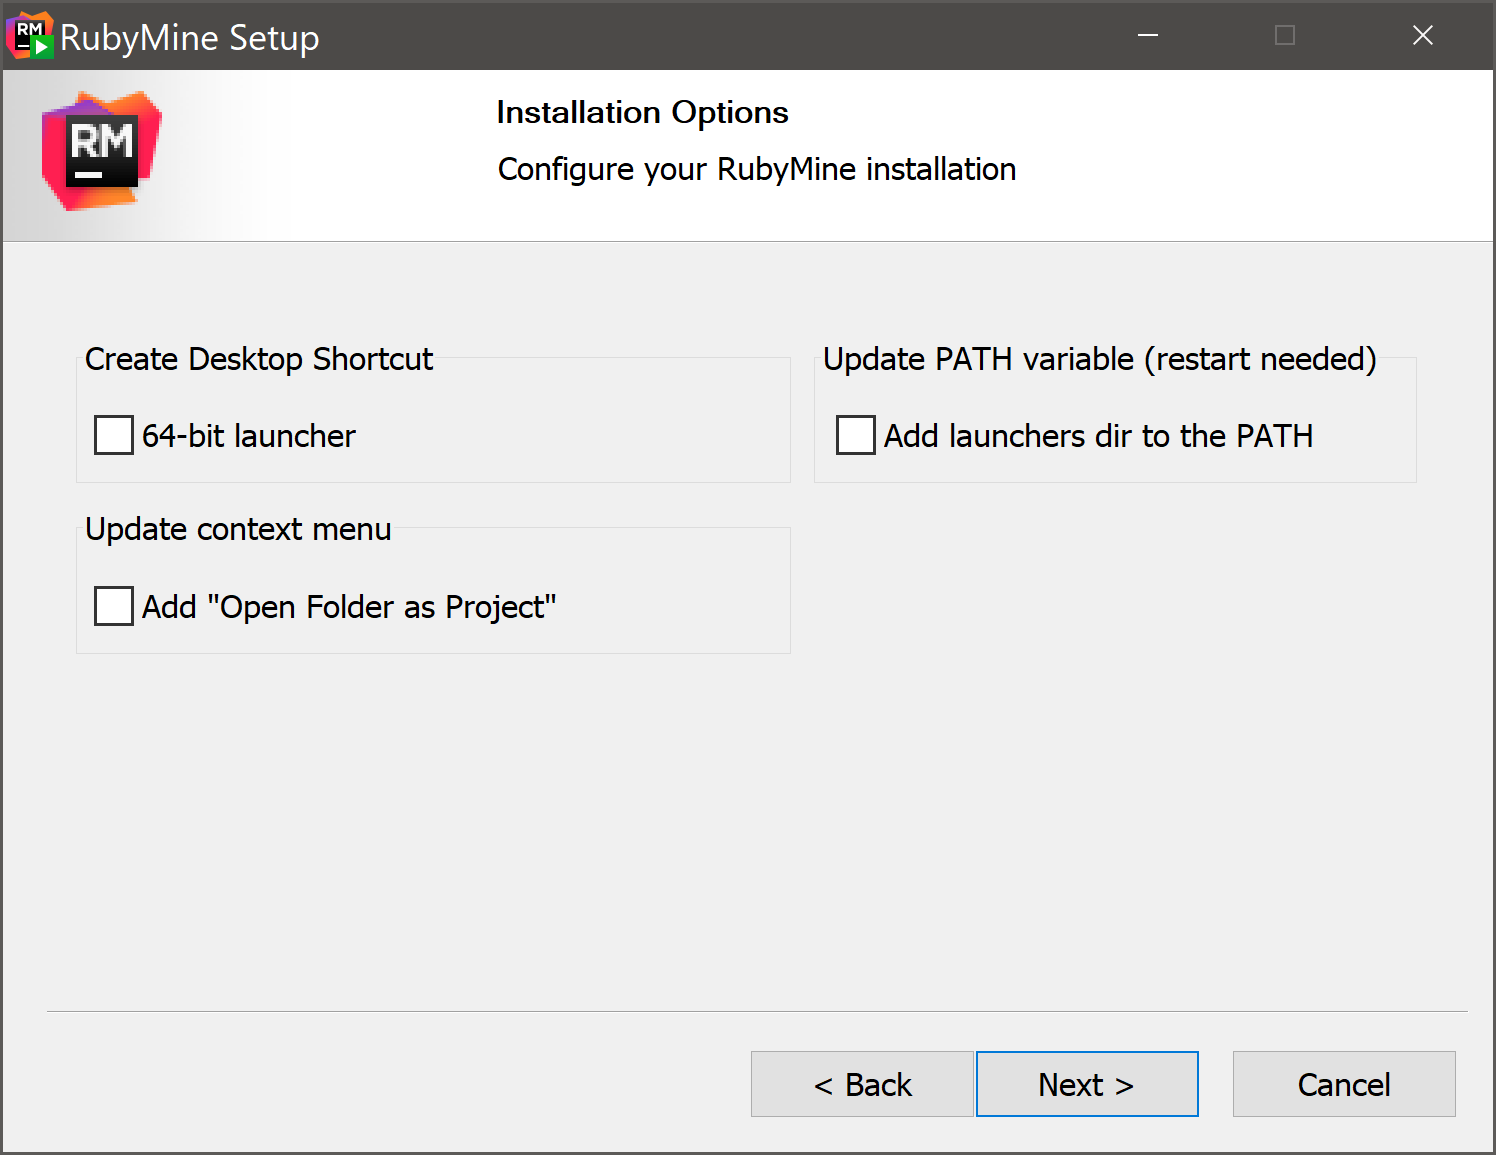
Run the installer and follow the wizard steps.
On the Installation Options step, you can configure the following:
Create a desktop shortcut for launching RubyMine.
Add the directory with RubyMine command-line launchers to the PATH environment variable to be able to run them from any working directory in the Command Prompt.
Add the Open Folder as Project action to the system context menu (when you right-click a folder).
To run RubyMine, find it in the Windows Start menu or use the desktop shortcut. You can also run the launcher batch script or executable in the installation directory under bin .
Extract the archive to the desired folder.
To run RubyMine, use the launcher batch script or executable in the extracted directory under bin .
There are separate disk images for Intel and Apple Silicon processors.
Mount the image and drag the RubyMine app to the Applications folder.
Run the RubyMine app from the Applications directory, Launchpad, or Spotlight.
Extract the tarball to a directory that supports file execution.
For example, to extract it to the recommended /opt directory, run the following command:
Do not extract the tarball over an existing installation to avoid conflicts. Always extract it to a clean directory.
Execute the rubymine.sh script from the extracted directory to run RubyMine.
To create a desktop entry, do one of the following:
On the Welcome screen, click Configure | Create Desktop Entry
From the main menu, click Tools | Create Desktop Entry
When you run RubyMine for the first time, some steps are required to complete the installation, customize your instance, and start working with the IDE.
For information about the location of the default IDE directories with user-specific files, see Directories used by the IDE.
Silent installation on Windows
Silent installation is performed without any user interface. It can be used by network administrators to install RubyMine on a number of machines and avoid interrupting other users.
To perform silent install, run the installer with the following switches:
/S : Enable silent install
/CONFIG : Specify the path to the silent configuration file
/D : Specify the path to the installation directory
This parameter must be the last in the command line and it should not contain any quotes even if the path contains blank spaces.
To check for issues during the installation process, add the /LOG switch with the log file path and name between the /S and /D parameters. The installer will generate the specified log file. For example:
Silent configuration file
You can download the default silent configuration file for RubyMine at https://download.jetbrains.com/ruby/silent.config
The silent configuration file defines the options for installing RubyMine. With the default options, silent installation is performed only for the current user: mode=user . If you want to install RubyMine for all users, change the value of the installation mode option to mode=admin and run the installer as an administrator.
The default silent configuration file is unique for each JetBrains product. You can modify it to enable or disable various installation options as necessary.
It is possible to perform silent installation without the configuration file. In this case, omit the /CONFIG switch and run the installer as an administrator. Without the silent configuration file, the installer will ignore all additional options: it will not create desktop shortcuts, add associations, or update the PATH variable. However, it will still create a shortcut in the Start menu under JetBrains .
Install as a snap package on Linux
You can install RubyMine as a self-contained snap package. Since snaps update automatically, your RubyMine installation will always be up to date.
To use snaps, install and run the snapd service as described in the installation guide.
On Ubuntu 16.04 LTS and later, this service is pre-installed.
RubyMine is distributed via two channels:
The stable channel includes only stable versions. To install the latest stable release of RubyMine, run the following command:
The —classic option is required because the RubyMine snap requires full access to the system, like a traditionally packaged application.
The edge channel includes EAP builds. To install the latest EAP build of RubyMine, run the following command:
When the snap is installed, you can launch it by running the rubymine command.
To list all installed snaps, you can run sudo snap list . For information about other snap commands, see the Snapcraft documentation.
Источник
Как установить RubyMine на Ubuntu 20.04 LTS

Как установить RubyMine на Ubuntu 20.04 LTS
В этом руководстве мы покажем вам, как установить RubyMine в Ubuntu 20.04 LTS. Для тех из вас, кто не знал, RubyMine — это специальная среда разработки Ruby и Rails. IDE предоставляет широкий спектр необходимых инструментов для разработчиков Ruby, тесно интегрированных друг с другом для создания удобной среды для продуктивной разработки на Ruby и веб-разработки с помощью Ruby on Rails.
В этой статье предполагается, что у вас есть хотя бы базовые знания Linux, вы знаете, как использовать оболочку, и, что наиболее важно, вы размещаете свой сайт на собственном VPS. Установка довольно проста и предполагает, что вы работаете с учетной записью root, в противном случае вам может потребоваться добавить ‘ sudo ‘ к командам для получения привилегий root. Я покажу вам пошаговую установку RubyMine на Ubuntu 20.04 (Focal Fossa). Вы можете следовать тем же инструкциям для Ubuntu 18.04, 16.04 и любого другого дистрибутива на основе Debian, например Linux Mint.
Установите RubyMine на Ubuntu 20.04 LTS Focal Fossa
Шаг 1. Во-первых, убедитесь, что все ваши системные пакеты обновлены, выполнив следующие apt команды в терминале.
Шаг 2. Установка RubyMine в Ubuntu 20.04.
- Установите RubyMine через Snap.
Чтобы установить RubyMine, мы будем использовать менеджер пакетов Snap:
Шаг 3. Доступ к RubyMine в Ubuntu.
После успешной полной установки вы можете запустить RubyMine из меню приложений Ubuntu или запустить RubyMine, используя следующую команду:

Поздравляю! Вы успешно установили RubyMine . Благодарим за использование этого руководства для установки RubyMine в системе Ubuntu 20.04 LTS Focal Fossa. Для получения дополнительной помощи или полезной информации мы рекомендуем вам посетить официальный сайт RubyMine .
Источник
Get started with RubyMine
RubyMine is an integrated development environment (IDE) that helps you be more productive in every aspect of Ruby/Rails projects development — from writing and debugging code to testing and deploying a completed application. RubyMine is available for different platforms including macOS, Windows, and Linux.
In this tutorial, we’ll show you the main RubyMine capabilities using a fork of a sample application created for the Ruby on Rails Tutorial. Before starting this tutorial, do the following:
Install the Ruby distribution for your platform.
We’ll perform all steps using RubyMine installed on macOS.
Open a project
First of all, we need to clone the repository containing the sample application:
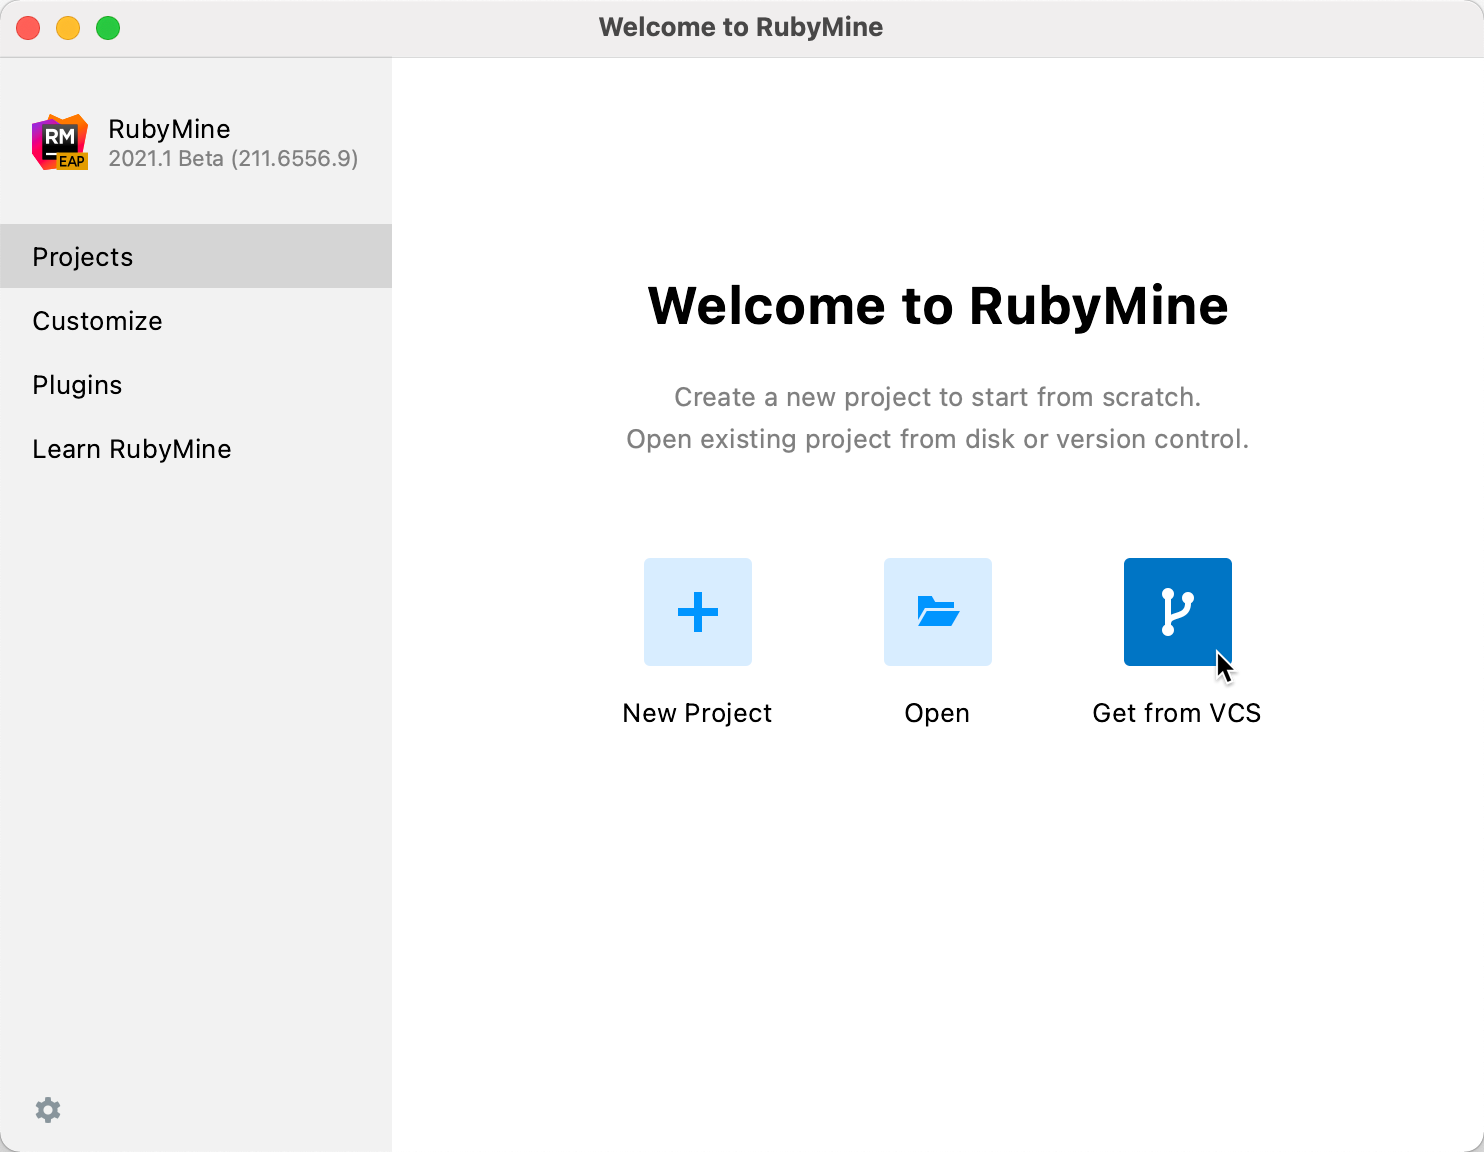
Run RubyMine and click Get from Version Control on the Welcome Screen .
In the Get from Version Control dialog, do the following:
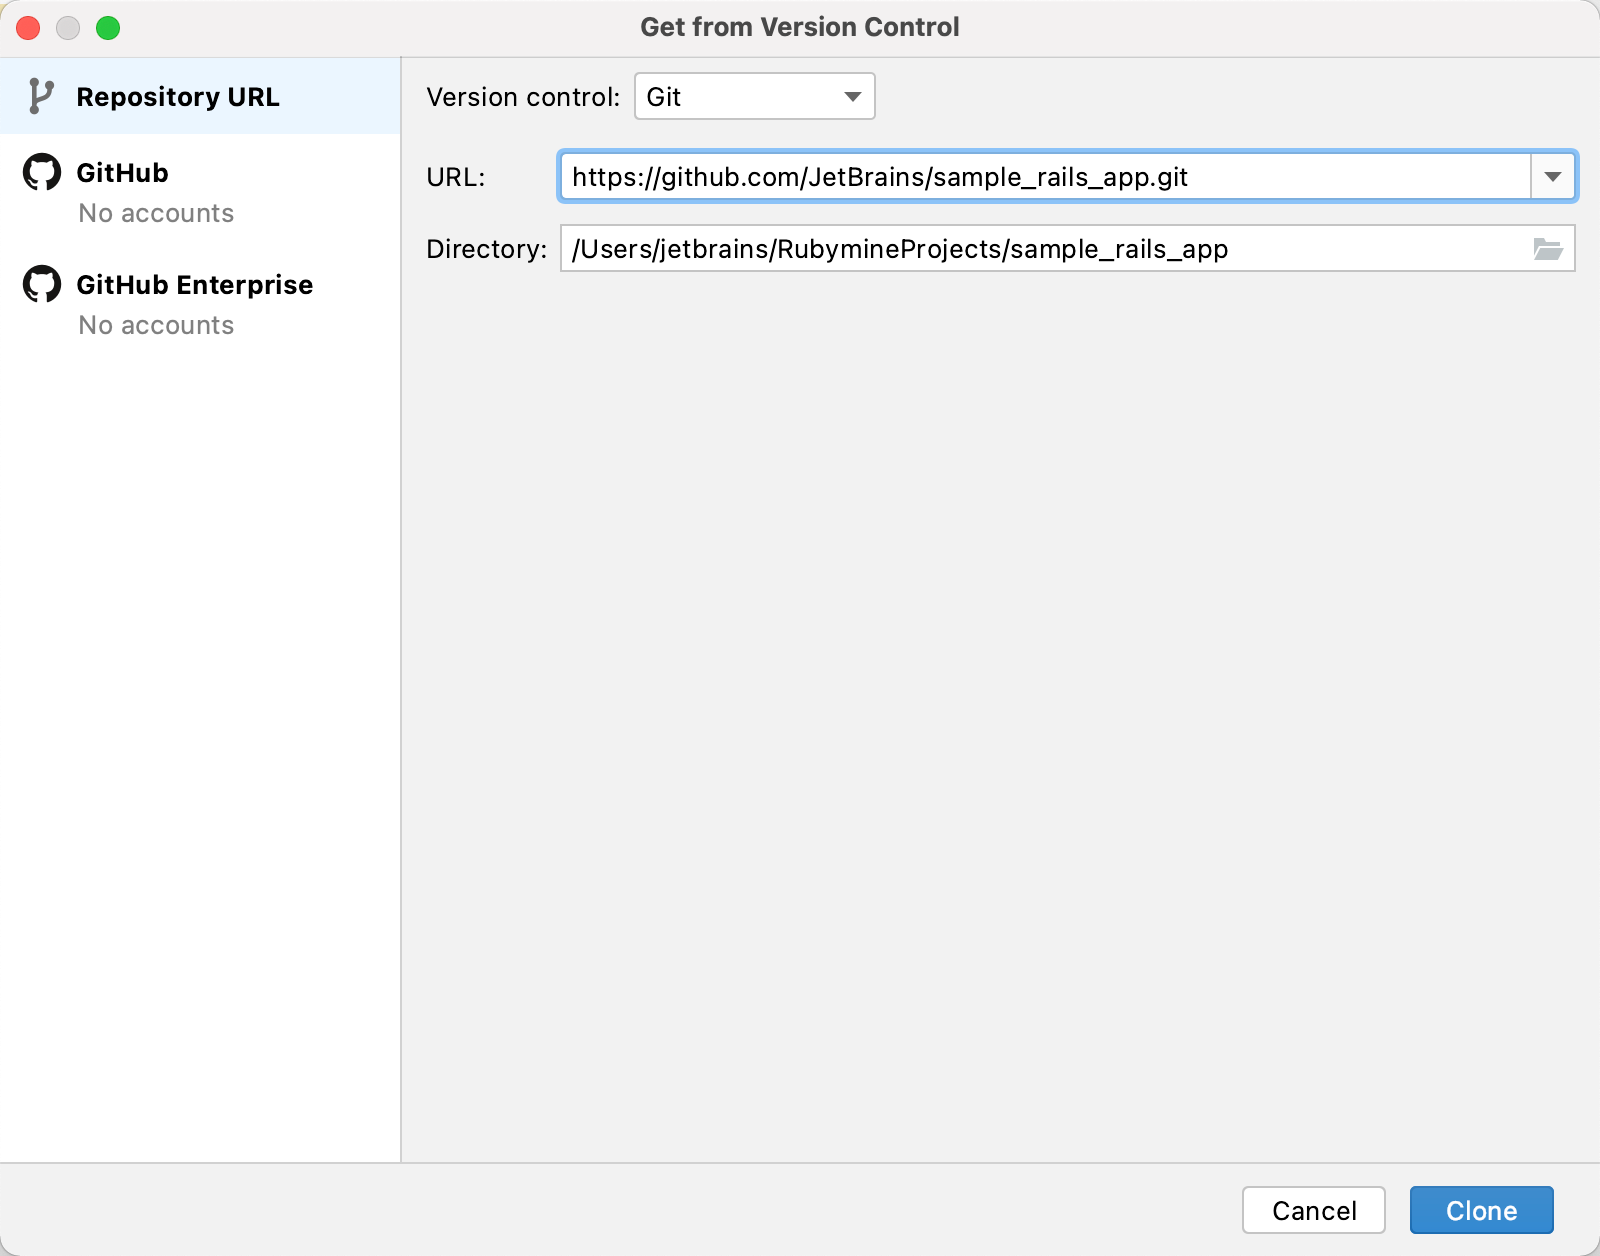
Make sure that Git is selected in the Version control field.
Insert the following address to the URL field:
Click the Clone button. RubyMine will show a progress bar indicating a cloning process.
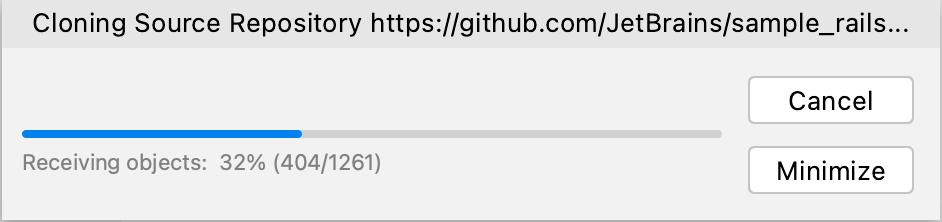
After cloning the repository, RubyMine opens the directory and starts the indexing process. You can see the progress in the Status Bar .
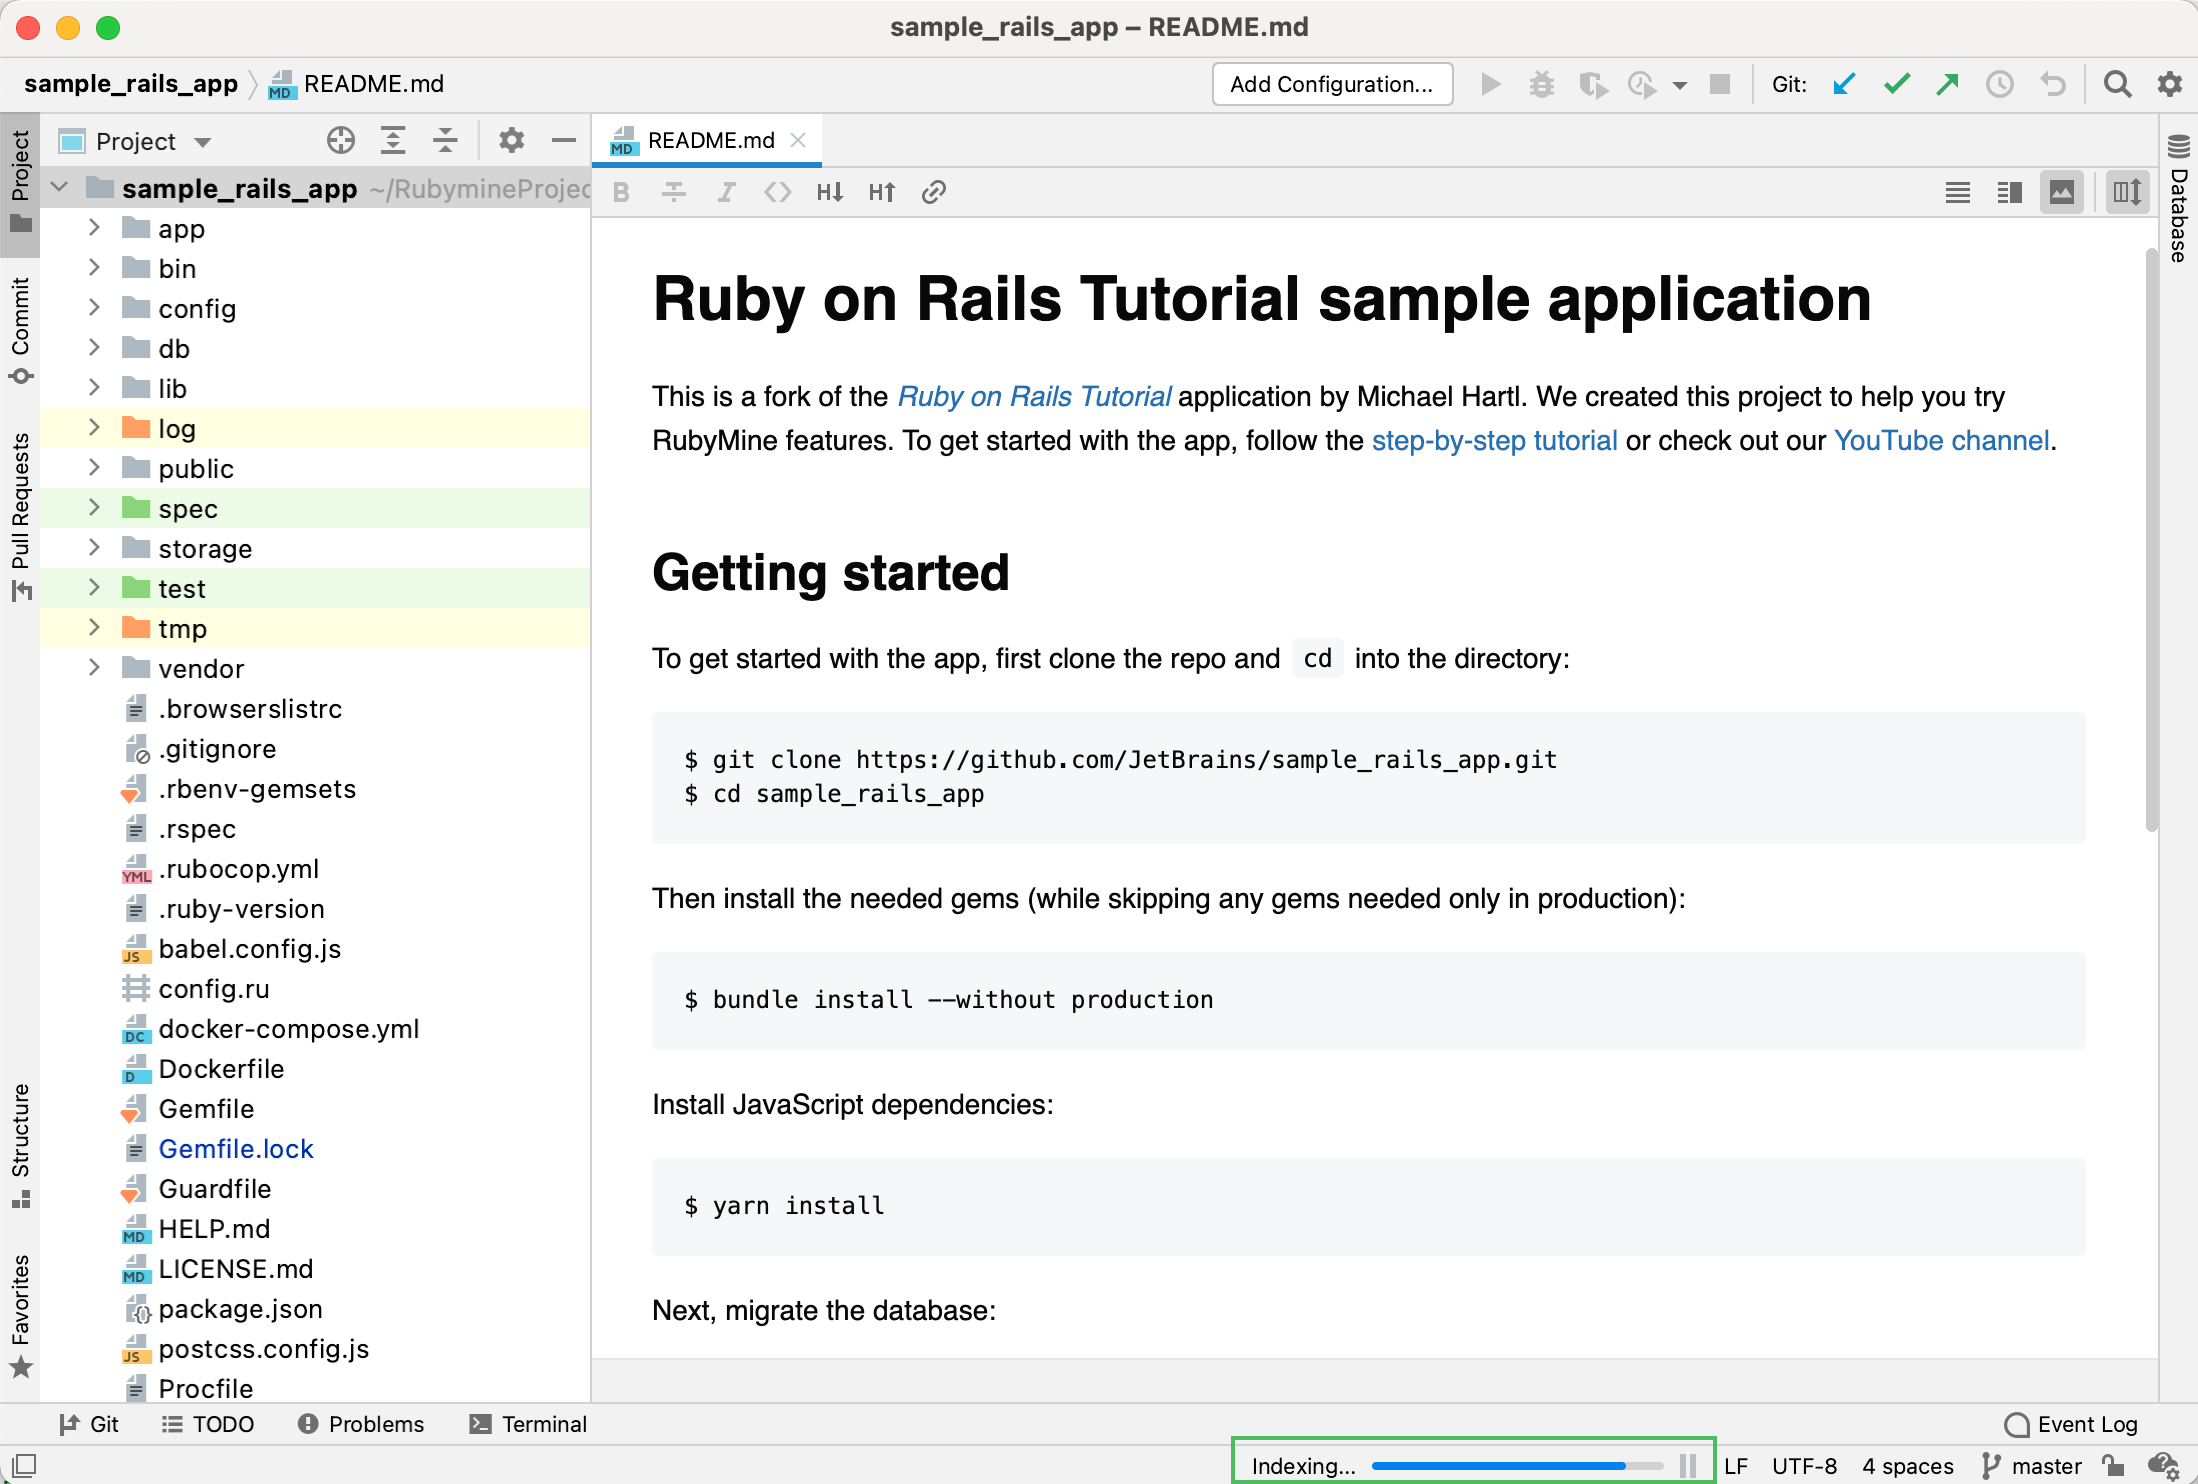
RubyMine indexes your project to analyze its sources and collects the information on available files, class and method definitions, and so on. This is required for code insight features such as code completion and navigation.
Indexing occurs when you open a project for the first time, install dependencies, add new files to a project, get updates from a version control system, or switch branches.
Select the Ruby interpreter and install gems
After you’ve opened the project, it is necessary to select the required Ruby interpreter and install the dependencies specified in the project’s Gemfile :
Press Ctrl+Alt+S to open the Settings/Preferences dialog.
Go to the Languages & Frameworks | Ruby SDK and Gems page and choose the required interpreter.
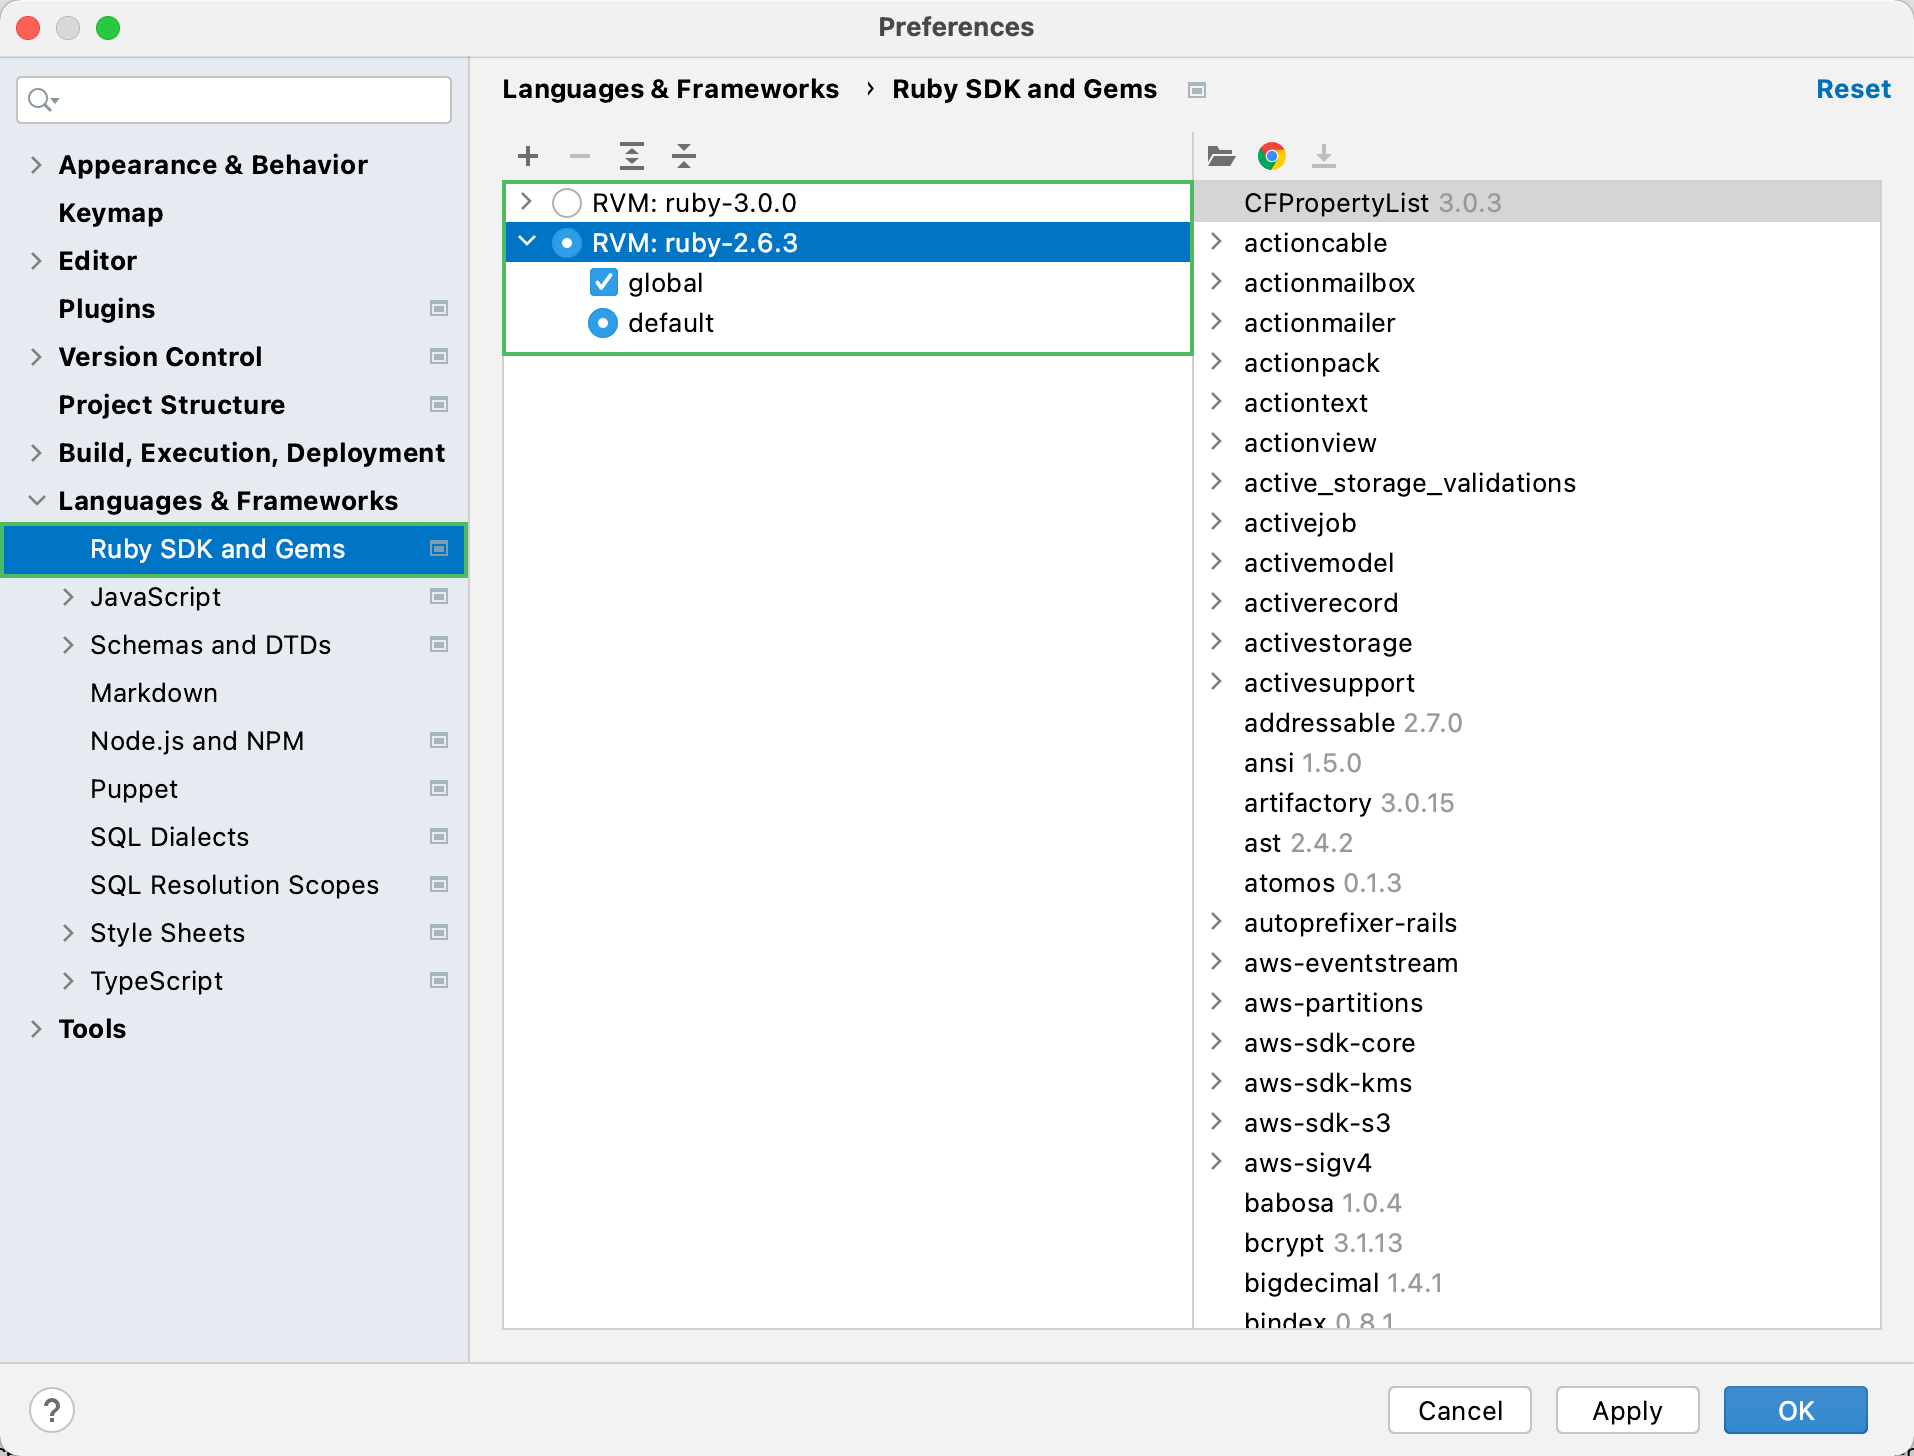
In this tutorial, we use RVM to manage Ruby interpreters. You can also use interpreters managed by other version managers or installed using the package management system of your operating system.
Now, let’s install the gems specified in the Gemfile . RubyMine allows you to use Bundler to manage gems. Press Ctrl twice and start typing bundle install . Then, select the bundle install command from the list and press Enter .

(Optional) If the current project interpreter does not have the required Bundler version specified in Gemfile.lock , RubyMine suggests installing it.
In the Bundle Install dialog, add the following argument:
Then, click Install .

Wait until RubyMine installs all gems.

Install JavaScript dependencies
To install JavaScript dependencies mentioned in the project’s package.json file using Yarn, do the following:
Press Ctrl twice again and start typing yarn install . Then, select the yarn install command from the list and press Enter .

Wait until RubyMine installs all packages.

Run migrations
Before running our Rails application, we need to migrate the database.
Press Ctrl twice and type db:migrate . Select rake db:migrate in the dropdown and press Enter .

Leave the default settings in the invoked Execute ‘db:migrate’ dialog and click OK .

This creates the development.sqlite3 database in the db folder.
Run rake db:migrate one more time as described in the first step. This time, set the Environment option to test in the Execute ‘db:migrate’ dialog and click OK . The created test.sqlite3 database will be used to run tests.
Navigate through a project
RubyMine provides rich navigation capabilities to explore projects of any sizes. You can navigate between files, go to declarations, search entities of any types, and so on.
Project view
The Project view ( Alt+1 ) on the left side of the IDE displays the project structure. You can use it to open any file in your project, create new files, and so on.
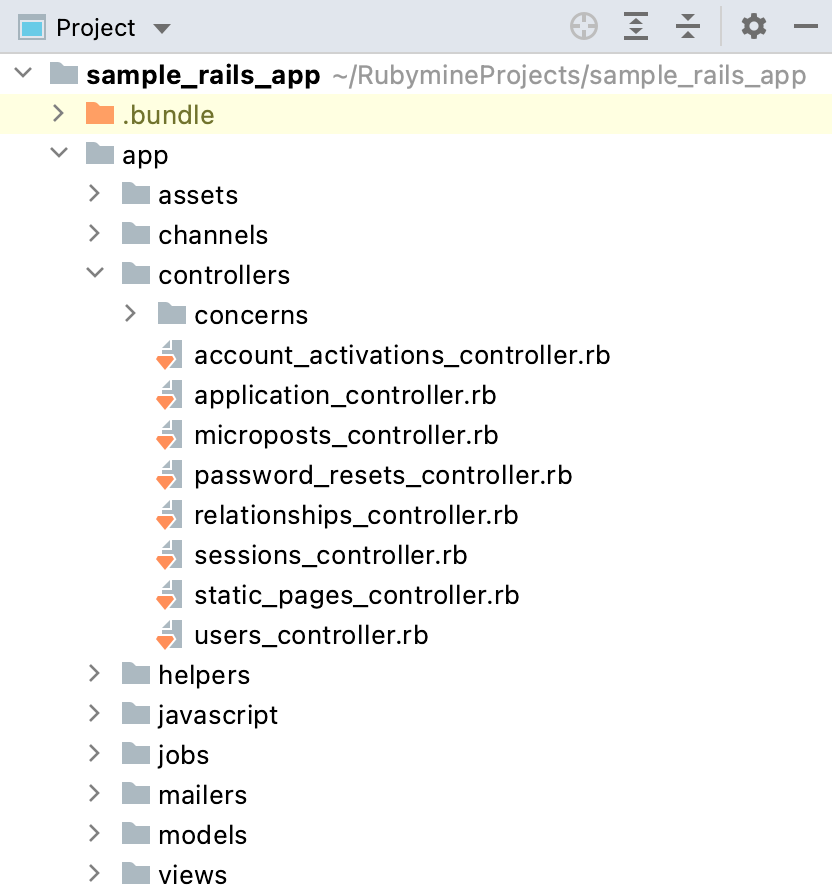
You can also switch to the special Rails view that shows logical project structure displaying controllers, models, views, DB migrations as Rails elements rather than files and directories.
Go to declaration
Go to declaration allows you to navigate to the declaration of a symbol from any symbol usage. To see this capability in action, press Ctrl+Shift+N , start typing users_controller , select the users_controller.rb file and click Enter .

In the opened app/controllers/users_controller.rb file, place the caret next to the User class and press Ctrl+B .
You’ll jump to the class declaration in the user.rb file.
Note that you can jump not only to project entities but to definitions within external libraries (which are gems in our case). For instance, keeping Ctrl pressed, hover your mouse pointer over the has_many method. When the method turns into a hyperlink, click it without releasing the key.
RubyMine will open the method definition within the ActiveRecord Rails module.
Find usages
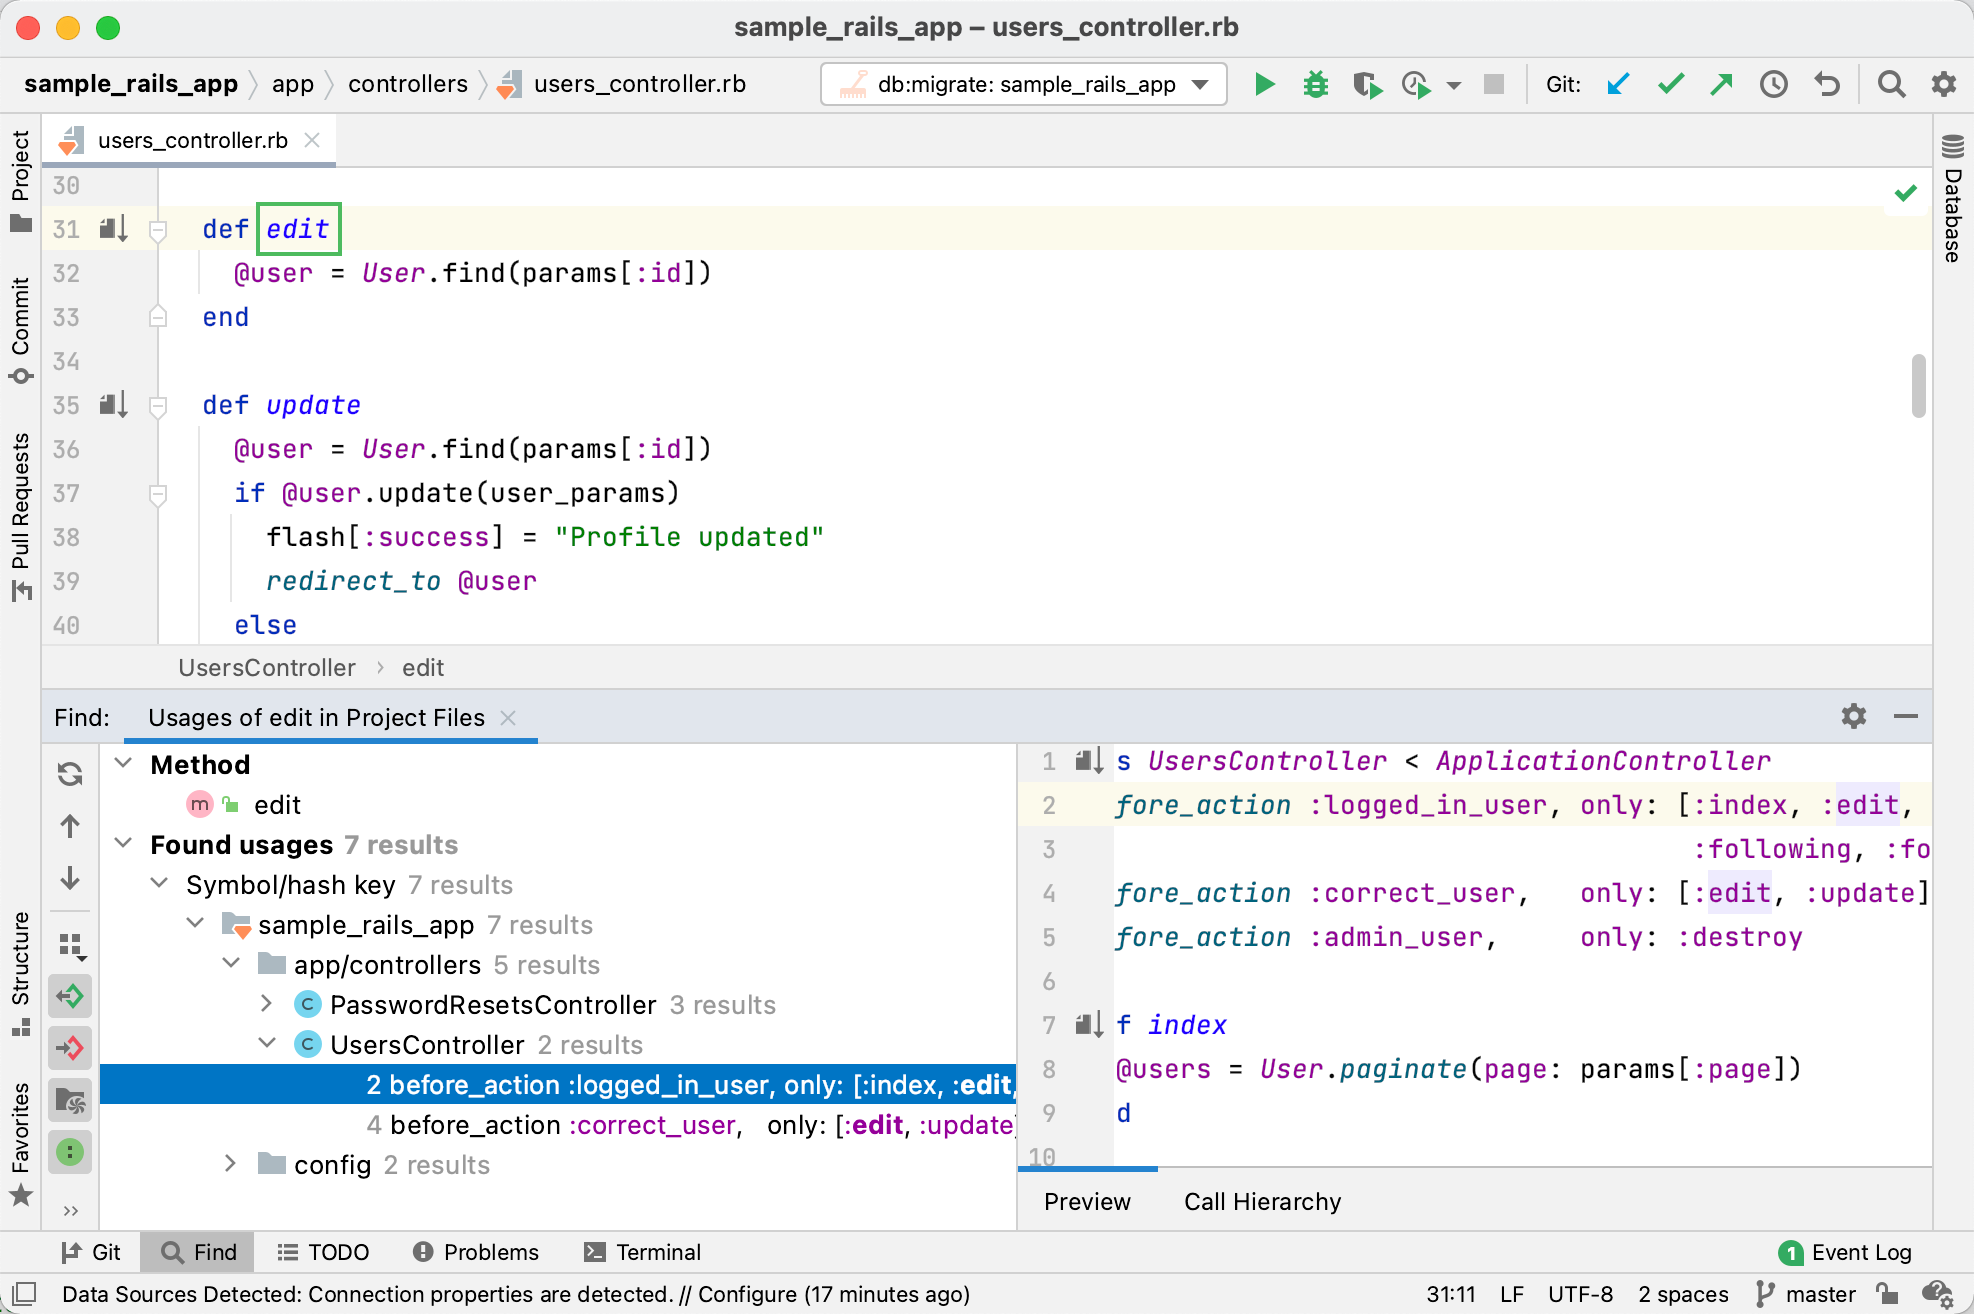
Let’s demonstrate the Find usages feature. In the app/controllers/users_controller.rb file, scroll down to the edit action, place the caret next to it and press Alt+F7 . In the Find window, you can explore the places where this action is used.
Navigate between Rails entities
When working on a specific Rails entity, like a controller, you can navigate to the related view, model, test, or helper. Place the caret next to edit method, press Ctrl+Alt+Home , select View and press Enter . RubyMine will open the edit.html.erb file containing the corresponding view.
You can use the same shortcut within a view or use the icon in the editor gutter to quickly go to the corresponding action.
Search everywhere
The next RubyMine feature allows you to search for files, classes, symbols, or options and jump to the entity you need.
Let’s try to find the destroy action within UsersController . Press Shift twice and start typing destroy . RubyMine lists all of the found results where your query is found. Select the destroy action from UsersController and press Enter .

The users_controller.rb file will be opened and the caret will be placed on the definition of the destroy action.
Edit code
RubyMine provides multiple code editing features available in the editor that allow you to speed up the development process. These include code completion, refactorings, code inspections, and so on.
Code completion
RubyMine can help you complete the names of classes, methods, keywords, and so on. When you invoke code completion, RubyMine analyses the context and suggests the choices applicable to the current caret position.
For instance, open the users_controller.rb file and go to the index method declared in the UsersController class. Type the following code inside the method.
. and then type dot. Because the User class is inherited from the ApplicationRecord module, the editor will display all inherited members.
After that, start typing first to filter the list and find the corresponding member from the Querying module, and press Enter .
You can also invoke code completion manually by pressing Ctrl+Space .
Intentions
Intentions help you to quickly apply various code changes: convert statements for better code style, add strings to locale dictionaries, use language injections, and so on.
To see intentions in action, open the user.rb file and scroll down to the User.digest method, which uses a multiline ternary operator ( ?: ). According to the Ruby Style Guide, it is preferable to replace such operator with the if/then/else/end block. To do this, place the caret at this ternary expression (for instance, next to ActiveModel) and press Alt+Enter . Press Enter to convert a ternary operator to the if/then/else/end block.
Note that you can check your code and detect possible issues using inspections.
Refactor code
Refactoring is the process of modifying source code in order to make it easier to maintain and extend, but without changing its behavior. Let’s look at some refactoring features available in RubyMine.
Rename refactorings allow you to rename classes, methods, files, variables, and parameters with all the references to them in the code corrected accordingly. Open the users.rb file and scroll down to the downcase_email method raised in the before_save ActiveRecord callback. Place the caret next to this method and press Ctrl+Shift+I to see its definition.
Click Esc and press Ctrl+Alt+Shift+T . Select Rename in the invoked popup, which suggests various refactorings.
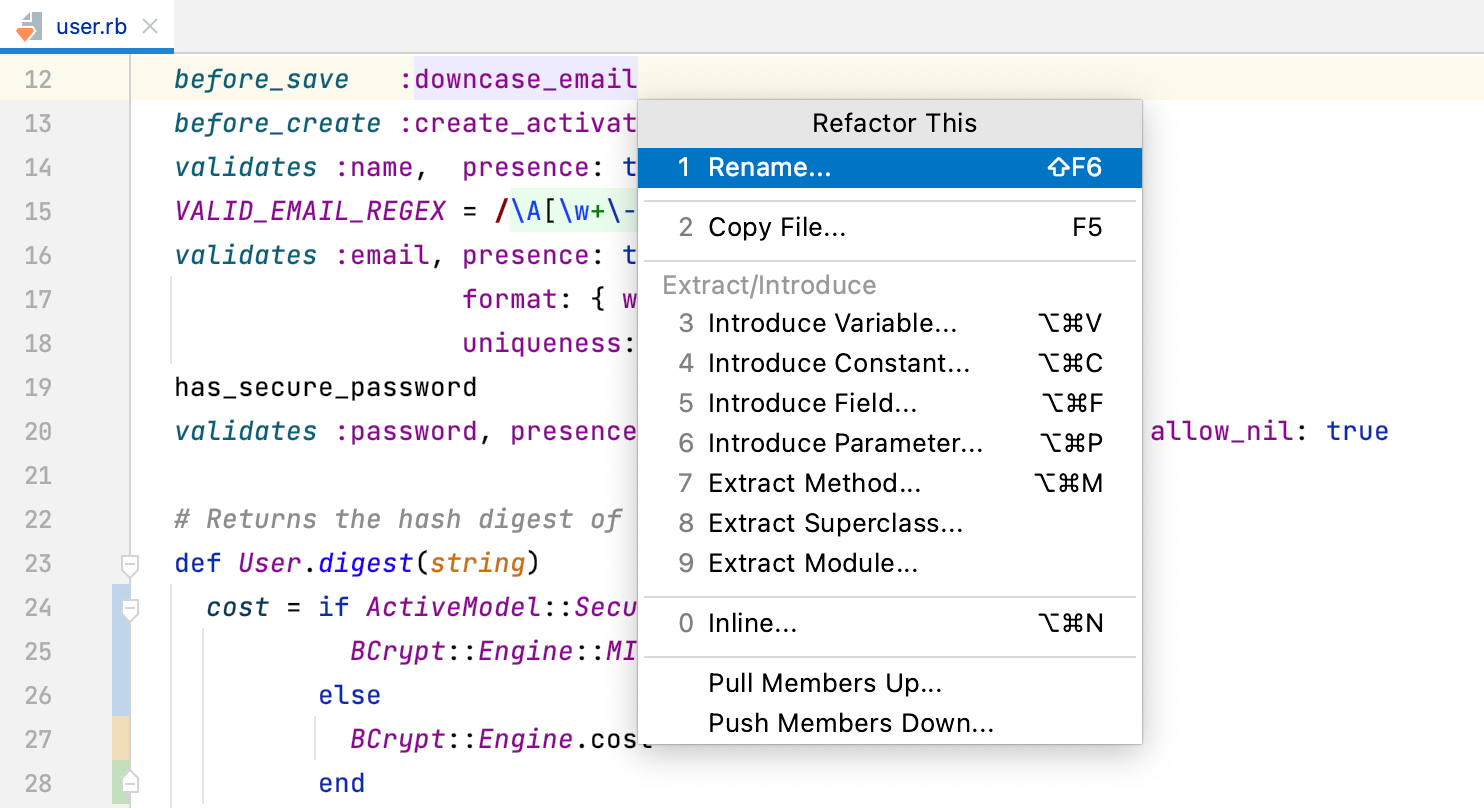
In the Rename dialog, specify a new method name ( lowercase_email in our case) and click Refactor .

The Refactor Preview window will display all references to the renamed method.

Click Do Refactor to rename the method in all places.
Extract variable
The Extract Variable refactoring puts the result of the selected expression into a variable. It declares a new variable and uses the expression as an initializer. The original expression is replaced with the new variable.
Open the user.rb file and go to the feed method. In this method, we can extract an SQL subquery to a variable. To do this, select a corresponding substring and press Ctrl+Alt+V . Then, specify the variable name and press Enter to finish extracting.
Reformat code
RubyMine allows you to reformat source code to meet the requirements of your code style.
Let’s reformat the code of the user.rb file. Open this file and press Ctrl+Alt+L .
RubyMine will reformat the entire file and display a number of changed lines.
Analyze code
In this part, we’ll perform static code analysis and detect problems.
RubyMine supports multiple inspection types and, moreover, allows displaying RuboCop offenses inside the IDE. The RuboCop inspection is enabled in RubyMine by default and requires the RuboCop gem to be installed in the project SDK. If this gem not installed, RubyMine will suggest doing this.

Let’s open the Gemfile containing a list of gems used by the application. Hover the mouse pointer over the warning displayed for the active gem.

RubyMine will display a Rubocop message that notifies you about necessity to order gems in the alphabetical order (see OrderedGems).
Place the caret next to the active_storage_validations gem and press Alt+Enter . The editor will suggest fixing all issues related to incorrect gems ordering. Press Enter to do this.
You can also check the entire project and display all warnings in a single report. To do this, select Code | Inspect Code in the main menu. In the invoked dialog, you can specify the desired inspection scope.

Leave the Whole project option and click OK . The inspection results window will show warnings for a whole project.

You can navigate through this report and fix or suppress specific warnings.
Run tests
RubyMine enables you to use different testing frameworks such as Minitest, RSpec or Cucumber.
Run all tests
Our project contains Minitest tests in the test folder. To run all tests, open the Project view by pressing Alt+1 . Then, right-click the test folder and select Run ‘All tests in test’ from the context menu.

RubyMine will run and display test results in the Run tool window.
Run specific tests
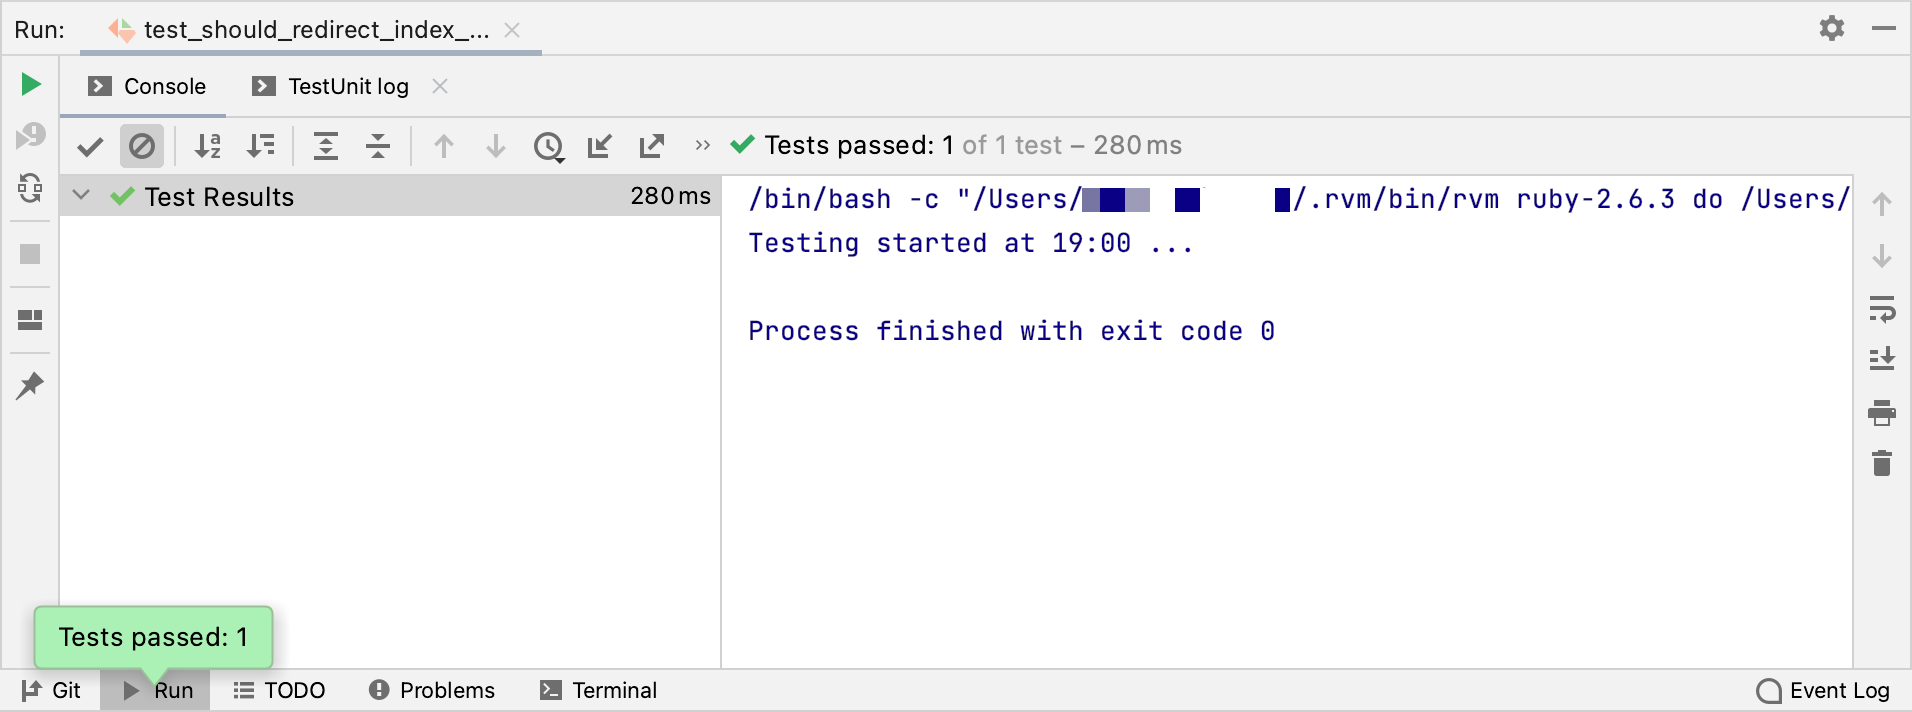
Now let’s see how to run a specific test. Open the users_controller_test.rb file, scroll down to the should redirect index when not logged in test and click the Run button on the left gutter next to this test.

In the invoked menu, select Run ‘Minitest: test_should_redirect_index. ’ . RubyMine will display the result for this test.
Rerun failed tests
Now let’s go back to users_controller_test.rb and break two tests. For the should get new and should redirect index when not logged in tests comment the get_sighup_path and get users_path lines. To do this, select these lines and use the Ctrl+/ shortcut.

Run all tests again as described in Run all tests. You can see now that these tests failed.

Let’s fix these tests in the currently opened users_controller_test.rb file by uncommenting the get_sighup_path and get users_path lines Ctrl+/ . We can now rerun only these failed tests using the button.
Now we are ready to run our application.
Run an application
To run our Rails application, press Ctrl twice and start typing development . Select the Development: sample_rails_app configuration from the list and press Enter .

RubyMine will show the process of preparing the application to run.

Copy the 0.0.0.0:3000 address used by a web server, insert it to the browser’s address bar and press Enter to see our working application.

Debug an application
One of the key features of RubyMine is debugging support. The debugger provides various ways to examine the state of a running application. You can step through your code and check variable values, set watches on variables to see when values change, and so on.
Our sample application uses the puma web server, which default worker timeout equals 60 seconds. For debugging purposes, it can be useful to set this timeout to a larger value. To do this, open the config/puma.rb file and specify the worker_timeout option.
Set a breakpoint and start debugging
First, open the users_controller.rb file. Set a breakpoint within the create method next to the line where a new user is created.

To start debugging, press Ctrl twice and start typing sample_rails_app . Select the Development: sample_rails_app configuration from the list, hold down the Shift key (the dialog title will be changed to Debug ), and press Enter .

If the debase and ruby-debug-ide gems required for debugging have not been installed yet, RubyMine suggests installing them.
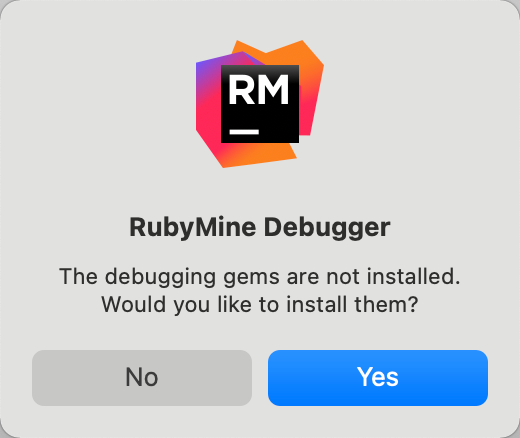
After installing the gems, the Debug tool window will show the application output.

Open a browser on the local machine and specify the application address 0.0.0.0:3000 .
Click the Sign up now! button. On the Sign up page, enter your credentials and click Create my account .

The program will stop when it reaches the breakpoint.
Examine variables
You can now examine the application state and the values of variables.

The Frames pane displays the application threads and the corresponding call stacks. In our case, the create method is called in Thread 30 . The Variables pane allows you to examine variables available in the current context.
Use the button to show or hide calls of methods from external libraries.
Let’s add the user_params variable to the list. Click the button in the Variables pane and start typing user_params . Select the user_params variable in the invoked drop-down and press Enter .
Then, click the button next to this variable and then expand the @parameters variables in the same way. You can see the user credentials specified in the Sign up form.
Once the breakpoint is hit, we can step through the code.
Step over
Step over proceeds to the next line in the current scope (for example, goes to the next line), without descending into any method calls on the way.
On the screen below, you can see that the User object is not created yet and the @user variable not initialized (equals nil ).

Press F8 or click the button in the Debug window toolbar. The debugger will go to the next line — the if statement. In the editor and Variables pane, you can see that the @user variable was initialized.

Use the button to examine @user properties.
Step into
Step into will cause the debugger to descend into the method calls or blocks on the current line and follow them through. If there are multiple method calls or blocks, you can choose the desired target.
Click the button to resume program execution. Go to the browser again and create another user in the Sign up form. The script will stop when it reaches the line where a user is created.

Press F7 or click the button. The editor will set a focus on the user_params method. You can use arrow keys or Tab to choose the desired method to step into ( new or user_params in the example below). Select user_params and press Enter . The program execution will jump to the user_params method definition.
If you press F7 another time, the debugger will suggest selecting between the params and require methods from the StrongParameters module.
Debug in console
The debugger has the Console tab that enables you to interact with a debugged application with an IRB-like console.
Start typing user_params in the console, select the corresponding variable and press Enter .
The Console window will display the values of variables.
Источник


