- How to install tiny core linux
- 1. Start the installation
- 2. Browse to the install files
- 3. Formatting
- 4. Bootcodes
- 5. CorePlus installation options
- 6. Tiny Core installation options
- 7. Install
- 8. Testing
- Tiny Core Linux
- Quick & Easy Overview
- 1. Requirements
- 2. Introduction
- 3. Cloud Mode
- 4. USB Stick Mode
- 5. USB Stick Boot Mode
- 6. Installing Applications
- 7. I’m Having Problems
- 8. I Need More Help
- 1. Minimum System Requirements
- 2. Introduction
- 3. Cloud Mode
- 4. USB Stick Mode
- 5. USB Stick Boot Mode
- 6. Installing Applications
- 7. I’m Having Problems
- 8. I Need More Help
- How to install tiny core linux
- 1. Start the installation
- 2. Browse to the install files
- 3. Formatting
- 4. Bootcodes
- 5. CorePlus installation options
- 6. Tiny Core installation options
- 7. Install
- 8. Testing
How to install tiny core linux
The first step before you install any operating system such as Tiny Core is to back up everything on your computer before starting.
Before making the commitment to perform a frugal install you should consider our Quick and Easy Overview. It covers the basics of running Tiny Core from CDROM and/or USB pendrive. Most will find learning Tiny Core the quick and easy way a better starting point.
But for those who are ready to take the plunge to frugal, this guide shows step by step information on how to install TC via the installer. The older instructions for a manual install are still available, but using the installer is recommended.
The guide assumes you’ve either booted the CorePlus CD, or have installed the tc-install extension (tc-install.tcz)
Keep in mind that this guide is basic and that the user may choose to adapt, remove and/or add parts as desired.
The installer is also applicable to USB sticks and other external media.
Note: If you already have a Linux System booting, then you do not need to make a partition for Tiny Core! Tiny Core can run in a single directory in your existing Linux installation. To do so, at step 1, uncheck the option to «Install boot loader». At step 2, select an existing partition, and at Step 3, do not format it. Upon completion you will need to manually configure your existing boot loader.
1. Start the installation
Open the installer:

It can also be started via the shell or Run icon by typing «tc-install».

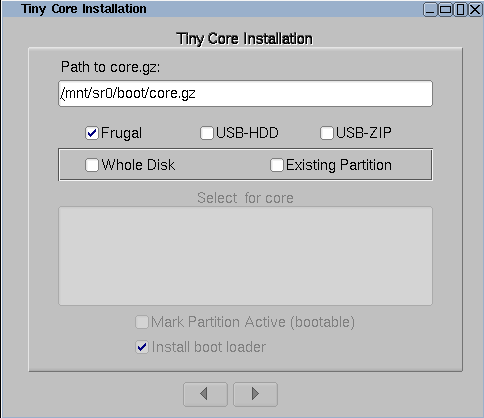
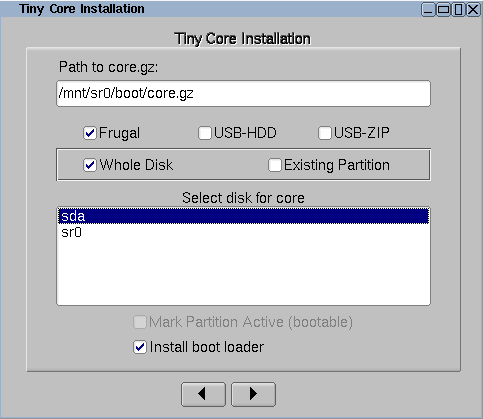
2. Browse to the install files
Browse to /mnt/device/boot and select the core.gz file.
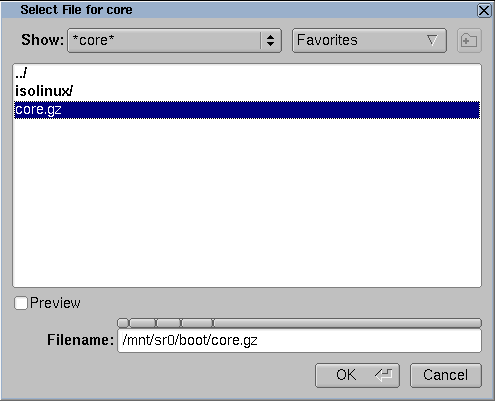
With the source selected, pick the desired install type and target. We’re going to install to an empty hard drive.
If using an existing partition, tick the box to mark it active to have it bootable.

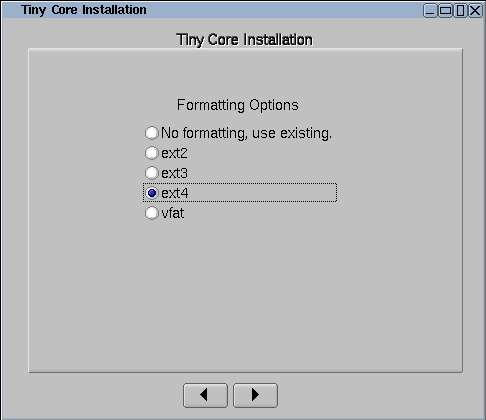
3. Formatting
Format the new partition. It’s recommended to pick one of the ext* options to support linux permissions.
4. Bootcodes
If you want to use additional bootcodes, enter them now. Otherwise leave this blank.
The example bootcodes set a framebuffer resolution and disable wbar icons.
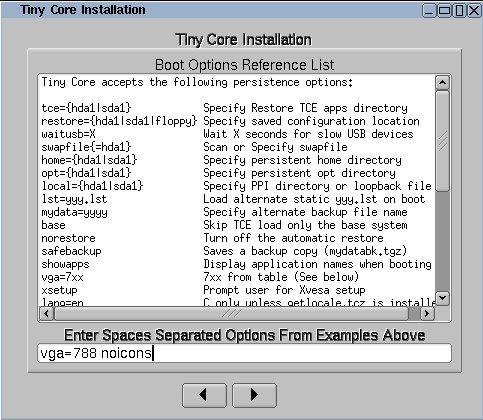
Note that you can edit them any time after the install in the bootloader’s config file, usually extlinux.conf.
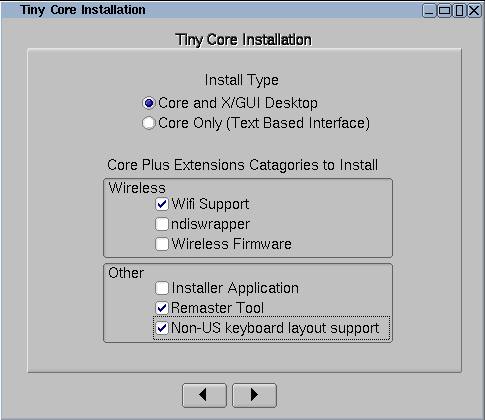
5. CorePlus installation options
If you are installing from the CorePlus CD you will see an additional screen asking which extensions from CorePlus you would like to install. Note that you will only see this screen if running the installer from a CorePlus CD.

The selected extensions will be installed.
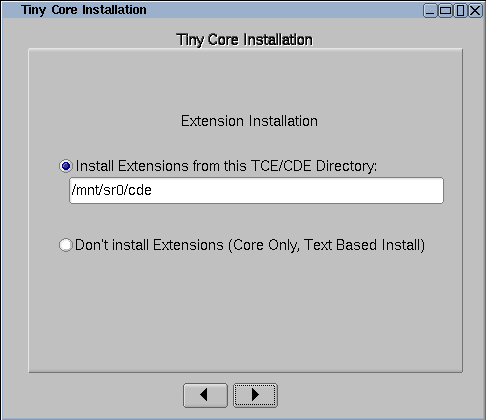
6. Tiny Core installation options
If you are installing from the Tiny Core CD you will see an additional screen asking which directory extensions should be installed from. You should select the cde or tce directory that contains the extensions that you would like installed. For example, if the Tiny Core CD is mounted on /mnt/sr0 you should select /mnt/sr0/cde
Note that you will not see this screen if installing from CorePlus.

All extensions from selected directory will be installed.
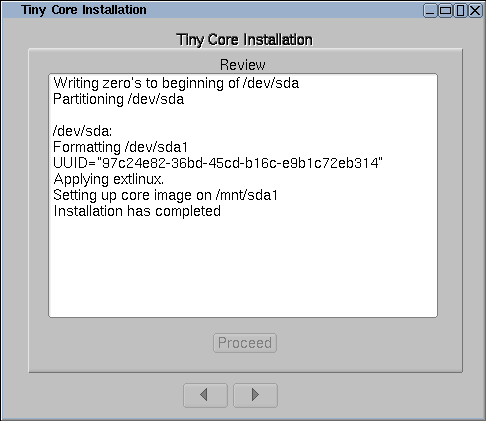
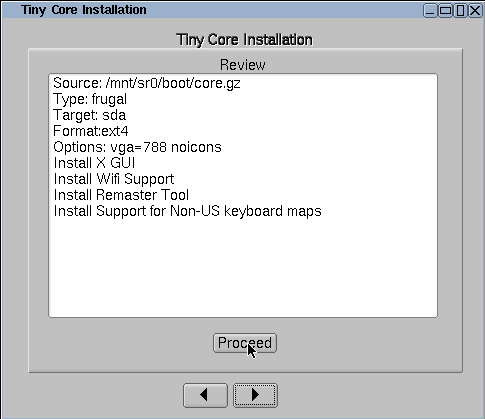
7. Install
If everything’s OK, click on proceed:

The time required will depend on the size of your hard drive.
8. Testing
TC is now installed!
Remove the original CD boot media and reboot.
Note: the system may need to be configured to boot hdX first in the BIOS.
Источник
Tiny Core Linux
Quick & Easy Overview
1. Requirements
2. Introduction
3. Cloud Mode
4. USB Stick Mode
5. USB Stick Boot Mode
6. Installing Applications
7. I’m Having Problems
8. I Need More Help
1. Minimum System Requirements
CPU-i486DX
RAM-48Mb
CD Drive
Wired Internet Connection
TinyCore CD
USB Port
USB Memory Stick, also known as a USB Pen Drive with a known filename on it; this will help you to identify your stick.
2. Introduction
TinyCore is an open system that starts you off with a basic desktop and lets you choose which applications you want to install.
In fact, you can even install applications to a USB stick, that way you can take the CD and USB stick with you, use it in another computer, and still have the same working enviroment.
Applications you may be interested in include web browsers, spreadsheets, video players, and audio editors amongst many others available.
Here are the simplest ways that TinyCore can be run depending on your needs. You should read the following brief paragraphs to determine which one is right for you.
These are just the basics to get you up and running. There are more advanced techniques available in the forums and on the TinyCore Wiki pages.
3. Cloud Mode
Cloud mode is the easiest way to start. Insert the CD and turn on your computer. When you see the TinyCore banner, simply hit the enter key.
After displaying a few messages the desktop will appear. At this point you are free to remove the CD if you wish. Applications installed in this mode will always be put in memory, never on your disk.
This is a good mode to use if you just want to try out applications to see if you like them or to simply surf the web. You will have to reload your applications each time you reset the computer.
4. USB Stick Mode
This is for people who wish to save their applications and prefer NOT to install them on their hard drive, or wish to make them portable.
Plug in a USB memory stick, insert the CD, and turn on the computer. When you see the banner type, «tinycore waitusb=10» without the quotes and hit the enter key.
When the desktop appears you will see the window bar on the bottom of the screen. Single click on the icon that looks like a file cabinet; that will open the file manager program.
In the left pane you will see the directory tree. Look for the directory called «mnt/» and if it is not already expanded, click on the + sign just left of it. This will show you the drives connected to your computer.
Your memory stick should be listed as «sda1». Click on sda1 and make sure the the known filename appears in the panel to the right. If it doesn’t, then try the other drives listed under «/mnt» (but not fd0) until your filename appears.
In the left panel right click on the drive that your stick is listed as and select «Create directory» from the pop up menu; a box will pop up prompting you for a directory name. Type in «tce/» and hit the enter key. You have just created the directory where TinyCore will save any applications, desktop settings, and files you create. The next time you start your computer TinyCore will automatically find this directory and all your applications will be available to run.
When you want to shut down, click on the icon at the left end in the window bar at the bottom of the screen, and a little window will pop up. Under «Backup Options» it should say «Backup» and under that it should list your memory stick as «sda1/tce». Click on «OK» and any new files will be saved. Never just hit the power switch.
5. USB Stick Boot Mode
If your computer is capable of booting off of a USB memory stick you can transfer TinyCore to the stick, allowing you to run without the CD.
READ SECTION 4 FIRST; IT CONTAINS ADDITIONAL INFORMATION.
Plug in a USB memory stick, insert the CD, and turn on the computer. When you see the banner, type, «tinycore waitusb=10» without the quotes and hit the enter key.
When the desktop appears, you will see the window bar on the bottom of the screen. Single click on the icon that has a screwdriver displayed in it. When the Control Panel pops up, click the HD/USB Install button. When the install window pops up, follow the directions in that window.
THIS WILL DELETE THE CONTENTS OF THE MEMORY STICK! BE SURE IT DOES NOT CONTAIN ANYTHING IMPORTANT!
6. Installing Applications
Click on the desktop. When the menu pops up go to ‘System Tools» and click on «AppBrowser».
When the AppBrowser pops up, look to the left of the «Go» button and make sure the dropdown box is set to «OnDemand». Look to the right of the «Go» button and where it says «TCE» make sure it points to your USB memory stick, usually «/mnt/sda1/tce/optional».
If your memory stick is not «sda1» then edit it with the correct location and click the Set button. Now click on the «Connect» button, select an application, click «Go», and your application will be installed.
Be sure to read the text under the «Info» tab; it may contain additional instructions to complete the install.
7. I’m Having Problems
My Applications Are No Longer Available When I Restart The Computer.
You may have a slow USB device. Reboot and try «tinycore waitusb=20».
You installed them OnDemand instead of OnBoot.
Click on the desktop and from the popup menu go to OnDemand and click on your application, if it still does not start, click on the desktop again and select Applications from the popup menu and click on your application.
How Do I Change An Application Between OnDemand And OnBoot?
Click on the desktop and from the popup menu go to SystemTools and select ControlPanel. When the control panel pops up, select AppsAudit.
To change an application from OnDemand to OnBoot, click OnDemand and then Maintenance. From the right panel click the applications you wish to change. Click OnDemand and Exit OnDemand. Now click OnBoot and then Maintenance. From the left panel click the applications you want OnBoot.
When you are done click OnBoot and then Exit OnBoot. Your changes will take effect the next time you reboot.
8. I Need More Help
Check out the FAQ page; there is plenty of useful information listed there. Also check out the Wiki Getting Started page. If you need more help you should first try searching the forums. There is a good chance that somebody else has had the same problem and a solution was found.
You can also sign up for the forum. Just pick a user name, a password, supply your E-mail address, and you’re in! Except for a «Wellcome to TC» message, you will not receive any E-mails you did not request. Be sure to state the nature of the problem and how you arrived at that point. Please also include a brief discription of your hardware.
Источник
How to install tiny core linux
The first step before you install any operating system such as Tiny Core is to back up everything on your computer before starting.
Before making the commitment to perform a frugal install you should consider our Quick and Easy Overview. It covers the basics of running Tiny Core from CDROM and/or USB pendrive. Most will find learning Tiny Core the quick and easy way a better starting point.
But for those who are ready to take the plunge to frugal, this guide shows step by step information on how to install TC via the installer. The older instructions for a manual install are still available, but using the installer is recommended.
The guide assumes you’ve either booted the CorePlus CD, or have installed the tc-install extension (tc-install.tcz)
Keep in mind that this guide is basic and that the user may choose to adapt, remove and/or add parts as desired.
The installer is also applicable to USB sticks and other external media.
Note: If you already have a Linux System booting, then you do not need to make a partition for Tiny Core! Tiny Core can run in a single directory in your existing Linux installation. To do so, at step 1, uncheck the option to «Install boot loader». At step 2, select an existing partition, and at Step 3, do not format it. Upon completion you will need to manually configure your existing boot loader.
1. Start the installation
Open the installer:

It can also be started via the shell or Run icon by typing «tc-install».
2. Browse to the install files
Browse to /mnt/device/boot and select the core.gz file.

With the source selected, pick the desired install type and target. We’re going to install to an empty hard drive.
If using an existing partition, tick the box to mark it active to have it bootable.
3. Formatting
Format the new partition. It’s recommended to pick one of the ext* options to support linux permissions.

4. Bootcodes
If you want to use additional bootcodes, enter them now. Otherwise leave this blank.
The example bootcodes set a framebuffer resolution and disable wbar icons.

Note that you can edit them any time after the install in the bootloader’s config file, usually extlinux.conf.
5. CorePlus installation options
If you are installing from the CorePlus CD you will see an additional screen asking which extensions from CorePlus you would like to install. Note that you will only see this screen if running the installer from a CorePlus CD.
The selected extensions will be installed.
6. Tiny Core installation options
If you are installing from the Tiny Core CD you will see an additional screen asking which directory extensions should be installed from. You should select the cde or tce directory that contains the extensions that you would like installed. For example, if the Tiny Core CD is mounted on /mnt/sr0 you should select /mnt/sr0/cde
Note that you will not see this screen if installing from CorePlus.
All extensions from selected directory will be installed.
7. Install
If everything’s OK, click on proceed:
The time required will depend on the size of your hard drive.
8. Testing

TC is now installed!
Remove the original CD boot media and reboot.
Note: the system may need to be configured to boot hdX first in the BIOS.
Источник


