- Restart your Mac in macOS or Windows
- How to start up in macOS from Windows
- How to start up in Windows from macOS
- Learn more
- Download and install Windows support software on your Mac
- Install the latest macOS updates
- Format a USB flash drive
- Download the Windows support software
- Install the Windows support software
- Learn more
- How to Install Windows 10 on an External Drive on a Mac
- Overview
- Things you need
- Hardware
- Software
- The Guide
- Part 1: Obtaining Windows Support Software
- Part 2: Preparing the Windows 10 USB Installer
- Part 3: Turning off System Integrity Protection
- Part 4: Preparing your External Drive
- Part 5: Installing Windows 10 on your External Drive
- Part 6: Installing rEFInd
- Part 7: Setting up Windows
- Part 8: Turning on System Integrity Protection
- Other Notes
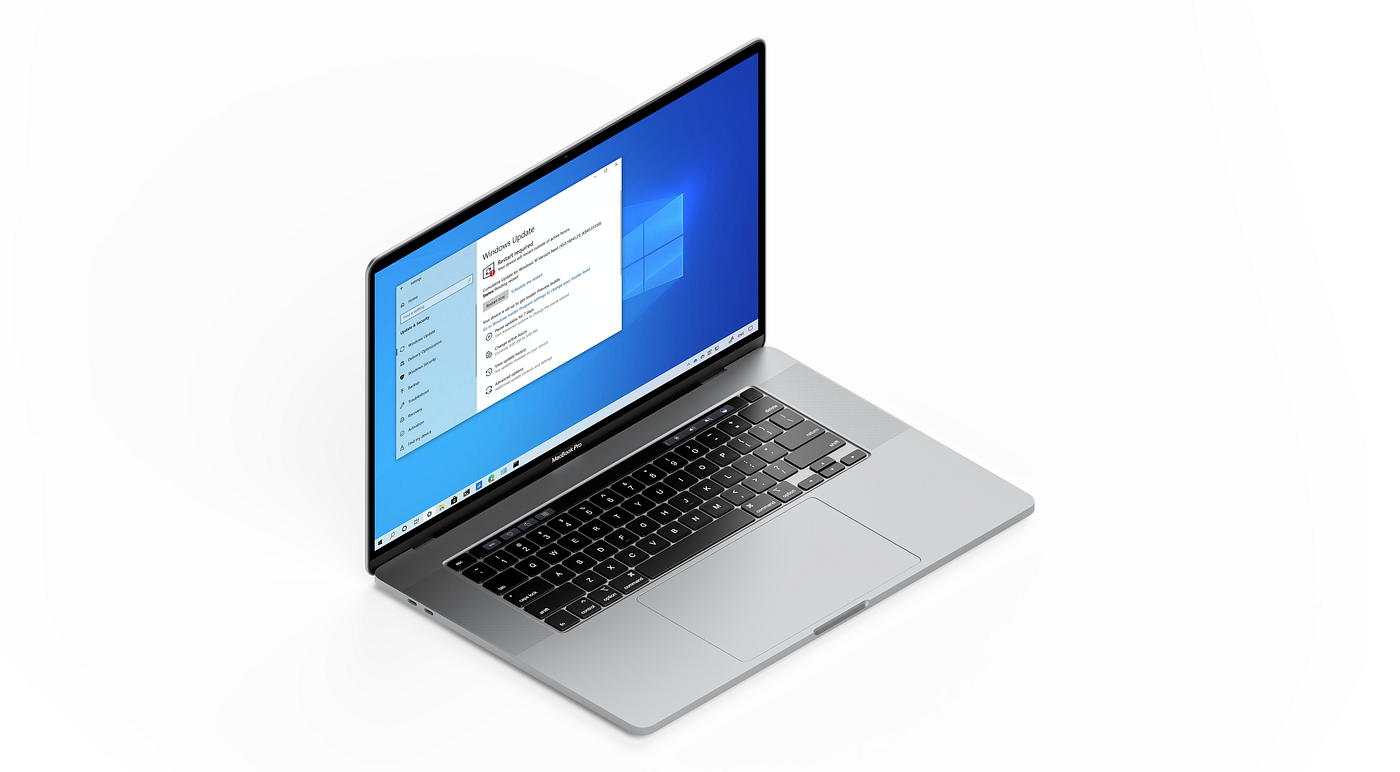
Restart your Mac in macOS or Windows
After installing Microsoft Windows on your Mac, you can choose whether your Mac starts up in macOS or Windows.
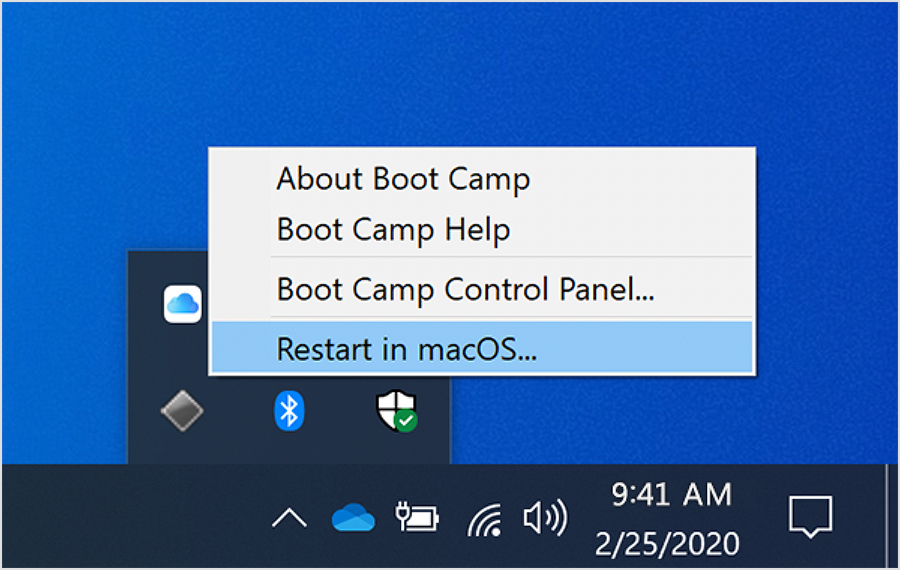
How to start up in macOS from Windows
- From the notification area on the right side of the Windows taskbar, click to show hidden icons.
- Click the Boot Camp icon .
- From the menu shown, choose Restart in macOS.
If you haven’t installed the latest Boot Camp updates, you might get the message ”Could not locate the OS X boot volume.»
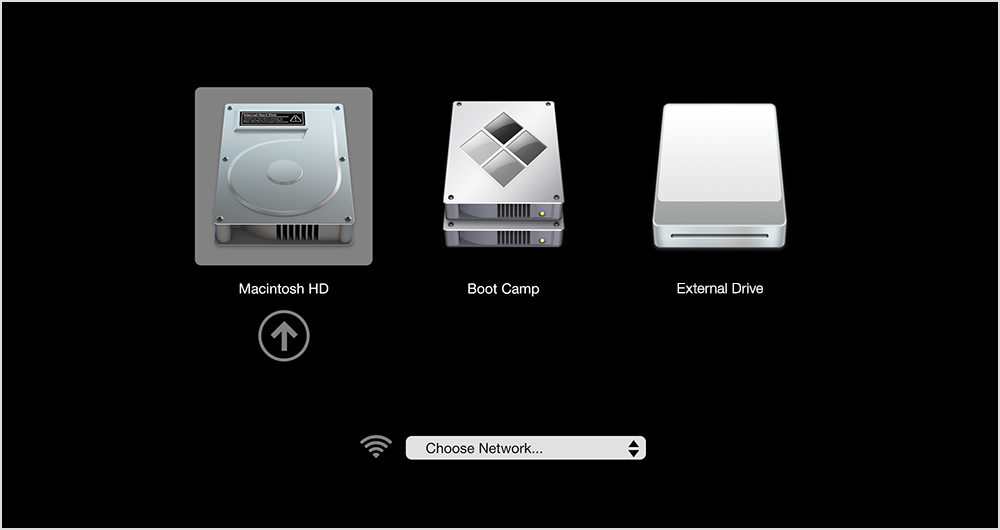
Or use Startup Manager as your Mac starts up:
- Restart your Mac from the Start menu in Windows.
- Press and hold the Option (or Alt) ⌥ key as your Mac begins to restart.
- Select your Mac startup volume (Macintosh HD) in the Startup Manager window, then press Return or click the up arrow:
How to start up in Windows from macOS
- Use Startup Manager to choose your Windows (Boot Camp) volume during startup.
- Or select your Boot Camp volume in Startup Disk preferences, then restart.
Learn more
- If you’re having difficulty using VoiceOver or another screen reader to complete these steps, please contact Apple Support.
- Learn how to install Windows 10 on your Mac.
Information about products not manufactured by Apple, or independent websites not controlled or tested by Apple, is provided without recommendation or endorsement. Apple assumes no responsibility with regard to the selection, performance, or use of third-party websites or products. Apple makes no representations regarding third-party website accuracy or reliability. Contact the vendor for additional information.
Источник
Download and install Windows support software on your Mac
After using Boot Camp Assistant to install or upgrade Microsoft Windows on your Mac, you might also need to install the latest Windows support software (drivers) from Apple.
When you install Microsoft Windows on your Mac, Boot Camp Assistant automatically opens the Boot Camp installer, which installs the latest Windows support software (drivers). If that doesn’t happen, or you experience any of the following issues while using Windows on your Mac, follow the steps in this article.
- Your Apple mouse, trackpad, or keyboard isn’t working in Windows.
Force Touch isn’t designed to work in Windows. - You don’t hear audio from the built-in speakers of your Mac in Windows.
- The built-in microphone or camera of your Mac isn’t recognized in Windows.
- One or more screen resolutions are unavailable for your display in Windows.
- You can’t adjust the brightness of your built-in display in Windows.
- You have issues with Bluetooth or Wi-Fi in Windows.
- You get an alert that Apple Software Update has stopped working.
- You get a message that your PC has a driver or service that isn’t ready for this version of Windows.
- Your Mac starts up to a black or blue screen after you install Windows.
If your Mac has an AMD video card and is having graphics issues in Windows, you might need to update your AMD graphics drivers instead.

Install the latest macOS updates
Before proceeding, install the latest macOS updates, which can include updates to Boot Camp.
Format a USB flash drive
To install the latest Windows support software, you need a 16GB or larger USB flash drive formatted as MS-DOS (FAT).
- Start your Mac from macOS.
- Plug the USB flash drive into your Mac.
- Open Disk Utility, which is in the Utilities folder of your Applications folder.
- Choose View > Show All Devices from the menu bar.
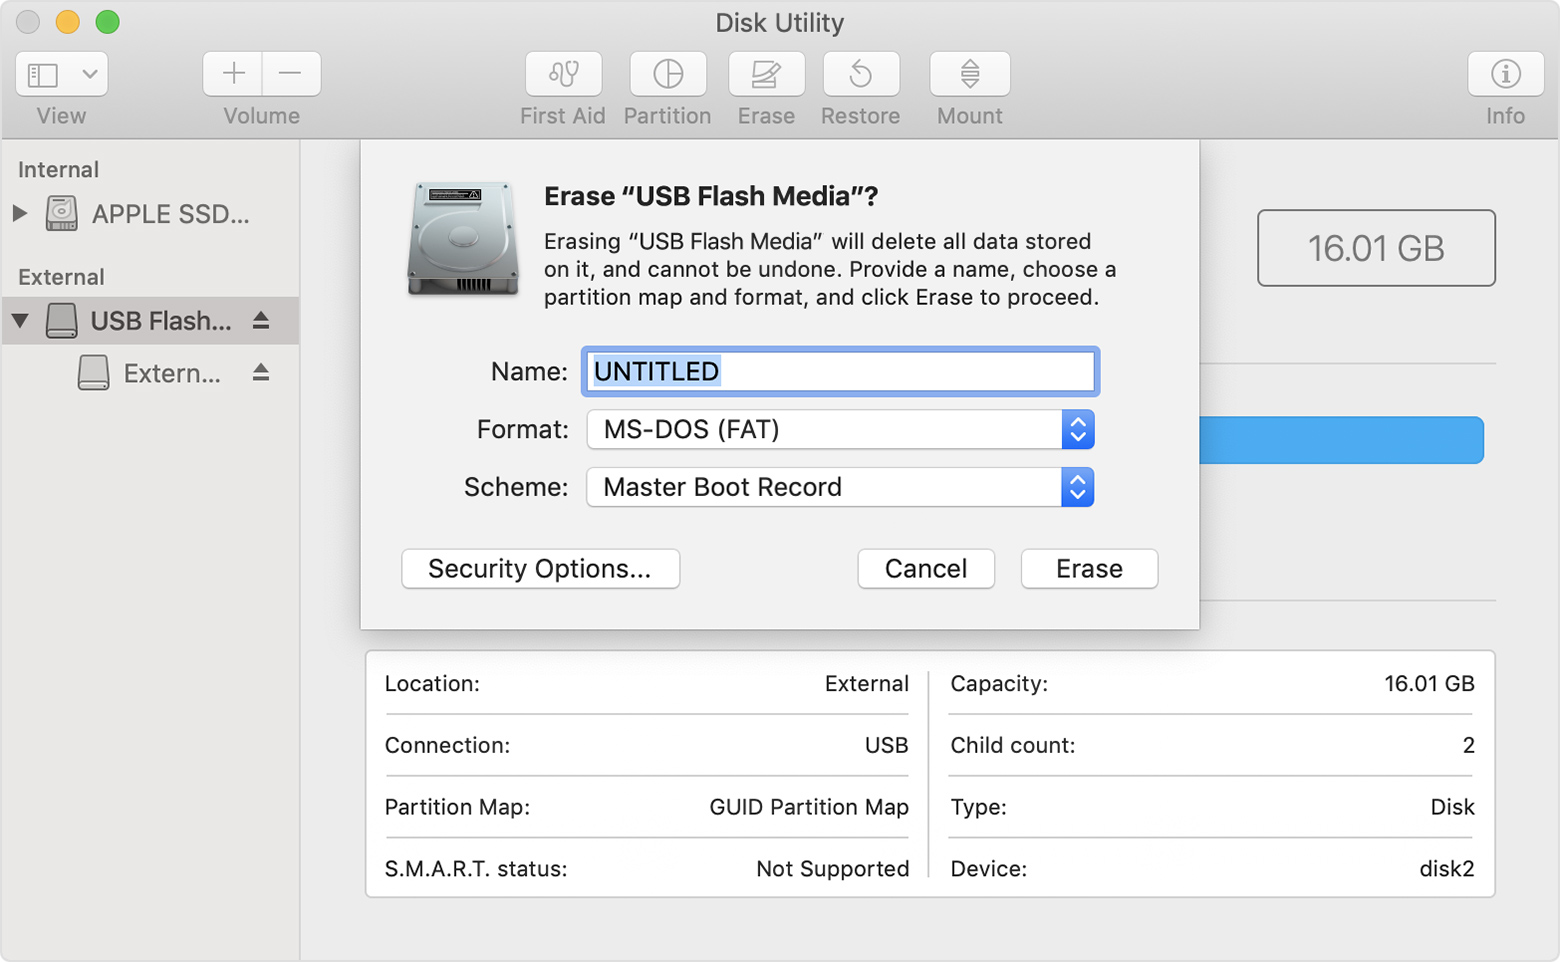
- From the sidebar in Disk Utility, select your USB flash drive. (Select the drive name, not the volume name beneath it.)
- Click the Erase button or tab.
- Choose MS-DOS (FAT) as the format and Master Boot Record as the scheme.
- Click Erase to format the drive. When done, quit Disk Utility.
Download the Windows support software
- Make sure that your Mac is connected to the Internet.
- Open Boot Camp Assistant, which is in the Utilities folder of your Applications folder.
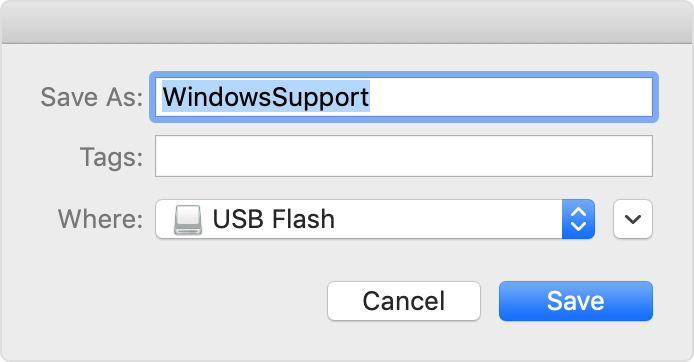
- From the menu bar at the top of your screen, choose Action > Download Windows Support Software, then choose your USB flash drive as the save destination. When the download completes, quit Boot Camp Assistant.
Install the Windows support software
After downloading the Windows support software to your flash drive, follow these steps to install the software. (If you’re attempting to resolve issues with a Bluetooth mouse or keyboard, it might be easier to use a USB mouse or keyboard until these steps are complete.)
- Make sure that the USB flash drive is plugged into your Mac.
- Start up your Mac in Windows.
- From File Explorer, open the USB flash drive, then open Setup or setup.exe, which is in the WindowsSupport folder or BootCamp folder. When you’re asked to allow Boot Camp to make changes to your device, click Yes.
- Click Repair to begin installation. If you get an alert that the software hasn’t passed Windows Logo testing, click Continue Anyway.
- After installation completes, click Finish, then click Yes when you’re asked to restart your Mac.
Learn more
If you can’t download or save the Windows support software:
- If the assistant says that the Windows support software could not be saved to the selected drive, or that the USB flash drive can’t be used, make sure that your USB flash drive has a storage capacity of at least 16GB and is formatted correctly.
- If the assistant doesn’t see your USB flash drive, click Go Back and make sure that the drive is connected directly to the USB port on your Mac—not to a display, hub, or keyboard. Disconnect and reconnect the drive, then click Continue.
- If the assistant says that it can’t download the software because of a network problem, make sure that your Mac is connected to the Internet.
- Make sure that your Mac meets the system requirements to install Windows using Boot Camp.
If a Mac feature still doesn’t work after updating the Windows support software, search for your symptom on the Apple support website or Microsoft support website. Some features of your Mac aren’t designed to work in Windows.
Information about products not manufactured by Apple, or independent websites not controlled or tested by Apple, is provided without recommendation or endorsement. Apple assumes no responsibility with regard to the selection, performance, or use of third-party websites or products. Apple makes no representations regarding third-party website accuracy or reliability. Contact the vendor for additional information.
Источник
How to Install Windows 10 on an External Drive on a Mac

Hello! I guess this is my last resort. Unfortunately, I can’t get SASM to work natively on macOS Catalina for my computer architecture course. At this point, I can either work on Windows 10 or Ubuntu (or whatever Linux distro you can think of). As per the title, we’ll be installing Windows 10. There are a lot of ways to do this but this method provides more control over the installation process.
My method addresses the issue on storage. Most entry-level Macs only have 128GB of storage. And if you’re human, 70% of that is already filled with files. There’s really not much room there for Windows.
Boot Camp is Apple’s way of letting users get Windows on their devices. But… We wont be using that. I’m pretty sure you’ve already figured out why. Well if you haven’t, let me tell you. Boot Camp doesn’t allow you to install Windows on an external drive. So, we’ll be going around that restriction just like how you install Windows on normal PCs.
If you have extra storage, might as well use Boot Camp to avoid the hassle.
Overview
I’ve tested this on pre-UEFI and UEFI Macs, and it has been working great. Granted, you might have to do some additional steps for pre-UEFI systems but we won’t be doing that here. This guide is geared towards UEFI Macs which are models from 2013 and above.
GUI installers are pretty convenient, huh? Well, we won’t be using those in this guide. We’ll be using Terminal on macOS and Command Prompt on Windows. Over this whole process, you’ll learn how to manage drives using DISKPART , install Windows using DISM in command prompt, and how difficult it is to work around Apple’s kernel for Macs.
Well, the last one might be hard for you to realize because I already written this guide for you to follow. There’s not much headache on your side at this point.
Things you need
Before we begin, make sure you have these stuff.
Hardware
If you already are using an external drive that you wanna use for this, that’s fine. Just make a backup of your files from that drive first before proceeding because we have to reformat that drive.
- Your Mac
- At least 120GB HD or SSD (preferably USB 3.0 or higher)
- At least 8GB flash drive (also preferably USB 3.0 or higher)
Software
Obviously, you need the Windows 10 ISO, but that’s not the interesting part. By the way, this setup takes into consideration long-term use thus the need of installing a custom boot loader. It will allow us to choose which operating system we want to boot into without accessing Apple’s boot menu. You can really use any boot loader you want but I prefer rEFInd.
The Guide
Just a quick disclaimer before we begin. Do note that I’m not responsible if things go wrong. Proceed at your own risk. Make sure you have backed up all of your files!
Part 1: Obtaining Windows Support Software
For Windows 10 to work properly on our computers regardless of whether it’s a Mac or not, we need drivers. Apple consolidated all of the drivers we need for Windows. We can download them using Boot Camp Assistant.

- Open Boot Camp Assistant.
- Click Action on the menu bar then press Download Windows Support Software.
- It’ll ask you where you want to save a directory named WindowsSupport. Just save it in the Downloads folder for ease.
- Wait for it to finish downloading. Once done, you can close Boot Camp Assistant.
Part 2: Preparing the Windows 10 USB Installer
In this part, you’ll be learning how to create a bootable Windows 10 USB Installer for Macs. We’ll be formatting the drive using Disk Utility.

- Plug in your flash drive to your Mac.
- Open Disk Utility.
- Click View on the menu bar then press Show All Devices.
- Click on your flash drive under External over on the side panel. In my case, it’s SanDisk Ultra Fit Media.
- Click Erase on the toolbar.
- Set Name to Windows 10, Format to EXFAT, and Scheme to GUID Partition Map.
- Click on Erase to format the drive.
- Open up the Windows 10 ISO you’ve downloaded earlier. Drag all the contents of that ISO onto the flash drive we just fo.
- Open WindowsSupport, the drivers we download from the previous part. Drag all of the contents of that folder onto the flash drive.

Part 3: Turning off System Integrity Protection
This part is needed since we’re gonna install a custom boot loader. But, don’t worry! We’re gonna turn it back on after the installation.
- Restart your Mac.
- Once you hear the boot chime, press and hold CMD + R to get into Recovery Mode.
- In the menu bar, click on Utilities then press Terminal.
- Execute csrutil disable .
- Turn off your Mac.
Part 4: Preparing your External Drive
Oh, boy! Here comes the fun stuff. By far, this is the tedious part of the whole guide. We’ll be dabbling a bit with Command Prompt. Hopefully, you can learn some new concepts here! Be sure that you already have a backup of your files from the external drive.
- Unplug all USB devices except for the Windows 10 USB Installer and the external drive you want to install Windows on.
- Turn on your Mac.
- Once you hear the boot chime, press and hold ALT to access the boot menu.
- You’re gonna be presented with a list of bootable devices but we have to boot into the Windows 10 USB Installer we just created. Select the one labeled EFI Boot. You’ll see the Windows logo during boot up. If you see more than one device with that label, try each one until you find the right one.
- Once the boot up is successful, you’ll be greeted with the Windows 10 GUI installer.
- Press SHIFT + FN + F10 to open Command Prompt.
- Enter DISKPART . Then, execute LIST DISK . Identify the disk number of your external drive. In my case, it is 2 .
- To select your external drive, enter SELECT DISK 2 . Change 2 to your disk number.
- Once successfully selected, enter CLEAN . This will wipe the partition table and uninitialize your external drive.
- Now, we have to create a partition for Windows 10 to be installed in. Enter CREATE PARTITION PRIMARY SIZE=122880 . This will create a 128GB logical volume. Of course, you can change it to whatever size you want. At the minimum, you should set it to 60GB.
- Enter ASSIGN LETTER=W . This will set the volume letter to W which will make it easier for us to reference the volume later.
- To format the partition, enter FORMAT QUICK FS=NTFS .
- Enter LIST VOLUME . We have to look for the EFI partition. It is formatted as FAT32 with Info set to Hidden.
- Select the volume by entering SELECT VOLUME 4 . In my computer, the EFI partition has the volume number 4. Change it to the volume number of your EFI partition.
- Enter ASSIGN LETTER=Z .
- Verify that the partition you just created has its volume letter set to W and the EFI partition set to Z. Also check the volume letter of the Windows 10 USB Installer. In my case, it’s D.
- Enter EXIT to close DISKPART.
Part 5: Installing Windows 10 on your External Drive
Now that the partitioning is out of the way, we can begin with the installation. We’ll be installing Windows 10 via DISM . Essentially, we are deploying the Windows 10 image onto the partition we just created.
- In Command Prompt, type in dism /Get-WimInfo /WimFile:D:\Sources\install.wim . This will list down the editions you can install. Identify the index number of the edition you want.
- To start installing, enter dism /Apply-Image /ImageFile:D:\Sources\install.wim /index:6 /ApplyDir:W:\ . Change the volume letters if you have different ones. The index number I have is 6 for Windows 10 Pro. Change the index to your liking.
- Once it’s done, we have to verify if Windows was installed successfully in the partition. Enter DIR W: to list down the directories and files in that partition. Again, change the volume letter if you assigned a different one.
- To make your installation bootable, enter bcdboot W:\Windows /l en-us /s Z: /f UEFI . This will create the boot files in your EFI partition.
- Turn off your Mac and unplug the Windows 10 USB Installer.
Part 6: Installing rEFInd
In this part, we’ll be installing a custom boot loader. rEFInd will make it easy for us to select operating systems on boot. Fortunately, the author created a script for us to use.

Part 7: Setting up Windows
If it went well, you should’ve been greeted with the rEFInd boot loader.
- Your Windows 10 installation should appear. Do note that it will always appear even if the external drive is unplugged. This is because we installed the boot files of Windows 10 onto the internal EFI partition.
- Select Windows to boot.
- Complete the setup.
- Plug in your Windows 10 USB Installer and open the BootCamp folder.
- Run setup.exe to install the drivers.
- Congratulations! We’re finally done!
Part 8: Turning on System Integrity Protection
This part is crucial and may leave your system vulnerable. But, don’t worry! We’ll turn it back on now.
- Restart your Mac.
- Once you hear the boot chime, press and hold CMD + R to get into Recovery Mode.
- Open up Terminal.
- Execute csrutil enable .
- Restart your Mac.
Other Notes
I bet you’ve noticed that rEFInd looks ugly. Well, I have something to tell you. You can install themes. Check this one out that goes well with the aesthetic Apple is going for. rEFInd is very customizable but I’ll leave the configuration to you. You can find the documentation of the boot loader here. Look at how my triple boot setup is recognized by rEFInd below.

You might’ve realized that if you have a larger drive, only one partition is present, your Windows 10 partition. This is because we haven’t created the partition for the unused space yet. To do so, just open up the Disk Management tool on Windows and create a partition for the unused space of your drive. Make sure you set the format of that partition to EXFAT so that you can have read and write capabilities for both macOS and Windows.
If you want to configure rEFInd to install themes or whatnot, you have to access the rEFInd folder in the EFI partition. To make things easier for you, here’s how to mount the partition and how to locate the rEFInd folder.

If you want to uninstall the boot loader, it’s relatively easy. Just mount the EFI partition and delete the folder named refind . If you want to remove Windows 10 from your external drive, that’s easy too. Just delete the partition from Disk Utility.
Lastly, I’ve had a couple of people try this on a 2018 MacBook Pro and it seemed to fail during the post-installation phase. An OOBE error keeps on occurring. The keyboard and mouse inputs weren’t recognized which prohibited us from working around the error. If you have any solutions regarding this or anything at all, feel free to leave a response.
Источник


