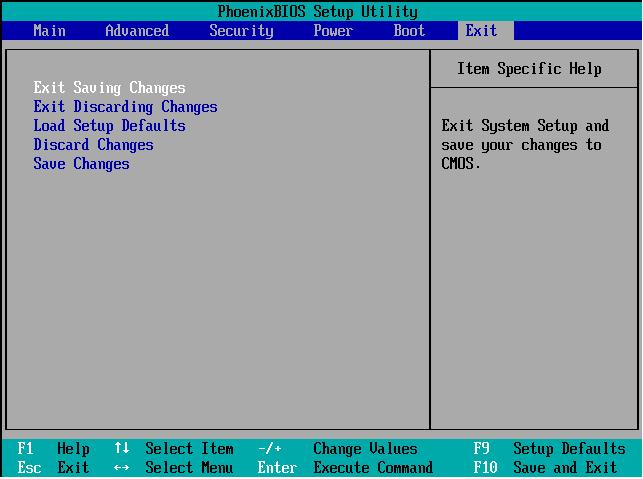
- Boot to UEFI Mode or legacy BIOS mode
- To boot to UEFI or BIOS:
- UEFI and BIOS modes in WinPE
- Detect if WinPE is booted into BIOS or UEFI Mode
- Make sure you boot into the right mode every time
- Use preformatted hard drives, and use a method that doesn’t automatically format the drive.
- Remove the UEFI or BIOS boot files
- Boot only when in UEFI mode
- Boot only when in BIOS mode
- How to install Windows via BIOS: settings, step-by-step guide, tips
- Basic Input-Output System. (BIOS)
- BIOS settings
- Management information.
- Booting the device with BIOS
- Loading Windows through a USB flash drive
- Tips and tricks
- Easy Windows installation process
- Difference in installation processes
- Operating system hard disk partitions.
- Analysis of the hard disk during installation.
- Retention of personal information.
- BIOS/UEFI Setup Guide: Boot from a CD, DVD, USB Drive or SD Card
- How-to Summary: Boot Your Computer from a CD/DVD/USB/SD Drive
- BIOS vs. UEFI: What’s the Difference?
- How to Access Your BIOS or UEFI Setup Screen
- Navigating BIOS / UEFI Setup
- How to Change the BIOS / UEFI Boot Order to Boot from a USB / CD Drive
- Booting from a USB drive or CD/DVD
- Troubleshooting Boot Options
- Disabling Fast Startup
- Boot Device Menu / Boot Override
Boot to UEFI Mode or legacy BIOS mode
Choose UEFI or legacy BIOS modes when booting into Windows PE (WinPE) or Windows Setup. After Windows is installed, if you need to switch firmware modes, you may be able to use the MBR2GPT tool.
In general, install Windows using the newer UEFI mode, as it includes more security features than the legacy BIOS mode. If you’re booting from a network that only supports BIOS, you’ll need to boot to legacy BIOS mode.
After Windows is installed, the device boots automatically using the same mode it was installed with.
To boot to UEFI or BIOS:
Open the firmware menus. You can use any of these methods:
Boot the PC, and press the manufacturer’s key to open the menus. Common keys used: Esc, Delete, F1, F2, F10, F11, or F12. On tablets, common buttons are Volume up or Volume down (find more common keys and buttons). During startup, there’s often a screen that mentions the key. If there’s not one, or if the screen goes by too fast to see it, check your manufacturer’s site.
Or, if Windows is already installed, from either the Sign on screen or the Start menu, select Power ( ) > hold Shift while selecting Restart. Select Troubleshoot > Advanced options > UEFI Firmware settings.
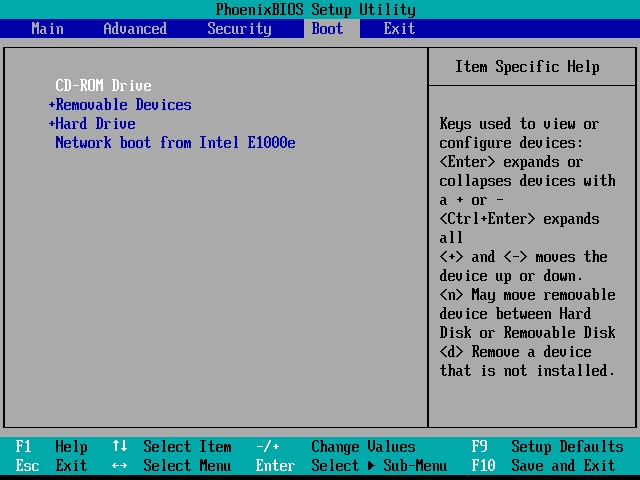
From the firmware menus, boot to drive or network while in UEFI or BIOS mode:
On the boot device menu, select the command that identifies both the firmware mode and the device. For example, select UEFI: USB Drive or BIOS: Network/LAN.
You might see separate commands for the same device. For example, you might see UEFI USB Drive and BIOS USB Drive. Each command uses the same device and media, but boots the PC in a different firmware mode.
Some devices only support one mode (either UEFI or BIOS). Other devices will only allow you to boot to BIOS mode by manually disabling the UEFI security features. To disable the security features, go to Security > Secure Boot and disable the feature.
Some older PCs (Windows 7-era or earlier) support UEFI, but require you to browse to the boot file. From the firmware menus, look for the option: «Boot from file», then browse to \EFI\BOOT\BOOTX64.EFI on Windows PE or Windows Setup media.
UEFI and BIOS modes in WinPE
Detect if WinPE is booted into BIOS or UEFI Mode
Query the registry to determine which mode the device is in. You can do this from the command line:
| Return code | Firmware mode |
|---|---|
| 0x1 | BIOS |
| 0x2 | UEFI |
Use it in a script:
Note that between delims= and » %%A is a tab, followed by a space.
Make sure you boot into the right mode every time
Here are a couple of ways you can make sure you’re booted into the right firmware mode every time you start your PC.
Use preformatted hard drives, and use a method that doesn’t automatically format the drive.
If you want to ensure that your drive boots into a certain mode, use drives that you’ve preformatted with the GPT file format for UEFI mode, or the MBR file format for BIOS mode. When the installation starts, if the PC is booted to the wrong mode, Windows installation will fail. To fix this, restart the PC in the correct firmware mode.
Remove the UEFI or BIOS boot files
If you want a PC to only boot into a certain mode, you can remove the files that Windows PE or Windows Setup use to boot in UEFI or BIOS mode. Remove the following files, depending on the mode you want to boot to.
Boot only when in UEFI mode
Remove the bootmgr file from the root of the Windows PE or Windows Setup media. This prevents the device from starting in BIOS mode.
Boot only when in BIOS mode
Remove the efi folder from the root of the Windows PE or Windows Setup media. This prevents the device from starting in UEFI mode.
How to install Windows via BIOS: settings, step-by-step guide, tips

How to install Windows via BIOS? Competent setting and precise actions will help you complete it quickly and efficiently. The updated version can be downloaded from CD-ROM, DVD-ROM or USB stick.
Basic Input-Output System. (BIOS)

BIOS is the basis of the motherboard, it is the I / O base (hereinafter I / O) located on the “motherboard”. The existence of the BIOS guarantees the ability to tune and correct the computer.
The I / O system for each PC depends on the “motherboard”.
BIOS settings
You can determine the BIOS settings for a specific motherboard by looking at them in the motherboard passport.
Important! Incorrect BIOS parameters can damage the computer or reduce the power indicator.
Management information.
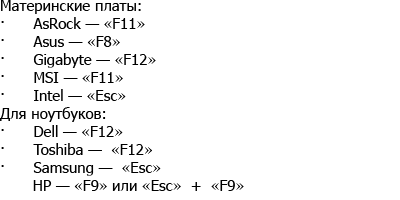
How to install Windows via BIOS, boot from DVD, USB, HDD depends on several Boot Menu keys:
Booting the device with BIOS
You need to get into the BIOS: restart the PC and enter “Setup” – the software that is responsible for the initial boot of the computer.
During the reboot, carefully monitor the inscriptions on the monitor screen, you must not skip the line that appears below with the following text:
Press ____ to enter SETUP.
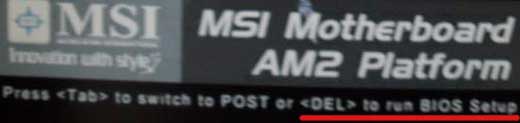
The program prompts you how to get into the BIOS, you must press the key that is written on the screen, it can be:
F1, F2, F3, F10, Del, Esc – they differ on different computers, depending on the BIOS version.
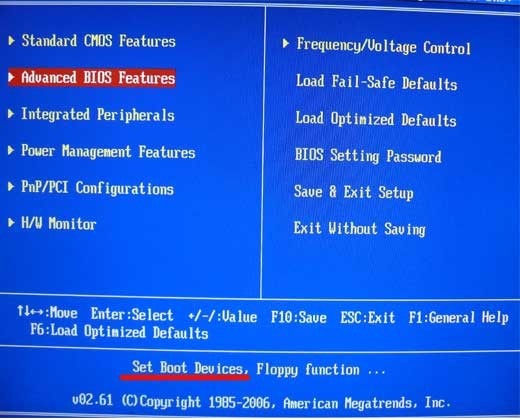
Hold down the key until the system redirects to the Basic Input-Output System. A list of tabs will appear on the screen, you need to select the one that says about booting devices – “Boot devices” or “Advanced BIOS Features”.
If you did not succeed in completing the prescribed actions the first time, do not despair, you must repeat all the actions a couple of times.
We select a tab, in order to enter, you need to press the “ENTER” button. After that, in the drop-down list, find the “Boot Sequence” tab and check the correctness of the selection with the information that will appear on the right on the monitor screen. It should be said that the selected tab is responsible for the boot priority of devices.
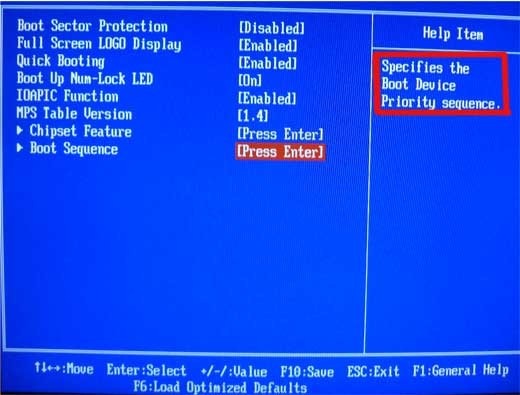
After the boot tab is defined, controlling the input keys, you need to set the priority so that the first in the list is “CD-ROM” or that boot device.
With the help of which the whole process will be carried out. To do this, select “First Boot Device” in the list and after that the hard drive came.
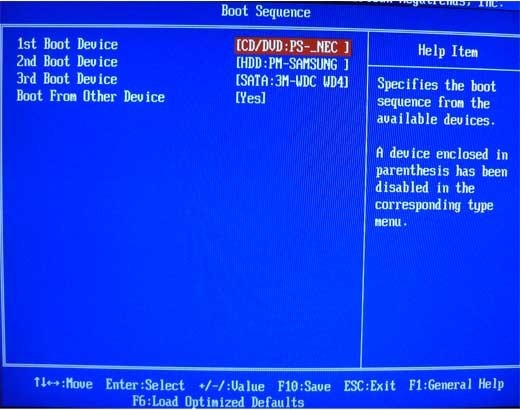
You need to confirm the correctness of your choice and press the “OK” button.
Thus, all BIOS settings for booting and reinstalling Windows are ready. This was all done so that the next time the PC is rebooted, the OS itself redirects the Windows boot from the previously selected drive.
In order to start the download, you must restart your computer.
Loading Windows through a USB flash drive
To install Windows via the Basic Input-Output System from a USB flash drive, in fact, the whole procedure is similar to the one described above, but you need to select Secure Boot from the list of proposed tabs in the I / O BIOS system or select the appropriate menu item in the OS with a simple version of “overlay” versions.
The process of installing Windows from a USB flash drive does not start and a black screen is shown on the monitor:
- UEFI mode enabled;
- The flash drive is formatted in NTFS;
- BIOS I / O supports only NTFS partitions, UEFI – FAT 32.
With a new version of the system to boot from a USB flash drive, it asks for permission to automatic mode. It is best to refuse such an offer, otherwise the OS may be installed on the wrong partition or delete some of your personal files.
Before installing BIOS settings, you must select using “+” or “-” and click on the “Boot” tab.
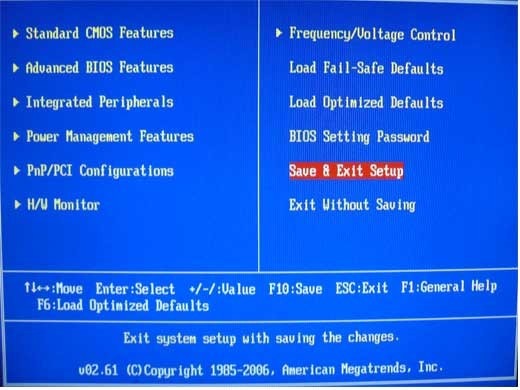
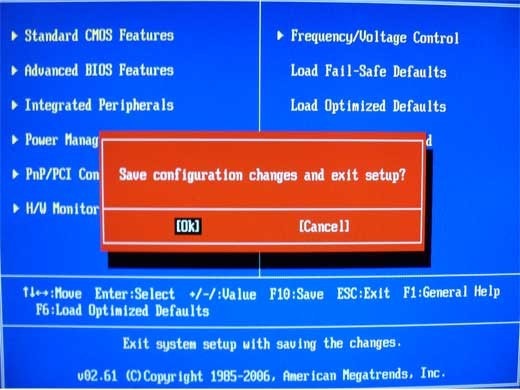
When choosing settings, you must save them. To do this, you need to press the “F10” – “Save and exit” key. You can also perform this action by pressing the “->” – “Exit Saving Changes” key, i.e. “Exit and save changes.”
After the approved and selected option and device boot priority, you need to select the F10 option, and then restart the computer.
Tips and tricks

For novice users who need to reinstall Windows through BIOS, experts have developed some tips for a competent and fast flow of the process.
For a well-tuned BIOS system, you should pay special attention to these recommendations:
- PC requirements (subject to Windows 7):
- Memory – at least 1 GB;
- Processor – at least 1 Hz;
- Video card – minimum DirectX 9.
- Time to work in BIOS.
How long does the process of setting up and configuring a new version of Windows take? It all depends on the technical parameters of the PC:
- Speed ”Clock Speed”;
- The number of cores “Cores”;
- The trunk frequency is “800/1066/1333/1600 MHz”.
On average, it will take one hour to install Windows via BIOS.
Easy Windows installation process
A clean installation is a manual startup of the system disk during computer startup. After that, start, press any button, after the message “Press any key” appears on the tap.
The BIOS indicates the location of the new OS, for example, on a CD / DVD or on a hard disk, so that the old version is not used at all, or has been deleted. The clean version is used for any OS: Unix, DOS, Windows XP, as well as Linux, Windows 8 and Windows 7.
Simple is rarely used and is not recommended. This is due to the fact that the new version is launched from a CD / DVD disc already installed by the old OS. So a simple installation is more like the “overlay” process, since the new version is overlaid on the old version.
Difference in installation processes
Easy installation of Windows:
- Computer startup;
- BIOS;
- Operating system;
- BIOS;
- Installation.
Clean install:
- Computer startup;
- BIOS;
- Installation.
- Clean install.
Operating system hard disk partitions.
Often during a clean install, all partitions are formatted and old versions and files are removed. If you need to reinstall a system with several partitioned disks where important files are stored, you can leave the information unchanged.
It is not necessary to format the D drive, however, the C drive containing the old Windows files will be formatted.
Analysis of the hard disk during installation.
Before starting the installation of Windows (with a non-working OS, crashes and glitches), you need to try to use the last chance to restore and clean from malware.
In case of clearly expressed problems with the operation of the PC, it is necessary, first of all, to check the state of the hard disk, analyze the work of the segments, otherwise, even during the installation of the system, the formatting process may freeze or work unstably.
Retention of personal information.
Personal data and information is a very important component that cannot always be restored in case of deletion or damage, therefore, before reinstalling anything, you need to take care of their safety.
To save information and personal data when reinstalling Windows, you need to copy and transfer all the necessary files to a portable medium (disk, USB flash drive, etc.). It is also very important to save passwords, for this it is recommended to use the Backup program or do it the old-fashioned way, manually.
By exactly following the rules and tips, you can understand how to install Windows via BIOS on a computer, even for a person without special skills and experience, in such situations.
The main requirement for correct installation is the accuracy of the step-by-step guide suggested in the article above. Detailed photos accompanying the installation steps will help you navigate the I / O BIOS system.
BIOS/UEFI Setup Guide: Boot from a CD, DVD, USB Drive or SD Card

Windows runs on thousands of computer configurations, but installing a new operating system like Windows 10 on the variety of configurations that exist is another thing. The steps may be different depending on whether your computer has an existing Windows 10 installation on it, an earlier version of Windows on it or a completely different operating system on it, like macOS or Linux. In each case, installing Windows 10 relies on booting from a device other than your main hard disk drive (HDD) or solid state drive (SSD). To do that, you need to access the BIOS or UEFI setup page. Sometimes, this is easier said than done.
In this guide, we’ll walk through the basic steps that apply to most scenarios. Then, we’ll discuss some troubleshooting and alternate methods, in case the simple approach doesn’t work for you.
How-to Summary: Boot Your Computer from a CD/DVD/USB/SD Drive
- BIOS vs. UEFI: What’s the Difference?Optional. In case you want some background info on what the heck UEFI is and why it makes things difficult.
- How to Access BIOS / UEFI Setup Screen. Includes the keyboard commands you need to access the BIOS or UEFI setup screen.
- Navigate BIOS / UEFI Setup Screen. Finding your way around without a typical keyboard/mouse interface.
- How to Change Boot Order in BIOS / UEFI. These are the settings you need to change in BIOS / UEFI to allow your PC to boot from a USB or CD.
- Booting from a USB/CD/DVD Drive or SD Card. Once you’ve configured your BIOS / UEFI correctly, here’s what to do.
Best case scenario, those steps will get you up and running. If not, see our Troubleshooting section. This includes details for changing the boot order on a Microsoft Surface device and booting from another device on a Mac.
Note: Once you master the steps to boot your computer from a USB or CD/DVD, you can use this to boot other operating systems or bootable live environments on your machine.
BIOS vs. UEFI: What’s the Difference?
Each computer, whether it’s a DELL, HP, Acer or even a custom built system, is an island unto itself before Windows 10 (or some other operating system) starts. Since the 1980s, hardware vendors have worked together to standardize around common access routines and commands for managing your BIOS Boot Options. The BIOS, which stands for Basic In Output System, is a critical bit of low-level code stored in nonvolatile memory that your computer uses to manage your hardware and load Windows 10 or another operating system.
A new standard called UEFI or Universal Extensible Firmware Interface came online a decade ago and became the standard for new PCs and devices preinstalled with Windows 8 or later. UEFI offers more advanced options than BIOS, with support for features such as a graphical user interface and mouse support, making it easier to configure boot and hardware settings. UEFI also supports recent security standards required by Windows 10 and previous releases such as Secure Boot, which maintains the integrity of a computer’s state and prevents malicious code from compromising your system at boot time. After decades of systems using BIOS, malware has become more sophisticated, where it is even possible for malicious code to easily infect key operating system code such as the Master Boot Record.
How to Access Your BIOS or UEFI Setup Screen
Because of the variety of brands and configurations, and the ongoing revisions to these systems, this article is not exhaustive. That said, the following provides a comprehensive list of common methods for booting into the BIOS or UEFI firmware interfaces.
To enter the BIOS, you need to press a certain key or combination of keys while your computer is booting up. Usually, your window to do this is very brief—you have to press the button when the splash screen with the manufacturer’s logo is displayed. If it seems like your computer boots too fast for you to get a chance to hit the button, you may need to disable fast startup.
Here is a list of the common functions or commands for loading the BIOS. Please note, your BIOS screen might display a hint to indicate the appropriate function key for loading the firmware. Start your computer then proceed to strike the appropriate key or command to load the BIOS. After loading the BIOS or UEFI, connect your USB media or connect the DVD install media.
F1 / Ctrl + Alt + Esc
F1 / F2 / F10 / Delete
Ctrl + Alt + Enter / Fn + Esc / Fn + F1 / Delete / Reset twice
Esc / F2 / F10 / F12
Ctrl + Alt + F3 / Ctrl + Alt + Ins / Fn + F1
F2 / F10 / Delete
Navigating BIOS / UEFI Setup
Each BIOS or UEFI looks different and works differently, but most share basic principles for navigation. For menu driven BIOS or UEFI interfaces, your keyboard’s arrow keys are used to access and enter menus. The settings for configuring boot options are sometimes hidden under submenus, which you will have to navigate using these keys.
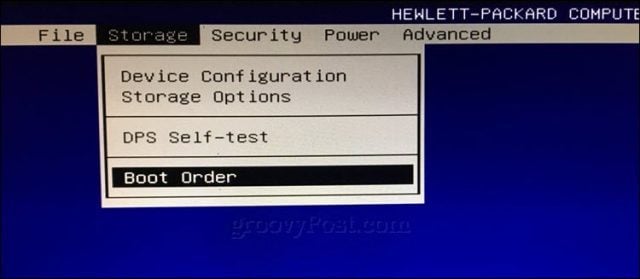
On my HP desktop, the option for changing the system’s boot order is located under Storage > Boot Order. On my other computer, an HP Elitebook, the boot order is called Boot Options located under the System Configuration tab, which uses a graphical interface. So, the experience will vary depending on the system you are using; even if they are the same brands. Navigate through these interfaces by browsing and looking for logical labels that might suggest what you are looking for – storage, boot, disks, etc.
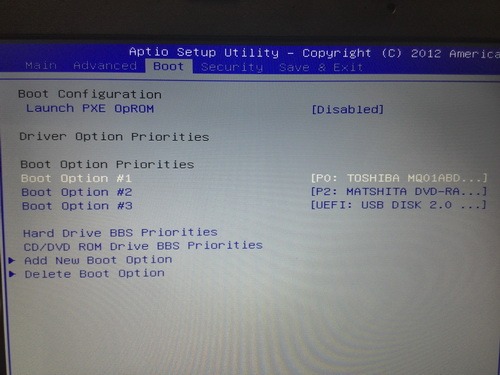
How to Change the BIOS / UEFI Boot Order to Boot from a USB / CD Drive

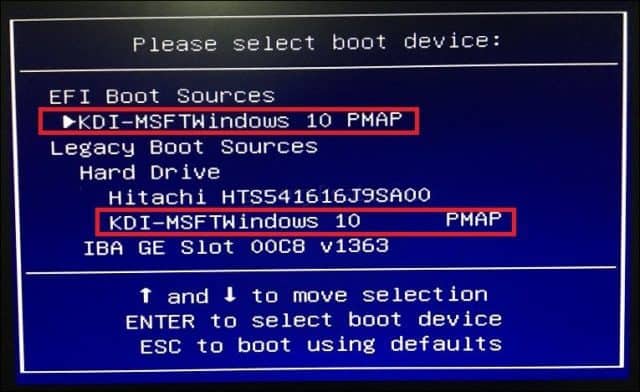
Once you’ve found the Boot Order menu, the interface will present menus displaying the structure of your boot order. Boot order determines which devices your computer will try to boot from first, second, etc. when you turn it on. Most often, your first boot device is your hard disk or SSD containing Windows 10. You can also have your DVD, CD or USB thumb drive, set as the first boot device without it affecting Windows 10 loading into main memory. If you have a removable storage device set as your first boot device the BIOS will check if there is any attached removable storage as part of POST (Power On Self Test). If a USB thumb drive or DVD is detected, the system will prompt you to boot from it before loading any existing operating systems on the local disk.
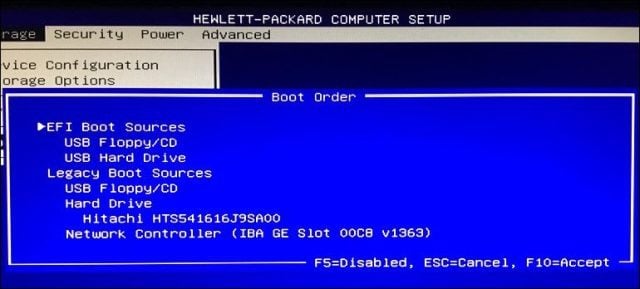
Moving through the options will require using the arrow keys. If you don’t see your connected USB device listed, choose the USB storage listed under EFI or Legacy sources. Use the down arrow key to navigate to the selection; some older BIOS interfaces will require using function keys such as F5 and F6 to navigate up and down the boot order. After selecting the appropriate option, you will need to confirm these changes; pressing F10 will usually save them. If not, read the on-screen instructions, which will identify the appropriate function key for saving or accepting changes.
Booting from a USB drive or CD/DVD
Once the desired option has been selected and confirmed, depending on the type of installation media you are using, you might see different options. USB media will immediately boot into a Windows Boot Manager, prompting selection of the architecture of Windows 10 – 32 or 64 bit – you would like to install.
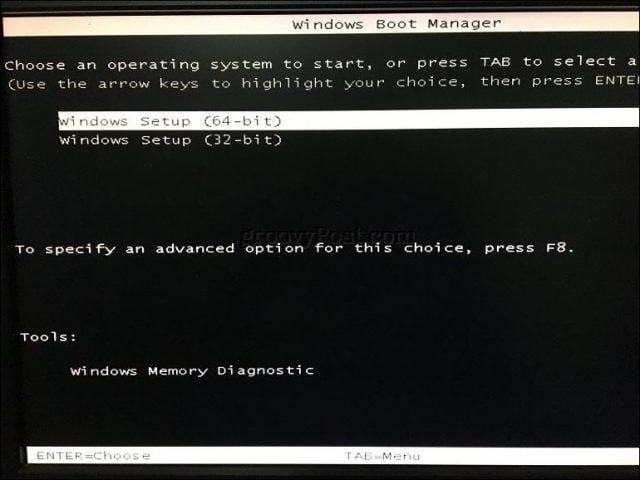
If you are installing from DVD media, Windows 10 setup will prompt you to hit any key on your keyboard to load setup.

From there, you should be home free. As long as you created your bootable installation media correctly, the on-screen instructions should guide you through the rest of the process.
Troubleshooting Boot Options
Some systems might encounter problems when attempting to boot from removable media. If you are following the steps above to a T and you’re still having issues, look into some of the items below.
- Accessing the UEFI setup page on a Microsoft Surface device. The steps for accessing the BIOS / UEFI page on Surface devices are a bit different. See the steps below for Setting Up UEFI on a Microsoft Surface.
- Changing UEFI settings on an out-of-the-box Windows 8 or Windows 10 device. For computers that you buy with Windows 8 or Windows 10 pre-installed, it may be tricky to access the UEFI / BIOS. See the steps below for Configuring UEFI on Windows 8 or Windows 10 Computers.
- What about Mac? Apple computers support installing Windows, but they don’t have a BIOS / UEFI setup page like your typical PC. See our section on installing Windows on a Mac below.
- Make sure the bootable media was created properly. Boot issues can sometimes be attributed to how the install media was configured or prepared. For instance, on UEFI-based systems – systems designed for Windows 8 or later – preparing the install media, if downloaded from the Microsoft software page, will require using the Microsoft Media Creation Tool or a third-party utility such as Rufus.
- Enable Legacy Boot Sources. If you are installing on an older computer using BIOS, selecting the option under Legacy Boot Sources or Legacy USB will let you start Windows setup from a USB or CD drive.
- Disable Secure Boot. Security technologies included in UEFI such as Secure Boot can be a blocker and prevent the system from booting external storage sources. Disabling Secure Boot, temporarily—normally accessible under the security menu or tab—will often resolve this.
- Disable Fast Startup. If you are unable to access the BIOS, you may need to disable Fast Startup, if it is enabled.
- Resetting BIOS settings. Some BIOS / UEFI setup screens have a factory reset option. This can sometimes be a quick fix but proceed with caution. If you have your drive BitLocker encrypted with TPM enabled, this may make your existing system drive unusable. OF course, this is a non-issue if your goal is to reinstall your operating system from scratch.
Disabling Fast Startup
If you are attempting to load the firmware on a computer already running Windows, this might prove difficult because of the Fast Startup setting that might be enabled. Fast Startup was first introduced in Windows 8 as a way to make Windows start quicker after shutdown by caching key pieces of operating system code.
If you are experiencing problems loading your BIOS or UEFI or changing your boot order, start Windows then turn off Fast Startup.
- Press Windows key + X
- Click Power Options
- Click Choose what the power buttons do
- Click the link Change settings that are currently unavailable
- Under Shutdown settings, uncheck Turn on fast startup (recommended)
Boot Device Menu / Boot Override
Some computers will let you press a function key that takes you to a direct menu where you can immediately choose, which volume: USB thumb drive, SD Card, external hard disk, local disk or optical media you would like to boot from. Dell and HP systems, for instance, will present an option to boot from USB or DVD after striking the F12 or F9 keys respectively. This boot device menu is accessed once you’ve already entered into the BIOS or UEFI setup screen.
Here is a list of commands for accessing the direct boot menu on popular brands:


