- Как установить WordPress на компьютер с Windows 10
- Пакет №1 — InstantWP
- Пакет №2 — ServerPress
- How to Install WordPress Locally on Your Windows or Mac Computers
- Installing WordPress on a Windows PC
- Installing WordPress
- Installing WordPress on a Mac PC
- Conclusion
- About Christopher Jan Benitez
- How to Install WordPress on Windows 10 Computers with XAMPP Support
- Step 1: Download XAMPP Package
- Step 2: Install XAMPP
- Step 3: Configure XAMPP
- Step 4: Create WordPress Database
- Step 5: Download WordPress Content
Как установить WordPress на компьютер с Windows 10
Свой личный веб-сайт под управлением CMS WordPress можно разместить на базе одной из двух платформ: на веб-сервере, что является самым популярным вариантом среди владельцев блогов, или на ПК с установленным пакетом специализированного программного обеспечения. Если планируете выполнить установку WordPress на локальный компьютер под управлением ОС Windows 10, то сегодня получите верное направление.
Данная статьи содержит поэтапное руководство по настройке вашего персонального компьютера, в качестве локального веб-сервера, для разработки и тестирования работы своего нового веб-сайта. Разница между размещением блога на личном ПК и веб-сервере хостинга заключается в его адресе: вместо обычного имени домена вы будете использовать «http://localhost[…]».
В отношении пользовательского опыта, размещая CMS WordPress на своем компьютере, вы сможете работать со своим сайтом в автономном режиме. При этом будете тестировать изменения быстрее и доводить их до совершенства, перед запуском ресурса в режиме реального времени. Итак, чтобы установить систему управления сайтом локально на Windows 10, мы можем выбрать один из 2-х пакетов программного обеспечения с нужной функциональностью.
Пакет №1 — InstantWP
В соответствии с утверждением авторов, это переносная и автономная среда разработки, которая идеально подходит в том случае, если вы хотите ознакомиться с одной из популярных платформ для создания веб-сайтов или если являетесь их разработчиком.
Для установки InstantWP на локальный компьютер достаточно выполнить следующие действия. Загрузите архив с программой по ссылке:
извлеките файлы из архива и перейдите созданную в папку.
Найдите пакетный файл с именем «Start-InstantWPP.bat» и запустите его. Когда появится запрос брандмауэера, нажмите кнопку «Разрешить доступ».
На экране появится руководство, в котором воспользовавшись подсказками, нажимайте кнопку «Далее» до тех пор, пока не достигнете конца. После завершения, ваша локальная система управления сайтом будет готова к работе.

Появится несколько окон командной строки. Не волнуйтесь, это совершенно нормально. Подождите, пока сервер запустится. Теперь нажмите на кнопку «WordPress Admin» для перехода на страницу входа администратора ресурса. По умолчанию используйте следующие логин и пароль.

Если вы не можете получить доступ к странице, подождите некоторое время. Это связано с тем, что сервер всё ещё не запустился в фоновом режиме. Как вы видите, это простой и быстрый способ запуска WordPress на вашем компьютере. Инструмент полностью портативный, поэтому допускается его перенос с одного устройства на другое.
Пакет №2 — ServerPress
Этот инструмент поставляется в 2-х версиях, премиум и бесплатной. Последняя хоть и работает с ограничениями, но ее должно хватить для всех ваших нужд. Загрузите архив по ссылке:
после ввода адреса своей электронной почты.
По завершении загрузки извлеките содержимое архива. Запустите файл «Install DSL v393» и следуйте инструкциям Мастера установки и настройки сервера. После окончания, перейдите в каталог:
на своем системном диске и запустите исполняемый файл «DesktopServer» с административными правами.
Выберите запуск служб Apache и MySQL и нажмите кнопку «Далее». При появлении запроса брандмауэра, разрешите доступ. Нажмите кнопку создания нового веб-сайта. Укажите нужное имя и корень сайта на диске. Рекомендуем оставить со значениями по умолчанию. Закончите создание каталогов нажатием соответствующей кнопки.

Перейдите по указанной ссылке:
выберите язык и сконфигурируйте свою платформу. После этого сможете получить полноценный доступ к веб-сайту.

Это и есть наш ответ на вопрос, как установить WordPress локально на ПК. Оба метода схожи, хотя первый и может быть более простым для начинающих сайтостроителей. Спасибо за внимание!
How to Install WordPress Locally on Your Windows or Mac Computers
Without a doubt, WordPress is the most popular content management system for hobbyists and professional webmasters alike. It powers 25.4% of all websites in the world along with over 76.5 million blogs since 2004.
Due to its unrivaled popularity, most web hosting companies offer 1-click WordPress installation apps straight from the control panel – allowing users to commence site building within minutes.
This process works by installing WordPress straight into your web server. And since it is hosted online, you can access your dashboard from anywhere as long as you have an internet connection.
Sure, the ability to access your WordPress site from any device is convenient, but installing the CMS locally into your computer also has some advantages:
- Accurate Speed Testing– Testing your site without depending on internet connectivity will help you accurately scale its
- Personal Backup– Designing and developing your site locally also means you always have a personal backup ready.
- Better Design Process– Using WordPress offline allows you to make design changes without affecting the experience of live visitors.
Need Help Setting Up Your WordPress Site?
WHSR is now partner with Codeable.io to assist users who need professional WP development / customization services.
To install WordPress on your Windows or Mac computer, follow the instructions below:
Installing WordPress on a Windows PC
To install WordPress on a Windows PC, you need to use a program named WAMP, which can be downloaded from their official website.
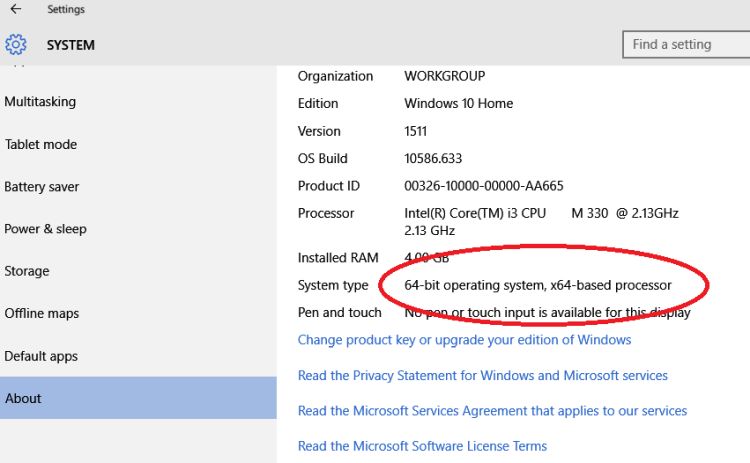
Take note that WAMP is available in two versions – 64-bit and 32-bit. To know which version is compatible with your PC, go to Start > Settings > System > About (for Windows 10 users) or Start > Run, type in “sysdm.cpl” and click on the “General” tab.
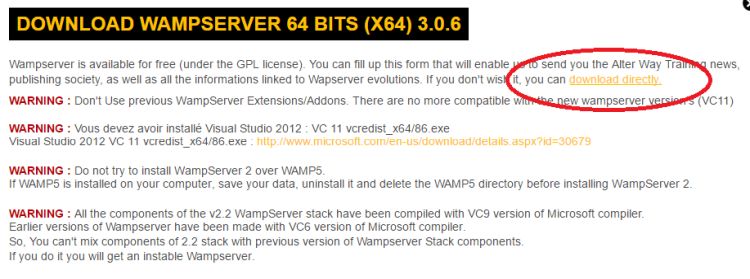
A notification will appear you click the download button for the appropriate version. Go ahead and click “download directly” to proceed.
Once the download is complete, continue with the installation by following the on-screen instructions. Read everything carefully as WAMP has very specific requirements to be installed correctly. Below are a few tips:
- Run the installer with admin privileges (Right Click > “Run as administrator”).
- Make sure you have the updated redistributable packages of VC9, VC10, VC11, VC13 and VC14. The download links for these are included in the installer.
- Close Skypebefore installing and using WampServer.
- Disable IIS.
- Install WAMP to the root directory of your primary local disk. For example, the install directory should be at “c:\wamp\” if Windows is installed in local disk (“C:”).
- Don’t forget to check “Create a Desktop Icon” so you can easily access WAMP later.
When asked to choose your default browser, remember that you need to navigate and find the .exe file. A good strategy is to right-click the desktop shortcut of your browser, click “Properties,” and go to the “Shortcut” tab. The .exe file’s location should be in the “Target” field.
After successfully installing and launching WAMP, look for the “W” icon in your taskbar notification area. If this icon is red, then it means the WAMP server is currently offline. Green, on the other hand, indicates that the server is fully online. In which case, you can now access your server by typing “localhost” or 127.0.0.1 in your web browser. You can also leave click the “W” icon and click “Localhost.”

In your main WAMP information page, click “phpMyAdmin” under “Tools.” This will allow you to manage and create a database for your offline WordPress installation. Alternatively, you can type http://127.0.0.1/phpmyadmin/ into your web browser.
To create a new database in phpMyAdmin, go to “Databases” from the main menu. You can use any name you like, but it is better to use something identifiable like “wordpress-local.” Take note that the database name is not case-sensitive.
Installing WordPress
The next step is to download WordPress from their main website. Remember that the download is in a compressed folder format. You only need to extract the WordPress folder in the “www” subdirectory of WAMP. For example, if you installed WAMP in “C:\wamp\,” then you must extract the WordPress folder in the directory “C:\wamp\www\.”
To load WordPress, go to http://localhost/wordpress/. At first, you will be prompted that you need a “wp-config.php” file. Just click on “Create a Configuration File” to proceed.

When done, you can proceed with the installation of WordPress as you would with a web hosting platform. Just remember to use “localhost” as the database host and use the correct database name you specified earlier. When it comes to your MySQL username, use root and leave the password blank.

Installing WordPress on a Mac PC
Finally, installing WordPress on a Mac PC involves the same steps. But instead of using WAMP, you need to use a different software known as MAMP. Just like the former, you can download this straight from their official website.

After installing MAMP, make sure to configure the app to use Apache port 80 and MySQL port 3306 first. Doing so allows you to launch your local website using the address http://localhost. Just go to Preferences > Ports and then input the correct values.

Just remember that you need to create an Apache server, so be sure this option is highlighted when creating your document root. You can then run the Apache and MySQL servers using the main app.
To create a new database with MAMP, click on “Open Start Page” and then go to “phpMyAdmin.” From there, you can follow the similar steps from the WAMP tutorial as shown above.
Conclusion
Installing and using WordPress locally has numerous advantages. Just remember to follow the instructions above very carefully to ensure a successful installation.
About Christopher Jan Benitez
Christopher Jan Benitez is a professional freelance writer who provides small businesses with content that engages their audience and increases conversion. If you are looking for high-quality articles about anything related to digital marketing, then he’s your guy!Feel free to say «hi» to him on Facebook, Google+, and Twitter.
How to Install WordPress on Windows 10 Computers with XAMPP Support
WordPress, the most popular content management system can be used to create all kind of websites… from personal blogs to eCommerce to almost any types of websites… In order to run WordPress, you’ll need to install a webserver, a database server and PHP server scripting modules…
99% of the time WordPress will be installed on a Linux system, including Ubuntu with either the LAMP or LEMP stack… However, there are some open source projects today that are making it possible to install WordPress on Microsoft Windows desktops and servers…
One such project is XAMPP… XAMPP is a completely free, easy to install Apache distribution containing MariaDB, PHP, and Perl.
This brief tutorial shows students and new users how to install WordPress with Apache2, MariaDB and PHP on Microsoft Windows 10 or Server computers…
To get Windows on Windows, follow the steps below:
Step 1: Download XAMPP Package
To get XAMPP installed on Windows, head over to Apache Friends website and download the Windows version

Step 2: Install XAMPP
After downloading the Windows version, you should be prompted install the package… You’ll need to install with Apache, MySQL, PHP and Perl as shown in the image below… Complete the installation and continue to the next step…
Accept the default installation directory: C:\xampp

Step 3: Configure XAMPP
Now that the package is installed, open XAMPP and start up Apache and MySQL services as shown in the image below…

After starting Apache2 and MySQL, these servers should be running… to test whether Apache is running, open Internet Explorer on the host machine and type the URL below:
This should bring up Apache XAMPP default page…

To validate that MariaDB is installed and functioning, open the Shell command prompt on the right of XAMPP Control Panel.. This should launch the command shell… then type the commands below:
mysql
This should you onto MariaDB database server..

To secure MariaDB database server, open the Shell command windows again, then type the commands below…
When prompted, answer the questions below by following the guide.
- Enter current password for root (enter for none): Just press the Enter
- Set root password? [Y/n]: Y
- New password: Enter password
- Re-enter new password: Repeat password
- Remove anonymous users? [Y/n]: Y
- Disallow root login remotely? [Y/n]: Y
- Remove test database and access to it? [Y/n]: Y
- Reload privilege tables now? [Y/n]: Y
Step 4: Create WordPress Database
While still in the Shell command windows, type the commands below to logon to MariaDB database server… type the password you enter above when prompted…
Then create a database called wpdb
CREATE DATABASE wpdb ;
Create a database user called wpuser with new password
CREATE USER ‘ wpuser ‘@’localhost’ IDENTIFIED BY ‘ new_password_here ‘;
Then grant the user full access to the database.
GRANT ALL ON wpdb .* TO ‘ wpuser ‘@’localhost’ IDENTIFIED BY ‘ user_password_here ‘ WITH GRANT OPTION;
Finally, save your changes and exit.
Step 5: Download WordPress Content
Now that WordPress database has been created, go and download WordPress content from its download page.
After downloading the WordPress file, extract it into the C:\xampp\htdocs
You can delete all the files and folders in there and extract WordPress content that that folder… the htdocs should look like this:

When done, open Internet Explorer and type
This time you should see WordPress default setup page..

Type in the database connection info and continue

Create WordPress admin account and continue

After installing, logon to WordPress admin dashboard…


