- Why, When, and How To Use a Virtual Machine
- Who Needs a Virtual Machine?
- Which Virtual Machine to Use
- How to Use VirtualBox
- Customizing Virtual Machines
- How to Share Directories Between Host and Guest
- Install Linux Inside Windows Using VirtualBox [Step by Step Guide]
- Installing Linux inside Windows using VirtualBox
- Requirements
- Step 1: Download and install VirtualBox
- Step 2: Download the Linux ISO
- Step 3: Install Linux using VirtualBox
- Troubleshooting: AMD-V is disabled in the BIOS
- About Abhishek Prakash
Why, When, and How To Use a Virtual Machine
I must admit I haven’t been a huge fan of virtual machines for personal use until recently. As a Linux advocate who would take pains to convert users to Linux, virtual machines served no purpose for me.
Back in 2005, the greatest challenge for Linux was hardware: wireless wouldn’t work; Bluetooth might not work, graphics would give glitches and even USB devices like tablet pens refused to talk. Every time you came across a new device, you had to find drivers and wrappers to make things work. A Linux user needed to interact with “real” hardware to find solution; a virtual machine was out of question. As a Linux journalist, I could not rely on a virtual machine to review a distro and recommend it. I needed to know how well it worked with “real” metal.
Things have changed, however. Thanks to work done by kernel developers like Greg Kroah-Hartman, most hardware works out of the box on Linux. Hardware support has become less and less important and the focus has shifted to the unique features of distros. Of late, I have become a heavy user of virtual machines, which allows me to safely play with multiple distros on the same machine and write about them.
Virtual machines are used heavily in the enterprise segment, but in this article I am going to talk about advantages of virtual machines for new Linux users and how they can benefit from them.
Who Needs a Virtual Machine?
Many Linux users have to dual boot because they need certain proprietary software or services that are not yet available for Linux. In many countries, software needed for tax filing and other government related work is supported only on Windows. Instead of going through the complexity and pain of dual booting, you can easily use virtual machine to run Windows software.
Looking at the vulnerabilities found in Microsoft Windows, I would be extremely careful with it running on my main system. I am much more comfortable keeping Windows in a contained virtual environment. That way, even if it is compromised, it will not damage my entire system or data and will only affect the limited set of files it was accessing. I run a Windows 8.1 machine in virtual environment to perform certain tasks that couldn’t be done under Linux — although I rarely use that machine.
One area where virtual machines won’t work are gaming. You need to talk to real CPU, GPU, and RAM to get the gaming experience you want — especially if you are playing resource hungry games like Crysis. Audio and video editing won’t work either, as you don’t want a virtual layer between the application and the hardware. Beyond these and some other areas, virtual machines work great.
VMs also can be useful for those non-Linux users who want to play with Linux or who want to migrate to it but don’t want to jump shark by formatting the OS they were used to and switching to Linux. Virtual machines get these users comfortable with Linux, so they can make the switch with confidence when they are ready. And, you can be running Linux “inside” your shiny Mac OS X or Windows 10.
The best thing about virtual machines is that I can run multiple Linux distributions on the same hardware, without having to reboot to switch between distros. As a Linux journalist, it’s extremely important for me to run various distros and keep an eye on them. And, as a Linux user, it’s even more important to be well versed with all major distros instead of being “vendor-locked” or totally dependent on any one. Using VMs, I can also run different desktop environments on the same system without having to log out to change the environment.
If you are aspiring to become a system admin or developer, you certainly don’t want to know only one distro; you must be an expert in any Linux; you never know which OS your employer or client would be using. You can’t say “sorry, I know only Ubuntu.” If you are a developer, you need different distributions to test your applications.
You can clearly see that there are many advantages of using virtual machines. The biggest advantages of using virtualization instead of multi-booting is efficiency. I used to waste way too much time in formatting hard drives and switching between distros. With virtual machines, you can start a new virtual machine for a distro without affecting your work; it’s as easy as opening a new application.
If you are a distro-hopper or enthusiast like me then a virtual machine is bliss. I am an Arch Linux user, but I keep an eye on half a dozen other distros including openSUSE, Kubuntu, Ubuntu, Fedora, Linux Mint, etc. It’s “virtually” impossible for me to have six physical machines, which waste financial resources and electricity and take up space. Instead of buying six physical machines, I would rather invest in more RAM and a multicore processor that can handle more virtual machines. Now I run almost a dozen distros (including Windows) on the same machine; and there is no downtime.
Which Virtual Machine to Use
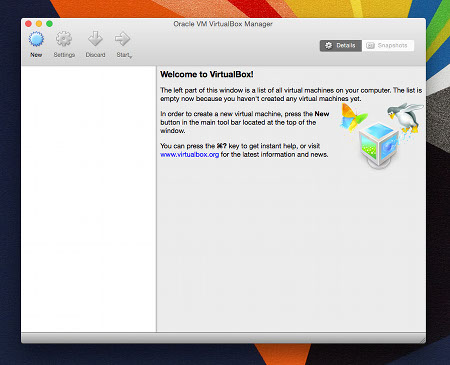
Because we are talking about Linux here, you have several options, such as VMware, Qemu, KVM, Xen, and VirtualBox, among many others; each with their own pros and cons. Of these, I prefer VirtualBox (see Figure 1 above), even though solutions like KVM can be more powerful and efficient. The reason I chose VirtualBox is that it’s extremely easy to use even by a new Linux user. It has tons of features and functionalities that can be easily accessed without any hard-core technical knowledge. The biggest advantage is its cross-platform support — you can install VirtualBox on Linux, Windows, and Mac OS X.
How to Use VirtualBox
You can download VirtualBox and install it on your system like a regular application. For this story, I installed VirtualBox on a MacBook Pro so that I can use Linux on the same machine. Open the VirtualBox app and click on the New button to create a new virtual machine. Give the machine a name (which should be the name of the distro). Then, enter the amount of RAM you want to allocate to the virtual machine.
Now you have to create virtual hard drive for the system; I would suggest VDI format. Here you can choose dynamically allocated size, because it won’t reserve all the allocated space and will grow as it uses more space. However, it can’t exceed the space you allocated. In the next step, you can choose the amount of space you want to allocate to the virtual hard drive. At this stage, you can also choose the location of the drive on the physical hard drive.
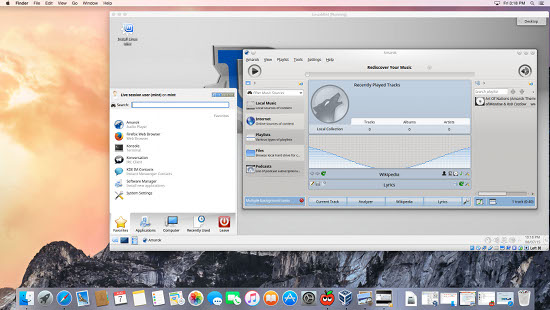
You are almost there; you will see the name of the newly created virtual machine in the left pane. When you click on it to start the system, in the first run, it will ask for the .iso image of the distro that you want to install on the system. Just browse to the .iso image of your desired distro and there you have a Linux distro running inside the Mac OS X (Figure 2).
One advantage is that, once you have a virtual machine up and running, you can just move the vdi file around and get the same distro up and running with all settings and data. This comes in handy if you are migrating from one host (host is the system where you install VirtualBox software and guest is the OS that runs inside VirtualBox) system to another.
Customizing Virtual Machines
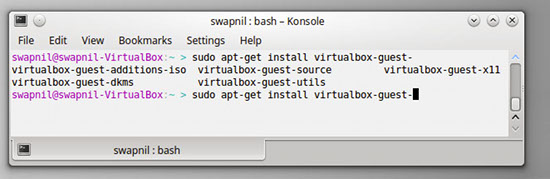
Depending on your distribution, you may or may not be able to get full screen resolution. In such cases, you will have to install some virtualbox packages inside the guest OS. The most common packages are virtualbox-guest-additions-iso, virtualbox-guest-x11, virtualbox-guest-dkms, and virtualbox-guest-utils (Figure 3).
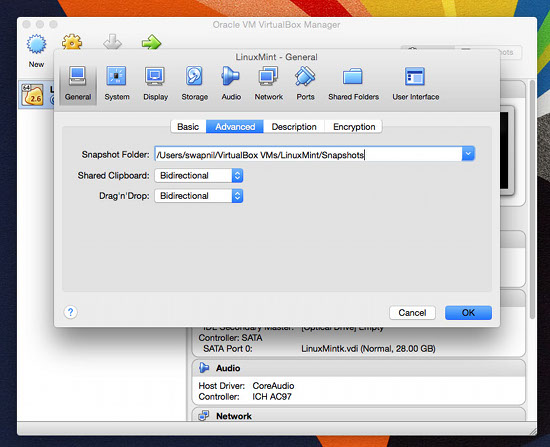
You can further tweak the VirtualBox settings to bring the guest and host OS closer. Shut down the virtual machine and click on Settings for that machine. In the General tab, go to Advanced and select Bidirectional for Shared Clipboard and Drag and Drop. Now you can copy and paste text between guest and host machines. You will also be easily drag and drop files between the two machines.
In some cases, you may have to also change the default network from NAT to Bridged Adapter to access the local network (Figure 5). I run a local file server, so I always switch to Bridged Adapter (more about file sharing later).

You can also change the amount of RAM allocated to the virtual machine, just open the System from the settings and modify RAM from the Motherboard tab; if you need to increase CPU capacity of the VM, you can easily do that from the Processor tab. What you can’t easily change is the storage space; that needs extra work, so be thoughtful with hard drive space when you create a virtual machine.
How to Share Directories Between Host and Guest
In Settings, you will find an option where you can add “shared” folders from the host machine to the guest system. However, because I run a local file server that keeps all my files, I simply mount the file server on the VM and then gain access to all my files. You can also enable access to USB ports so you can use the USB devices plugged into the system. Just go to the ports tab and add any USB devices connected to the system.
That’s pretty much what I do on my VirtualBox. If you haven’t tried VirtualBox before and have been multi-booting, you should give virtual machines a try. If you are a VirtualBox user, let us know in the comments what all you use it for.
Источник
Install Linux Inside Windows Using VirtualBox [Step by Step Guide]
Last updated April 29, 2021 By Abhishek Prakash 220 Comments
Brief: Using Linux in a virtual machine gives you the option to try Linux within Windows. This step-by-step guide shows you how to install Linux inside Windows using VirtualBox.
There are several ways to install Linux. You can clean everything from your system and install Linux. You can dual boot Linux with Windows and choose one of the operating systems at the boot time. You can even install Linux within Windows from Microsoft Store (though this only provides you with the command line version of Linux).
But if you want to use Linux without making any changes to your Windows system, you can go the virtual machine route. Basically, you install and use Linux like any regular Windows application. When you just want to try Linux for limited use, virtual machines provide the most comfortable option.
In this tutorial, I’ll show you how to install Linux inside Windows using VirtualBox.
Installing Linux inside Windows using VirtualBox
VirtualBox is free and open source virtualization software from Oracle. It enables you to install other operating systems in virtual machines. It is recommended that your system should have at least 4GB of RAM to get decent performance from the virtual operating system.
Requirements
- Good internet connection to download software and Linux ISO. (You can also use some other computer with an internet connection to download these files.)
- Windows system with at least 12 GB of free space.
- Windows system with 4GB of rRAM. (It can work with less RAM as well, but your system will start to lag while using Linux in the virtual machine.)
- Make sure to enable virtualization in the BIOS
I am installing Ubuntu 17.10 in this tutorial, but the same steps apply to any other Linux distribution. If you prefer videos, you can watch the one below from our YouTube channel:
Step 1: Download and install VirtualBox
Go to the website of Oracle VirtualBox and get the latest stable version from here:
Installing VirtualBox is not rocket science. Just double-click on the downloaded .exe file and follow the instructions on the screen. It is like installing any regular software on Windows.
Step 2: Download the Linux ISO
Next, you need to download the ISO file of the Linux distribution. You can get this image from the official website of the Linux distribution you are trying to use.
I am using Ubuntu in this example, and you can download ISO images for Ubuntu from the link below:
Step 3: Install Linux using VirtualBox
You have installed VirtualBox and you have downloaded the ISO for Linux. You are now set to install Linux in VirtualBox.
Start VirtualBox, and click on the New symbol. Give the virtual OS a relevant name.

Allocate RAM to the virtual OS. My system has 8GB of RAM and I decided to allocate 2GB of it. You can use more RAM if your system has enough extra.

Create a virtual disk. This serves as the hard disk of the virtual Linux system. It is where the virtual system will store its files.

I recommend using the VDI file type here.

You can choose either the “Dynamically allocated” or the “Fixed size” option for creating the virtual hard disk.

The recommended size is 10 GB. However, I suggest giving it more space if possible. 15-20 GB is preferable.

Once everything is in place, it’s time to boot that ISO and install Linux as a virtual operating system.

If VirtualBox doesn’t detect the Linux ISO, browse to its location by clicking the folder icon as shown in the picture below:

Soon you’ll find yourself inside Linux. You should be presented with the option to install it.
Things from here are Ubuntu-specific. Other Linux distributions may have slightly different looking steps, but it won’t be complicated at all.

You can skip to Continue.

Select ‘Erase disk and install Ubuntu’. Don’t worry. It won’t delete anything on your Windows operating system. You are using the virtual disk space of 15-20GB that we created in previous steps. It won’t impact the real operating system.

Just click on Continue.

Things are pretty straightforward from here.


Try to choose a password that you can remember. You can also reset the password in Ubuntu if you forget it.

You are almost done. It may take 10-15 minutes to complete the installation.

Once the installation finishes, restart the virtual system.

If it gets stuck on the screen below, you may close the VirtualBox.

And that’s all. From now on, just click on the installed Linux virtual machine. You’ll be able to use it directly. The installation is a one time only process. You can even delete the Linux ISO that you downloaded earlier.
I strongly recommend using VirtualBox Guest Additions on Ubuntu for it provides better compatibility and you would be able to use copy-paste and drag-drop between Linux and Windows.
Troubleshooting: AMD-V is disabled in the BIOS
If you face this error while using the virtual machine:
Not in a hypervisor partition (HVP=0) (VERR_NEM_NOT_AVAILABLE).
AMD-V is disabled in the BIOS (or by the host OS) (VERR_SVM_DISABLED).
Result Code:
E_FAIL (0x80004005)
Component:
ConsoleWrap
Interface:
IConsole
This means that virtualization is blocked on your system. You’ll have to activate it in your BIOS settings first.
Reboot your system and as soon as it powers up, press F2/F10/F12 to access BIOS settings. You have to look for the virtualization option in the BIOS and enable it.
Any questions?
That’s all you need to do to install Linux in VirtualBox on Windows. If you have any doubts, or if you encounter any issues, please feel free to ask your questions in the comment box below.
Like what you read? Please share it with others.
About Abhishek Prakash
Creator of It’s FOSS. An ardent Linux user & open source promoter. Huge fan of classic detective mysteries ranging from Agatha Christie and Sherlock Holmes to Detective Columbo & Ellery Queen. Also a movie buff with a soft corner for film noir.
Thanks for the article and for the troubleshoot step for the virtualization disabled by default 🙂
You are welcome.
I just followed your steps and it installed and ran Ubuntu just fine. Everything seems to work. I even installed Chrome easily. I’m running it on a laptop with a 1.2g Intel and 8g of RAM. Thank you for the article.
You are welcome 🙂
Just wanted to thank you for this amazing workflow.
Glad you liked it.
Thank You! I’m taking a Linux class right now at my local community college and I greatly appreciate you helping me with furthering my IT endeavors and career. Good luck with everyone else and thank you again!
Happy to be of help with your learning and career. Do subscribe to the weekly newsletter to get regular updates.
Thanks Abhishek that was very helpful and easy to follow. Post the installation of Ubuntu 20.04.3 LTS, I am having a peculiar problem. Basically the libc library and header files are not there though I have updated all the files during install. The specific error I get is :
gcc: fatal error: stdio.h: No such file or directory
on trying various fixes
e.g.
sudo apt-get install libc6-dev
I still get the following
>>>sudo apt-get install build-essential
Reading package lists… Done
Building dependency tree
Reading state information… Done
Some packages could not be installed. This may mean that you have
requested an impossible situation or if you are using the unstable
distribution that some required packages have not yet been created
or been moved out of Incoming.
The following information may help to resolve the situation:
The following packages have unmet dependencies:
build-essential : Depends: libc6-dev but it is not going to be installed or
libc-dev
Depends: g++ (>= 4:9.2) but it is not going to be installed
E: Unable to correct problems, you have held broken packages.
Any thought? I basically want to write my code in C / C++ (including system calls) and run them.
Источник


