- Create a Bootable USB Flash Drive
- To create a bootable USB flash drive
- How to Create a Bootable USB Stick on Windows 10, 8, 7?
- Why make a bootable USB stick on Windows?
- How to create a bootable USB on Windows 10/8/7?
- Part 1. Create bootable Windows installation USB media via CMD
- Part 2. Create a bootable USB drive for Windows repair
- Part 3. Create a bootable USB drive for portable Windows device
- Final words
- How to Make Bootable USB Flash Drive from ISO on Windows 10/8/7/Mac
- Method #1: Make Bootable USB from ISO Using Command Prompt
- Method #2: Create A Bootable USB using iSeePassword WizISO
- Method #3: Make Bootable USB from ISO using RMPrepUSB
Create a Bootable USB Flash Drive
Applies To: Windows Server 2016 Essentials, Windows Server 2012 R2 Essentials, Windows Server 2012 Essentials
You can create a bootable USB flash drive to use to deploy Windows Server Essentials. The first step is to prepare the USB flash drive by using DiskPart, which is a command-line utility. For information about DiskPart, see DiskPart Command-Line Options.
To create a bootable USB flash drive for use in recovering or reinstalling Windows on a PC instead of a server, see Create a recovery drive.
For additional scenarios in which you may want to create or use a bootable USB flash drive, see the following topics:
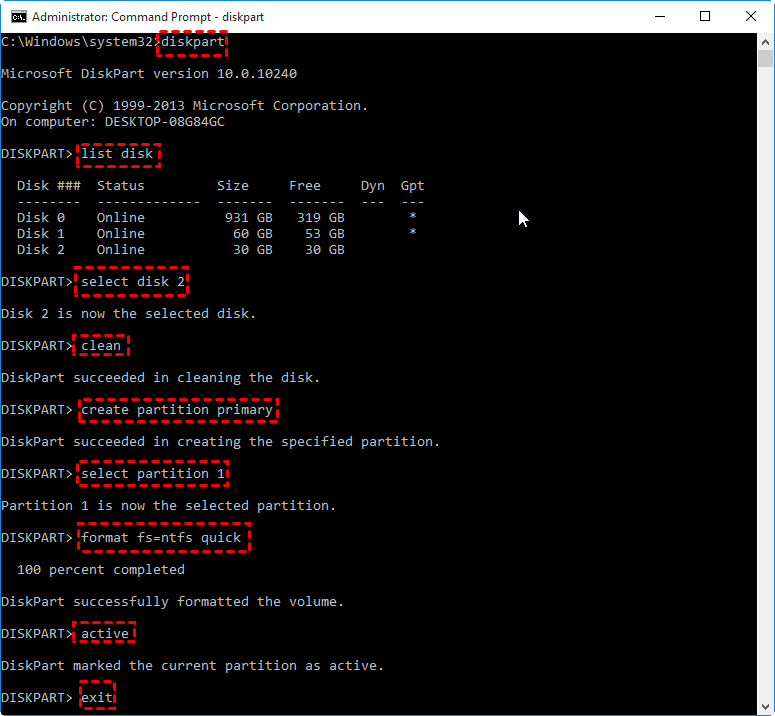
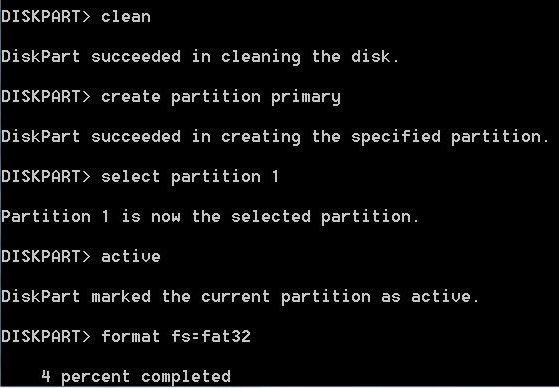
To create a bootable USB flash drive
Insert a USB flash drive into a running computer.
Open a Command Prompt window as an administrator.
In the new command line window that opens, to determine the USB flash drive number or drive letter, at the command prompt, type list disk , and then click ENTER. The list disk command displays all the disks on the computer. Note the drive number or drive letter of the USB flash drive.
At the command prompt, type select disk , where X is the drive number or drive letter of the USB flash drive, and then click ENTER.
Type clean , and the click ENTER. This command deletes all data from the USB flash drive.
To create a new primary partition on the USB flash drive, type create partition primary , and then click ENTER.
To select the partition that you just created, type select partition 1 , and then click ENTER.
To format the partition, type format fs=ntfs quick , and then click ENTER.
If your server platform supports Unified Extensible Firmware Interface (UEFI), you should format the USB flash drive as FAT32 rather than as NTFS. To format the partition as FAT32, type format fs=fat32 quick , and then click ENTER.
Type active , and then click ENTER.
Type exit , and then click ENTER.
When you finish preparing your custom image, save it to the root of the USB flash drive.
How to Create a Bootable USB Stick on Windows 10, 8, 7?
If you need to create a bootable USB stick on Windows, you can read through this page. It explains how to create a bootable Windows USB via CMD or a piece of free software.

By Emily  / Last Updated April 15, 2021
Why make a bootable USB stick on Windows?
A bootable USB drive is an external hard drive that contains the operating system and can be used to boot a computer or laptop. Most users plan to create a bootable USB drive in Windows for the following three different purposes.
в—†Repair Windows PC: the most important one should be saving the PC when it cannot boot successfully due to a virus, serious system failure, defective hard drive, or other disk errors. With the bootable USB drive, you can reboot the computer and repair it accordingly.
в—†Clean install OS: it can be used as an external installation media to clean install the operating system. This is much quicker and easier than installing OS from CD or DVD-ROM.
в—†Bring your familiar OS everywhere: the bootable USB drive can also be a portable Windows device, which you can take everywhere and enjoy the familiar OS environment on other computers, even the brand-new one without OS installed.
How to create a bootable USB on Windows 10/8/7?
As listed above, the bootable Windows USB drive can be used under different situations, so the process of creating a bootable USB stick on Windows will also differ slightly. But don’t worry, this article will outline how to make a bootable USB device for the above 3 purposes on Windows 10/8/7.
Part 1. Create bootable Windows installation USB media via CMD
First of all, we will show you how to create a bootable USB drive for installing the OS.
Tips:
в—Џ The USB drive should be at least 4GB of storage (for a 32-bit operating system) or at least 8GB (for a 64-bit system).
в—Џ Back up files you have stored on the USB drive because the drive will be formatted during this process and all files on it will be erased.
Step 1. Open Command Prompt windows: click “Start” button, input “cmd” in the Search box and press “Enter”. Right click the “Command Prompt” icon and select “Run as administrator”.
Step 2. In the pop-out Command Prompt window, type “diskpart” and press “Enter” to launch Diskpart utility. Inside the Diskpart window, input the following commands in turn and press “Enter” after each one.
list disk
select disk #
clean
create partition primary
select partition 1
format fs=ntfs quick (if you plan to create UEFI bootable USB using Diskpart, type “format fs=fat32 quick” instead to format it into FAT32 file system)
active
exit
Don’t close the Command Prompt. You can minimize it for a little bit since the process is not finished yet. Now, put the Windows DVD into your computer’s DVD drive. Open Windows File Explorer to check out the drive letter of the Windows DVD drive and the USB drive.
Then, go back to the CMD window and type in “D: CD BOOT” (replace D: with your DVD drive letter) and press Enter. Type “CD BOOT” again and press Enter. Lastly, type “BOOTSECT.EXE /NT60 H: “ (replace your USB flash drive letter for H:) and press Enter.
At last, copy all the files and folders of the Windows DVD to your USB flash drive in File Explorer. Now, you can plug the bootable USB flash drive into the target computer to start installing OS.
Part 2. Create a bootable USB drive for Windows repair
If your Windows computer cannot boot due to hard drive failure, you can create a bootable USB drive as a Windows repair tool. In this case, you can use the free AOMEI Partition Assistant Standard .
Apart from creating a bootable USB stick on Windows computer for a PC emergency, it also offers related functions to repair boot issues such as rebuilding MBR, checking and fixing bad sectors on the system drive.В Now you can free download it and learn how to create a bootable USB stick on Windows 10/8/7 for Windows repair.
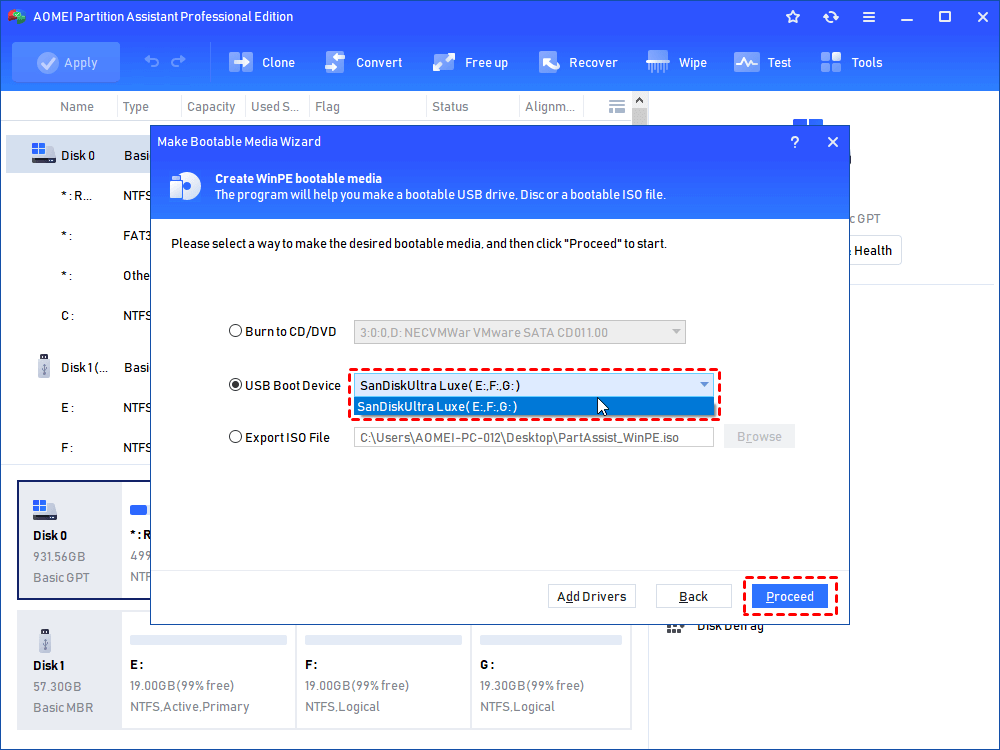
Step 1. Connect the USB drive to a working Windows computer, install and run AOMEI Partition Assistant Standard. Click “Make Bootable Media” and hit on “Next” to proceed.

Step 2. Choose the right USB drive under “USB Boot Device” and click “Proceed”.
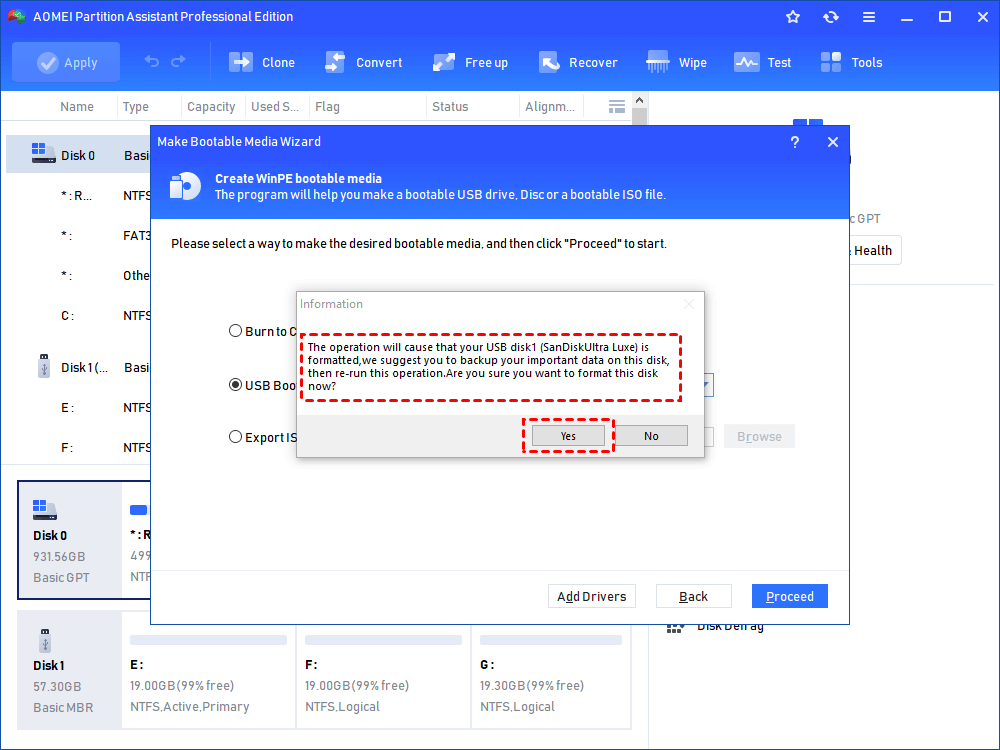
Step 3. Then you will be told the USB will be formatted, please back up important data. If you have done that, click “Yes”.
Step 4. Then wait for the process to be completed.
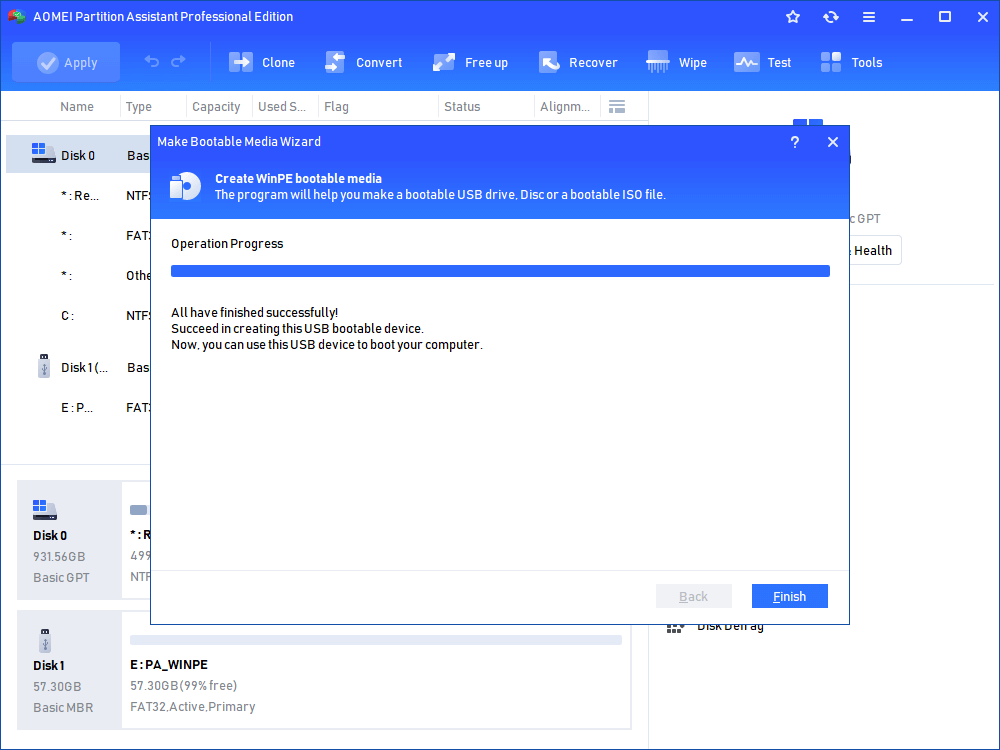
Note: the bootable USB drive contains the pre-installed AOMEI Partition Assistant Standard.
When the process is done, insert the bootable USB drive into the computer with boot issues, change boot order in Boot menu to make it boot from the bootable USB stick. Then you can rebuild MBR on the system primary hard drive.
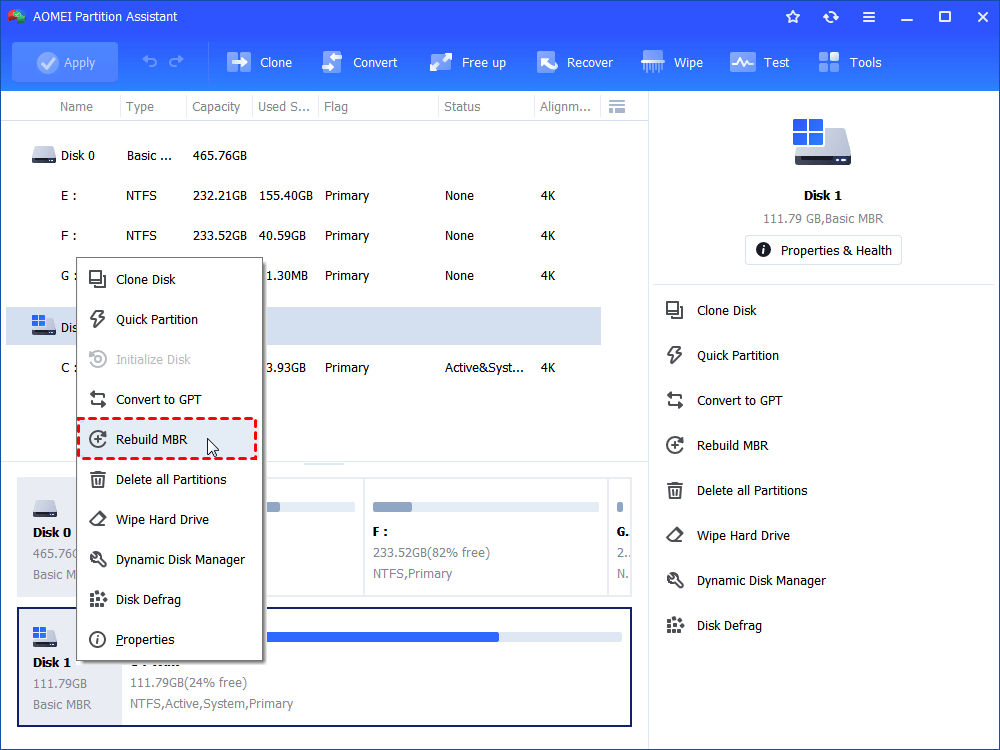
Or you can right-click the system partition to check whether there are some bad sectors on the partition and fix them if necessary. Those two functions are most commonly used functions to repair Windows boot failures.
Part 3. Create a bootable USB drive for portable Windows device
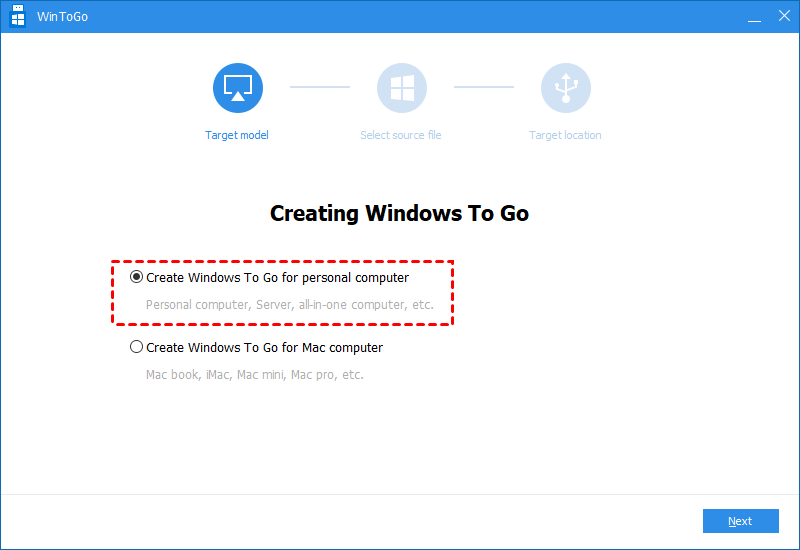
In addition to the above two purposes of uses, some users want to create a bootable USB stick on Windows to get a portable Windows USB drive. For this task, you can upgrade to Professional. It offers the “Windows To Go Creator” feature. Much like “Windows To Go” developed by Microsoft, but it is much more powerful and flexible.
It supports both certified and non-certified USB drive. It can create any edition of Windows 10/8/7 bootable USB no matter it is Enterprise, Education, Home or Professional. Besides, it allows you to make Windows 10/8/7 portable USB drive with and without Windows ISO files. Moreover, it does not a USB drive over 32GB, instead, 13GB is enough in most cases.
Step 1. Install and run AOMEI Partition Assistant Pro on your PC. Click “All Tools” > “Windows To Go Creator” on the left side.

Step 2. Select «Create Windows ToGo for personal computer». PS.: if you want toВ run Windows from USB on Mac, you can use the seond option.
Step 3. Choose «Create Windows ToGo with system disc/ISO» and click on «Next».
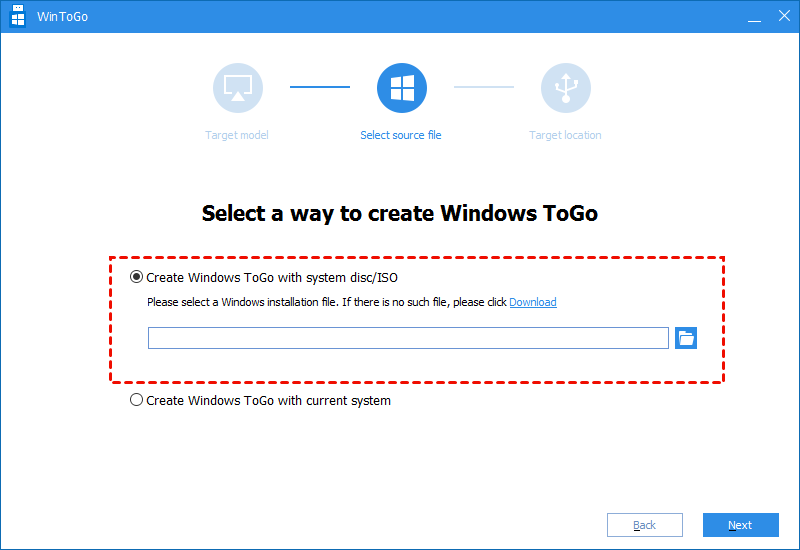
Step 4. Choose Windows ISO file in this window. Click “Next”.
Note: If you don’t have Windows ISO files, go for the second method to create Windows bootable USB with current system .

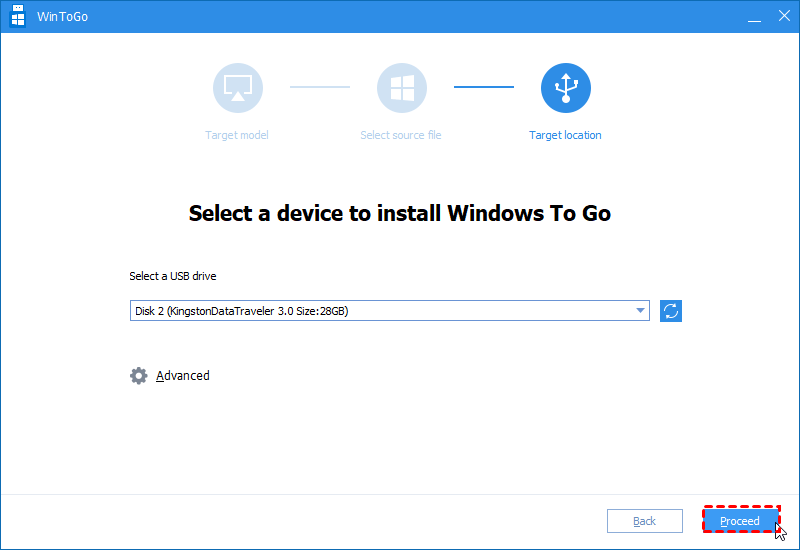
Step 5. Select USB drive and c lick on “Proceed” to start creating a bootable USB drive in Windows computer.
Final words
This article has shown how to create a bootable USB stick on Windows 10/8/7 for different usages. Be clear about your requirements and choose the right method. If you want to create a Server bootable USB drive for repairing Server computer or enjoying the customized Windows Server environment, you can try AOMEI Partition Assistant Server.
How to Make Bootable USB Flash Drive from ISO on Windows 10/8/7/Mac
Creating USB driver in the latest Windows version has become a lot easier with the in-built ISO burners. Gone are the days when you used to download an ISO image file of the operating system and burn it into CD/DVD. USB flash drives has completely destroyed the usage of CD/DVDs and the main reason is its size, speed and portability. Bootable USB drivers simply means that you are preparing a USB flash drive to install an operating system. Essentially, creating bootable USB drivers to install operating system of your choice varies from each Windows and Mac versions.
In this short guide, we will show how to make or create a bootable USB from ISO file on all Windows version computers. Making a bootable driver is not similar to copying an ISO image file directly on the USB flash drive. Before creating a bootable USB from ISO, please remember to backup all data contained on your USB flash drive as using any trick from this guide will entirely wipe the data from your USB drive.
If you’re locked out of Windows 7 and can’t recall the password at all, don’t worry, resetting Windows 7 password will be extremelyВ easy with the help of Windows Password Recovery Pro.
Method #1: Make Bootable USB from ISO Using Command Prompt
This part can be applied from any Windows version including Windows 10, 8, 7, XP and other older versions. It is indeed an old-fashioned method but it works like charm all the time. Here’s what to do –
Step 1. Insert the USB flash drive on the computer and let the computer automatically detect it.
Step 2. Click on Start and start command prompt.
Step 3. Type «DISKPART» and press enter to start the disk part utility.
Step 4. From here, you will have to enter a series of command. First, type «List Disk» to see all the available drivers on the computer. Check the disk number of your flash drive and remember it.
Step 5. Next, type «Select Disk 1» considering Disk 1 is the USB flash driver and press Enter.
Step 6. Now keep on typing these series of commands.
— Clean
— create partition primary
— select partition 1
— active
— format fs=fat32
When the formatting process is completed, simply type «Assign» followed by exit.
Step 7. Now copy all the files of your operating system on to the USB flash drive and it is done. You can now install your operating system using the bootable USB flash drive.
Method #2: Create A Bootable USB using iSeePassword WizISO
Making a Windows install disk isn’t as simple as formatting a drive or copying ISO file to your USB drive on Windows and Mac OS X. You need to use a professional ISO Editor to write the ISO image to your USB instead of copying. Are you confused with the steps mentioned in above parts or they just didn’t work? If that was the case, then it is the time to give a try on iSeePassword WizISO, it’s an amazing tool to burn ISO image to USB with a built powerful burning engine.
WizISO a ISO Toolkit which allows you to burn ,extract, edit, create and copy disc without losing the bootableВ information. This program provides two partition style MBR and UEFI model which allows you to make UEFI bootable drive. What’s more. If you want to edit your ISO file,then just import it to the program and directly edit, add, delete, rename your ISO file then save it to a standard ISO format. . It supports 200+ USB brands mo matter it is old or new. The most important part is that it is super easy to use. Not convinced? Please check the tutorial below:
Step 1. Download iSeePassword WizISO from this website and install it on the computer. (Windows version and Mac version all available).
Step 2. Open the program after installation and the main interface is shown like blow.
Step 3. Click «Browse» button to find local ISO file and add it to computer.
Step 4. Now insert an USB drive to the computer and select the drive name from the list undert «Create A Bootable USB».
Step 5. Finally, click «Burn» button to start the burning process. It will take around 15 minutes to fully write the ISO file to USB. The actual time is depending on how lagre the file is. After that, you can take out the USB and use it to fix system issues.
Pro:
- High success rate with strong burning engine.
- User-friendly interface that everyone can use it freely.
- Take less time for burning.
- Support both DVD and USB as burning media.
- Automatically detect correct file format before burning.
Method #3: Make Bootable USB from ISO using RMPrepUSB
RMPrepUSB is yet another ISO image file burning program that helps to create bootable USB flash drives. It is absolutely free to use and it’s an open source tool. Learn how to use Rufus.
Step 1. Download it from the official website and store it on your computer.
Step 2. It’s ready-to-use program that needs no installation at all. You can open the program just by double clicking on it.
Step 3. Insert the USB flash drive and let it be recognized by the program automatically.
Step 4. Select the device name that you are using. It is recommended to use an 8 GB flash drive to run everything smoothly. Leave the rest of the options to the default settings and select the ISO image file stored in your computer. Make sure to check «Create a bootable disk» to make the USB driver bootable.
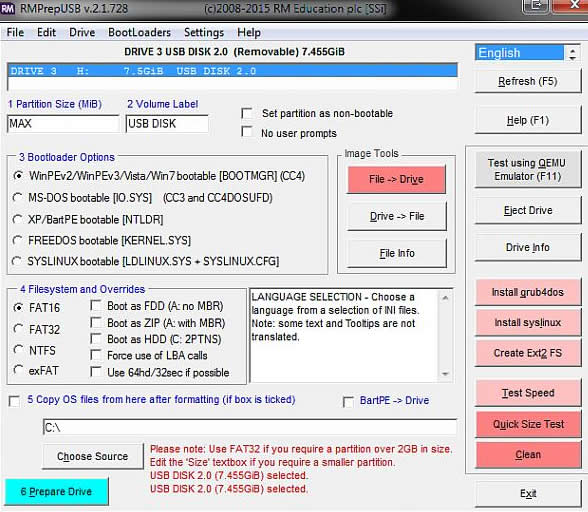
Step 5. Click on «Start» to initiate the burning process and once it is finished, you can eject the flash drive. It now a ready-made bootable USB driver.
Cons:
- Quite complicated, not intended for the beginner.
- Don’t support UEFI boot.
- Don’t provide any support.
Creating a bootable USB flash drive can be really a hectic task if you don’t know the right procedure. Hopefully, you guys were able to create a bootable USB driver by using the methods shared in this guide. If you have any easier method than this then don’t forget to share it with us. Stay tuned for more!

Vicky is a professional Windows technology author with many experience, focusing on computer technology. She’s very much enjoy helping people find solutions to their problems. Her knowledge and passion always drive her to discover everything about technology.


