- How to Install Mac OS X theme on Elementary os 5.0 Juno
- Install Mac OS X theme on Elementary OS Juno.
- Screen Shots:
- Video Tutorial:
- How To Make Ubuntu Look Like Mac (In 5 Steps)
- How To Make Ubuntu Look like a Mac
- 1. Pick the Right Desktop Environment
- GNOME Shell
- 2. Install a Mac GTK Theme
- Tip: How To Install GTK Themes
- 3. Install a Mac Icon Set
- How to Install Icon Themes
- 4. Change the System Font
- 5. Add a Desktop Dock
- Plank Dock
- How to make elementary os look like mac os
How to Install Mac OS X theme on Elementary os 5.0 Juno
The new version 5.0 of elementary OS is released on October 2018 called “Juno”. This version is based on Ubuntu 18.04 and comes with so many new features and redesign.
It has some new features like a Night light, Improved app center, new system sound for notification, keyboard layout like Mac OS, New text editor code and so many other features.
It also comes with a major change in design with a new look and feels because of latest Gtk+. And now it introduced its official color palette. So now icons and other things will look more uniform.
All we know that Elementary OS is already known for its Mac OS like user interface and we love that and even it is completely free.
But now you make your Elementary OS look even more like Mac OS X by installing a theme on your Elementary OS Juno.
Install Mac OS X theme on Elementary OS Juno.
- First download Theme from here.
- Extract the downloaded file.
- Now install Elementary tweaks by next three commands in the terminal. (Make sure your internet connection is working)
- sudo add-apt-repository ppa:philip.scott/elementary-tweaks
- sudo apt-get update
- sudo apt-get elementary-tweaks
- Open usr/share/icons as administrator then paste both icon folders Dark-Mode and Light-Mode.
- Open usr/share/themes as administrator then paste all theme folders Sierra-dark, Sierra-dark-solid and Sierra-light-solid.
- Open System setting>Tweaks>Change Gtk+ and icons.
- And also change layout to OS X.
Screen Shots:
Video Tutorial:
Источник
How To Make Ubuntu Look Like Mac (In 5 Steps)
Do you want to make Ubuntu look like Mac OS X? If so, we’re going to show you how to do it, step-by-step.
The whole point of using Linux is that you can do things like this
Whether you have a bad case of Apple envy or you just appreciate the design aesthetic of Apple’s OS; there’s nothing wrong with aping the appearance of a rival operating system.
After all, the whole point of using Linux is that you are free to do things like this — you certainly can’t make macOS look like Ubuntu!
How To Make Ubuntu Look like a Mac
A stack of Mac GTK themes, icon sets, fonts and cursors are available for Linux, most a quick Google away.
Below you’ll find the Mac GTK and icon themes we think give you the best Mac-like look on your Linux box. But don’t be afraid to explore DeviantArt, GitHub, and other avenues if our choices don’t quite match up with your tastes.
1. Pick the Right Desktop Environment
GNOME Shell

To achieve the most Mac-like look on Linux you need to use the most appropriate desktop environment, and that is GNOME Shell.
This is not a slight against other desktop environments (DEs) as Unity, Budgie, MATE, Cinnamon and more can be made to resemble Cupertino’s computing OS too.
But GNOME Shell is the most customisable desktop environment as it lets you theme and re-arrange everything you need to with the least amount hackery or fuss.
If you’re using Ubuntu 18.04 LTS or later you already have GNOME Shell, so you can skip ahead.
But if you don’t have GNOME Shell installed you will need to install it first.
This is easy. Just click the button below and follow in the on-screen prompts (select ‘lightdm’ as the display manager when asked):
You’re also going to need to the GNOME Tweaks tool in a few steps time, so install that now too:
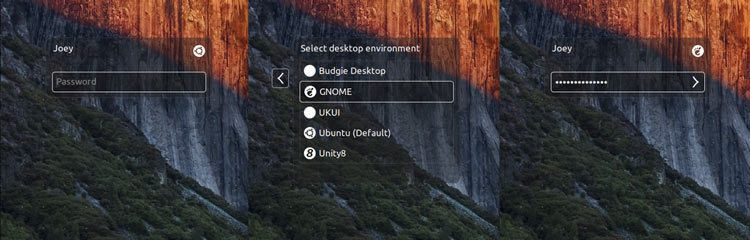
Once both installations are complete you need to logout and select the ‘GNOME Shell’ session from the Unity Greeter:
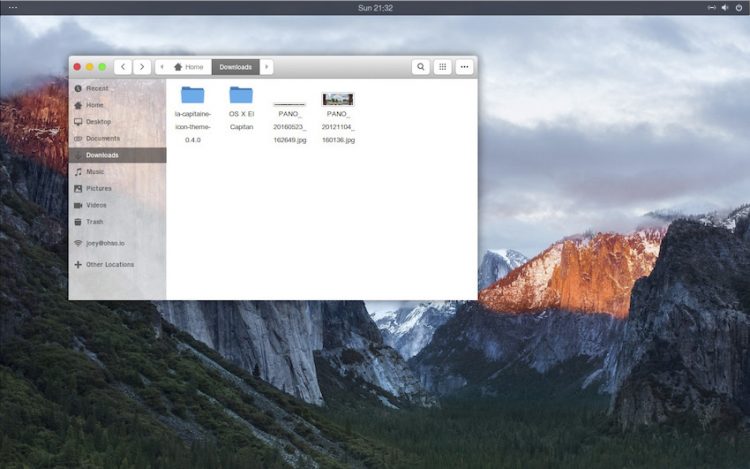
2. Install a Mac GTK Theme
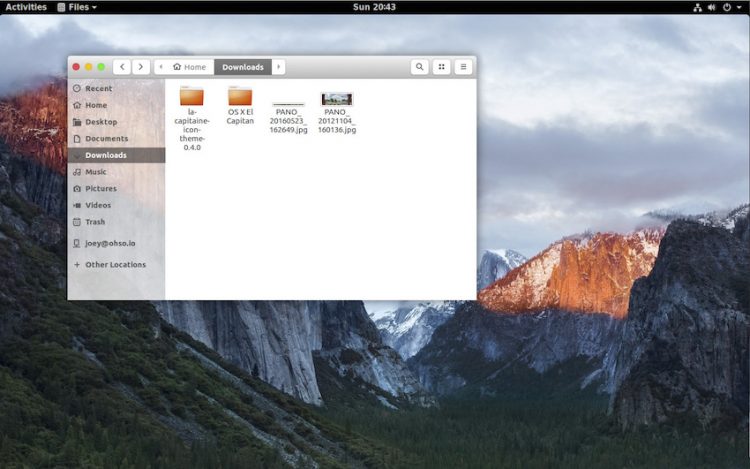
The easiest way to make Ubuntu look like a Mac is to install a Mac GTK theme.
Our top recommendation is the ‘macOS Mojave’ theme by Vinceluice. This is a near-enough pixel-perfect clone of Apple’s OS skin, and is available in light and dark versions. It’s one of the best designed Mac GTK themes out there (it also has a matching GNOME Shell theme).
The ‘macOS Mojave’ theme requires GNOME 3.20 or later, so you’ll need to be running Ubuntu 16.10 or later to use it.
If you’re running the older Ubuntu 16.04 LTS release you can use the competent ‘macOS Sierra’ clone created by the B00merang project:
Looking for something more similar to Big Sur? We’ll be updating this post soon!
Tip: How To Install GTK Themes

Once you download your chosen macOS theme from the link(s) above, you will need to install it.
To install themes in Ubuntu first extract the contents of the archive you downloaded, then move the folder inside to the
/.themes folder in your Home directory.
If you do not see this folder press Ctrl + H to reveal hidden folders. Next, find the .themes folder or create it if it doesn’t exist. Move the extract folder mentioned above to this folder.
Finally, to change theme, open GNOME Tweak Tool > Appearance and select your chosen theme (and the GNOME Shell theme, if you also downloaded one).
3. Install a Mac Icon Set

Next grab some a Mac Icon set for Linux. A quick Google will throw up a bunch of results. Most, sadly, aren’t complete enough to function as a full icon set, so you’ll also want to use (and in some cases manually specify) a fall back icon theme like Faba, or Papirus.
To avoid all of that hassle you may wish to use the fabulous ‘La Capitaine‘ icon pack.
What’s great about La Capitaine is that it’s a proper Linux icon set, with custom macOS inspired icons for many Linux apps and not just a direct port of mac icons to Linux. It’s also totally open-source, and is available to download from Github.
How to Install Icon Themes
Once you’ve downloaded your chosen theme from the link(s) above you need to install it. To do this first extract the contents of the archive you download, then move the folder inside to the
/.icons folder in your Home directory.
If you don’t see this folder press Ctrl + H to view hidden folders. Next, find the .icons folder or create it if it doesn’t exist. Move the extract folder mentioned above to this folder.
Finally, to apply, open GNOME Tweak Tool > Appearance and select your chosen theme.
4. Change the System Font
If you’ve used Mac OS X / macOS at some point in the past few years you’ll know it has clean, crisp system typography.
‘Lucida Grande’ is the familiar Mac system font, though Apple uses a system font called ‘San Franciso’ in recent releases of macOS.
A quick Google should turn up plenty more information (and links to download San Francisco font) but be aware that neither font is not licensed for distribution — so we can’t link you to it, sorry!
Thankfully there’s an open-source alternative to ‘Lucida Grande’ called Garuda. It’s even pre-installed out of the box on Ubuntu, so you don’t need to go on a font safari to find it.

Head to GNOME Tweak Tool > Fonts and set the ‘Windows Titles’ and ‘Interface’ fonts to Garuda Regular (or any other font you wish).
If you use Unity you can use Unity Tweak Tool to change the font on Ubuntu.
5. Add a Desktop Dock
Ask people what a Mac desktop looks like and chances are they will mention its ubiqutious desktop dock. This is a combined application launcher and window switcher.
If you opted to use GNOME Shell back in Step 1 install the excellent Dash to Dock extension from the GNOME extensions site. This dock can be adjusted, tweaked and tune to look exactly like its macOS counterpart.
Dash to Dock doesn’t look very mac-ish by default so you will want to dive in to the GNOME Tweak Tool > Extensions > Dash to Dock > Appearance to change the colour to white, and lower the opacity.
Plank Dock
If you chose to stick with the Unity desktop you can set the Unity Launcher to hide ( System Settings > Desktop > Behaviour ) and install Plank, a desktop dock, to handle app launching and window switching:
Plank can be configured with all sorts of themes too, making it easy to replicate the Mac OS X experience. Gnosemite is a faithful mac Plank theme worth a look.
That’s it; we’ve achieved our aim to make Ubuntu look like a Mac — now it’s your turn.
We’d love to see a screenshot of your mac-inspired creation so do feel free to share one in the comments.
Home » How To » How To Make Ubuntu Look Like Mac (In 5 Steps)
Источник
How to make elementary os look like mac os
Installing elementary OS alongside macOS
Table of Contents
This guide makes a few assumptions about the Mac you’re using. Before we you begin, make sure:
Your Mac only has macOS installed on it.
If you have an existing install of elementary OS or Windows on your computer, this guide may not fully apply to you.
You’re running OS X 10.11 El Capitan or macOS 10.12 Sierra
This guide is written with recent versions of macOS in mind. If you’re using an older version, things might be different, so bear that in mind.
Your Mac is relatively new (2012 or later)
Your Mac must not have a Core 2 duo or Solo (or older) processor. Only the past couple few years of Macs (which have 64-bit EFI) are supported.
Your Mac is not a 2015/2016 MacBook or 2016 MacBook Pro
At the time of writing (December 2016), these very new models have limited functionality under elementary OS.
- At least 15GB of extra disk space on your Mac
- elementary OS iso
- rEFInd Boot Manager
- USB Thumb Drive at least 2GB capacity
- Lots of patience!
NOTE: For those who don’t know this, a dollar sign ( $ ) indicates that you type the command into a Terminal window. You do not copy the dollar sign 🙂
Prep Your Mac Hard Drive
Back your computer up.
No, really! Make sure you have a backup, and make sure to test that it works. This procedure has been tested multiple times, but there’s still a chance something could go wrong and you could lose data. On macOS, Time Machine is a great option for backing your computer up.
Shrink your macOS partition to make room for elementary OS. At least 30 GB is a reasonable minimum.
- If you plan on using elementary OS as your primary OS, you’ll want to give it much more, of course. Once you decide what size you want to resize your macOS partition down to, you can resize it with this command: $ diskutil cs resizeStack / XXXg , where XXX is the desired number of GB your macOS partition will be resized down to.
- For example, if your Mac has a 500 GB internal hard drive, you might decide to allocate 300 GB for macOS, and 200 GB for elementary OS. You’d then issue this command: $ diskutil cs resizeStack / 300g .
Get elementary OS
Download the iso from elementary OS.
Verify the download by running this command from terminal:
Should give you the result 8035e0a2fbc977d931af22dcefb77ed6fe87815d89188a43e2cb345f13e629cf
Create a Bootable USB using Etcher
Install elementary OS
Shut off your Mac and plug in the USB flash drive you created with elementary OS on it.
Holding down the option key on your keyboard, press the power button to turn on your computer.
From the boot manager screen that appears, choose elementary OS.
After choosing to boot elementary OS, you’ll be given a few options as to how to boot the installer. Choose Try Elementary OS.
Once elementary OS finishes booting up, open Terminal and run $ ubiquity -b . This will launch the graphical elementary OS installer. When the installer asks about partitioning, make sure you choose Something Else. .
- Note for advanced users: the -b flag tells the installer to install without installing the GRUB boot-loader. This guide makes use of EFI stub loading, which allows a capable boot manager (such as rEFInd, which we’ll set up later) to launch the Linux kernel directly, without an intermediary boot-loader (e.g. GRUB).
You should see some free space at the end your hard drive partition list ( /dev/sda ), about the size you freed up when you shrunk your macOS partition. Choose this free space, and format it as Ext4 and set its mount point to / . Choose Apply, and finish installing elementary OS.
Install reFInd Boot Manager
Restart your computer and boot back into macOS. At this point, elementary OS is installed, but you can’t boot into it yet, because you haven’t installed a boot manager. That’s the next step!
Download the rEFInd boot manager and unzip it. Drag the unzipped folder onto your desktop.
Turn off your Mac.
Boot into Recovery Mode by holding down ⌘ + R while turning on your Mac.
Once in Recovery Mode, open Disk Utility. Choose your macOS partition and click Mount in the toolbar to mount it.
Quit Disk Utility and open Terminal.
cd into the directory where you unzipped rEFInd, which will probably be something like /Volumes/Macintosh\ HD/Users/jane/Desktop/refind* , if your macOS username was jane .
Install rEFInd ( $ ./refind-install )
Reboot your Mac.
You should now see the rEFInd menu, which options to boot elementary OS and macOS. Congrats! You’re all set.
You can install a theme to make it look nicer, and there’s many options for customizing rEFInd’s behavior too. Here’s what my setup looks like: 
These are optional tweaks that will help you feel more are home.
MacOS Modifier keys create macOS like keyboard bindings
f.lux plugin to help alleviate eye-strain
bash-it make your bash shell awesome
linux-brew package manager for linux
My Wi-Fi isn’t working
Sometimes Wi-Fi might not work out-of-the-box because the necessary driver isn’t installed. In some cases, you’ll be able to install them manually.
- Somehow get a temporary internet connection, e.g. via your smartphone’s USB or Bluetooth tethering function or a Thunderbolt to RJ45 adapter (Thunderbolt ethernet works well with 0.4.1 Loki)
- Run $ sudo apt install bcmwl-kernel-source to install the driver and its dependencies.
30 seconds for the rEFInd menu to show up.
This is a known compatibility issue with rEFInd and some Mac hardware models. If you experience this problem, try the following steps:
- Mount your EFI System Partition (ESP), which is where rEFInd is installed. ( $ sudo ./mountesp )
- Rename the refind directory ( $ mv /Volumes/ESP/EFI/refind /Volumes/ESP/EFI/BOOT )
- Rename the refind EFI blob ( $ mv /Volumes/ESP/EFI/BOOT/refind_x64.efi /Volumes/ESP/EFI/BOOT/bootx64.efi )
- Reboot and see if your problem is fixed.
After booting installation USB screen remains black
If the screen remains black after booting from the installation USB, try the following steps:
- When the boot menu with the elementary OS logo appears enter the boot menu
- Change the boot parameters quiet splash to nomodeset and continue booting
That solution is an extract of a StackExchange answer.
Источник


