- Create installation media for Windows
- Make for Windows
- Version
- Description
- Homepage
- Download
- How to Make a Windows 10 USB Using Your Mac — Build a Bootable ISO From Your Mac’s Terminal
- Quincy Larson
- Step 1: Download the Windows 10 ISO file
- Step 2: Insert your USB storage drive into your Mac
- Step 3: Use the diskutil command to identify which drive your USB is mounted on
- Step 4: Format your USB Drive to work with Windows
- Step 5: Use hdiutil to mount the Windows 10 folder and prepare it for transfer.
- Step 6: Copy the Windows 10 ISO over to your USB Drive
- Step 7: Put your USB into your new PC and start loading Windows
- Quincy Larson
- Chapter 34 make : special considerations for Windows
- 34.1 Install make on Microsoft Windows
- 34.2 Update your PATH
- 34.3 Issues we are still clarifying
Create installation media for Windows
You can use installation media (a USB flash drive or DVD) to install a new copy of Windows, perform a clean installation, or reinstall Windows 10.
To create installation media, go to the software download website, where you’ll find step-by-step instructions. On that website, you can select a version of Windows and create your own installation media using either a USB flash drive or a DVD. To go directly to one of the versions, select one of these links:
Windows 10 (Then select Download tool now.)
Important: Back up your files before you install or reinstall Windows on your PC. Learn how for Windows 10 or for Windows 7 and Windows 8.1.
To create the installation media, here’s what you’ll need:
A PC with a reliable internet connection. The download time will vary, depending on your internet connection.
A USB flash drive or DVD. A blank USB flash drive with at least 8 GB of space, or a blank DVD (and DVD burner). We recommend using a blank USB or blank DVD because any content on it will be deleted. When burning a DVD from an ISO file, if you’re told the disc image file is too large, you’ll need to use dual layer (DL) DVD media.
A product key. Your 25-character product key (not required for digital licenses). For help finding it, go to Find your Windows product key.
After you’ve created the installation media, you can reset or reinstall Windows. To learn more, go to Recovery options in Windows 10.
Make for Windows
Make: GNU make utility to maintain groups of programs
Version
Description
Make is a tool which controls the generation of executables and other non-source files of a program from the program’s source files. Make gets its knowledge of how to build your program from a file called the makefile, which lists each of the non-source files and how to compute it from other files. When you write a program, you should write a makefile for it, so that it is possible to use Make to build and install the program.
Capabilities of Make
- Make enables the end user to build and install your package without knowing the details of how that is done — because these details are recorded in the makefile that you supply.
- Make figures out automatically which files it needs to update, based on which source files have changed. It also automatically determines the proper order for updating files, in case one non-source file depends on another non-source file. As a result, if you change a few source files and then run Make, it does not need to recompile all of your program. It updates only those non-source files that depend directly or indirectly on the source files that you changed.
- Make is not limited to any particular language. For each non-source file in the program, the makefile specifies the shell commands to compute it. These shell commands can run a compiler to produce an object file, the linker to produce an executable, ar to update a library, or TeX or Makeinfo to format documentation.
- Make is not limited to building a package. You can also use Make to control installing or deinstalling a package, generate tags tables for it, or anything else you want to do often enough to make it worth while writing down how to do it.
Homepage
Download
If you download the Setup program of the package, any requirements for running applications, such as dynamic link libraries (DLL’s) from the dependencies as listed below under Requirements, are already included. If you download the package as Zip files, then you must download and install the dependencies zip file yourself. Developer files (header files and libraries) from other packages are however not included; so if you wish to develop your own applications, you must separately install the required packages.
| Description | Download | Size | Last change | Md5sum |
|---|---|---|---|---|
| • Complete package, except sources | Setup | 3384653 | 25 November 2006 | 8ae51379d1f3eef8360df4e674f17d6d |
| • Sources | Setup | 1252948 | 25 November 2006 | b896c02e3d581040ba1ad65024bbf2cd |
| • Binaries | Zip | 495645 | 25 November 2006 | 3521948bc27a31d1ade0dcb23be16d49 |
| • Dependencies | Zip | 708206 | 25 November 2006 | d370415aa924fa023411c4099ef84563 |
| • Documentation | Zip | 2470575 | 25 November 2006 | 43a07e449d4bab3eb3f31821640ecab7 |
| • Sources | Zip | 2094753 | 25 November 2006 | 8bed4cf17c5206f8094f9c96779be663 |
You can also download the files from the GnuWin32 files page.
You can monitor new releases of the port of this package.
How to Make a Windows 10 USB Using Your Mac — Build a Bootable ISO From Your Mac’s Terminal

Quincy Larson

Most new PCs don’t come with DVD drives anymore. So it can be a pain to install Windows on a new computer.
Luckily, Microsoft makes a tool that you can use to install Windows from a USB storage drive (or «thumbdrive» as they are often called).
But what if you don’t have a second PC for setting up that USB storage drive in the first place?
In this tutorial we’ll show you how you can set this up from a Mac.
Step 1: Download the Windows 10 ISO file
You can download the ISO file straight from Windows. That’s right — everything we’re going to do here is 100% legal and sanctioned by Microsoft.
If you want an English-language version of the latest update of Windows 10, you can download the ISO here.
If you have a relatively new computer, you probably want the 64-bit version. If you’re not sure, go with the 32-bit version to be safe.
If you want a non-English-language version of Windows, or want to get an older update version, download the ISO here instead.
Step 2: Insert your USB storage drive into your Mac
The ISO file is only about 5 gigabytes, but I recommend you use a USB drive with at least 16 gigabytes of space just in case Windows needs more space during the installation process.
I bought a 32 gigabyte USB drive at Walmart for only $3, so this shouldn’t be very expensive.
Stick your USB drive into your Mac. Then open your terminal. You can do this using MacOS Spotlight by pressing both the ⌘ and Space bar at the same time, then typing «terminal» and hitting enter.
Don’t be intimidated by the command line interface. I’m going to tell you exactly which commands to enter.
Step 3: Use the diskutil command to identify which drive your USB is mounted on
Open Mac Spotlight using the ⌘ + space keyboard shortcut. Then type the word «terminal» and select Terminal from the dropdown list.
Paste the following command into your terminal and hit enter:
You will see output like this (note — your Mac’s terminal may be black text on a white background if you haven’t customized it).
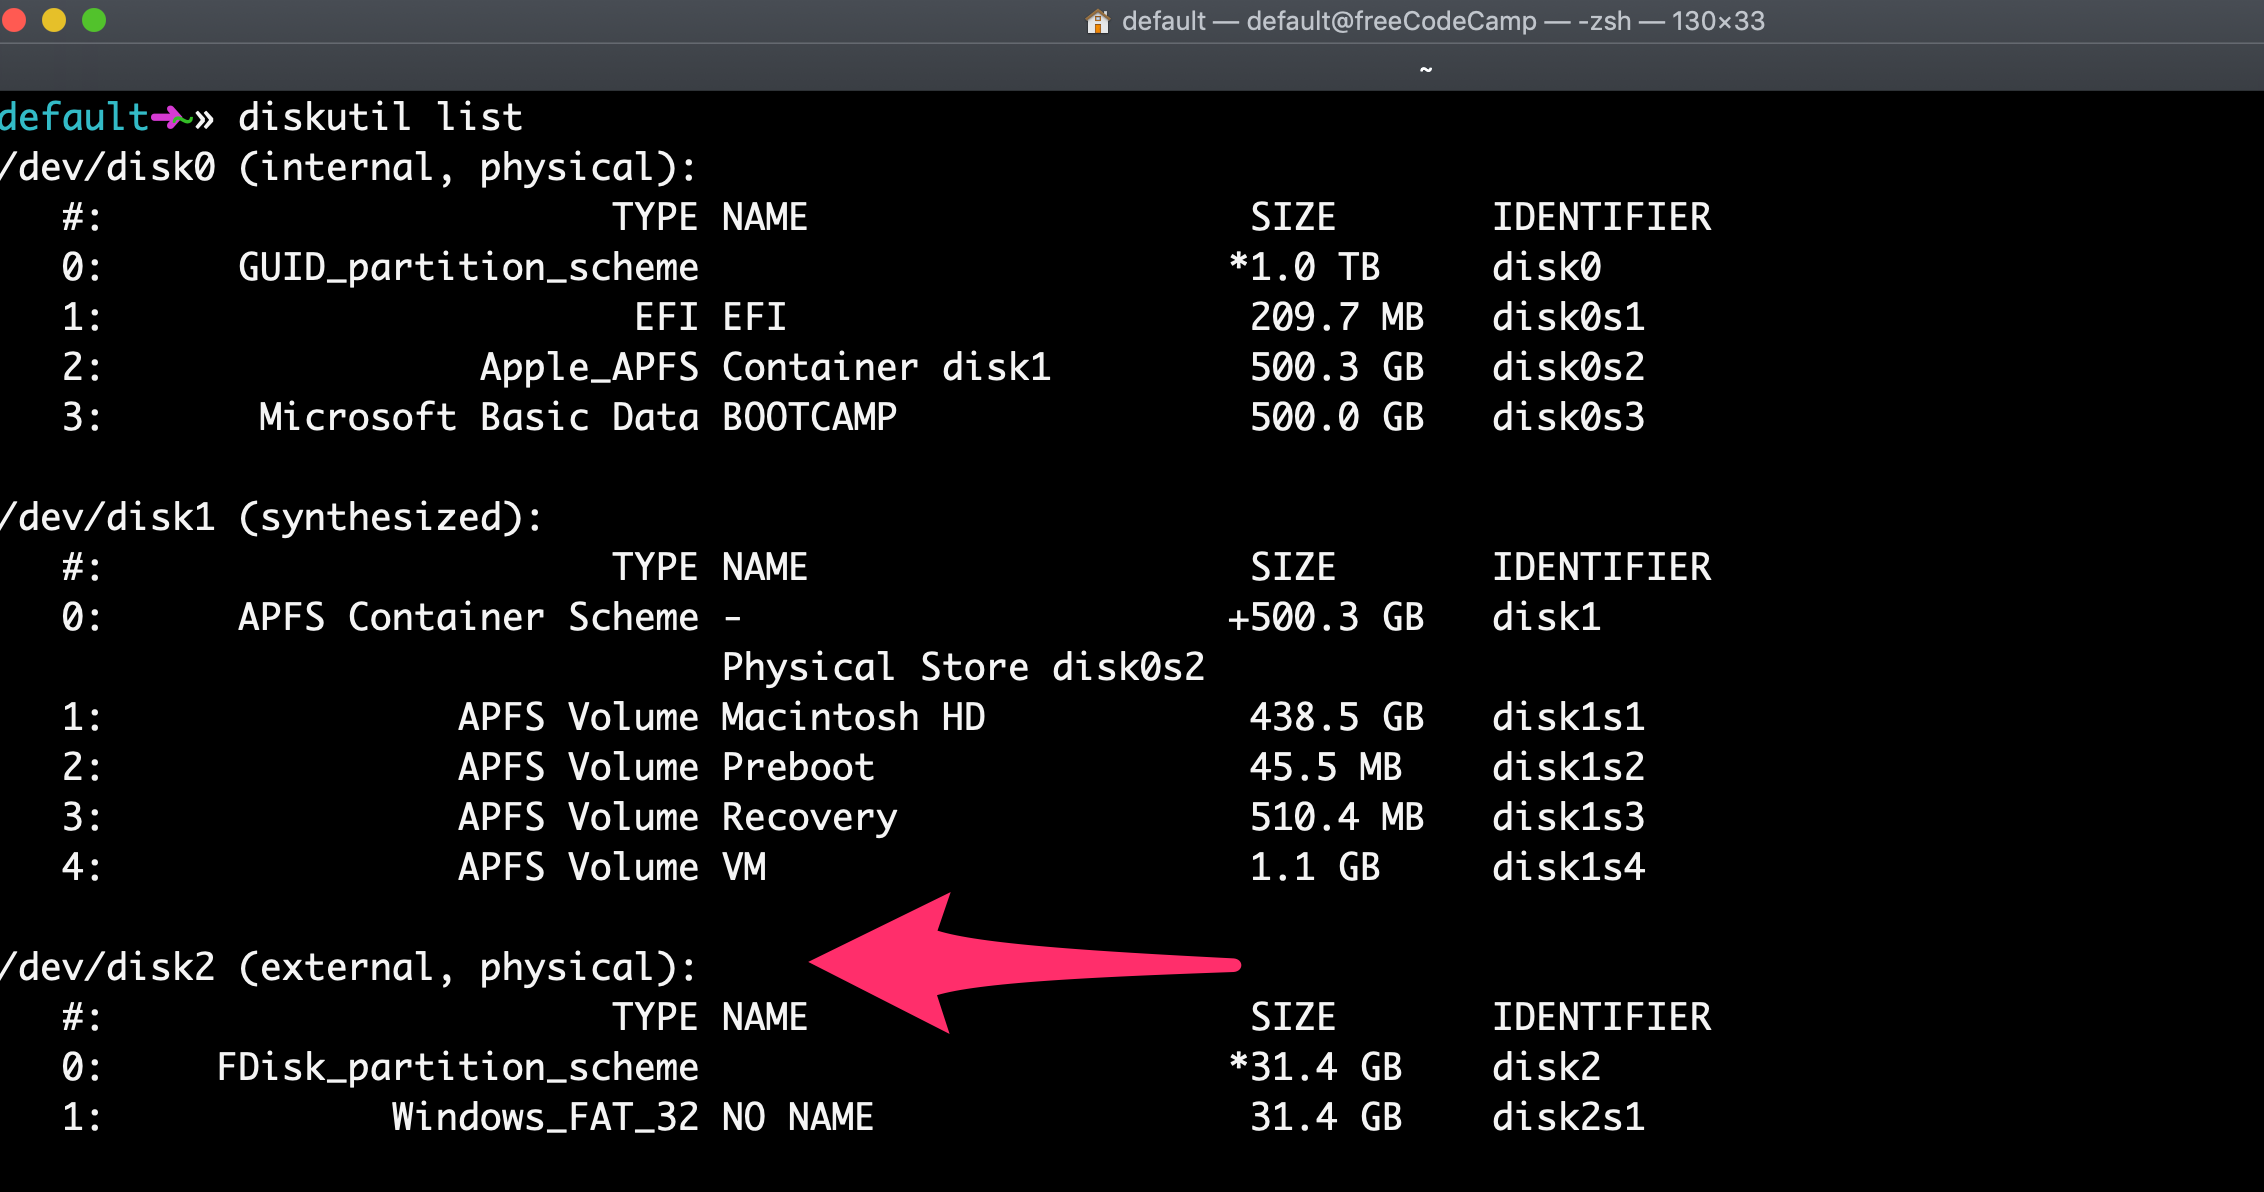
Copy the text I point to here. It will probably be something like
Step 4: Format your USB Drive to work with Windows
Next format your USB drive to Windows FAT32 format. This is a format that Windows 10 will recognize.
Note that you should replace the disk2 with the name of the your drive from step 3 if it wasn’t disk2 . (It may be disk3 or disk4 ).
Run this command using the correct disk number for your USB:
diskutil eraseDisk MS-DOS «WIN10» GPT /dev/disk2
Then you’ll see terminal output like this.
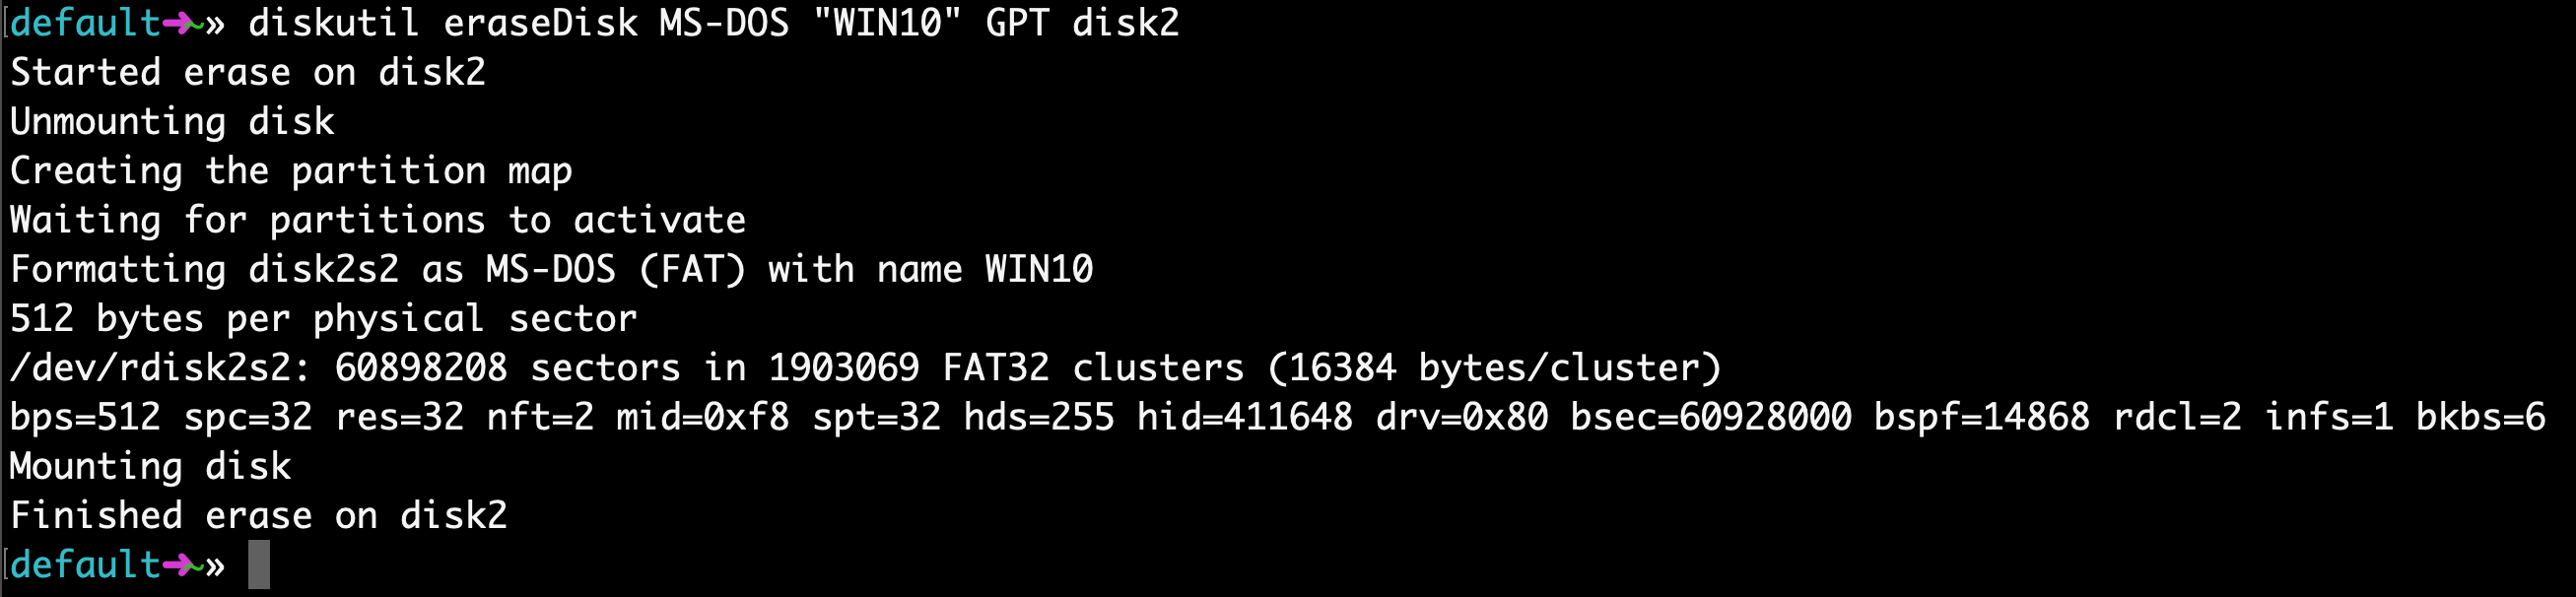
This will probably only take about 20 seconds on a newer computer, but may take longer on an older computer.
Note that for some hardware, you may instead need to run this command, which uses the MBR format for partitioning instead of GPT. Come back and try this command if step 7 fails, then redo steps 5, 6, and 7:
Step 5: Use hdiutil to mount the Windows 10 folder and prepare it for transfer.
Now we’re going to prep our downloaded ISO file so we can copy it over to our USB drive.
You will need to check where your downloaded Windows 10 ISO file is and use that. But your file is probably located in your
/Downloads folder with a name of Win10_1903_V1_English_x64.iso .
Step 6: Copy the Windows 10 ISO over to your USB Drive
Update April 2020: One of the files in the Windows 10 ISO – install.wim – is now too large to copy over to a FAT-32 formatted USB drive. So I’ll show you how to copy it over separately.
Thank you to @alexlubbock for coming up with this workaround.
First run this command to copy over everything but that file:
rsync -vha —exclude=sources/install.wim /Volumes/CCCOMA_X64FRE_EN-US_DV9/* /Volumes/WIN10
Then run this command to install Homebrew (if you don’t have it installed on your Mac yet):
/usr/bin/ruby -e «$(curl -fsSL https://raw.githubusercontent.com/Homebrew/install/master/install)»
Then use Homebrew to install a tool called wimlib with this terminal command:
brew install wimlib
Then go ahead and create the directory that you’re going to write the files into:
Then run this command. Note that this process may take several hours, you may see 0% progress until it finishes. Don’t abort it. It will use wimlib to split the install.wim file into 2 files less than 4 GB each (I use 3.8 GB in the following command), then copy them over to your USB:
wimlib-imagex split /Volumes/CCCOMA_X64FRE_EN-US_DV9/sources/install.wim /Volumes/WIN10/sources/install.swm 3800
Once that’s done, you can eject your USB from your Mac inside Finder. Note that Windows will automatically rejoin these files later when you’re installing.
Step 7: Put your USB into your new PC and start loading Windows
Congratulations — your computer now should boot directly from your USB drive. If it doesn’t, you may need to check your new PC’s BIOS and change the boot order to boot from your USB drive.
Windows will pop up a screen and start the installation process.
Enjoy your new PC, and your newly-installed copy of Windows.
Quincy Larson
The teacher who founded freeCodeCamp.org.
If you read this far, tweet to the author to show them you care. Tweet a thanks
Learn to code for free. freeCodeCamp’s open source curriculum has helped more than 40,000 people get jobs as developers. Get started
freeCodeCamp is a donor-supported tax-exempt 501(c)(3) nonprofit organization (United States Federal Tax Identification Number: 82-0779546)
Our mission: to help people learn to code for free. We accomplish this by creating thousands of videos, articles, and interactive coding lessons — all freely available to the public. We also have thousands of freeCodeCamp study groups around the world.
Donations to freeCodeCamp go toward our education initiatives, and help pay for servers, services, and staff.
Chapter 34 make : special considerations for Windows
2015-11-17 NOTE: This year we made R packages before we used make The hope is, therefore, that the make that ships with Rtools is all we need. So hopefully we can ignore this?
34.1 Install make on Microsoft Windows
We are still working out the best way to install make on Windows. Our current best recommendation is to install msysGit, which includes make as well as git and bash .
Download and install msysGit. The two software packages msysGit and Git for Windows are related. Both install git and bash , but only msysGit installs make . The programs installed by msysGit are found by default in C:\msysGit\bin . Here is the complete list of programs included with msysGit. For this activity, RStudio needs to be able to find in your PATH environment variable the program make , the shell bash , other utilities like rm and cp , and Rscript .
Here is another alternative for installing make alone:
- Go to the Make for Windows web site.
- Download the Setup program.
- Install the file you just downloaded and copy to your clipboard the directory in which it is being installed.
- FYI: The default directory is C:\Program Files (x86)\GnuWin32\
- You now have make installed, but you need to tell Windows where to find the program. This is called updating your PATH . You will want to update the PATH to include the bin directory of the newly installed program.
34.2 Update your PATH
If you installed Make for Windows (as opposed to the make that comes with Git for Windows), you still need to update your PATH .
These are the steps on Windows 7 (we don’t have such a write-up yet for Windows 8 – feel free to send one!):
- Click on the Windows logo.
- Right click on Computer.
- Select Properties.
- Select Advanced System Settings.
- Select Environment variables.
- Select the line that has the PATH variable. You may have to scroll down to find it.
- Select Edit.
- Go to the end of the line and add a semicolon ; , followed by the path where the program was installed, followed by \bin .
- Typical example of what one might add: ;C:\Program Files (x86)\GnuWin32\bin
- Click Okay and close all the windows that you opened.
- Quit RStudio and open it again.
- You should now be able to use make from RStudio and the command line.
34.3 Issues we are still clarifying
See issue 58 for what seems to be the most comprehensive statement of the Windows situation.
What are the tricky bits?
- Getting the same Makefile to “work” via RStudio’s Build buttons/menus and in the shell. And, for that matter, which shell? Git Bash or .
- Ensuring make , Rscript , pandoc , rm , etc. can be found = updating PATH .
- Getting make to use the correct shell.
- See issue 54 on the Discussion repo.


