- Creating and using a live installation image
- Downloading Fedora
- Creating and using live USB
- Using Fedora Media Writer
- Using GNOME Disk Utility
- Command line methods
- Using the livecd-iso-to-disk tool
- Using a direct write method
- How to make live usb on linux
- What You’ll Need
- Kali Linux Live USB Install Procedure
- Creating a Bootable Kali USB Drive on Linux (DD)
- Creating a Bootable Kali USB Drive on Linux (DD with status)
- Creating a Bootable Kali USB Drive on Linux (Etcher)
- How to Make a Linux USB Live Disk with the Terminal
- How to make a USB live disk with DD and the terminal
- How to restore your USB drive to normal
- Conclusion
Creating and using a live installation image
Downloading Fedora
You can download Fedora from https://getfedora.org/.
There are multiple desktops available for use with Fedora. Each has a slightly different look and feel and offers varying levels of customization. You can use the Fedora Workstation image, which comes with the GNOME desktop by default, and then change your environment afterwards by installing additional packages, or you can download a spin image which will give you a different environment out of the box. Visit Fedora Spins for more information.
You can also take advantage of Fedora Labs. Fedora Labs is a selection of curated bundles of purpose-driven software and content as curated and maintained by members of the Fedora Community. These may be installed as standalone full versions of Fedora or as add-ons to existing Fedora installations. Visit Fedora Labs for details.
Please refer to Fedora Installation Guide for getting help on the process of installing Fedora.
Creating and using live USB
You can write all Fedora ISO images to a USB stick, making this a convenient way on any USB-bootable computer to either install Fedora or try a live Fedora environment without writing to the computer’s hard disk. You will need a USB stick at least as large as the image you wish to write.
Using Fedora Media Writer
The official and supported tool to create a Fedora USB stick is the Fedora Media Writer utility, which was formerly known as LiveUSB Creator. To learn more about this application and how to use it, refer to the Preparing for Installation chapter of the Fedora Installation Guide.
Fedora Media Writer destroys all data on the USB stick. If you need a non-destructive write method (to preserve existing data on your USB stick) or support for ‘data persistence’, you can use the livecd-iso-to-disk utility on Fedora.
Using GNOME Disk Utility
| This method will destroy all data on the USB stick. If you need a non-destructive write method (to preserve existing data on your USB stick) and/or support for ‘data persistence’, you can use the livecd-iso-to-disk utility on Fedora. |
This method is considered unsupported. You can use it on your own risk.
This method is for people running Linux, or another unix with GNOME, Nautilus and the GNOME Disk Utility installed. Particularly, if you are using a distribution other than Fedora which does not support Flatpak, this may be the easiest available method. A standard installation of Fedora, or a standard GNOME installation of many other distributions, should be able to use this method. On Fedora, ensure the packages nautilus and gnome-disk-utility are installed. Similar graphical direct-write tools may be available for other desktops, or you may use the command-line direct write method.
Download a Fedora image, choose a USB stick that does not contain any data you need, and connect it.
Run Nautilus (Files), open the Overview by pressing the Start/Super key, type Files, and hit Enter .
Find the downloaded image, right-click on it, go to Open With, and click Disk Image Writer.
Select your USB stick as the Destination, and click Start Restoring.
Command line methods
These methods are considered unsupported. You can use them on your own risk.
Using the livecd-iso-to-disk tool
| This method will destroy all data on the USB stick if the —format parameter is passed. |
The livecd-iso-to-disk method is slightly less reliable than Fedora Media Writer and can be used reliably only from within Fedora: it does not work in Windows or macOS, and is not supported (and will usually fail) in non-Fedora distributions. However, it supports three advanced features which FMW does not include:
You may use a non-destructive method to create the stick, meaning existing files on the stick will not be destroyed. This is less reliable than the destructive write methods, and should be used only if you have no stick you can afford to wipe.
On live images, you can include a feature called a persistent overlay, which allows changes made to persist across reboots. You can perform updates just like a regular installation to your hard disk, except that kernel updates require manual intervention and overlay space may be insufficient. Without a persistent overlay, the stick will return to a fresh state each time it is booted.
On live images, you can also have a separate area to store user account information and data such as documents and downloaded files, with optional encryption for security and peace of mind.
By combining these features, you can carry your computer with you in your pocket, booting it on nearly any system you find yourself using.
It is not a good idea to try and write a new Fedora release using the version of livecd-iso-to-disk in a much older Fedora release: it is best to only use a release a maximum of two versions older than the release you are trying to write.
Ensure the livecd-tools package is installed: dnf install livecd-tools .
Remember to identify your USB stick’s device name first. In all cases, you can add the parameter —efi to render the stick bootable in native UEFI mode. Detailed usage information is available by running: livecd-iso-to-disk —help or man livecd-iso-to-disk .
To make an existing USB stick bootable as a Fedora image, without deleting any of the data on it, make sure that the USB drive is not mounted before executing the following, and give the root password when prompted:
In case it is not possible to boot from a disk created with the method shown above, before re-partitioning and re-formatting, often resetting the master boot record will enable booting:
| Using the —format option in the following command will erase all data on the USB drive. |
If necessary, you can have livecd-iso-to-disk re-partition and re-format the target stick:
To include a persistent filesystem for /home , use the —home-size-mb parameter. For example:
This will create a 2 GiB filesystem that will be mounted as /home each time the stick is booted, allowing you to preserve data in /home across boots.
To enable ‘data persistence’ support — so changes you make to the entire live environment will persist across boots — add the —overlay-size-mb parameter to add a persistent data storage area to the target stick. For example:
Here, 2048 is the desired size (in megabytes) of the overlay. The livecd-iso-to-disk tool will not accept an overlay size value greater than 4095 for VFAT, but for ext[234] filesystems it is only limited by the available space.
Due to the way it’s currently implemented, every single change to this form of overlay, writes AND deletes, subtracts from its free space so it will eventually be «used up» and your USB stick will no longer boot. You can use dmsetup status live-rw to see how much space remains in the overlay.
The output will contain something like snapshot 42296/204800 , indicating that 4229 of 204800 512-byte sectors are allocated. Because of these limitations, it is advisable to use the system-level persistence sparingly, for configuration changes and important security updates only. Or, if you have sufficient disk space available, changes to the LiveOS root filesystem snapshot can be merged into a new copy of the root filesystem.
You can combine —home-size-mb and —overlay-size-mb , in which case data written to /home will not exhaust the persistent overlay.
Using a direct write method
This method will destroy all data on the USB stick. If you need a non-destructive write method, to preserve existing data on your USB stick, and/or support for data persistence , you can use the livecd-iso-to-disk utility on Fedora.
This method directly writes the image to the USB stick much like Fedora Media Writer or GNOME Disk Utility, but uses a command line utility named dd . Like the other direct write methods, it will destroy all data on the stick and does not support any of the advanced features like data persistence, but it is a very reliable method. The dd tool is available on most Unix-like operating systems, including Linux distributions and macOS, and a Windows port is available. This may be your best method if you cannot use Fedora Media Writer or GNOME Disk Utility, or just if you prefer command line utilities and want a simple, quick way to write a stick.
Identify the name of the USB drive partition. If using this method on Windows, with the port linked above, the dd —list command should provide you with the correct name.
Источник
How to make live usb on linux
Our favourite way, and the fastest method, for getting up and running with Kali Linux is to run it “live” from a USB drive. This method has several advantages:
- It’s non-destructive — it makes no changes to the host system’s hard drive or installed OS, and to go back to normal operations, you simply remove the “Kali Live” USB drive and restart the system.
- It’s portable — you can carry Kali Linux in your pocket and have it running in minutes on an available system
- It’s customizable — you can roll your own custom Kali Linux ISO image and put it onto a USB drive using the same procedures
- It’s potentially persistent — with a bit of extra effort, you can configure your Kali Linux “live” USB drive to have persistent storage, so the data you collect is saved across reboots
In order to do this, we first need to create a bootable USB drive which has been set up from an ISO image of Kali Linux.
What You’ll Need
A verified copy of the appropriate ISO image of the latest Kali build image for the system you’ll be running it on: see the details on downloading official Kali Linux images.
If you’re running under Linux, you can use the dd command, which is pre-installed, or use Etcher.
A USB thumb drive, 4GB or larger. (Systems with a direct SD card slot can use an SD card with similar capacity. The procedure is identical.)
Kali Linux Live USB Install Procedure
The specifics of this procedure will vary depending on whether you’re doing it on a Windows, Linux, or macOS/OS X system.
Creating a Bootable Kali USB Drive on Linux (DD)
Creating a bootable Kali Linux USB drive in a Linux environment is easy. Once you’ve downloaded and verified your Kali ISO file, you can use the dd command to copy it over to your USB drive using the following procedure. Note that you’ll need to be running as root, or to execute the dd command with sudo. The following example assumes a Linux Mint 17.1 desktop — depending on the distro you’re using, a few specifics may vary slightly, but the general idea should be very similar. If you would prefer to use Etcher, then follow the same directions as a Windows user. Note that the USB drive will have a path similar to /dev/sdb.
WARNING: Although the process of imaging Kali Linux onto a USB drive is very easy, you can just as easily overwrite a disk drive you didn’t intend to with dd if you do not understand what you are doing, or if you specify an incorrect output path. Double-check what you’re doing before you do it, it’ll be too late afterwards.
Consider yourself warned.
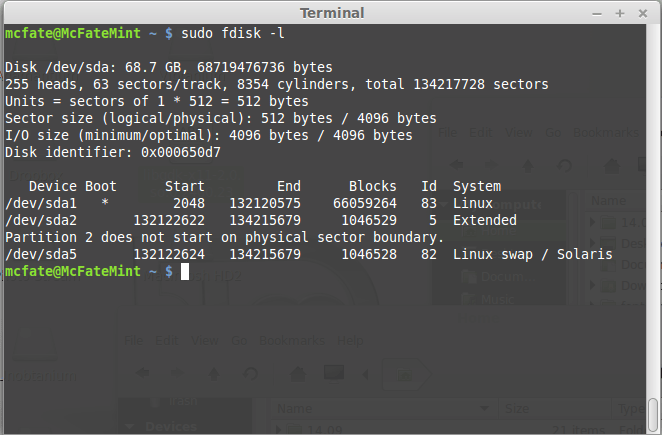
- First, you’ll need to identify the device path to use to write the image to your USB drive. Without the USB drive inserted into a port, execute the command sudo fdisk -l at a command prompt in a terminal window (if you don’t use elevated privileges with fdisk, you won’t get any output). You’ll get output that will look something (not exactly) like this, showing a single drive — “/dev/sda” — containing three partitions (/dev/sda1, /dev/sda2, and /dev/sda5):
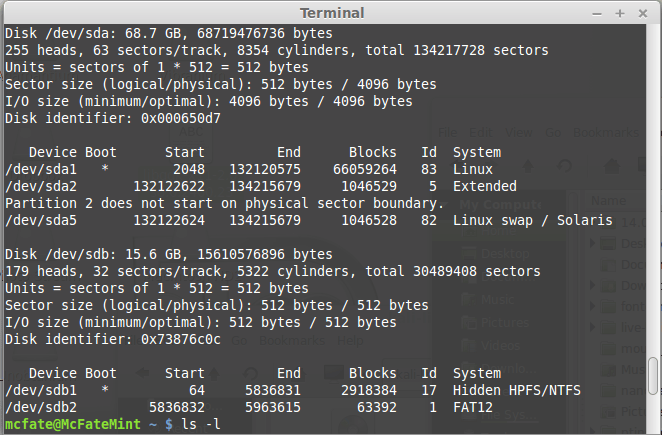
 2. Now, plug your USB drive into an available USB port on your system, and run the same command, “sudo fdisk -l” a second time. Now, the output will look something (again, not exactly) like this, showing an additional device which wasn’t there previously, in this example “/dev/sdb”, a 16GB USB drive:
 3. Proceed to (carefully!) image the Kali ISO file on the USB device. The example command below assumes that the ISO image you’re writing is named “kali-linux-2021.3-live-amd64.iso” and is in your current working directory. The blocksize parameter can be increased, and while it may speed up the operation of the dd command, it can occasionally produce unbootable USB drives, depending on your system and a lot of different factors. The recommended value, “bs=4M”, is conservative and reliable.
Imaging the USB drive can take a good amount of time, over ten minutes or more is not unusual, as the sample output below shows. Be patient!
The dd command provides no feedback until it’s completed, but if your drive has an access indicator, you’ll probably see it flickering from time to time. The time to dd the image across will depend on the speed of the system used, USB drive itself, and USB port it’s inserted into. Once dd has finished imaging the drive, it will output something that looks like this:
That’s it, really!
Creating a Bootable Kali USB Drive on Linux (DD with status)
Alternatively there are a few other options available for imaging.
The first option is dd with a status indicator. This is only available on newer systems however. To do this, we simply add the status flag.
Another option is to use pv . We can also use the size flag here to get an approximate timer. Change the size depending on the image being used.
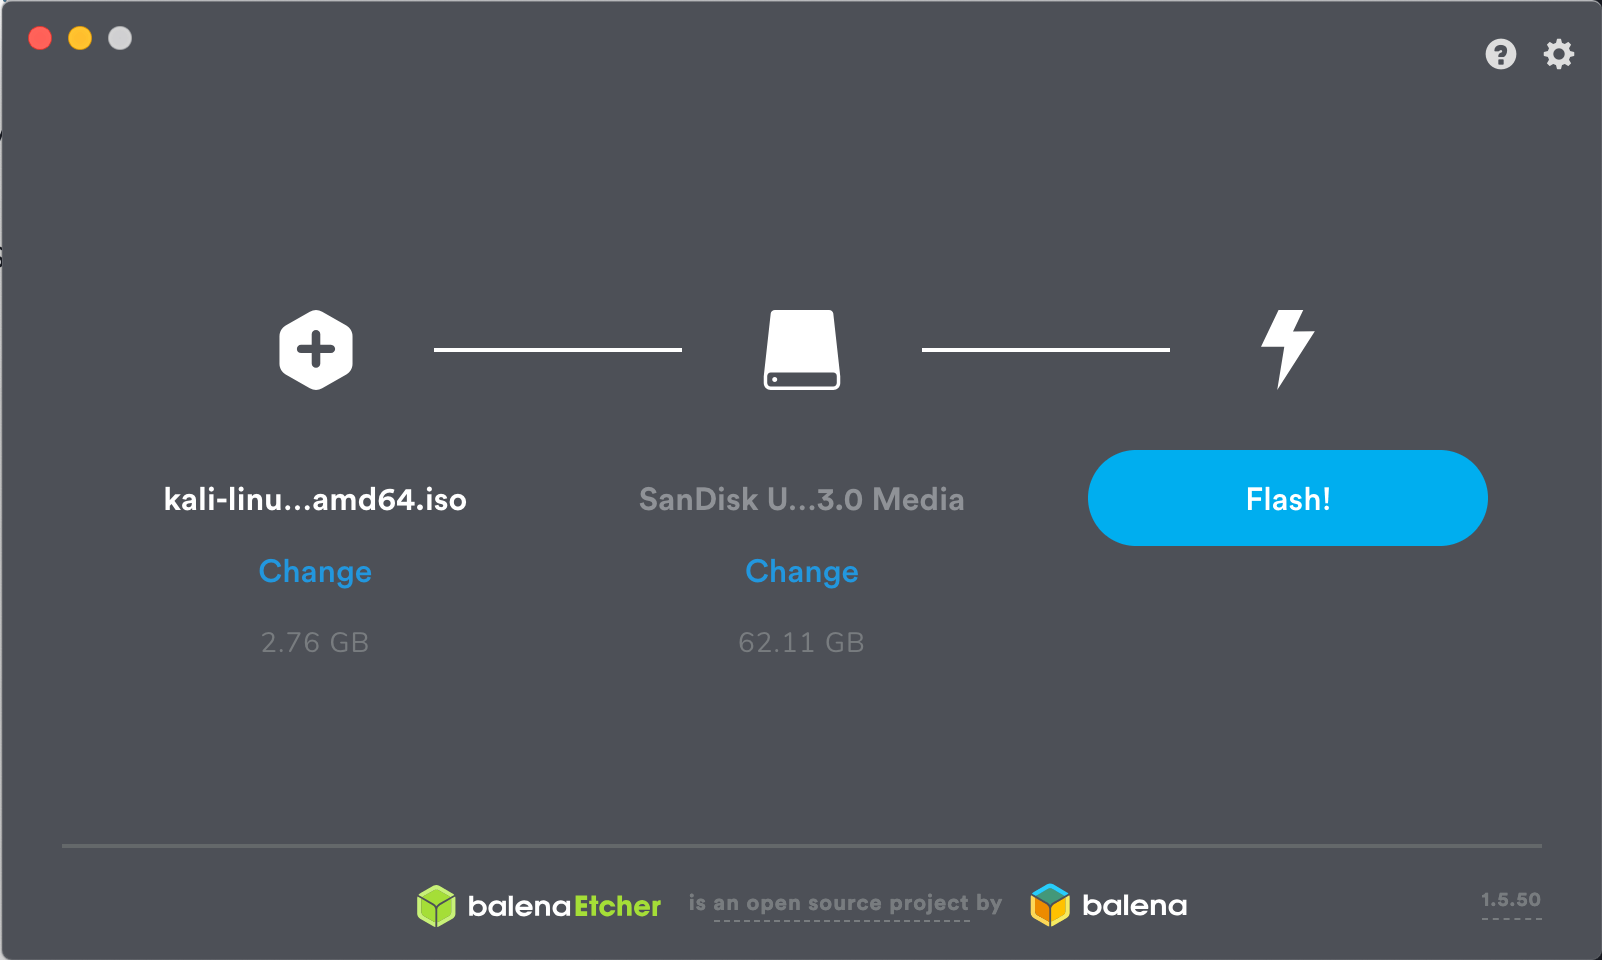
Creating a Bootable Kali USB Drive on Linux (Etcher)
Download and run Etcher.
Choose the Kali Linux ISO file to be imaged with “select image” and verify that the USB drive to be overwritten is the correct one. Click the “Flash!” button once ready.
 3. Once Etcher alerts you that the image has been flashed, you can safely remove the USB drive.
You can now boot into a Kali Live / Installer environment using the USB device.
Updated on: 2021-Sep-27
Author: g0tmi1k
Источник
How to Make a Linux USB Live Disk with the Terminal

When people install Linux these days, for the most part they’re doing it via a USB stick. There are a whole lot of graphical tools on Linux that can help with creating the live disk. These tools are all fine and everything, but what about a command line based option?
How to make a USB live disk with DD and the terminal
Making a USB stick is fairly easy in the command line. All it takes is a flash drive and a single command – the dd command to be exact. It’s a command specifically created for copying files.
Note: please make sure that your flash drive is formatted and all of the files are removed from it.
1. Open up a terminal window and enter the command below.
Are you not sure how this command works exactly? Well, for starters you need to change the /dev/sdX portion of the command to reflect your flash drive. To do that you’ll need to open a terminal and enter the command below.

Once the command is entered, you’ll notice that all hard drive (and similar media) are listed. Using the list, determine which one your drive is. In this case, our USB drive is located at /dev/sdb .
When you’ve found what your device is and changed it in the command to reflect it, you’ll need to change the if=isofile.iso to reflect the changes. Make sure it looks something like this.
For example, if your iso file is in the Downloads folder under your Home directory, here is the command:
Now that everything in the command has been configured, you can execute it. Please note, you’ll need to run this command as root or it won’t work.

The process will begin. It may take a while, and when you enter your command, you’ll just see the password prompt and nothing else. Don’t worry about that, its just dd doing its thing. After a while, you’ll see the terminal prompt exactly how much data was copied and at exactly what rate of speed. This means the creation has been successful.
How to restore your USB drive to normal
Want to put your USB drive back to normal? It’s pretty easy. Just open up a terminal and enter the command below. Soon after your drive should be back to normal.
Note: This command will zero your flash drive. You’ll need to use a partitioning tool like Gparted to create a new partition on it.

Like before, this command will take a while. Just be patient and soon the terminal will print out some details pertaining to what it just did. After that, you can take your favorite partitioning tool, create a new partition on your USB stick and everything will be back to normal.
Conclusion
I love making USB disks with the dd command. Why? It’s the most fool-proof way to create a live disk. I can honestly say that I’ve never had any issues using dd to create my live disks. I can’t say that I’ve had the same amount of success with other tools on Linux.
Derrik Diener is a freelance technology blogger.
Источник


