- How to Create a Disk Partitions in Linux
- Creating a Disk Partition in Linux
- If You Appreciate What We Do Here On TecMint, You Should Consider:
- How to Create Partitions in Linux
- Option 1: Partition a Disk Using parted Command
- Step 1: List Partitions
- Step 2: Open Storage Disk
- Step 3: Make a Partition Table
- Step 4: Check Table
- Step 5: Create Partition
- Option 2: Partition a Disk Using fdisk Command
- Step 1: List Existing Partitions
- Step 2: Select Storage Disk
- Step 3: Create a New Partition
- Step 4: Write on Disk
- Format the Partition
- Mount the Partition
- How To Partition and Format Storage Devices in Linux
- Introduction
- Install the Tools
- Identify the New Disk on the System
- Partition the New Drive
- Choose a Partitioning Standard
- Create the New Partition
- Create a Filesystem on the New Partition
- Mount the New Filesystem
- Mounting the Filesystem Temporarily
- Mounting the Filesystem Automatically at Boot
- Testing the Mount
- Conclusion
How to Create a Disk Partitions in Linux
In order to effectively use storage devices such as hard drives and USB drives on your computer, you need to understand and know how to structure them before using in Linux. In most cases, big storage devices are split into separate portions called partitions.
Partitioning enables you to split your hard drive into multiple parts, where each part acts as its own hard drive and this is useful when you are installing multiple operating systems in the same machine.
In this article, we will explain how to partition a storage disk in Linux systems such as CentOS, RHEL, Fedora, Debian and Ubuntu distributions.
Creating a Disk Partition in Linux
In this section, we will explain how to partition a storage disk in Linux using the parted command.
The first step is to view the partition table or layout on all block devices. This helps you identify the storage device you want to partition. You can do this using parted or fdisk command. We will use the former for purposes of demonstration, as follows, where the -l flag means list partition layout on all block devices.
![]() List Partitions in Linux
List Partitions in Linux
From the output of the above command, there are two hard disks attached to the test system, the first is /dev/sda and the second is /dev/sdb .
In this case, we want to partition hard disk /dev/sdb . To manipulate disk partitions, open the hard disk to start working on it, as shown.
At the parted prompt, make a partition table by running mklabel msdos or gpt, then enter Y/es to accept it.
![]() Make Disk Label
Make Disk Label
Important: Make sure to specify the correct device for partition in the command. If you run parted command without a partition device name, it will randomly pick a storage device to modify.
Next, create a new primary partition on the hard disk and print the partition table as shown.
![]() Create Partition in Linux
Create Partition in Linux
You can create another partition for the reaming space as shown.
![]() Create Another Partition
Create Another Partition
To quit, issue the quit command and all changes are automatically saved.
Next, create the file system type on each partition, you can use the mkfs utility (replace ext4 with the file system type you wish to use).
![]() Create Filesystem Type on Partition
Create Filesystem Type on Partition
Last but not least, to access the storage space on the partitions, you need to mount them by creating the mount points and mount the partitions as follows.
To check if the partitions are actually mounted, run the df command to report file system disk space usage.
![]() Check Partitions Disk Space Usage
Check Partitions Disk Space Usage
Important: You may need to update /etc/fstab file to mount newly created partitions automatically at boot time.
You might also like to read these following related articles:
That’s all! In this article, we have shown how to partition a storage disk, create a file system type on a partition and mount it in Linux systems. You can ask questions or share you thoughts with us via the comment form below.
If You Appreciate What We Do Here On TecMint, You Should Consider:
TecMint is the fastest growing and most trusted community site for any kind of Linux Articles, Guides and Books on the web. Millions of people visit TecMint! to search or browse the thousands of published articles available FREELY to all.
If you like what you are reading, please consider buying us a coffee ( or 2 ) as a token of appreciation.

We are thankful for your never ending support.
Источник
How to Create Partitions in Linux
Home » SysAdmin » How to Create Partitions in Linux
Creating disk partitions enables you to split your hard drive into multiple sections that act independently.
In Linux, users must structure storage devices (USB and hard drives) before using them. Partitioning is also useful when you are installing multiple operating systems on a single machine.
In this step-by-step tutorial, you will learn how to create a partition using the Linux parted or fdisk command.
- A system running Linux
- A user account with sudo or root privileges
- Access to a terminal window / command line (Activities >Search >Terminal)
Option 1: Partition a Disk Using parted Command
Follow the steps below to partition a disk in Linux by using the parted command.
Step 1: List Partitions
Before making a partition, list available storage devices and partitions. This action helps identify the storage device you want to partition.
Run the following command with sudo to list storage devices and partitions:
The terminal prints out available storage devices with information about:
- Model – Model of the storage device.
- Disk – Name and size of the disk.
- Sectorsize – Logical and physical size of the memory. Not to be confused with available disk space.
- PartitionTable – Partition table type (msdos, gpt, aix, amiga, bsd, dvh, mac, pc98, sun, and loop).
- DiskFlags – Partitions with information on size, type, file system, and flags.
Partitions types can be:
- Primary – Holds the operating system files. Only four primary partitions can be created.
- Extended – Special type of partition in which more than the four primary partitions can be created.
- Logical – Partition that has been created inside of an extended partition.
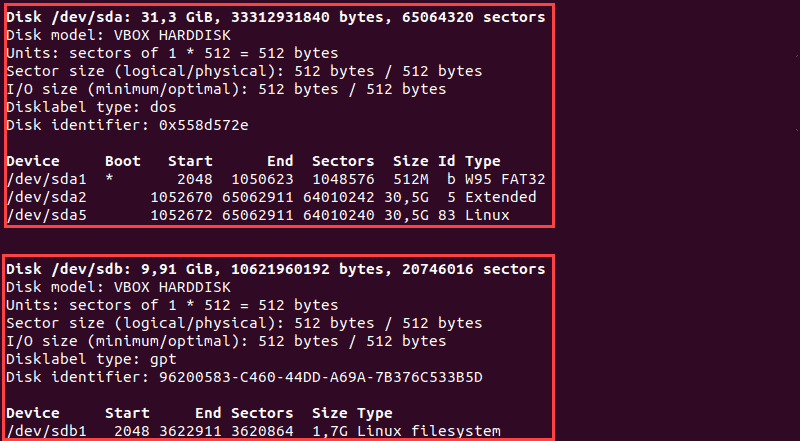
In our example, there are two storage devices ( /dev/sda and /dev/sdb ):
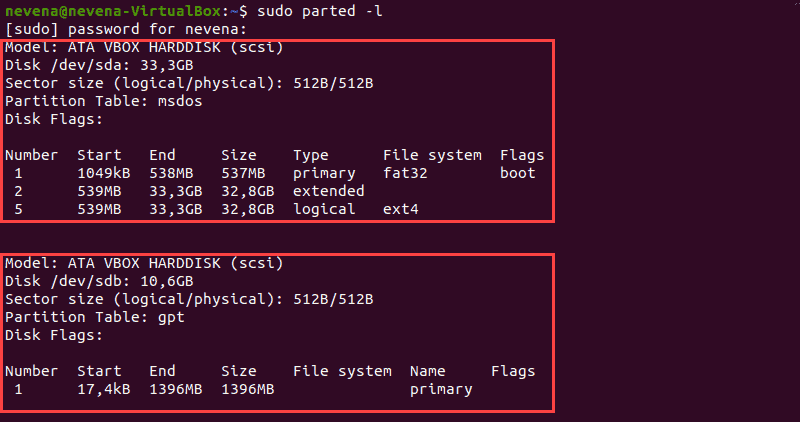
Note: The first storage disk ( dev/sda or dev/vda ) contains the operating system. Creating a partition on this disk can make your system unbootable. Only create partitions on secondary disks ( dev/sdb , dev/sdc , dev/vdb , or dev/vdc ).
Step 2: Open Storage Disk
Open the storage disk that you intend to partition by running the following command:

Always specify the storage device. If you don’t specify a disk name, the disk is randomly selected. To change the disk to dev/sdb run:
The dev/sdb disk is open:

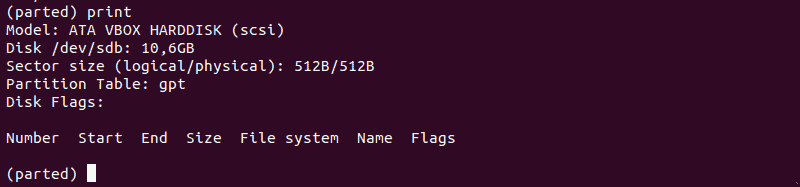
Step 3: Make a Partition Table
Create a partition table before partitioning the disk. A partition table is located at the start of a hard drive and it stores data about the size and location of each partition.
Partition table types are: aix, amiga, bsd, dvh, gpt, mac, ms-dos, pc98, sun, and loop.
The create a partition table, enter the following:
For example, to create a gpt partition table, run the following command:
Type Yes to execute:

Note: The two most commonly used partition table types are gpt and msdos. The latter supports up to sixteen partitions and formats up to 16TB of space while gpt formats up to 9.4ZB and supports up to 128 partitions.
Step 4: Check Table
Run the print command to review the partition table. The output displays information about the storage device:
Note: Run help mkpart command to get additional help on how to create a new partition.
Step 5: Create Partition
Let’s make a new 1854MB-partition using the ext4 file system. The assigned disk start shall be 1MB and the disk end is at 1855MB.
To create a new partition, enter the following:
After that, run the print command to review information on the newly created partition. The information is displayed under the Disk Flags section:
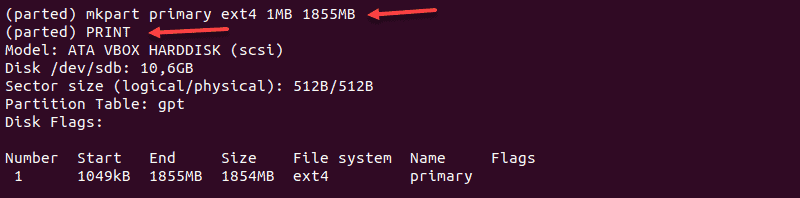
In a gpt partition table, the partition type is the mandatory partition name. In our example, primary is the name of the partition, not the partition type.
To save your actions and quit, enter the quit command. Changes are saved automatically with this command.

Note: The “You may need to update /etc/fstab file” message signals that the partition can be mounted automatically at boot time.
Option 2: Partition a Disk Using fdisk Command
Follow the steps below to partition a disk in Linux by using the fdisk command.
Step 1: List Existing Partitions
Run the following command to list all existing partitions:
The output contains information about storage disks and partitions:
Step 2: Select Storage Disk
Select the storage disk you want to create partitions on by running the following command:
The /dev/sdb storage disk is open:

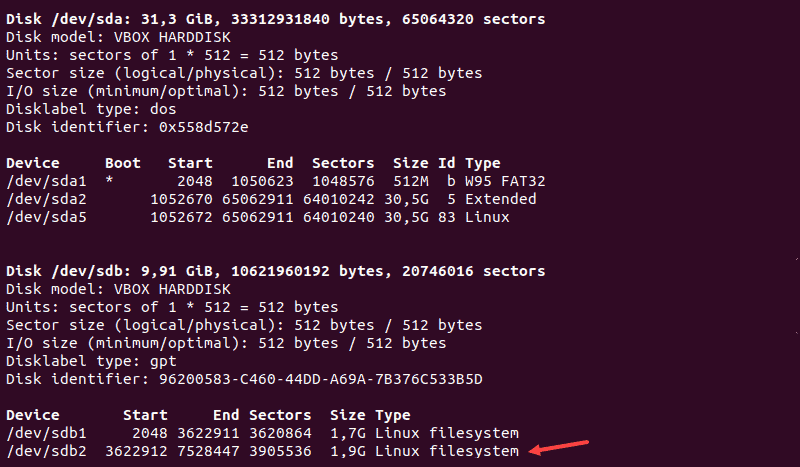
Step 3: Create a New Partition
1. Run the n command to create a new partition.
2. Select the partition number by typing the default number (2).
3. After that, you are asked for the starting and ending sector of your hard drive. It is best to type the default number in this section (3622912).
4. The last prompt is related to the size of the partition. You can choose to have several sectors or to set the size in megabytes or gigabytes. Type +2GB to set the size of the partition to 2GB.
A message appears confirming that the partition is created.

Step 4: Write on Disk
The system created the partition, but the changes are not written on the disk.
1. To write the changes on disk, run the w command:

2. Verify that the partition is created by running the following command:
As you can see, the partition /dev/sdb2 has been created.
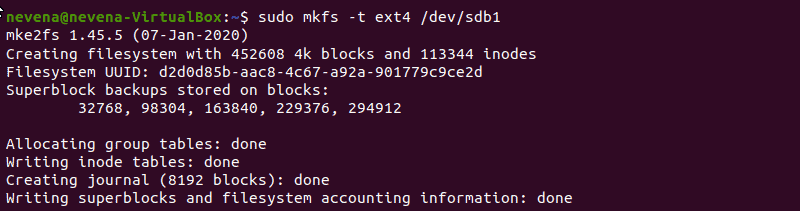
Format the Partition
Once a partition has been created with the parted of fdisk command, format it before using it.
Format the partition by running the following command:
Note: Check out our guide and learn how to format and mount disk partitions in Linux using ext4, FAT32, or NTFS file system!
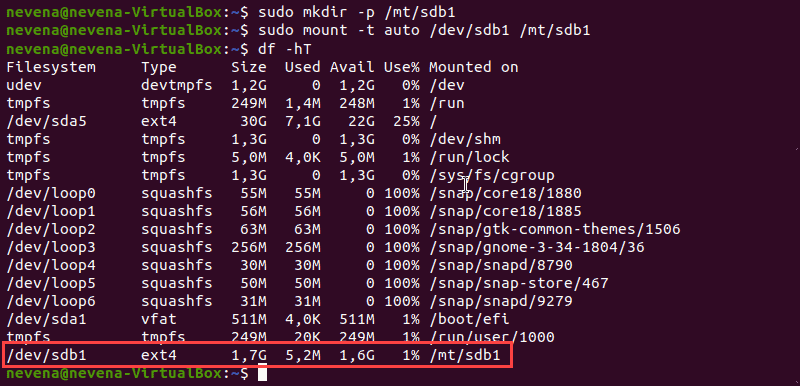
Mount the Partition
To begin interacting with the disk, create a mount point and mount the partition to it.
1. Create a mount point by running the following command:
2. After that, mount the partition by entering:
The terminal does not print out an output if the commands are executed successfully.
3. Verify if partition is mounted by using the df hT command:
Note: If you have NTFS partitions on your hard drive, check out our article on how to mount NTFS partitions in Linux.
After following this step-by-step tutorial, you should have a better understanding on how to partition a disk in Linux by using the parted or fdisk command.
For more Linux commands, see our Linux Commands Cheat Sheet.
Источник
How To Partition and Format Storage Devices in Linux
Published on July 13, 2016
Introduction
Preparing a new disk for use on a Linux system can be quick and easy. There are many tools, filesystem formats, and partitioning schemes that may complicate the process if you have specialized needs, but if you want to get up and running quickly, it’s fairly straightforward.
This guide will cover the following process:
- Identifying the new disk on the system.
- Creating a single partition that spans the entire drive (most operating systems expect a partition layout, even if only one filesystem is present)
- Formatting the partition with the Ext4 filesystem (the default in most modern Linux distributions)
- Mounting and setting up Auto-mounting of the filesystem at boot
Install the Tools
To partition the drive, we’ll use the parted utility. In most cases, this will already be installed on the server.
If you are on an Ubuntu or Debian server and do not have parted yet, you can install it by typing:
If you are on a CentOS or Fedora server, you can install it by typing:
Identify the New Disk on the System
Before we set up the drive, we need to be able to properly identify it on the server.
If this is a completely new drive, the easiest way to find it on your server may be to look for the absence of a partitioning scheme. If we ask parted to list the partition layout of our disks, it will give us an error for any disks that don’t have a valid partition scheme. This can be used to help us identify the new disk:
You should see an unrecognized disk label error for the new, unpartitioned disk:
You can also use the lsblk command and look for a disk of the correct size that has no associated partitions:
Remember to check lsblk in every session before making changes. The /dev/sd* and /dev/hd* disk identifiers will not necessarily be consistent between boots, which means there is some danger of partitioning or formatting the wrong disk if you do not verify the disk identifier correctly.
Consider using more persistent disk identifiers like /dev/disk/by-uuid , /dev/disk/by-label , or /dev/disk/by-id . See our introduction to storage concepts and terminology in Linux article for more information.
When you know the name the kernel has assigned your disk, you can partition your drive.
Partition the New Drive
As mentioned in the introduction, we’ll create a single partition spanning the entire disk in this guide.
Choose a Partitioning Standard
To do this, we first need to specify the partitioning standard we wish to use. GPT is the more modern partitioning standard, while the MBR standard offers wider support among operating systems. If you do not have any special requirements, it is probably better to use GPT at this point.
To choose the GPT standard, pass in the disk you identified like this:
If you wish to use the MBR format, type this instead:
Create the New Partition
Once the format is selected, you can create a partition spanning the entire drive by typing:
If we check lsblk , we should see the new partition available:
Create a Filesystem on the New Partition
Now that we have a partition available, we can format it as an Ext4 filesystem. To do this, pass the partition to the mkfs.ext4 utility.
We can add a partition label by passing the -L flag. Select a name that will help you identify this particular drive:
If you want to change the partition label at a later date, you can use the e2label command:
You can see all of the different ways to identify your partition with lsblk . We want to find the name, label, and UUID of the partition.
Some versions of lsblk will print all of this information if we type:
If your version does not show all of the appropriate fields, you can request them manually:
You should see something like this. The highlighted output indicate different methods you can use to refer to the new filesystem:
Mount the New Filesystem
Now, we can mount the filesystem for use.
The Filesystem Hierarchy Standard recommends using /mnt or a subdirectory under it for temporarily mounted filesystems. It makes no recommendations on where to mount more permanent storage, so you can choose whichever scheme you’d like. For this tutorial, we’ll mount the drive under /mnt/data .
Create the directory by typing:
Mounting the Filesystem Temporarily
You can mount the filesystem temporarily by typing:
Mounting the Filesystem Automatically at Boot
If you wish to mount the filesystem automatically each time the server boots, adjust the /etc/fstab file:
Earlier, we issued a sudo lsblk —fs command to display three filesystem identifiers for our filesystem. We can use any of these in this file. We’ve used the partition label below, but you can see what the lines would look like using the other two identifiers in the commented out lines:
You can learn about the various fields in the /etc/fstab file by typing man fstab . For information about the mount options available for a specific filesystem type, check man [filesystem] (like man ext4 ). For now, the mount lines above should get you started.
For SSDs, the discard option is sometimes appended to enable continuous TRIM. There is debate over the performance and integrity impacts of performing continuous TRIM in this manner, and most distributions include method of performing periodic TRIM as an alternative.
Save and close the file when you are finished.
If you did not mount the filesystem previously, you can now mount it by typing:
Testing the Mount
After we’ve mounted the volume, we should check to make sure that the filesystem is accessible.
We can check if the the disk is available in the output from the df command:
You should also be able to see a lost+found directory within the /mnt/data directory, which typically indicates the root of an Ext* filesystem:
We can also check that the file mounted with read and write capabilities by writing to a test file:
Read the file back just to make sure the write executed correctly:
You can remove the file after you have verified that the new filesystem is functioning correctly:
Conclusion
Your new drive should now be partitioned, formatted, mounted, and ready for use. This is the general process you can use turn a raw disk into a filesystem that Linux can use for storage. There are more complex methods of partitioning, formatting, and mounting which may be more appropriate in some cases, but the above is a good starting point for general use.
Источник


