- How to Boot From a USB Device
- Make your PC boot from a USB flash drive or external hard drive
- How to Boot From a USB Device
- What to Do When the USB Device Won’t Boot
- How to Make Bootable USB Flash Drive from ISO on Windows 10/8/7/Mac
- Method #1: Make Bootable USB from ISO Using Command Prompt
- Method #2: Create A Bootable USB using iSeePassword WizISO
- Method #3: Make Bootable USB from ISO using RMPrepUSB
- Booting from USB Media: A Comprehensive Overview
- How to boot a Mac from USB media
- Boot from USB: Windows
- Linux USB Boot Process
- Creating USB boot media
How to Boot From a USB Device
Make your PC boot from a USB flash drive or external hard drive
:max_bytes(150000):strip_icc()/tim-fisher-5820c8345f9b581c0b5a63cf.jpg)
:max_bytes(150000):strip_icc()/ryanperiansquare-de5f69cde760457facb17deac949263e-180a645bf10845498a859fbbcda36d46.jpg)
There are lots of reasons you might want to boot from a USB device, like an external hard drive or a flash drive, but it’s usually so you can run special kinds of software.
When you boot from a USB device, what you’re doing is running your computer with the operating system installed on the USB device. When you start your computer normally, you’re running it with the operating system installed on your internal hard drive—Windows, Linux, etc.
Time Required: Booting from a USB device usually takes 10–20 minutes, but it depends a lot on if you have to make changes to how your computer starts up.
How to Boot From a USB Device
Follow these easy steps to boot from a flash drive, an external hard drive, or some other bootable USB device.
:max_bytes(150000):strip_icc()/how-to-boot-from-a-usb-device-2626091-D-v1-5b1183bd04d1cf00371e7aeb.png)
If the USB boot option is not first in the boot order, your PC will start «normally» (i.e., boot from your hard drive) without even looking at any boot information that might be on your USB device.
The BIOS on most computers lists the USB boot option as USB or Removable Devices, but some confusingly list it as a Hard Drive option, so be sure to dig around if you’re having trouble finding the right one to choose.
After setting your USB device as the first boot device, your computer will check it for boot information each time your computer starts. Leaving your computer configured this way shouldn’t cause problems unless you plan on leaving the bootable USB device attached all the time.
Attach the USB device to your computer via any available USB port.
:max_bytes(150000):strip_icc()/usb-plug-5c433f4546e0fb0001f804f1.jpg)
Creating a bootable flash drive or configuring an external hard drive as bootable is a task in itself. Chances are you made it to these instructions here because you know whatever USB device you have should be bootable after properly configuring BIOS.
See our How to Burn an ISO File to a USB Drive tutorial for general instructions on doing exactly that, which tends to be the reason most people need to figure out how to boot from one.
Since you’re not actually inside of the operating system at this point, restarting isn’t the same as using normal restart buttons. Instead, BIOS should explain which key to press—such as F10—to save the boot order changes and restart the computer.
Watch for a Press any key to boot from external device. message.
:max_bytes(150000):strip_icc()/boot-from-usb-message-57c76dae3df78c71b65d7c9e.png)
You may be prompted with a message to press a key on some bootable devices before the computer boots from the flash drive or another USB device.
If this happens, and you do nothing, your computer will check for boot information on the next boot device in the list in BIOS (see Step 1), which will probably be your hard drive.
Most of the time, when trying to boot from a USB device, there is no key-press prompt. The USB boot process usually starts immediately.
Your computer should now boot from the flash drive or USB based external hard drive.
What happens now depends on what the bootable USB device was intended for. If you’re booting from Windows 10, Windows 8, or Windows 7 installation files on a flash drive, the operating system setup will begin. If you’re booting from a DBAN flash drive you created, it will start. You get the idea.
What to Do When the USB Device Won’t Boot
If you tried the above steps, but your computer didn’t boot from the USB device, check out some of the tips below. There are several places that this process can get hung up at.
Recheck the boot order in BIOS (Step 1). The number one reason a bootable flash drive or another USB device won’t boot is that BIOS isn’t configured to check the USB port first.
Didn’t find a «USB Device» boot order listing in BIOS? If your computer was manufactured around 2001 or before, it might not have this ability.
If your computer is newer, check for some other ways that the USB option might be worded. In some BIOS versions, it’s called «Removable Devices» or «External Devices.»
Remove other USB devices. Other connected USB devices, like printers, external media card readers, etc., could be consuming too much power or causing some other problem, preventing the computer from booting from a flash drive or another device. Unplug all other USB devices and try again.
Or, if you have multiple bootable devices plugged in at once, the computer might simply be booting to the wrong device, in which case the easiest fix would be to remove all USB storage devices but the one you want to use right now.
Copy the files to the USB device again. If you created the bootable flash drive or external hard drive yourself, which you probably did, repeat whatever steps you took again. You may have made a mistake during the process.
See How to Burn an ISO File to USB if you started with an ISO image. Getting an ISO file onto a USB drive, like a flash drive, isn’t as easy as just expanding or copying the file there.
Switch to another USB port. The BIOS on some motherboards only checks the first few USB ports. Switch to another USB port and restart your computer.
Update your motherboard’s BIOS. If your computer is ancient, the BIOS version running on the motherboard may not support booting directly from a USB device. Try flashing the BIOS and checking again for this feature.
How to Make Bootable USB Flash Drive from ISO on Windows 10/8/7/Mac
Creating USB driver in the latest Windows version has become a lot easier with the in-built ISO burners. Gone are the days when you used to download an ISO image file of the operating system and burn it into CD/DVD. USB flash drives has completely destroyed the usage of CD/DVDs and the main reason is its size, speed and portability. Bootable USB drivers simply means that you are preparing a USB flash drive to install an operating system. Essentially, creating bootable USB drivers to install operating system of your choice varies from each Windows and Mac versions.
In this short guide, we will show how to make or create a bootable USB from ISO file on all Windows version computers. Making a bootable driver is not similar to copying an ISO image file directly on the USB flash drive. Before creating a bootable USB from ISO, please remember to backup all data contained on your USB flash drive as using any trick from this guide will entirely wipe the data from your USB drive.
If you’re locked out of Windows 7 and can’t recall the password at all, don’t worry, resetting Windows 7 password will be extremelyВ easy with the help of Windows Password Recovery Pro.
Method #1: Make Bootable USB from ISO Using Command Prompt
This part can be applied from any Windows version including Windows 10, 8, 7, XP and other older versions. It is indeed an old-fashioned method but it works like charm all the time. Here’s what to do –
Step 1. Insert the USB flash drive on the computer and let the computer automatically detect it.
Step 2. Click on Start and start command prompt.
Step 3. Type «DISKPART» and press enter to start the disk part utility.
Step 4. From here, you will have to enter a series of command. First, type «List Disk» to see all the available drivers on the computer. Check the disk number of your flash drive and remember it.
Step 5. Next, type «Select Disk 1» considering Disk 1 is the USB flash driver and press Enter.
Step 6. Now keep on typing these series of commands.
— Clean
— create partition primary
— select partition 1
— active
— format fs=fat32
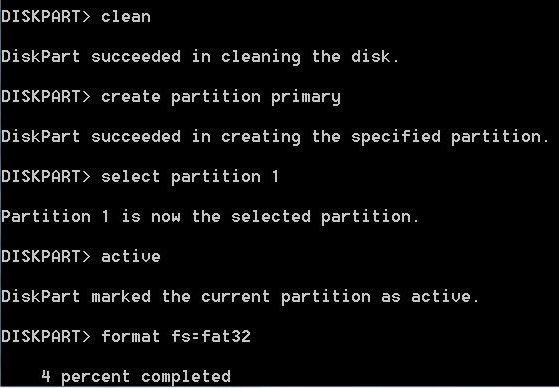
When the formatting process is completed, simply type «Assign» followed by exit.
Step 7. Now copy all the files of your operating system on to the USB flash drive and it is done. You can now install your operating system using the bootable USB flash drive.
Method #2: Create A Bootable USB using iSeePassword WizISO
Making a Windows install disk isn’t as simple as formatting a drive or copying ISO file to your USB drive on Windows and Mac OS X. You need to use a professional ISO Editor to write the ISO image to your USB instead of copying. Are you confused with the steps mentioned in above parts or they just didn’t work? If that was the case, then it is the time to give a try on iSeePassword WizISO, it’s an amazing tool to burn ISO image to USB with a built powerful burning engine.
WizISO a ISO Toolkit which allows you to burn ,extract, edit, create and copy disc without losing the bootableВ information. This program provides two partition style MBR and UEFI model which allows you to make UEFI bootable drive. What’s more. If you want to edit your ISO file,then just import it to the program and directly edit, add, delete, rename your ISO file then save it to a standard ISO format. . It supports 200+ USB brands mo matter it is old or new. The most important part is that it is super easy to use. Not convinced? Please check the tutorial below:
Step 1. Download iSeePassword WizISO from this website and install it on the computer. (Windows version and Mac version all available).
Step 2. Open the program after installation and the main interface is shown like blow.
Step 3. Click «Browse» button to find local ISO file and add it to computer.
Step 4. Now insert an USB drive to the computer and select the drive name from the list undert «Create A Bootable USB».
Step 5. Finally, click «Burn» button to start the burning process. It will take around 15 minutes to fully write the ISO file to USB. The actual time is depending on how lagre the file is. After that, you can take out the USB and use it to fix system issues.
Pro:
- High success rate with strong burning engine.
- User-friendly interface that everyone can use it freely.
- Take less time for burning.
- Support both DVD and USB as burning media.
- Automatically detect correct file format before burning.
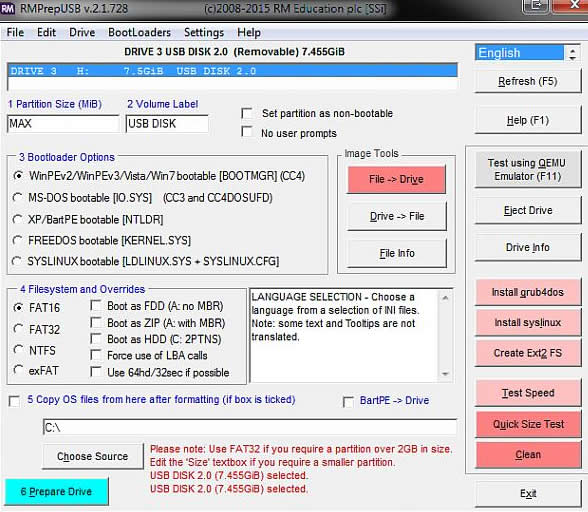
Method #3: Make Bootable USB from ISO using RMPrepUSB
RMPrepUSB is yet another ISO image file burning program that helps to create bootable USB flash drives. It is absolutely free to use and it’s an open source tool. Learn how to use Rufus.
Step 1. Download it from the official website and store it on your computer.
Step 2. It’s ready-to-use program that needs no installation at all. You can open the program just by double clicking on it.
Step 3. Insert the USB flash drive and let it be recognized by the program automatically.
Step 4. Select the device name that you are using. It is recommended to use an 8 GB flash drive to run everything smoothly. Leave the rest of the options to the default settings and select the ISO image file stored in your computer. Make sure to check «Create a bootable disk» to make the USB driver bootable.
Step 5. Click on «Start» to initiate the burning process and once it is finished, you can eject the flash drive. It now a ready-made bootable USB driver.
Cons:
- Quite complicated, not intended for the beginner.
- Don’t support UEFI boot.
- Don’t provide any support.
Creating a bootable USB flash drive can be really a hectic task if you don’t know the right procedure. Hopefully, you guys were able to create a bootable USB driver by using the methods shared in this guide. If you have any easier method than this then don’t forget to share it with us. Stay tuned for more!

Vicky is a professional Windows technology author with many experience, focusing on computer technology. She’s very much enjoy helping people find solutions to their problems. Her knowledge and passion always drive her to discover everything about technology.
Booting from USB Media: A Comprehensive Overview
While fans of different operating systems might debate which one is the most stable, reliable, flexible or user-friendly, there’s one inarguable point: Every machine – regardless of the OS – can run into issues.
And while users historically would pop a boot media disk into their DVD or CD drive, many computers no longer come with optical disk drives. As a result, booting from USB media is becoming the standard.
How you start that rescue media can vary depending on the operating system you are using, but there are a few general guidelines that can help get your machine started, regardless of the OS you prefer.
So if your system is unstable, you need to run a diagnostic tool on the hard drive, or you just want to load a Linux desktop just to see what it’s all about, let’s look at how you start your machine using rescue USB boot media.
How to boot a Mac from USB media
Getting your Mac to load from a USB drive is fairly straightforward.
- Insert the USB boot media into an open USB slot.
- Press the Power button to turn on your Mac (or Restart your Mac if it’s already on).
- When you hear the startup chime, press and hold the Option key. Holding that key gives you access to OS X’s Startup Manager. Once the Startup Manager screen appears, release the Option key. The utility will look for any available drives that include bootable content.
- Using either the pointer or arrow keys on the keyboard, select the USB drive you wish to boot from.
- Once selected, either hit the Return key or double-click your selection. The machine will start to boot from the USB drive.
NOTE: Have multiple USB devices connected to your Mac? Don’t worry. The Startup Manager only lists drives that include bootable content.
Boot from USB: Windows
Starting your PC using USB rescue media is not difficult, although it first requires an adjustment in the BIOS (Basic Input Output System). That’s because the BIOS settings include the boot sequence the machine follows when starting up. The boot order tells the machine which devices to search for the software needed to launch the computer and the priority each device in that search.
If you’re booting from USB media, you must change the BIOS boot order so the USB device is listed first. Otherwise the computer will load from the hard drive as normal.
Start by plugging the thumb drive into a USB port. Then to change the BIOS boot sequence:
- Press the Power button for your computer.
- During the initial startup screen, press ESC, F1, F2, F8 or F10. (Depending on the company that created your version of BIOS, a menu may appear.)
- When you choose to enter BIOS Setup, the setup utility page will appear.
- Using the arrow keys on your keyboard, select the BOOT tab. All of the available system devices will be displayed in order of their boot priority. You can reorder the devices here.
- Move USB to be first in the boot sequence.
NOTE: If you cannot find USB or Removable Devices among the device options, your BIOS may list it under Hard Drive Devices. In that case, you’ll need to:
- Move Hard Drive Devices to the top
- Expand to show all hard drive device options
- Move USB device to the top of that hard drive list
In the future, your computer will first check the USB port for boot media when starting up. That won’t be a problem, since the BIOS will move to the next device in the boot sequence . unless you keep the boot media in the USB port. Then the system will launch from that device every time.
Linux USB Boot Process
To boot Ubuntu from USB media, the process is very similar to the Windows instructions above.
- Confirm the BIOS boot sequence lists the USB drive first, or make that change as needed.
- After the USB flash drive is inserted into the USB port, press the Power button for your machine (or Restart if the computer is running).
- The installer boot menu will load, where you will select Run Ubuntu from this USB.
- Ubuntu will launch and you can begin to working in the system – setting preferences, reconfiguring the system as needed, or running any diagnostic tools.
Creating USB boot media
Regardless of the operating system you are using, booting your machine from USB media does not need to be difficult. A general understanding how your system loads can provide the basics needed to understand what is going on when you use boot media.
Creating USB boot media doesn’t need to be difficult either, although there are several options to consider.
For Mac users, we recommend visiting Apple’s support page on USB boot media. It provides guidance that is specific to the iteration of OS X you are running (i.e. Sierra, High Sierra, Yosemite, etc.) to help you get the boot version you need.
Windows and Linux users might consider Acronis Disk Director 12, which includes an intuitive Boot Media Builder that streamlines the process and offers tremendous flexibility for the type and kind of boot media you can create, including WinPE media.


