- How to mount ISO images on Windows 10
- How to mount ISO image with File Explorer
- Mount image with double-click
- Mount image from context menu
- Mount image from ribbon menu
- Unmount image
- How to mount ISO image with PowerShell
- Mount ISO image command
- Unmount ISO image command
- More Windows 10 resources
- Halo: MCC’s live service elements make it better, not worse
- Microsoft’s Surface Duo is not ‘failing up’
- Here’s what you can do if Windows 10 update KB5001330 is causing issues
- These external monitors go perfectly with the Lenovo ThinkPad X1 Carbon
- How to Mount and Burn ISO Files in Windows 10 and Previous
- How to Mount and Unmount an ISO File in Windows
- How to Burn an ISO file to Disc
- How to Mount or Burn an ISO Image in Windows 8 and Windows 10
- The Windows File Explorer lets you burn disc image files to a DVD
- ISO Burning vs. Mounting
- How to Mount an ISO File in Windows 8 or Windows 10
- How to Unmount an ISO Image in Windows
- How to Burn an ISO File in Windows 8 or Windows 10
- Tutorial: How to Mount an ISO File Using WinCDEmu
How to mount ISO images on Windows 10
 Source: Windows Central
An ISO image is a container format designed to store the contents of a physical disk (CD, DVD, or Blu-ray). Software companies usually use this file format as a medium to distribute the applications and tools without the need to ship physical media, which can be costly and time-consuming. For example, Microsoft uses this format to distribute previews of Windows 10 to testers and many other products.
Although you can find a lot of tools to work with images, Windows 10 includes the ability to mount and mount ISO files natively without the need for extra software.
In this Windows 10 guide, we’ll walk you through the steps to mount and unmount the ISO images using File Explorer as well as PowerShell commands.
How to mount ISO image with File Explorer
On Windows 10, you can access the content of an image in at least three different ways using File explorer. You can double-click the file, you can use the content menu option, or the option available in the ribbon menu.
Mount image with double-click
To quickly mount an ISO file on Windows 10, use these steps:
- Open File Explorer.
- Browse to the folder with the ISO image.
Double-click the .iso file file to mount it.
 Source: Windows Central
Once you complete these steps, the ISO file will open like any other folder, allowing you to access and extract the contents as necessary.
Mount image from context menu
To mount an ISO image with the File Explorer context menu, use these steps:
- Open File Explorer.
- Browse to the folder with the ISO image.
Right-click the .iso file and select the Mount option.
 Source: Windows Central
Once you complete the steps, you can access the contents of the image by selecting the virtual drive from the left navigation pane.
Mount image from ribbon menu
To mount an image with the ribbon menu, use these steps:
- Open File Explorer.
- Browse to the folder with the ISO image.
- Select the .iso file.
- Click the Disk Image Tools tab.
Click the Mount button.
 Source: Windows Central
If you have a third-party tool to open compressed files (such as .zip, .tar, .rar, etc.), it’s possible the tool may also be configured as the default application to open ISO images. When this happens, you won’t see an option to mount images. However, you can still right-click, select the Open with submenu, and select the Windows Explorer option to mount the ISO.
Unmount image
Once you are no longer using the image, you can quickly unmount the file by right-clicking the virtual drive under This PC in File Explorer and selecting the Eject option.
- Open File Explorer.
- Expand This PC from the left navigation pane.
Right-click the virtual drive and select the Eject option.
![]() Source: Windows Central
Source: Windows Central
After you complete these steps, the image will no longer be accessible until you mount it again.
How to mount ISO image with PowerShell
It’s also possible to mount and unmount an image using commands with PowerShell.
Mount ISO image command
To mount an ISO image using a PowerShell command, use these steps:
- Open Start.
- Search for PowerShell, right-click the top result, and select the Run as administrator option.
Type the following command to mount an ISO image and press Enter:
Mount-DiskImage -ImagePath «PATH\TO\ISOFILE»
In the command, make sure to replace the «PATH\TO\ISOFILE» with the actual path of the .iso file.
For example, this command mounts an image in the «E:\» virtual drive:
Mount-DiskImage -ImagePath «E:\Windows10.iso»
 Source: Windows Central
Once you complete the steps, the ISO image will mount, and you will be able to access the contents to install the application or extract the image contents from the newly-available drive letter.
Unmount ISO image command
To unmount an image with PowerShell, use these steps:
- Open Start.
- Search for PowerShell, right-click the top result, and select the Run as administrator option.
Type the following command to mount an ISO image and press Enter:
Dismount-DiskImage -ImagePath «PATH\TO\ISOFILE»
In the command, make sure to replace the «PATH\TO\ISOFILE» with the actual path of the .iso file.
For example, this command removes the mount for an image in the «E:\» virtual drive:
Dismount-DiskImage -ImagePath «E:\Windows10.iso»
Source: Windows Central
After you complete the steps, the virtual drive will be removed, and the image will no longer be accessible until you mount it again.
More Windows 10 resources
For more helpful articles, coverage, and answers to common questions about Windows 10, visit the following resources:
![]()
Halo: MCC’s live service elements make it better, not worse
Halo: The Master Chief Collection is more popular than ever, but some fans don’t agree with the live service approach 343 Industries has taken with it. Here’s why those elements are, at the end of the day, great for the game and for Halo overall.
![]()
Microsoft’s Surface Duo is not ‘failing up’
Microsoft announced this week that it was expanding Surface Duo availability to nine new commercial markets. While Surface Duo is undoubtedly a work in progress, this is not a sign of a disaster. It’s also doesn’t mean that Surface Duo is selling a ton either. Instead, the reason for the expansion is a lot more straightforward.
![]()
Here’s what you can do if Windows 10 update KB5001330 is causing issues
In this guide, we’ll show you the steps to get rid of the update KB5001330 to fix profile, gaming, and BSoD problems with the Windows 10 October 2020 Update and May 2020 Update.
![]()
These external monitors go perfectly with the Lenovo ThinkPad X1 Carbon
The Lenovo ThinkPad X1 Carbon is an excellent laptop, but what if you want to project the display onto a larger screen? You’ll need an external monitor for that. Here are our favorite options.
How to Mount and Burn ISO Files in Windows 10 and Previous
By Melanie Pinola 28 January 2016
Microsoft and other companies often distribute software as an ISO file, an exact copy of a DVD. In Windows 8 and Windows 10, you can easily work with these files without needing third-party software. Here’s how to mount the ISO image so you can see the contents and burn it to a physical disc so you can install the software on any computer.

How to Mount and Unmount an ISO File in Windows
Mounting or opening an ISO file is as simple as double-clicking on it, thanks to Windows’ built-in ISO-handling capabilities. In Windows 7 and earlier, you’d need to use a utility like Virtual Clone Drive to mount an ISO.
When you double-click on an ISO file in Windows 8 and above, however, it opens to show you the contents, just as if you were browsing a CD or DVD.
In fact, it shows up as a virtual DVD drive and is assigned a drive letter. You can open and copy individual files and folders from the ISO once it’s mounted.
When you no longer need to work with the ISO, here’s how to unmount it: Right-click on the drive and select Eject.
How to Burn an ISO file to Disc
Creating a disc of the ISO contents, whether as a backup or to install the software on other computers, is a cinch too.
1. Insert a blank CD or DVD in your writable optical drive.
2. Right-click on the ISO file and select «Burn disk image.»
3. Select «Verify disc after burning» to make sure the ISO was burned without any errors.
4. Click Burn.
That’s it! Windows Disc Image Burner will do its thing and let you know when it’s finished.
Windows 10 doesn’t include any built-in way to create an ISO file from a DVD, but there are free utilities that will help you do this, such as open-source InfraRecorder.
How to Mount or Burn an ISO Image in Windows 8 and Windows 10
The Windows File Explorer lets you burn disc image files to a DVD
Windows offers built-in support for mounting and burning image files using the File Explorer app. Here’s how to mount and burn an ISO file to a DVD in Windows 8 and later.
Instructions in this article apply to Windows 10, Windows 8.1, and Windows 8.
ISO Burning vs. Mounting
ISO files, also called disc image files, contain an exact copy of a disc, whatever that disc may contain. When you burn an ISO file to a DVD, you are creating an exact duplicate of the original disc, not just the files on it. If the original is bootable, the copy will be too; if the original includes copyright protections, the copy will too.
When you mount a disc image file, Windows creates a virtual drive for your ISO file as though it were a physical disc. This allows you to watch the movie, listen to the music, or install the application from the file without ever having to burn the data to a disc.
How to Mount an ISO File in Windows 8 or Windows 10
To mount a disc image file in Windows:
Select the ISO file you want to mount in the File Explorer, then select the Disc Image Tools tab at the top of the window.
The Disc Image Tools tab only shows up when an ISO file is selected.
:max_bytes(150000):strip_icc()/001-mount-burn-iso-windows-8-10-3506971-98bbb48bc1e04764b4a115aaee6f81f6.jpg)
Select Mount in the top-left corner.
:max_bytes(150000):strip_icc()/002-mount-burn-iso-windows-8-10-3506971-58703a1c5c904e878e1690eca56657c4.jpg)
Windows will create a virtual drive and immediately open the contents of the image for you to view.
If you click This PC/My Computer in the left pane of the File Explorer window, you’ll see your virtual disc drive appears right along with any other drives you have installed on the system. At this point, you can copy files from the image to your hard drive, install an application, or do whatever you want.
How to Unmount an ISO Image in Windows
Once done, you’ll want to unmount the image file to take back the system resources used. To do so, right-click the virtual drive in the File Explorer window and select Eject.
:max_bytes(150000):strip_icc()/004_mount-burn-iso-windows-8-10-3506971-243810011ecd4c9e838626c3ae04fe86.jpg)
How to Burn an ISO File in Windows 8 or Windows 10
Insert a disc into your disc drive.
Make sure you pick a disc that matches the original format. For example, don’t try to burn a DVD image to a CD-R.
Select the ISO file you want to mount in the File Explorer, then select the Disc Image Tools tab at the top of the window.
Select Burn in the top-left corner.
:max_bytes(150000):strip_icc()/003-mount-burn-iso-windows-8-10-3506971-fe37bf82eeca46768834085e91f16f18.jpg)
Select your disc burner, then select Burn.
You have the option to select Verify disc after burning to make sure no files were corrupted. This will add considerable time to the process.
Tutorial: How to Mount an ISO File Using WinCDEmu
An ISO image is simply a «virtual copy» of an optical CD/DVD disc. Lots of software is distributed in the form of ISO images (e.g. you can download Windows 7 Service Pack ISO from Microsoft website). To mount an ISO file means to access its contents as if it was recorded on a physical medium and then inserted in the optical drive. If you downloaded a software in the form of an ISO image and want to install it, mounting it will be faster and easier than recording it on an actual disc.
To mount an image you need to install WinCDEmu. Then follow these steps:
- Open the folder containing the image file:

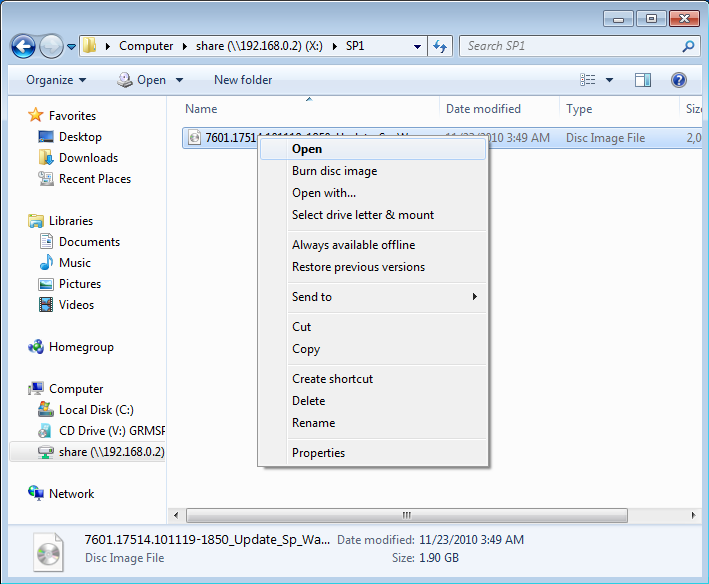
- Double-click at the image. Alternatively, you can right-click and select «Select drive letter & mount» from the context menu.
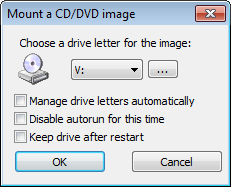
- Click at the OK button or press enter. If you don’t want to see this dialog every time you mount an image, set the «Manage drive letters automatically» checkbox.
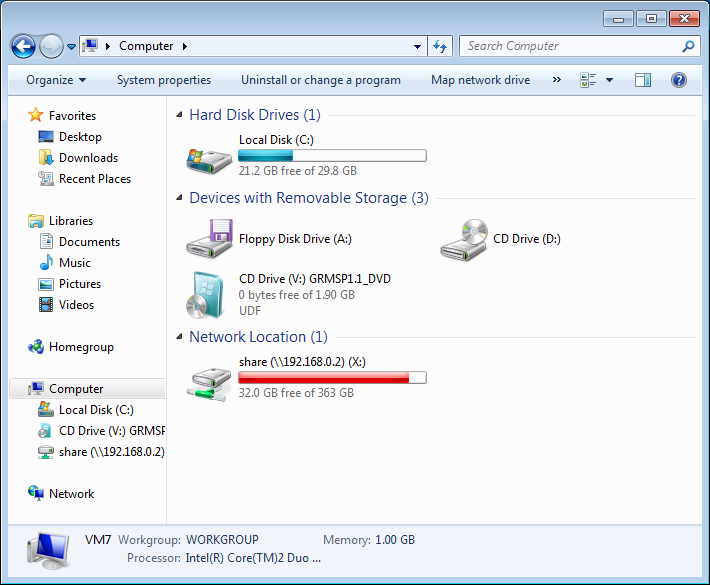
- A new virtual drive will appear among all other drives in the «computer» folder:
- You can use the virtual drive the same way as you would use a «real» optical disc — browse its contents, open files, start programs.
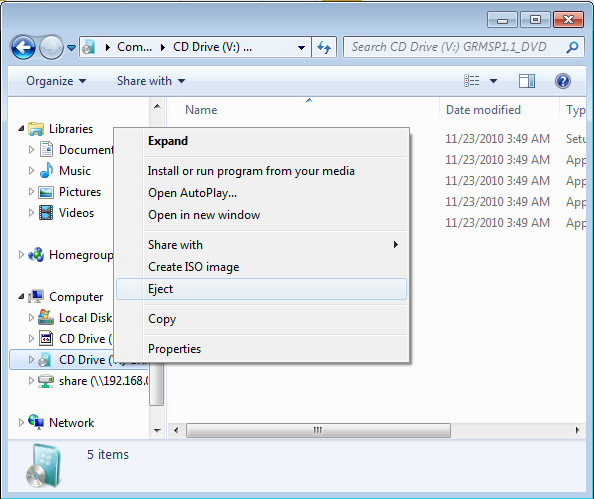
- Once you are done with the image, right-click on the virtual drive and select «Eject»:
- You can alternatively unmount the image by double-clicking at the image file again.
Read other WinCDEmu tutorials to learn how to create images with WinCDEmu and edit various settings.
If you have any questions or problems, feel free to post on WinCDEmu forum.


