- How to mount usb drive in a linux system
- Step 1: Plug-in USB drive to your PC
- Step 2 – Detecting USB Drive
- Step 3 – Creating Mount Point
- Step 4 – Delete a Directory in USB
- Step 5 – Formatting the USB
- Format vs Fat FileSystem
- Format NTFS FileSystem
- Format EXT4 FileSystem
- Ubuntu Documentation
- Introduction
- Automounting
- Mounting
- Configuring Automounting
- Configuring Program Autostart
- Unmounting/Ejecting
- Auto-mounting (Ubuntu Server)
- Manually Mounting
- Using Disks
- Using mount
- Get the Information
- Create the Mount Point
- Mount the Drive
- Unmounting the Drive
- Using pmount
- The Importance of Unmounting
- Other Useful Commands
- Troubleshooting
- Interfering services
- Unclean LogFile
- User Privileges
- Preferences
- USB 2 Issues
- old kernels workaround
- recent kernels workaround, from Karmic
- Buffer I/O Errors
- Device suddenly becomes read-only
- USB-Device is or becomes read-only without errors
- General tip
- Seeking Further Help
- Other Resources
- How to Mount USB Drive on Linux
- About the author
- Zeeman Memon
How to mount usb drive in a linux system
Do you know “how to use USB memory sticks with Linux”, If you are not sure then this article describes “how to mount USB drive on a Linux system with command line interface”
Universal serial bus, or USB (also known as Flash drive), is an electronic communications protocol that is commonly used in computer accessories and other small devices. If you have an up-to-date Linux system and a modern Desktop environment, your device should show up on your desktop, with no need to open a console. There are few important factors which are involved in learning how to mount USB drive with Linux machine.
Following are the step by step instructions to understand further –
Step 1: Plug-in USB drive to your PC
Step 2 – Detecting USB Drive
After you plug in your USB device to your Linux system USB port, It will add new block device into /dev/ directory. To verify it, use the following command –
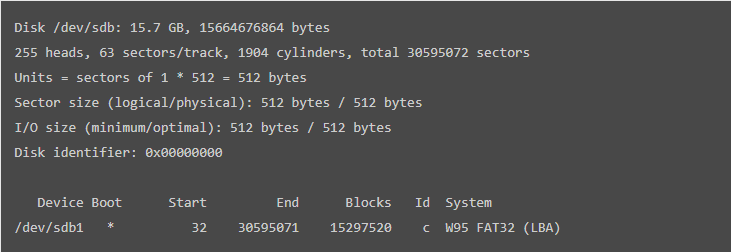
The sample output should be like this –
We can observe from the above result that, device boot, blocks, id and system format are displayed.
Step 3 – Creating Mount Point
To mount the USB, use the following command –
To create a directory in the mounted device, use the following commands –
The above command creates a directory called john in USB device.
Step 4 – Delete a Directory in USB
To delete a directory in USB, use the following command –
Step 5 – Formatting the USB
You should unmount the device first to format the USB device, then use the following command to unmount the device –
Now use either of the commands as per file system based on your requirement. To format a USB drive, users generally prefer VFAT or NTFS file systems because they can be easily mounted on Windows operating systems and Linux systems.
Format vs Fat FileSystem
To format USB with vFat File System, use the following command –
Format NTFS FileSystem
To format a USB Flash Drive with NTFS file system, use the following command –
Format EXT4 FileSystem
To format a USB with EXT4 file system, use the following command –
Congratulations! Now, you know “How to Mount USB Drive in a Linux System?”. We’ll learn more about these types of commands in our next Linux post. Keep reading!
Источник
Ubuntu Documentation
Introduction
This page explains how to use USB drives, like external hard disks and USB flash drives (aka USB sticks, thumb drives, pen drives, etc). The material here also applies to flash cards (like in your digital camera).
USB storage devices have the enormous advantage that for the most part they use a standard set of protocols. Thus, instead of needing individual drivers, as does much computer hardware, a standard driver permits access to the devices, making them very portable and able to easily work on many platforms.
For help with internal hard drives, see Fstab and MountingWindowsPartitions.
Automounting
Mounting
By default, storage devices that are plugged into the system mount automatically in the /media/ directory, open a file browser window for each volume and place an icon on your desktop. The rationale for this slight change of behavior can be found here. If you plug in a usb hard disk with many partitions, all of the partitions will automatically mount. This behaviour may not be what you want; you can configure it as shown below.
If the volumes have labels the icons will be named accordingly. Otherwise, they will be named «disk», «disk-1» and so on.
To change the volume label see RenameUSBDrive.
Configuring Automounting
To enable or disable automount open a terminal and type:
Browse to org.gnome.desktop.media-handling.
The automount key controls whether to automatically mount media. If set to true, Nautilus will automatically mount media such as user-visible hard disks and removable media on start-up and media insertion.
Another key, org.gnome.desktop.media-handling.automount-open, controls whether to automatically open a folder for automounted media.
If set to true, Nautilus will automatically open a folder when media is automounted. This only applies to media where no known x-content type was detected; for media where a known x-content type is detected, the user configurable action will be taken instead. This can be configured as shown below.
Configuring Program Autostart
To control which programs automatically start when you plug in a device, go to System-Settings — Details — Removable Media.
For more complex scenarios, see UsbDriveDoSomethingHowto.
Unmounting/Ejecting
Before you disconnect the device, don’t forget to unmount it. This can be done in one of the following ways:
- Right-click the desktop icon and select «Unmount» (or in some cases, «Eject»).
- In the file manager window, click on the «eject» button next to the name of the mounted volume.
- Right-click the icon in the launcher and select «Unmount».
Auto-mounting (Ubuntu Server)
By default, disk drives do not auto-mount in Ubuntu Server Edition. If you are looking for a lightweight solution that does not depend on HAL/DBUS, you can install «usbmount».
Manually Mounting
Using Disks
Disks (the GNOME disk utility) is an application for visually managing disk drives and media. When you run it, you will see a list of your drives, including USB drives. If you click a drive on the list, you can view its details, and you can click the triangle-shaped button (Play button) to mount the drive. (This method works even when the drive does not auto-mount.)
Using mount
Get the Information
Sometimes, devices don’t automount, in which case you should try to manually mount them. First, you must know what device you are dealing with and what filesystem it is formatted with. Most flash drives are FAT16 or FAT32 and most external hard disks are NTFS. Type the following:
Find your device in the list. It is probably something like /dev/sdb1. For more information about filesystems, see LinuxFilesystemsExplained.
Create the Mount Point
Now we need to create a mount point for the device. Let’s say we want to call it «external». You can call it whatever you want, but if you use spaces in the name it gets a little more complicated. Instead, use an underscore to separate words (like «my_external»). Create the mount point:
Mount the Drive
We can now mount the drive. Let’s say the device is /dev/sdb1, the filesystem is FAT16 or FAT32 (like it is for most USB flash drives), and we want to mount it at /media/external (having already created the mount point):
The options following the «-o» give you ownership of the drive, and the masks allow for extra security for file system permissions. If you don’t use those extra options you may not be able to read and write the drive with your regular username.
Otherwise, if the device is formatted with NTFS, run:
Note: You must have the ntfs-3g driver installed. See MountingWindowsPartitions for more information.
Unmounting the Drive
When you are finished with the device, don’t forget to unmount the drive before disconnecting it. Assuming /dev/sdb1 is mounted at /media/external, you can either unmount using the device or the mount point:
You cannot unmount from the desktop by right-clicking the icon if the drive was manually mounted.
Using pmount
There is a program called pmount available in the repositories which allows unprivileged users to mount drives as if they were using sudo, even without an entry in /etc/fstab. This is perfect for computers that have users without RootSudo access, like public terminals or thin clients.
pmount can be used with the same syntax as mount (but without sudo), or quite simply as follows:
Example:
- This will mount the device /dev/sdb1 at /media/flash_drive.
If you leave off the label option, it will mount by default at /media/device.
To unmount the device, use pumount, like so:
For more help, see the man pages for pmount and pumount.
The Importance of Unmounting
Before disconnecting devices, you must unmount them first. This is similar to «Safely Remove» in Windows in that the device won’t unmount until data is finished being written to the device, or until other programs are finished using it. This applies to all types of storage devices, including flash drives, flash cards, external hard drives, ipods and other media players, and even remote storage like Samba or NFS shares.
Failure to unmount before disconnecting the device can result in loss of data and/or a corrupted file system. There are no exceptions to this rule. Be safe — unmount your drives before disconnecting them!
Other Useful Commands
To see a list of your USB devices (the vendor and device ID’s), run:
To see all attached storage devices and their partitions, run:
To see information about currently mounted systems, simply run:
Troubleshooting
Presented here are some common problems users encounter.
Interfering services
Two services/programs responsible for automounting might interfere and thereby prevent a successful automount and permission setting.
Example: Activating the Automount function of Nautilus while using pmount will result in read-only permissions for normal users. Either disable Nautilus’ Automount function or deinstall pmount.
Unclean LogFile
If you are mounting drives formatted with NTFS (like most external USB hard disks are), you must first have the ntfs-3g driver installed. This is done automatically in newer versions of Ubuntu. You should also install ntfs-config and enable mounting, which is not done automatically. For ntfs-3g and ntfs-config, see MountingWindowsPartitions.
When a drive is not Safely Removed from a Windows machine (or a forced shutdown occurs from Windows), you may get an error like this when you plug in your drive:
The best option is Choice 1, but you can force the mount by running Choice 2 with sudo. You must then manually unmount it from the terminal (you can’t right click the desktop icon):
After that the drive should automount normally again.
User Privileges
If your usb device doesn’t appear on your desktop, you should check that your user has the correct privileges. Go to System->Administration->User and Groups, choose the user, click on «Properties», then go to the «User Privileges» tab. You should have the «Access external storage devices automatically» option checked.
Preferences
If your usb device doesn’t appear on your desktop, you should check that the automount action is enabled in the preferences:
Navigate to System->Preferences->Removable Drives and Media
NOTE: This does not seem to apply to Hardy Heron.
USB 2 Issues
old kernels workaround
If you encounter problems using your USB device with USB 2 (i.e. ‘high speed’ mode), you can revert to the ‘full speed’ mode (slower) by unloading ehci_hcd. To do that, type in a terminal:
before plugging in your device.
recent kernels workaround, from Karmic
ehci_hcd is now built into the kernel and cannot be load/unloaded using modprobe. To revert a connected device from (failing) high-speed to full-speed:
- Determine your device id using
- Find which bus it is connected to. The bus id can be found as a folder in /sys/bus/pci/drivers/ehci_hcd. The following script explores buses and connected devices: The information is also usually available in /var/log/kern.log
- Unbind the bus (and all devices) from the ehci_hcd driver. Insert the bus id in the following command, using the format 0000:00:xx.x
Buffer I/O Errors
If you see errors related to Buffer I/O when attaching a USB storage device, there are two ways to work around it. First, try using varying max_sectors settings, as such:
Try values of 120, 64 and 32.
If this does not resolve the issue, then you may need an unusual_dev entry for your device. It would look something like this:
The vendor and device IDs can be obtained from the output of «lsusb». The entry would be placed in drivers/usb/storage/unusual_devs.h. If you cannot compile your own kernel, please file a bug report, and we’ll attempt to compile a test module for you.
Device suddenly becomes read-only
If your device changes suddenly to read-only mode, and you see this kind of error:
This might be the sign of an unclean device. You should check your device. Try TestingStorageMedia to do so. Or use «Disk Utility» (under System, Administration), find your device, unmount it, check the file system, then mount it again.
USB-Device is or becomes read-only without errors
If you see «Write Protect is off» and no errors in your logfiles, than you should set filesystem type specific mount options (FS_MOUNTOPTIONS) in /etc/usbmount/usbmount.conf. Wrong gid causes mounting read only.
General tip
When you encounter problems with USB devices, the first thing to do is to check the latest debug information generated from the kernel just after you plug in your device and/or just after you encounter the problem.
To do that, open a terminal and type :
Check the latest messages; they should be related to your problem.
Seeking Further Help
The best place to get help with almost any Ubuntu problem is on the Ubuntu Forums. The Absolute Beginner Talk section is best for beginners.
Other Resources
Some other related material:
Источник
How to Mount USB Drive on Linux
Although, it is a time-consuming task, but once you know how to mount USB drive in LINUX, you will feel lightened and it would be easier for you to perform it the next time when needed. If you are having an updated LINUX System, and a modern computer environment, then your device shall show up on the desktop of your PC itself, but to make it happen at even an older computer, you need to read this article.
Here, in this article, we will discuss about how to mount USB drive in LINUX along with instructions on how to create, delete & format a USB Drive straight from your LINUX system. This should be an easy task once you get the hang of it, just make sure you follow all the steps carefully and you won’t have problems the next time you decide to mount your USB drive in Linux.
1) Plug-in your USB drive to your PC
First, you need to plug in your USB drive to your LINUX-based personal computer (PC) in which you want to access the USB drive.
2) Detecting the USB Drive on PC
The second step is the most important and easy step to accomplish. After plugging-in your USB device to your LINUX system’s USB port, the system will add a new block device into the /dev/ directory. To check that, use the following command – Firstly, open your command line and write the following command in CLI:
The resulting screen should be seen with the text like this:
The result above shows that device boot, blocks, id and system format are displayed.
After this step, you will need to create a mount point. In order to do so,
3) Create a Mount Point
In this step, we will guide you to create the mount point. Just type the following command to move forward:
In above given command, ‘sbd1’ refers to the name of your USB Device.
4) Creating a Directory in the USB Drive
Next, you will be required to create a directory in the mounted device. For that, use the following command:
Above commands will create a directory named ‘John’ in the USB Drive. You can create the directory of your desired name by replacing it with John. e.g.
This command will create a directory in the USB Drive with the name ‘Google’.
This step will complete your query of how to mount USB Drive in LINUX. After this step, a new directory will be created
5) Delete a Directory in USB Drive
After telling you about creating a Directory on your USB, its time to learn about how you can delete a directory on your USB Drive. To delete a directory, write the following command:
The above given command will delete the drive named as ‘John’. But if you want to delete a directory with your desired name, just replace it with ‘John’. e.g.
The above code deletes the directory named ‘Google’. Similarly, you can write any of your desired name to delete a directory on your USB Drive on a LINUX operated computer.
6) Formatting the Mounted USB in LINUX
In order to format a USB Flash Drive, you need to unmount the drive first. Use following command to un-mount the USB:
In above-given command, ‘sbd1’ refers to the name of your USB Device. Next, you have to choose either of the following codes as per your USB Drive file systems:
- For VFAT (FAT32) File System
To format VFAT (FAT32) file system, use:
In above given command, ‘sbd1’ refers to the name of your USB Device.
- For NTFS File System
To format NTFS file system USB Drive, use:
In above given command, ‘sbd1’ refers to the name of your USB Device.
- For EXT4 File System
For formatting EXT4 file system USB Drive, use:
In above given command, ‘sbd1’ refers to the name of your USB Device.
With that I have showed you the basics of mounting UBS drives on linux.
About the author
![]()
Zeeman Memon
Hi there! I’m a Software Engineer by degree, Blogger by skills who loves to write about tech, develop websites & do SEO. You can reach out to me on LinkedIn.
Источник


