- 3 Ways to Move Installed Programs to Another Location in Windows 10
- SteamMover
- Move installed programs to another location using SteamMover
- Application Mover
- How to Move installed programs using Application Mover
- Move the Apps from Settings
- How to Move Windows Programs to Another Drive
- 1. Move Apps using Settings
- 2. Change Install folders
- 3. Creating a Symlink
- 4. Use third-party software
- Wrapping Up
- How to Move Programs to Another Drive Like C to D? See the Guide! [MiniTool News]
- Summary :
- Windows 10 Move Program Files to Another Drive
- How to Move Programs to Another Drive like C to D
- Use Settings to Move Programs
- Create Directory Junction to Move Program Files to Another Drive
- Use a Third-Party Tool to Move Programs to Another Drive
- Alternative: Uninstall and Reinstall the Program
- The End
- ABOUT THE AUTHOR
3 Ways to Move Installed Programs to Another Location in Windows 10
By default, all of the new programs and software get installed on System Drive, which is the C drive. With the passage of time, C drive will get filled and you will need more space for further running. You can’t do any further installation of any new tool or program on your System now. To have free space on your System drive, you need to move some installed software to another location.
I am providing 3 easy ways to move your installed programs to another location in Windows 10, so you may have free space for upcoming installations on C drive. Kindly follow the below steps.
SteamMover
SteamMover is a program to move your games, files, and folders of the installed programs to another location and free up your disk space if you are having low or less space on any particular drive.
Move installed programs to another location using SteamMover
- Download the SteamMover from below link.
- A zip file will be downloaded, open it and click on the exe file. The main window of the tool will be in front of you. No installation isn’t required.
- Select the folder location of your installed programs, then a list will be shown to you. Now select any program you want to move and enter the Alternative folder (where you are going to shift it). And click on the arrow at below of window.
- A Command Prompt window will appear, and commands will run that change the location of that particular folder.
- To confirm the folder location, open your Alternative Dive. As I moved the Adobe folder to D, so I’ll open the D drive to show you that the program is successfully moved to another location.
Note: be sure that your C drive is an NTFS format, not FAT32 format.
Application Mover
Application Mover is a utility that gives you access to move your installed programs on any other drive if you are facing less space on any of the Drives. This tool is very précised. The program you selected for migration, Application Mover, will scan each shortcut from every location and change the path to a new one so the workings of the program will not be affected.
How to Move installed programs using Application Mover
- Download the tool from below link.
- Run the installer. Click on Next to proceed further.
- After selecting all the parameters, click on Install to start the installation.
- Click on Finish to complete the installation.
- Open the Application Mover app from the Start Menu. Now select the Current path and New path for any program, which you want to move.
Move the Apps from Settings
Sometimes you install any game or social media app from the Windows Store. All those apps are installed on the C drive. You can move these apps to another drive in order to free up space.
Open Settings, and go to the “System”.
Now click on the “Apps and features”. Then a list of all installed apps will be shown to you. You can only move those apps which you install by yourself from the store. Not those that were pre-installed when you installed Windows 10.
Choose any method and move your installed programs to another location if your System drive gets filled with all installed programs. But be very careful while doing this, and do not move important and costly software to another location. Because moving the installed programs can cause any issue or bad working at a new place.
If you want to change the default location of your installed programs, refer to this article. Thank You.
How to Move Windows Programs to Another Drive

There’s only so much room on a Windows computer’s hard drive, and once you fill it up, your machine may run slower or have trouble with programs crashing. You can fix this problem on your device by moving the Windows programs you have installed to another drive.
Whether you just have limited space on your computer or you want to store your apps separately, moving the apps to a different drive will help. Running a lot of demanding applications like sophisticated games or video editing software will be easier if you keep your programs on a separate drive too.
Here are three different ways that almost any computer user can utilize to move those apps to a new location.
1. Move Apps using Settings
The easiest way to move apps from one drive to another on your Windows computer is to use the Apps settings. This procedure works for many, but not all of the programs you have installed.
To move apps using Apps settings:
1. Press Win + I to open Settings.
2. Click on Apps.

3. Scroll to find the app you want to move.
4. Click on the app and select Move.

5. Choose the drive where you want to move the program.
6. Click “Move” again.

If the Move button is unavailable for the app you want to move, that program is a Windows 10 app, and you cannot move it.
2. Change Install folders
Moving the file location of programs you have installed on your computer cannot just be done by copying and pasting. There are often too many different parts of the program in a variety of places in your drive, and moving them yourself can cause the program to stop running.
Instead of changing your registry and risking issues that can affect your entire computer, it may be easiest to uninstall the program and reinstall it to the new drive. Check the website to make sure you can still download the program before you remove it from your machine.
First, uninstall the app you want to move.
1. Press Win + I to open Settings.
2. Click on Apps.
3. Click on the app you want to remove.
4. Click the Delete button.
Now that you have uninstalled the program, you want to set up your computer so it will download apps to the drive you now want to use. You need to change the default install location for new apps.
1. Press Win + I to open Settings.
2. Click on “System”.
3. Click on “Storage”.

4. Scroll down and click on “Change where new content is saved”.

5. Under “New apps will save to:”, change the drive to the drive you want to use.

You can also change the other settings in this window if you want other new downloads to go to the new location as well.
Once you have chosen the drive where you want to install the program, go to the website and download the program.
3. Creating a Symlink
Say you want to move MSI Afterburner to a new location without it messing up. First, cut and paste the program’s folder from the old location to the new one.
Next, click Start, type cmd , right-click “Command Prompt” in the search results and click “Run as administrator.”
In the command prompt, make sure the command prompt is set to the drive you’re moving your program from. To do this, just enter the drive name followed by a colon (so “d:,” “e:,” “f:” or whatever).
Once you’ve done this, type your equivalent of the following command, replacing the drive name, program name and directory with those relevant to you:

If all goes well, you should get a message saying “Junction created for” followed by the program you moved to another drive. Go to the original location of the folder, and you’ll see a little shortcut-like icon next to the folder for the program that you moved.
Double-click this icon, and it’ll look like the program is still on the original drive in its entirety, but this is just an ingenious illusion. The program is actually in the new location – Windows just thinks it’s in the original location, which means that it will continue to work just as before. Clever, right?
4. Use third-party software
If you’re going to move programs that you cannot move using the Apps settings, or if you have a bunch of programs you want to move which makes uninstall and reinstall a long process, using a third-party app to move them for you may be the easiest thing you can do.
Here’s how to move the programs using a program called EaseUS Todo PCTrans.
1. Go to the EaseUS website.
![]()
2. Click the “Free Download” button.
3. Click on “Save”.
4. Say “Yes” to allow the program to make changes to your computer.
5. Click Install.
![]()
6. Click Start Now.
![]()
7. Click the App Migration option from the left side of the window.

9. Once the program begins, you will see a window with a list of programs. Click on the ones you want to move to the new drive location.
![]()
10. Click on the Browse button to choose the destination drive.

11. Select the drive you want to use and click Select Folder.

12. Click the Transfer button.
![]()
Other software you can use include Steam Mover (works for programs as well as games) and Application Mover.
All these programs are pretty simple to use, asking you to enter the current path of the program followed by the directory you want to move it to. Just follow the instructions, and you’ll be fine!

Wrapping Up
All the above methods will work to move your Windows programs to another drive and free up space on the main drive. Pick and use the one that you are most comfortable with.
Tracey Rosenberger spent 26 years teaching elementary students, using technology to enhance learning. Now she’s excited to share helpful technology with teachers and everyone else who sees tech as intimidating.
How to Move Programs to Another Drive Like C to D? See the Guide! [MiniTool News]
By Vera | Follow | Last Updated November 27, 2020
Summary :

You may want to move programs to another drive to free up some disk space if you have installed a lot of apps or programs on your Windows 10 PC. The good news is that you can easily do this work. Just follow these methods offered by MiniTool Solution now.
Windows 10 Move Program Files to Another Drive
On a hard drive of the computer, there is only so much room. If you fill it up, the device may get slower or have problems with programs. It is helpful if you choose to move installed programs from one drive to another. By default, you install some apps or programs on the system drive C.
Relatively speaking, it is simple to move music files, pictures and other files to another drive from one drive. However, it is difficult to move program files to another drive like D since a program creates a folder to Windows Registry and registers itself during the process of installation. The program may stop running if you simply move an installed program’s files to another drive.
So, how can you move programs from C to D? Three methods are described here!
How to Move Programs to Another Drive like C to D
Use Settings to Move Programs
One of the ways to move apps or programs to another drive is to use the Apps settings in Windows 10. As you know, a lot of programs are installed on your computer. Some of them come with your system and the others are installed by yourself. This method only works for the second case.
The following is the complete guide on how to move program files from C drive to D drive in Windows 10.
Step 1: Click the Start button and go to Settings.

Is the Settings app not opening in Windows 10? What to do if you can’t access Settings? This post gives you some solutions to fix this issue.
Step 2: Navigate to Apps to enter the Apps & features window.
Step 3: Scroll down, select an app that you need to move and click the Move button
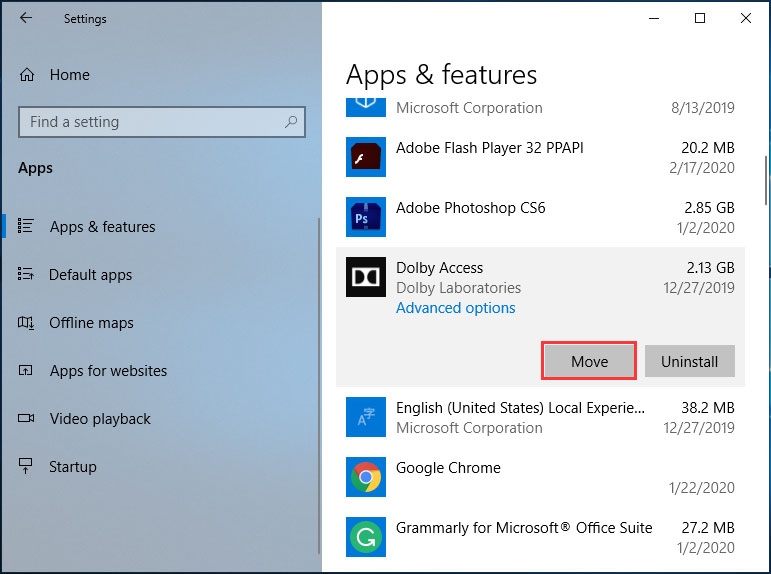
Step 4: Opt a destination drive like D and perform the operation by clicking Move.
Create Directory Junction to Move Program Files to Another Drive
You can follow these instructions below to easily relocate program files to another drive in Windows 10. Let’s see them:
Step 1: Open File Explorer, go to the root on the destination drive like D and right-click the blank area to choose New > Folder.
Step 2: Browse to the source drive folder that holds the program files in another File Explorer window. Choose the folder that contains the program files you want to move and copy the folder using Ctrl + C. Then, use Ctrl + V to paste that folder to the new drive.
Step 3: Delete the folder containing the program files you moved.
Step 4: Go to File > Open command prompt > Open command prompt as administrator and confirm the operation.
Step 5: Use the mklink /j «link location» «files location» command. For instance, if you want to move Microsoft Office from C to D, the command is mklink /j “C:\Program Files (x86)\Microsoft Office” “D:\Program Files (x86)\Microsoft Office”.
After that, run the program to see if it runs properly. This way, Windows just thinks the program is in the original location but actually, it is in the new location.
Use a Third-Party Tool to Move Programs to Another Drive
If you think the second way is troublesome and the first method won’t help, you can try a simple way and that is to use a third-party tool like SteamMover or Application Mover to move installed program files to another drive.
Just get one of them from the Internet and follow the offered instructions online to do the moving operation.
Alternative: Uninstall and Reinstall the Program
You can choose an indirect way to move programs from one drive to another. That is to uninstall the program that you want to move via Control Panel.
Description: You may want to know how to uninstall a program Windows 10 with the right way. Read this paper, it will show you four easy and safe methods.
Then, set up your computer so that it can download apps to the drive that you want to use.
Step 1: Press Win + I keys at the same time to open Windows Settings.
Step 2: Navigate to System > Storage.
Step 3: Locate to Change where new content is saved.
Step 4: In the pop-up window, choose D from New apps will save to and click Apply.

The End
How to move programs to another drive in Windows 10? Now, you know three methods after reading this post. Just try one of them if you have a need.
ABOUT THE AUTHOR

Position: Columnist
Vera is an editor of the MiniTool Team since 2016 who has more than 5 years’ writing experiences in the field of technical articles. Her articles mainly focus on disk & partition management, PC data recovery, video conversion, as well as PC backup & restore, helping users to solve some errors and issues when using their computers. In her spare times, she likes shopping, playing games and reading some articles.


