- Frequently Asked Questions about Windows Subsystem for Linux
- What is Windows Subsystem for Linux (WSL)?
- Who is WSL for?
- What can I do with WSL?
- Could you describe a typical development workflow that incorporates WSL?
- What is Bash?
- How does this work?
- Why would I use WSL rather than Linux in a VM?
- Why would I use, for example, Ruby on Linux instead of on Windows?
- What does this mean for PowerShell?
- Can I run ALL Linux apps in WSL?
- What Windows SKUs is WSL included in?
- What processors does WSL support?
- How do I access my C: drive?
- How do I set up Git Credential Manager? (How do I use my Windows Git permissions in WSL?)
- How do I use a Windows file with a Linux app?
- Are files in the Linux drive different from the mounted Windows drive?
- Why are there so many errors when I run apt-get upgrade?
- How do I uninstall a WSL Distribution?
- Why does ping generate permission denied errors?
- Why do I get «Error: 0x80040154» when I run bash.exe after upgrading Windows?
- How do I change the display language of WSL?
- Why do I not have internet access from WSL?
- How do I access a port from WSL in Windows?
- How can I back up my WSL distros, or move them from one drive to another?
- Where can I provide feedback?
- Adam the Automator
- The Ultimate Guide to Windows Subsystem for Linux (Windows WSL)
- Chris Blackden
- What is WSL?
- How to Enable WSL
- Prerequisites
- Enabling the WSL Windows Feature
- Downloading a Linux Distribution for WSL
- Setting your WSL Version
- Starting up WSL
- Sharing Windows/Linux Resources via WSL
- Sharing File Systems
- Finding the Linux File System from Windows with Environment Variables
- Finding the Linux File System from Windows via the Microsoft Store Packages Folder
- Finding the Windows File System from Linux
- The WSL2 Filesystem
- Sharing Environment Variables
- Overview
- Sharing Options
- Path Translation
- Sharing and Translating Windows Paths with Linux
- Sharing and Translating Linux Paths with Windows
- Sharing Network Resources
- Physical vs. Virtualized Network Interfaces
- Client DNS Resolution
- Using PowerShell and Bash Together
- PowerShell –> Bash
- Bash –> PowerShell/Cmd
- Translation Issues
- Install a Windows Subsystem for Linux GUI with Xfce4
- Setting Up
- Tips and Tricks
- Setting WSL Configuration Items at Bootup with wsl.conf
- Developing on WSL with Visual Studio Code (VS Code)
- Adding Windows Subsystem for Linux to the Windows Terminal
- Closing Thoughts
Frequently Asked Questions about Windows Subsystem for Linux
What is Windows Subsystem for Linux (WSL)?
The Windows Subsystem for Linux (WSL) is a feature of Windows 10 that enables you to run native Linux command-line tools directly on Windows, alongside your traditional Windows desktop and apps.
See the about page for more details.
Who is WSL for?
This is primarily a tool for developers, especially web developers, those working on open source projects, or deploying to Linux server environments. WSL is for anyone who likes using Bash, common Linux tools ( sed , awk , etc.) and Linux-first frameworks (Ruby, Python, etc.) but also enjoys using Windows productivity tools
What can I do with WSL?
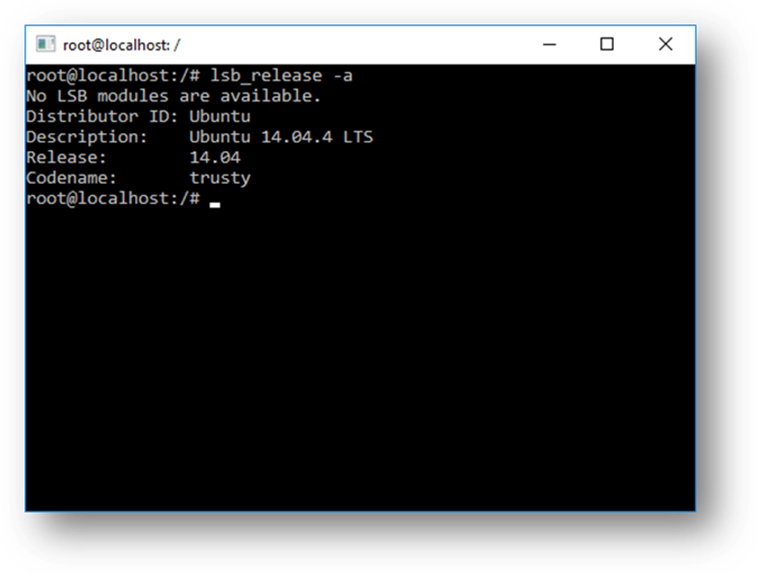
WSL enables you to run Linux in a Bash shell with your choice of distribution (Ubuntu, Debian, OpenSUSE, Kali, Alpine, etc). Using Bash, you can run command-line Linux tools and apps. For example, type lsb_release -a and hit enter; you’ll see details of the Linux distro currently running:
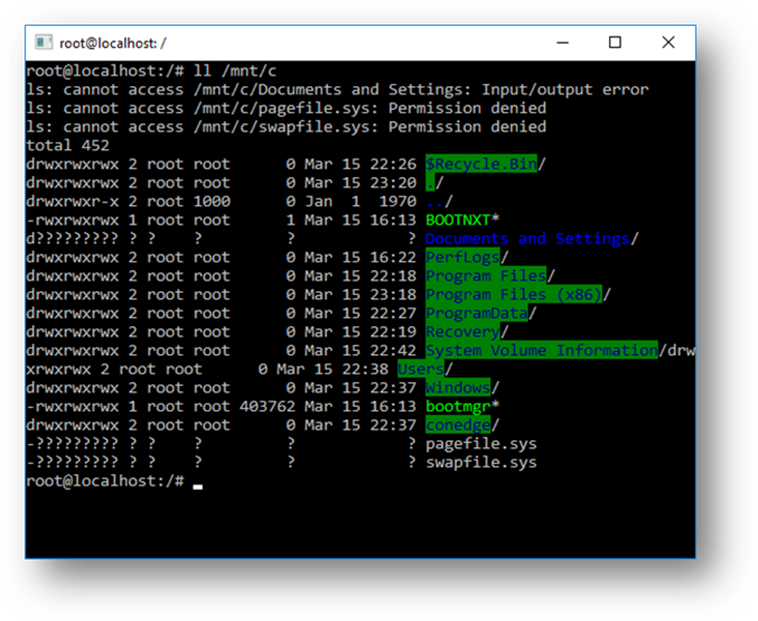
You can also access your local machine’s file system from within the Linux Bash shell – you’ll find your local drives mounted under the /mnt folder. For example, your C: drive is mounted under /mnt/c :
Could you describe a typical development workflow that incorporates WSL?
WSL targets a developer audience with the intent to be used as part of an inner development loop. Let’s say that Sam is creating a CI/CD pipeline (Continuous Integration & Continuous Delivery) and wants to test it first on a local machine (laptop) before deploying it to the cloud. Sam can enable WSL (& WSL 2 to improve speed and performance), and then use a genuine Linux Ubuntu instance locally (on the laptop) with whatever Bash commands and tools they prefer. Once the development pipeline is verified locally, Sam can then push that CI/CD pipeline up to the cloud (ie Azure) by making it into a Docker container and pushing the container to a cloud instance where it runs on a production-ready Ubuntu VM.
What is Bash?
Bash is a popular text-based shell and command-language. It is the default shell included within Ubuntu and other Linux distros, and in macOS. Users type commands into a shell to execute scripts and/or run commands and tools to accomplish many tasks.
How does this work?
Check out our blog where we go into detail about the underlying technology.
Why would I use WSL rather than Linux in a VM?
WSL requires fewer resources (CPU, memory, and storage) than a full virtual machine. WSL also allows you to run Linux command-line tools and apps alongside your Windows command-line, desktop and store apps, and to access your Windows files from within Linux. This enables you to use Windows apps and Linux command-line tools on the same set of files if you wish.
Why would I use, for example, Ruby on Linux instead of on Windows?
Some cross-platform tools were built assuming that the environment in which they run behaves like Linux. For example, some tools assume that they are able to access very long file paths or that specific files/folders exist. This often causes problems on Windows which often behaves differently from Linux.
Many languages like Ruby and node are often ported to, and run great, on Windows. However, not all of the Ruby Gem or node/NPM library owners port their libraries to support Windows, and many have Linux-specific dependencies. This can often result in systems built using such tools and libraries suffering from build and sometimes runtime errors or unwanted behaviors on Windows.
These are just some of issues that caused many people to ask Microsoft to improve Windows’ command-line tools and what drove us to partner with Canonical to enable native Bash and Linux command-line tools to run on Windows.
What does this mean for PowerShell?
While working with OSS projects, there are numerous scenarios where it’s immensely useful to drop into Bash from a PowerShell prompt. Bash support is complementary and strengthens the value of the command-line on Windows, allowing PowerShell and the PowerShell community to leverage other popular technologies.
Can I run ALL Linux apps in WSL?
No! WSL is a tool aimed at enabling users who need them to run Bash and core Linux command-line tools on Windows.
WSL does not yet support GUI desktops or applications (e.g. Gnome, KDE, etc.) Follow the Command Line Blog for updates.
Also, even though you will be able to run many popular server applications (e.g. Redis), we do not recommend WSL for hosting production services – Microsoft offers a variety of solutions for running production Linux workloads in Azure, Hyper-V, and Docker.
What Windows SKUs is WSL included in?
Windows Subsystem for Linux is available on the desktop version of Windows for Windows 10 Anniversary and Creators update or later.
Beginning in the Fall Creators update WSL will be available on both the desktop and server SKUs of Windows.
What processors does WSL support?
WSL supports x64 and ARM CPUs.
How do I access my C: drive?
Mount points for hard drives on the local machine are automatically created and provide easy access to the Windows file system.
/mnt/ /
Example usage would be cd /mnt/c to access c:\
How do I set up Git Credential Manager? (How do I use my Windows Git permissions in WSL?)
Git Credential Manager enables you to authenticate a remote Git server, even if you have a complex authentication pattern like Azure Active Directory or two-factor authentication. Git Credential Manager integrates into the authentication flow for services like GitHub and, once you’re authenticated to your hosting provider, requests a new authentication token. It then stores the token securely in the Windows Credential Manager. After the first time, you can use git to talk to your hosting provider without needing to re-authenticate. It will just access the token in the Windows Credential Manager.
To set up Git Credential Manager for use with a WSL distribution, open your distribution and enter this command:
Now any git operation you perform within your WSL distribution will use the credential manager. If you already have credentials cached for a host, it will access them from the credential manager. If not, you’ll receive a dialog response requesting your credentials, even if you’re in a Linux console.
How do I use a Windows file with a Linux app?
One of the benefits of WSL is being able to access your files via both Windows and Linux apps or tools.
WSL mounts your machine’s fixed drives under the /mnt/ folder in your Linux distros. For example, your C: drive is mounted under /mnt/c/
Using your mounted drives, you can edit code in, for example, C:\dev\myproj\ using Visual Studio / or VS Code, and build/test that code in Linux by accessing the same files via /mnt/c/dev/myproj .
IMPORTANT NOTE: One of the key limitations of using WSL is that directly accessing/changing files in your Linux distros’ file system using Windows apps or tools is not supported. See: Do not change Linux files using Windows apps and tools
Are files in the Linux drive different from the mounted Windows drive?
Files under the Linux root (i.e. / ) are controlled by WSL which mimics Linux specific behavior, including but not limited to:
- Files which contain invalid Windows filename characters
- Symlinks created for non-admin users
- Changing file attributes through chmod and chown
- File/folder case sensitivity
Files in mounted drives are controlled by Windows and have the following behaviors:
- Support case sensitivity
- All permissions are set to best reflect the Windows permissions
Why are there so many errors when I run apt-get upgrade?
Some packages use features that we haven’t implemented yet. udev , for example, isn’t supported yet and causes several apt-get upgrade errors.
To fix issues related to udev , follow the following steps:
Write the following to /usr/sbin/policy-rc.d and save your changes.
Add execute permissions to /usr/sbin/policy-rc.d
Run the following commands
How do I uninstall a WSL Distribution?
On builds prior to 1709 (16299) open a command prompt and run:
WSL distributions installed from the store can be uninstalled like any other Windows app, by right-clicking on the app tile and clicking Uninstall, or via PowerShell using the Remove-AppxPackage cmdlet).
Why does ping generate permission denied errors?
In WSL builds Properties -> Uncheck «Use legacy console»
Why do I get «Error: 0x80040154» when I run bash.exe after upgrading Windows?
The «Windows Subsystem for Linux» feature may be disabled during a Windows update. If this happens the Windows feature must be re-enabled. Instructions for enabling the «Windows Subsystem for Linux» feature can be found in the Installation Guide.
How do I change the display language of WSL?
WSL install will try to automatically change the Ubuntu locale to match the locale of your Windows install. If you do not want this behavior you can run this command to change the Ubuntu locale after install completes. You will have to relaunch bash.exe for this change to take effect.
The below example changes to locale to en-US:
Why do I not have internet access from WSL?
Some users have reported issues with specific firewall applications blocking internet access in WSL. The firewalls reported are:
- Kaspersky
- AVG
- Avast
- Symantec Endpoint Protection
- F-Secure
In some cases turning off the firewall allows for access. In some cases simply having the firewall installed looks to block access.
How do I access a port from WSL in Windows?
WSL shares the IP address of Windows, as it is running on Windows. As such you can access any ports on localhost e.g. if you had web content on port 1234 you could https://localhost:1234 into your Windows browser.
How can I back up my WSL distros, or move them from one drive to another?
The best way to backup or move your distros is via the export/import commands available in Windows Version 1809 and later. You can export your entire distribution to a tarball using the wsl —export command. You can then import this distro back into WSL using the wsl —import command, which can name a new drive location for the import, allowing you to backup and save states of (or move) your WSL distributions.
Please note that traditional backup services that backup files in your AppData folders (like Windows Backup) will not corrupt your Linux files.
Where can I provide feedback?
You can share feedback and ask questions through multiple channels.
If you have technical issues, or want to request new features please go to our Github issue tracker:
If you’d like to stay up to date with the latest WSL news you can do so with:
- Our command-line team blog
- Twitter. Please follow @craigaloewen on Twitter to learn of news, updates, etc.
Adam the Automator
The Ultimate Guide to Windows Subsystem for Linux (Windows WSL)

Chris Blackden
Read more posts by this author.
The Windows Subsystem for Linux or Windows WSL is a great solution for developers to natively work within Linux right on their Windows 10 version desktop.
If you’ve spent way too much time partitioning hard drives to have several Linux systems installed with Windows, you’re in luck with this article.
The fairy code-mother at Microsoft has decided to give you another option: The Windows Subsystem for Linux (WSL). WSL makes running a Linux system alongside Windows so much easier, and more flexible.
In this tutorial, you’ll learn how to get started with WSL. You’ll learn how to get started to learning how to use some nifty tools making WSL even more versatile than using bash or PowerShell on their own.
Table of Contents
What is WSL?
WSL or C:\Windows\System32\wsl.exe is a Windows tool that allows you to install a Linux distribution as an app from the Windows store.
Since WSL is a simple Windows executable, you can call it from a command prompt or PowerShell terminal. We’ll go deeper into that topic later. For now, it’s important to understand a little more about what WSL is doing under the hood.
How to Enable WSL
To set up and enable WSL involves installing a Linux distribution alongside Windows 10. But in a way that allows the two different operating systems to interact with each other.
Prerequisites
To install WSL on Windows, you have one requirement to meet; you must have a Windows 10 64-bit computer Build 18917 or later.
You can find your Windows 10 build by running the winver utility.
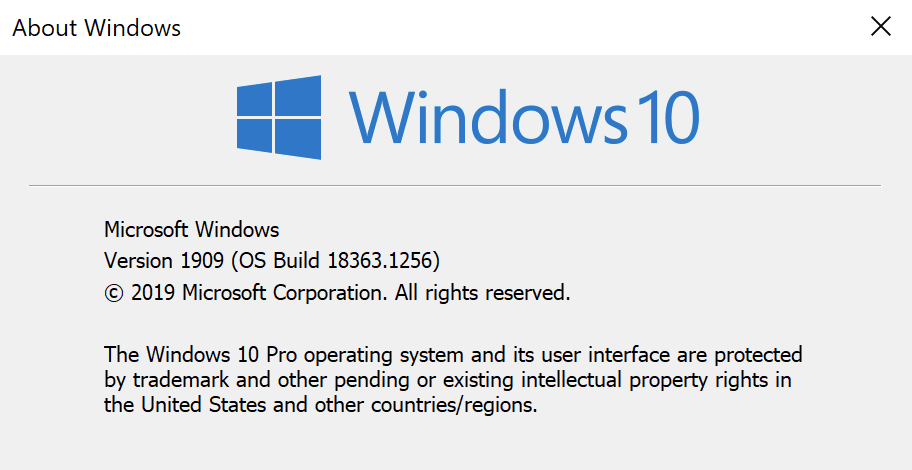 Windows build 1809
Enabling the WSL Windows Feature
WSL is a cinch to enable; no download required. It’s simply a single Windows feature.
To enable WSL, open up PowerShell as administrator and run the following:
Once complete, restart your computer and you’re done!
Downloading a Linux Distribution for WSL
WSL does not install any Linux distribution on its own. You’ll need to install one. Once Windows 10 comes back up, start setting up your chosen Linux distribution.
First, open up the Microsoft Store and search for ‘WSL’. You should soon see a list of Linux distributions show up.
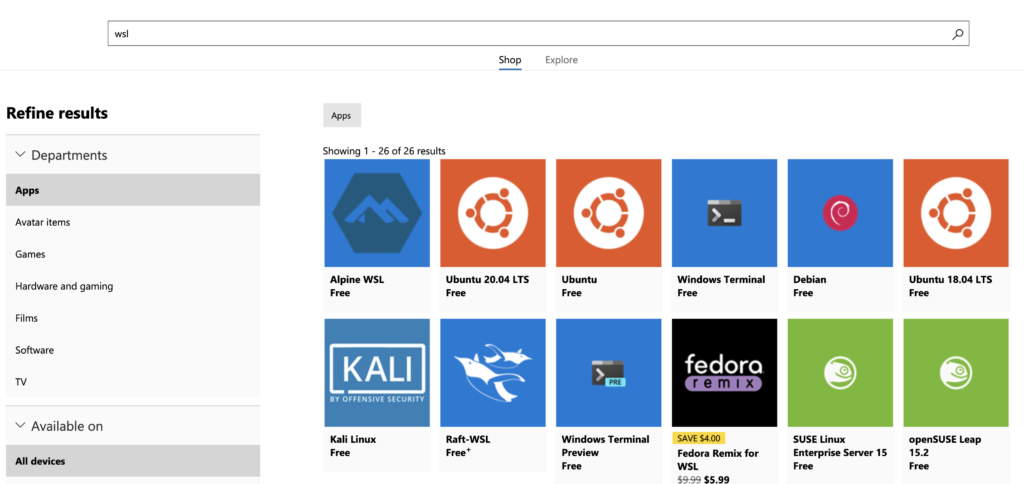
Next, choose your distribution of choice and install it. This tutorial will be using Ubuntu 18.04. At the time of this writing, you have a few other distributions available as well such as:
- Ubuntu 16.04 LTS
- Ubuntu 18.04 LTS
- OpenSUSE Leap 15
- OpenSUSE Leap 42
- SUSE Linux Enterprise Server 12
- SUSE Linux Enterprise Server 15
- Kali Linux
- Debian GNU/Linux
- Fedora Remix for WSL
- Pengwin
- Alpine WSL
Setting your WSL Version
You might have to enable Linux to work with WSL version 2. If so, you can do so by following the below instructions.
In a PowerShell console:
- List which versions of Linux you have installed by running wsl -l or wsl —list .
- Once you have the list, copy the name of the distro you want to run with WSL2 and run wsl —set-version 2 , replacing with the name you copied earlier.
- Confirm the command was successful by running wsl -l -v or wsl —list —verbose . This command will return a full list of WSL distros and the version each distro is using.
You can also set your default WSL version for any distros you install in the future to WSL2 by running wsl —set-default-version 2
Starting up WSL
To start using WSL, open up a PowerShell terminal and type wsl . If you’ve set up WSL correctly, you’ll enter a bash terminal running on the WSL distro of choice. From here, you can run any Linux commands you wish.
Below you will find a reference to all of the options the wsl.exe provides when starting up.
| Command | Explanation | Example |
|---|---|---|
| exec, -e | Will run command using without using default shell | wsl -e curl google.com |
| — | Passes anything after this parameter to default shell. Leaving the operator out will also work. | wsl — curl google.com, wsl curl google.com |
| distribution, -d | Opens a terminal in the specified distribution’s shell | wsl -d Ubuntu-18.04 |
| user, -u | Runs WSL command as the specified user as long as user exists on that distro | wsl -d Ubuntu-18.04 -u tux_user |
| export | Exports the specified distribution to a tar file on your local system. | wsl –export Ubuntu ./Test-Ubuntu.tar |
| import [–version] | Imports a tar file as a new WSL distribution. Can specify WSL version with the –version option | wsl –import Test-Ubuntu C:\data\Test-Ubuntu .\Test-Ubuntu.tar |
| list, -l [Options] | wsl –list | |
| all | List all installed WSL distributions | wsl -l –all |
| running | List only WSL distributions that are currently running | wsl -l –running |
| quiet, -q | Only show WSL distribution names | wsl -l -q |
| verbose, -v | Show detailed information about all WSL distributions | wsl -l -v |
| set-default, -s | Sets the specified WSL distribution as the default distribution for WSL commands. | wsl -s Test-Ubuntu |
| set-default-version | Changes the default WSL version for all new distributions installed to that system | wsl –set-default-version 2 |
| set-version | Changes the WSL version of the specified distribution | wsl –set-version Test-Ubuntu 2 |
| shutdown | Immediately terminates all running WSL distributions | wsl –shutdown |
| terminate, -t | Terminates the specified WSL distribution | wsl -t Test-Ubuntu |
| unregister | Unregisters the specified WSL distribution | wsl –unregister Test-Ubuntu |
| help | Display information about using WSL | wsl –help |
Once you get comfortable using these switches, you’ll find that running and managing applications through WSL is much easier than managing Linux virtual machines on your own.
Quick tip: Discover all flags and arguments for to WSL by running wsl —help .
When you’re finished, type exit to go back back to the PowerShell terminal.
Sharing Windows/Linux Resources via WSL
One of the best parts of WSL is that it can seamlessly share Windows and Linux resources with each other. At this time, you can share file systems, environment variables, network resources, and command-line tools like cmd and PowerShell.
All examples you will see in this section are via the WSL Ubuntu Linux distro. Your mileage may vary if you’ve chosen to download a different distro.
Sharing File Systems
The file system is one of the most useful things to share with WSL. WSL allows you to work with both file systems as if they were one.
The Windows 10 file system is mounted as a directory in Linux while your Linux file system will be mounted as a folder in Windows.
Finding the Linux File System from Windows with Environment Variables
When you install a Linux distro with WSL, it will sometimes add a Windows environment variable. In the case of the WSL Ubuntu Linux distro, it will create an environment variable called UBUNTU_HOME. This environment variable points to the Linux /home/ubuntu directory from both Windows and WSL Ubuntu.
The path defined in UBUNTU_HOME can be used to run scripts that use resources across them, or set a default location for the Windows terminal (covered later).
Other distros may define a similar environment variable. Inspect the Windows environment variables with the PowerShell command Get-ChildItem -Path $Env:\ after installing a new Linux distro to see if any may have been added.
This environment variable shortcut is handy if you want to put everything in the /home/ubuntu directory. But let’s dig a little deeper into how it got there and how else you can reach it.
Finding the Linux File System from Windows via the Microsoft Store Packages Folder
Not every WSL distro is guaranteed to come with an easy way to reference it. It’s important that you learn how to find the Linux file system an alternative way.
Since most WSL Linux distributions will be installed from the Microsoft store, you can look for the Linux file system in the same place as other Windows store apps. Navigate to %USERPROFILE%\AppData\Local\Packages\ to find the directory where your Windows store apps go. Then assume control of the folder as this is usually protected by default.
You will see many subfolders in the packages folder where your Linux distrubution file system may be presented. The WSL Ubuntu distro, for example, was under the CanonicalGroupLimited.Ubuntu18.04onWindows_79rhkp1fndgsc folder for me.
If you navigate into the package folder, you will find the Linux file system. For WSL Ubuntu, it’s located in the LocalState\rootfs folder. This is the root directory of your Linux distro.
Finding the Windows File System from Linux
To find the Windows 10 file system from Linux, open up WSL in Windows. WSL will then bring up a bash terminal. This bash terminal will start in your UBUNTU_HOME directory by default.
You can also find the root of your Windows storage volumes as well. Each of your Windows letter drives (C, D, E, etc) is treated as a mounted drive from the WSL Linux file system. You’ll find each volume mounted as /mnt/c, /mnt/d, etc as long as you have root privileges.
The WSL2 Filesystem
Navigating the WSL filesystem is fairly straightforward. Anyone not familiar with a Linux file system structure will appreciate being able to navigate it with the Windows Explorer. Bu if you want to switch to WSL2, it’s going to be a little more complicated.
WSL2 changes how everything works under the hood for sharing file systems. For starters, the filesystem is now a virtual hard disk in vhdx format instead of a directory.
You can find the vhdx file under %USERPROFILE%\AppData\Local\Packages\CanonicalGroupLimited.Ubuntu18.04onWindows_79rhkp1fndgsc\LocalState for an WSL Ubuntu distro.
You’ll find that VHDX files can be mounted in Windows with the Disk Manager tool. But, the virtual disks cannot be mounted while the WSL distro is registered.
Sharing Environment Variables
Environment variables are a crucial part of any operating system, making it easy to reference binaries and executables anywhere in your applications.
Before Windows 10 build 17063, the only environment variable shared between Windows 10 and WSL Linux was the PATH variable. Since then it is possible to share environment variables by using WSLENV the environment variable.
Using the WSLENV environment variable to share other environment variables can feel a little meta. To share environment variables across platforms, you actually have to set environment variables inside of another environment variable.
Overview
Sharing environment variables is a three-step process below. The only major difference when sharing across Windows/Linux is the switch argument used (full reference below).
- Define environment variable in Windows or Linux.
- Set the WSLENV environment variable equal to the previously defined environment variable followed by a switch argument (for path translation).
- Read the environment variable in Windows or Linux.
Sharing Options
You can make variables available four different ways depending on which platform you’d like the environment variable to show up on using switches (table shown below).
- Windows filesystem to only be available from itself
- WSL filesystem to only be available from WSL
- WSL filesystem to be available on both WSL Linux and Windows
- Windows filesystem to be be available on both WSL Linux and Windows
| Flag | Explanation |
|---|---|
| /p | Single path. A variable set with this will be translated between the Windows and WSL Linux and made available to both. |
| /l | List of paths. Similar to /p , except it can accept more than one path. On Windows, this list will be delimited by semicolons while on WSL Linux it will be delimited by colons. |
| /u | Unix path. A path set with this flag can only be accessed when invoking WSL Linux from Windows. Can be used with either the /p or /l flags |
| /w | Windows path. A path set with this flag can only be accessed when invoking Windows from WSL Linux. Can be used with either the /p or /l flags |
Path Translation
The main reason to share environment variables is for path translation. As you may already know, Windows has user profile folders as Linux has user profile directories, for example. Each user has a predetermined “home folder” like C:\Users\ on Windows and /home/ on Linux.
Using the /p and /l switches, the WSL will translate these folder paths between platforms.
Sharing and Translating Windows Paths with Linux
You can share a single path or multiple paths at once using the /p and /l switches.
At a Windows command prompt and with a Windows environment variable defined called DESKTOP, assign a value of DESKTOP/p to the WSLENV variable. This allows you to access it from WSL Linux. You can see an example below.
The exact same procedure can be performed for multiple paths at once using the /l switch.
Sharing and Translating Linux Paths with Windows
To share and translate Linux path with Windows is the same procedure as it Windows although using Linux-specific commands to set environment variables.
For a deeper look at sharing environment variables, check out, this Microsoft article.
Sharing Network Resources
The networking component is another handy resource to share between Windows and WSL Linux.
Physical vs. Virtualized Network Interfaces
In WSL2, the network interfaces are virtualized. Virtualized network interfaces mean that WSL2 network instances can hold different IP configurations than their Windows 10 counterparts.
At the time of this writing, IP addresses for WSL2 Linux use Network Address Translation (NAT) to access network resources on Windows, though Microsoft has mentioned removing NAT is high on their backlog of issues to fix.
Client DNS Resolution
WSL will still both generate /etc/resolv.conf and /etc/hosts files to allow for DNS resolution. As long as you don’t explicitly override that behavior in /etc/wsl.conf, client DNS resolution will continue to work as expected.
You’ll learn more about the wsl.conf file later in the post.
Using PowerShell and Bash Together
One of the coolest features of WSL is the ability to seamlessly pass information to and from PowerShell and Bash on WSL.
PowerShell –> Bash
Since the WSL executable accepts input from the pipeline, you can call the wsl.exe command inside of PowerShell and accept stdin. This allows you to use WSL to pass entire objects from PowerShell into the WSL which then get processed with the bash terminal. You can see an example below.
Bash –> PowerShell/Cmd
You can also pass information from bash in the WSL to PowerShell and cmd just as easily. Below you can see an example of executing the Linux ls command and passing the output to the PowerShell Select-Object cmdlet via the pipeline.
You can also call some Windows cmd utilities from the WSL and pass the output back to Linux as long as both commands are in the system path.
Remember that the WSL knows what the system path is on both sides because it has access to the Windows PATH variable by default
Below you can see that you can run ipconfig, which is a Windows command, from within the WSL and pass that output to the Linux grep command. You can also see the opposite of calling the Linux command which and passing output to the Windows ipconfig command.
Translation Issues
There are some caveats to passing command output back and forth between bash and PowerShell.
One big problem is how PowerShell and bash return information. PowerShell is an object-oriented programming language while bash is a string manipulation tool. Any PowerShell objects piped to bash will flattened as a string. Conversely, any bash output piped to PowerShell will be converted to a string object.
You can get around the behavior somewhat by converting or explicitly casting object types in PowerShell like in the example below. But if you are expecting to pass objects between PowerShell and WSL without any extra work, you’re going to be disappointed.
By casting the bash date as the [datetime] class in PowerShell, now we have a valid PowerShell object that we can use in our script. If you are writing scripts that need to go from Windows to WSL and back again, it’s possible to do with a little massaging to the code.
Install a Windows Subsystem for Linux GUI with Xfce4
When command-line tools aren’t enough, it’s time to break out the GUIs. If you need to run a graphical utility on WSL, explore a custom distro, or you’re not familiar with bash yet, you can install a Linux GUI.
Linux has many available desktop environments. One of the most common ones to set up for WSL is called Xfce. At the time of this writing, Xfce is at version 4. Other desktop environments are available but in this article, you’ll learn how to get Xfce4 set up.
When you have a Linux desktop environment set up, you’ll need a service that understands the RDP protocol. In this article, we’ll focus on the xRDP server. xRDP is an open source RDP server for Linux that allows you to use RDP clients to connect to Linux just as if you can Windows hosts.
Setting Up
To access a Linux GUI from Windows with Xfce4 and xRDP, follow the instructions below. In a WSL terminal:
- Download and install Xfce4 – Download and install Xfce4 using the command sudo apt-get -y install xfce4 && sudo apt-get -y install xubuntu-desktop . This will take a while. Stand by.
- Install the xRDP server – Download and install xRDP by running sudo apt-get -y install xrdp .
- Configure xRDP for xfce4 – echo xfce4-session >
/.xsession
At this point, you should be able to open an RDP session from Windows 10. Open up remote desktop connection window using mstsc and provide the Linux IP address found in step #5.
If all goes well, you can open an RDP connection to the Linux distro that’s running on your Windows operating system as shown below.
Tips and Tricks
Now that you know the basics of WSL and how to use it, what’s next? Fortunately there are a lot of tools that are either built for or work well with WSL.
Setting WSL Configuration Items at Bootup with wsl.conf
A configuration file exists in the WSL at /etc/wsl.conf. This file contains configuration settings that run every time the WSL distro is started. When the wsl.conf file exists, WSL will ingest any setting in this file every time the Linux distro is started.
There are a few different sections inside of the wsl.conf file you can configure.
- Automount – Mounting drives from Windows at start
- Network – Generate resolv.conf or the hosts file
- Interop – Enabling or disabling interop with Windows
For more details on the wsl.conf file, check out the Microsoft Set WSL Launch Settings page.
Developing on WSL with Visual Studio Code (VS Code)
VS Code seemingly integrates with everything and WSL is no exception. From within VS Code, you can set up a workspace on your WSL Distro but manipulate it completely with VS Code on Windows. You don’t even need to have a terminal running!
To set up VS Code on Windows to work with WSL, you’ll first obviously need VS Code for Windows installed. Also be sure you have the Remote – WSL VS Code extension installed.
Once you’ve got the extension installed, you can now connect to it by opening a WSL terminal and running code . is the directory where you’d like to run VS Code from. VS Code will then detect that you are in a WSL distro, open a window, and establish a connection to to the workspace.
Confirm it worked by noticing the WSL connection icon in the lower left corner of VS Code. You should see that it has the name of your WSL distro.
You can even use the built-in terminal to interact directly with the WSL workspace. There’s no need to run a separate window for git bash commands.
Adding Windows Subsystem for Linux to the Windows Terminal
Another useful use-case of WSL is to add the WSL console it to the Windows Terminal.
From within Windows Terminal, you add each WSL distro in it’s own tab. You can also customize the look of each tab so you don’t get lost.
If you’re using a WSL distro that sets an environment variable for the user directory like UBUNTU_HOME, you can also set that as the starting directory for your terminal.
If you’d like a complete video walkthrough on setting up WSL to work with the Windows Terminal, check out the TechSnips how-to video below.
Closing Thoughts
Microsoft released the WSL to allow Linux developers the ability to develop on Windows. So far, the WSL has been a step in the right direction.
It appears that the WSL is going to be a crucial component of Microsoft’s new open-source friendly strategy. If Microsoft is going to take on Apple to be the devices that developers write their code on, it’s going to be an uphill battle. But WSL is a strong card to play.
WSL brings about many many welcome benefits to developers like:
- Significantly lighter weight than running local Linux VMs
- Removing the overhead of installing and managing a hypervisor
- No more requirement for multi-partitioned hard drives
- No more complicated grub bootloaders
WSL just turns on and runs so we can all code happily ever after.


